HPE SimpliVity backups
Backup and restore Docker persistent volumes with HPE SimpliVity
In order to restore a Docker volume, you need to restore a special VM that has been deployed for the sole purpose of backing up Docker volumes. There is one such VM for each datastore defined in the datastores array in the group_vars/vars file. By default, a single datastore is specified in the playbooks:
datastores: ['Docker_HPE']
Note: The use of a single datastore is recommended. If you have configured multiple datastores, you need to understand and keep track of how your Docker volumes are distributed across the datastores.
The name of the special VM follows the pattern <prefix>-in-dockervols-<Datastore> where:
- <prefix> is the value of the variable
dummy_vm_prefixfrom the filegroup_vars/vars - <Datastore> is the name of the datastore
For example, based on the default values in the scripts, the VM name would be hpe-VM-in-dockervols-Docker_HPE
Create a Docker volume
To see any existing Docker volumes created using the vSphere driver, use the docker volume ls command on one of the Docker nodes and limit the results to those volumes created using the vSphere driver. If you have already used the playbooks to install Prometheus for example, you may see a listing as follows:
# docker volume ls | grep vsphere
vsphere:latest      prom_hpe-db-data@Docker_HPE
To create a Docker volume named test_01, you can use the docker volume create command specifying the vSphere driver:
# docker volume create -d vsphere test_01
test_01
You can check that the volume exists using the docker volume ls command:
# docker volume ls | grep vsphere
vsphere:latest      prom_hpe-db-data@Docker_HPE
vsphere:latest      test_01@Docker_HPE
You can attach a container to the volume and then add data to it by creating a text file with some arbitrary content:
# docker run -it --rm -v test_01:/tmp alpine sh -c "echo some test data here > /tmp/foo.txt"
If this is the first time you have used the alpine image, you may see additional output relating to download of image layers:
Unable to find image 'alpine:latest' locally
latest: Pulling from library/alpine
88286f41530e: Already exists
Digest: sha256:f006ecbb824d87947d0b51ab8488634bf69fe4094959d935c0c103f4820a417d
Status: Downloaded newer image for alpine:latest
The container will exit once the shell command has run and any unnamed volumes will be removed. However, the named volume test_01:/tmp will persist. To check that the data is still available after the container exited, spin up a new container and try to retrieve the data:
# docker run -it --rm -v test_01:/tmp alpine sh -c "cat /tmp/foo.txt"

some test data here
Automated backup
By default, the special VM and any Docker volume in the dockvols folder are backed up every hour. This is controlled by the following settings in the group_vars/vars file.
backup_policies:
 - name: 'hpe-gold'
   days: 'All'
   start_time: '00:00'
   frequency: '60'
   retention: '43200'

dummy_vm_prefix: 'hpe-VM'

docker_volumes_policy: 'hpe-gold'
The backup policy hpe-gold is assigned to the special VM that is used to back up the Docker volumes. This policy specifies that a backup is taken every hour (frequency: '60' means sixty minutes) while the backup is retained for one month (retention: '43200' means 43200 minutes or thirty days).
Manual backup
Rather than waiting for an automated backup to take place, you can create a backup immediately. Right-click on the special VM, in this case hpe-VM-in-dockervols-Docker_HPE, select All HPE SimpliVity Actions and choose Backup Virtual Machine as shown in Figure 22.
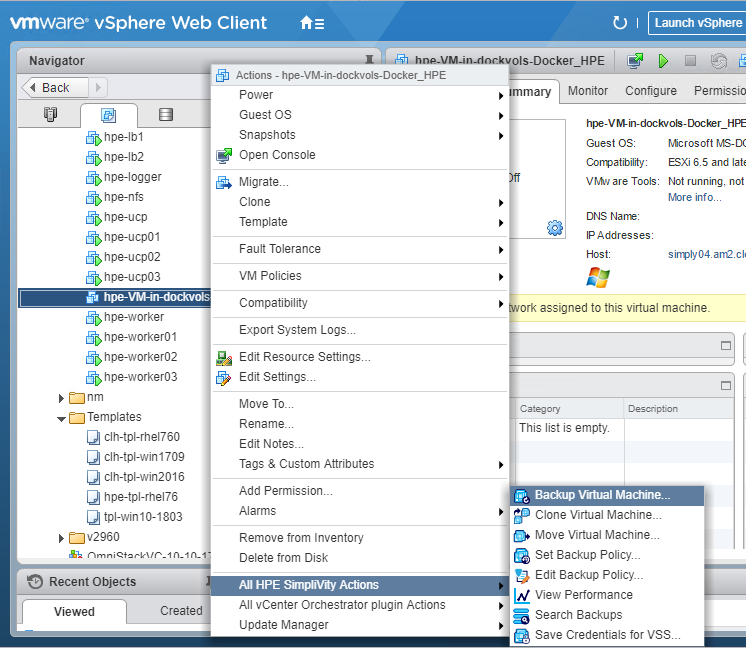
Figure 22. Backup virtual machine
You can specify a backup name, in this case manual_backup_test_01, as shown in Figure 23.
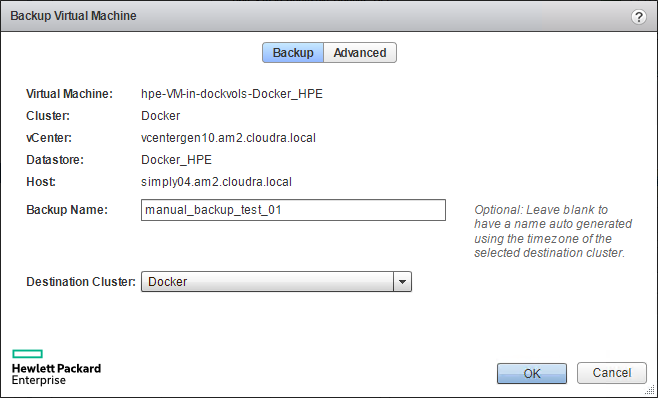
Figure 23. Backup virtual machine details
Restore
Right-click on the special VM, in this case hpe-VM-in-dockervols-Docker_HPE. On the Configure tab, select HPE SimpliVity Search Backups as shown in Figure 24.
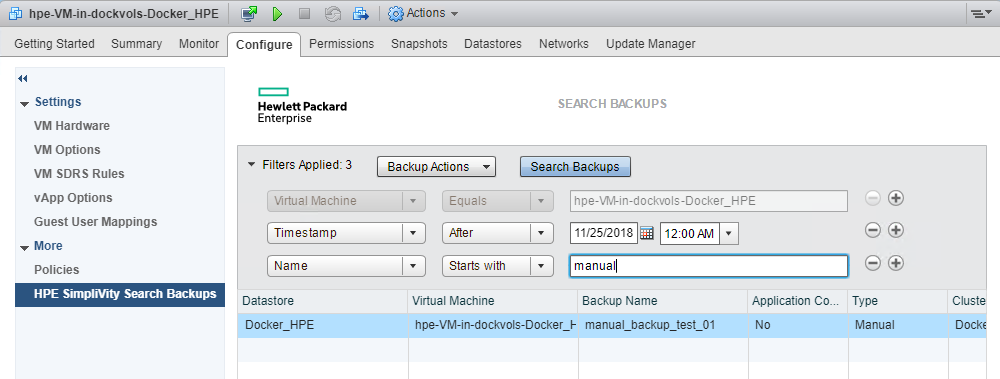
Figure 24. Search backups
You can narrow the search based on the time of the backup. If you are restoring from an automatic backup, the name will be the timestamp of the backup. If you are restoring from a manual backup, the name will be the one you specified earlier when creating the backup, in this case manual_backup_test_01.
Right-click on the backup you wish to restore, as shown in Figure 25, and select Restore Virtual Machine.
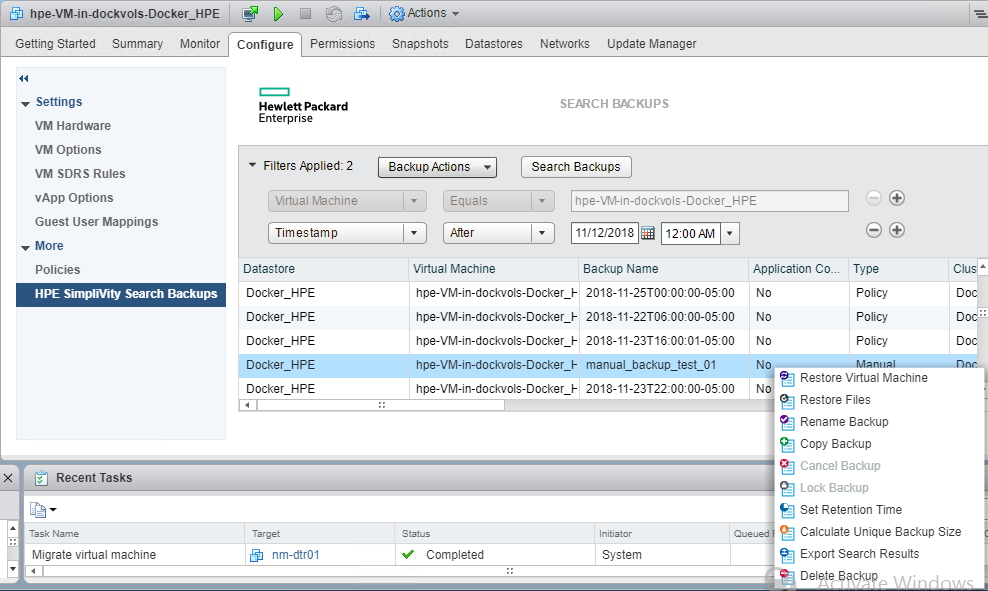
Figure 25. Restore virtual machine
In the details screen, shown in Figure 26, you can choose a name for the new virtual machine and specify the datastore.
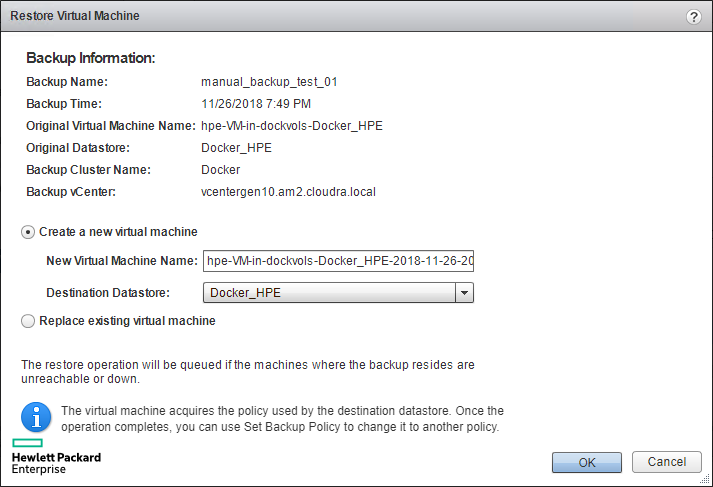
Figure 26. Restore virtual machine details
The name of the new virtual machine will default to a combination of the special VM name and a timestamp, in this instance hpe-VM-in-dockervols-Docker_HPE-2018-11-26-20h47m01s. The datastore should be the one specified in the datastores array from the group_vars/vars file. Click OK to restore the virtual machine.
Once the virtual machine has been restored, navigate to the datastore and locate the new VM in the file browser, as shown in Figure 27.
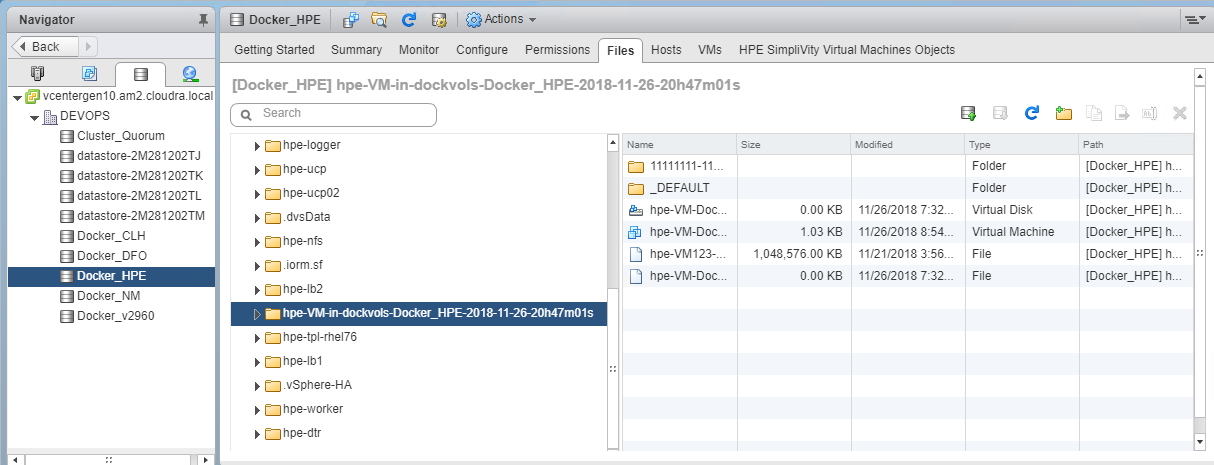
Figure 27. Browse for restored virtual machine
Navigate to the folder named 1111111-1111-1111-1111-... as shown in Figure 28. You will see files with names based on the Docker volume name that you used at the start, in this instance test_01.vmdk and test_01-478...f1f.vmfd

Figure 28. Locate vmdk and vmfd files
You need to move these two files to the dockvols sub-directory named 1111111-1111-1111-1111-... in the same datastore. Right click on the .vmdk file and choose Move to... as shown in Figure 29.
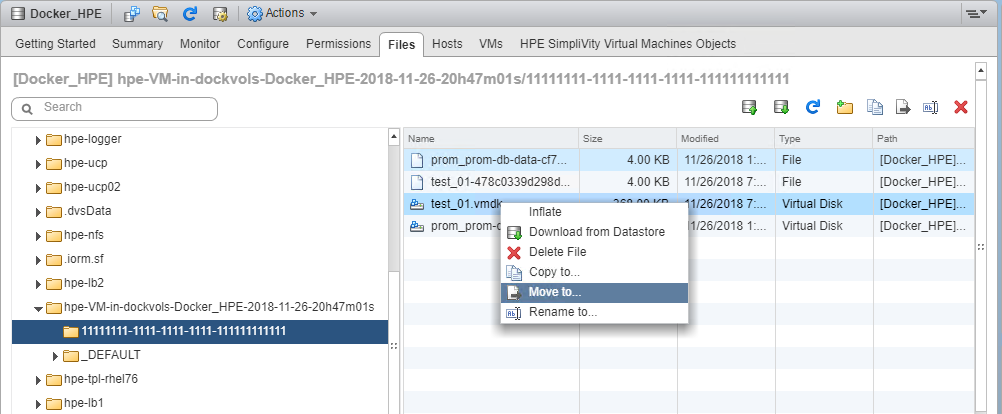
Figure 29. Move files
Set the destination folder to the dockvols sub-directory named 1111111-1111-1111-1111-... as shown in Figure 30.
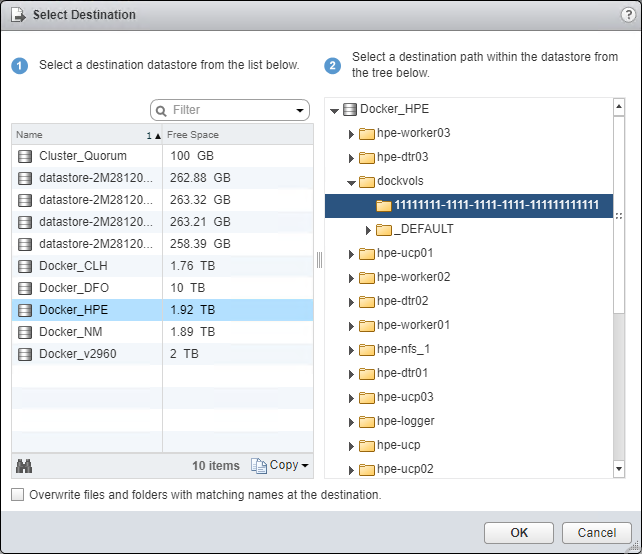
Figure 30. Move to destination
It is only necessary to move the .vmdk file as the .vmfd file will automatically follow. The dockvols sub-directory named 1111111-1111-1111-1111-... should now contain both files as shown in Figure 31.

Figure 31. Files moved to destination
Test the restore
You can check that the volume test_01 has been restored by using the docker volume ls command again.
# docker volume ls | grep vsphere

vsphere:latest      prom_hpe-db-data@Docker_HPE
vsphere:latest      test_01@Docker_HPE
You can verify that the volume contains the correct data by spinning up a container and running a shell command:
# docker run -it --rm -v test_01:/tmp alpine sh -c "cat /tmp/foo.txt"

some test data here
The data you entered in the text file before performing the backup and deleting the volume is available once again after restoring the volume.