# HPECP Airgap Installation
# Solution components overview
RMT server
Repository server
a. Docker registry
b. K8s RPMs registry
Deploying HPE Ezmeral Container Platform
# Solution architecture
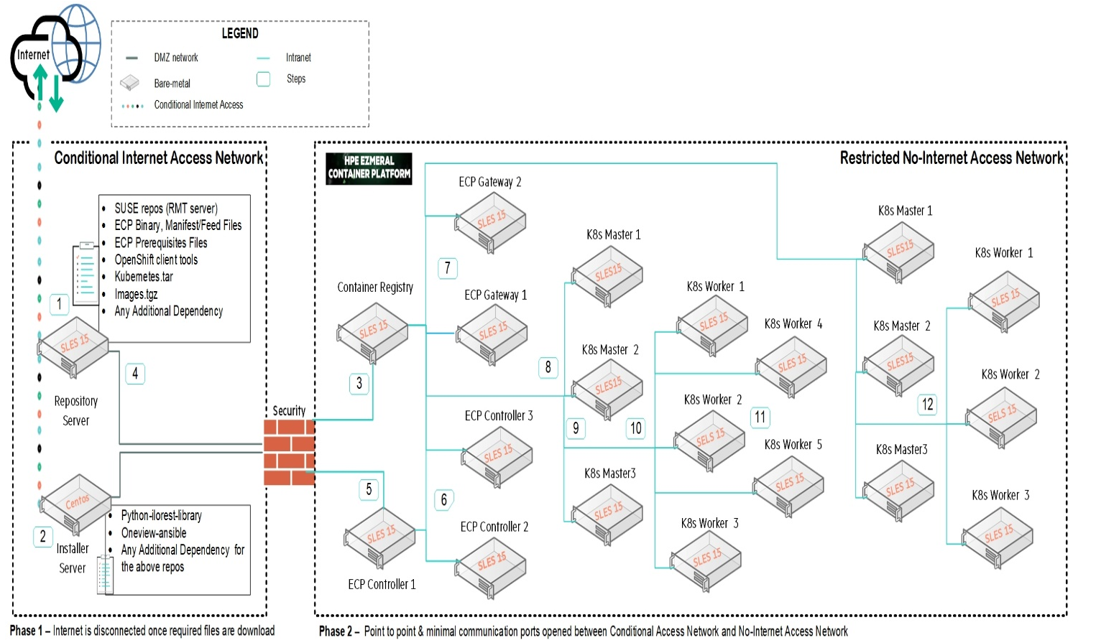
Figure 37: HPECP Airgap Architecture
# RMT server
# Server hardware configuration
Network adapter - 1 interface on the production network.
CPU - 12 vCPU
Memory - 36 GB
Hard disk - a minimum of 3.5 TB
a. / - 2 TB
b. /home - 1 TB
c. /swap - 70 GB
OS - SUSE Enterprise Linux 15 SP2
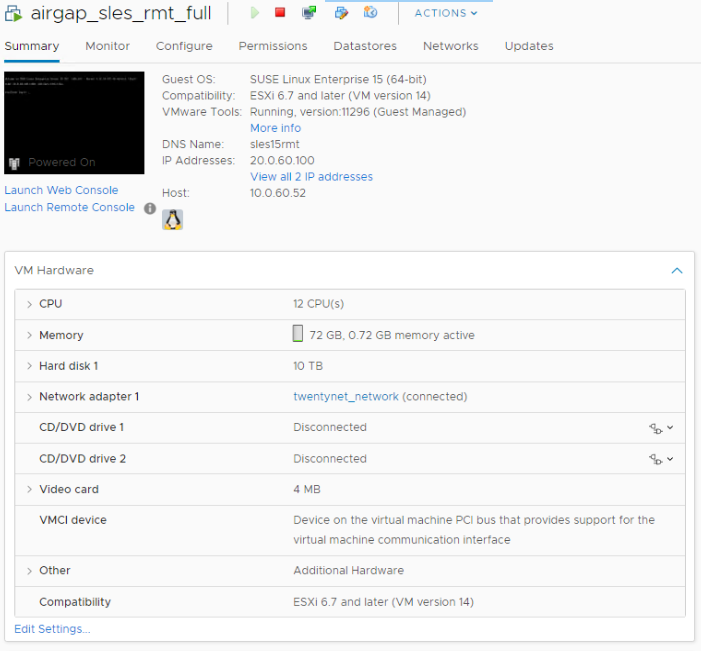 Figure 38: Server Hardware Configuration
# Partition details
> lsblk
NAME MAJ:MIN RM SIZE RO TYPE MOUNTPOINT

sda 8:0 0 10T 0 disk

├─sda1 8:1 0 8M 0 part

└─sda2 8:2 0 10T 0 part

├─system-root 254:0 0 2T 0 lvm /

├─system-swap 254:1 0 70.8G 0 lvm

└─system-home 254:2 0 953.2G 0 lvm /home

sr0 11:0 1 663M 0 rom

sr1 11:1 1 1.1G 0 rom
# Configuring RMT server
While installing OS or once the OS is installed on the server to be used as SLES RMT server, provide the following details:
While installing OS
- Select the registration method as "register system via scc.suse.com" and provide the registered email address and registration code for "SUSE Linux Enterprise Server for x86, AMD64, Intel64"
Once OS is installed, register the system and enable required modules by executing below commands.
SUSEConnect -r REGISTRATION_CODE -e EMAIL_ADDRESS
SUSEConnect -p sle-ha/15.2/x86_64 -r ADDITIONAL REGCODE
SUSEConnect -p sle-caas/15.2/x86_64 -r ADDITIONAL REGCODE
SUSEConnect -p sle-module-containers/15.2/x86_64
SUSEConnect -p sle-module-desktop-applications/15.2/x86_64
SUSEConnect -p sle-module-development-tools/15.2/x86_64
SUSEConnect -p sle-module-cap-tools/15.2/x86_64
SUSEConnect -p PackageHub/15.2/x86_64
SUSEConnect -d -p sle-module-server-applications/15.2/x86_64
SUSEConnect -p sle-module-legacy/15.2/x86_64
SUSEConnect -p sle-module-public-cloud/15.2/x86_64
SUSEConnect -p sle-module-web-scripting/15.2/x86_64
Once the server is registered to SUSE and the required modules are enabled, perform the following steps to install RMT service. Ensure the server is connected to the internet at this moment.
- Install the prerequisite modules
> zypper in screen vim iputils bind-utils - Install RMT server module
> zypper in rmt-server
- Install the prerequisite modules
Configure RMT
> yast2 rmtThis will open a wizard for configuring RMT service
Enter your organization credentials. To retrieve your credentials, login to scc.suse.com/proxies and look for the "Mirroring Credentials"
 **Figure 39:** Retrieve Credentials  **Figure 40:** RMT configuration step 1  **Figure 41:** RMT configuration step 1 successfulEnter credentials for a new MariaDB user and database name. This user will then be created. Then select Next.
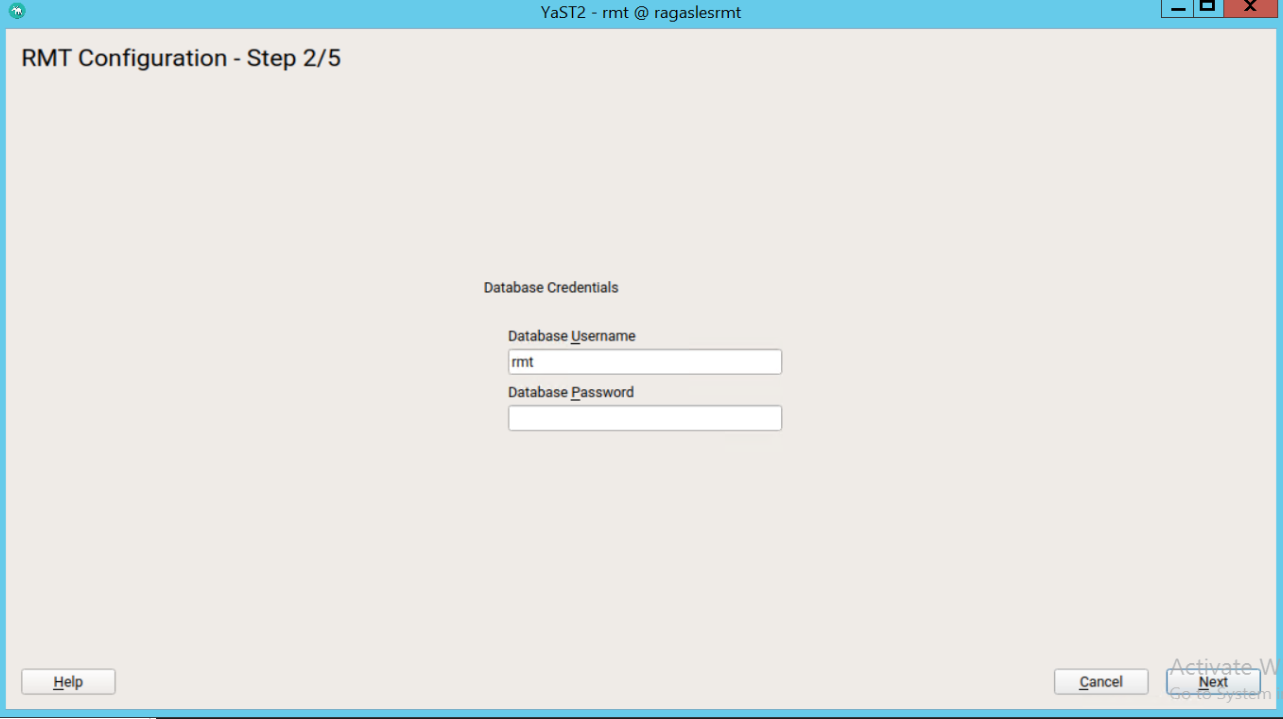
Figure 42: RMT configuration step 2
If a password for the MariaDB root user is already set, you are required to enter it. If no password is set for root, you are asked to enter a new one.
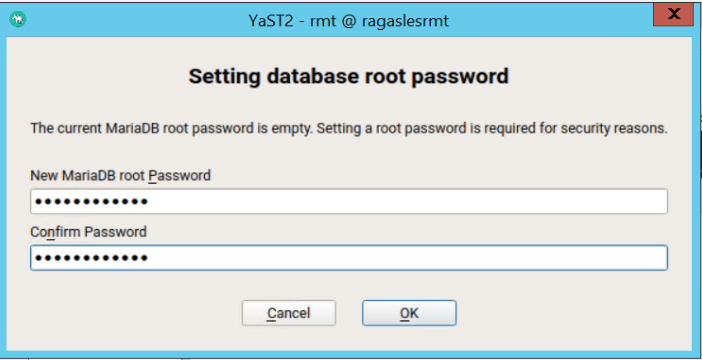
Figure 43: RMT configuration set database root password
Enter a common name for the SSL certificates. The common name should usually be the fully qualified domain name (FQDN) of the server. Enter all domain names and IP addresses with which you want to reach the RMT server as alternative common names.
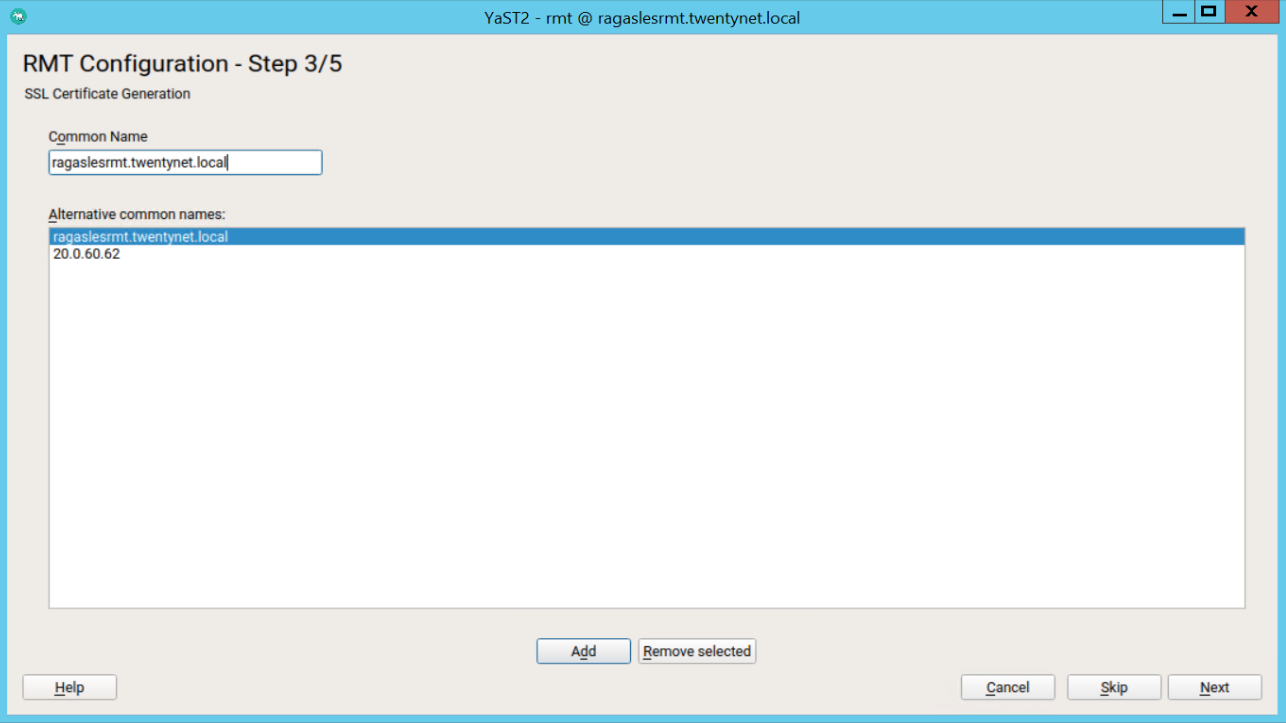
Figure 44: RMT configuration step 3
When all common names are entered, select Next.
Provide a password for the CA private certificate key and click OK.
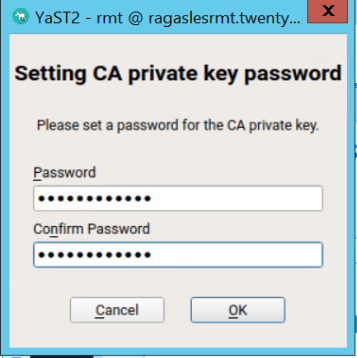
Figure 45: RMT configuration setting CA private key
If firewalld is enabled on this system, enable the checkbox to open the required ports.
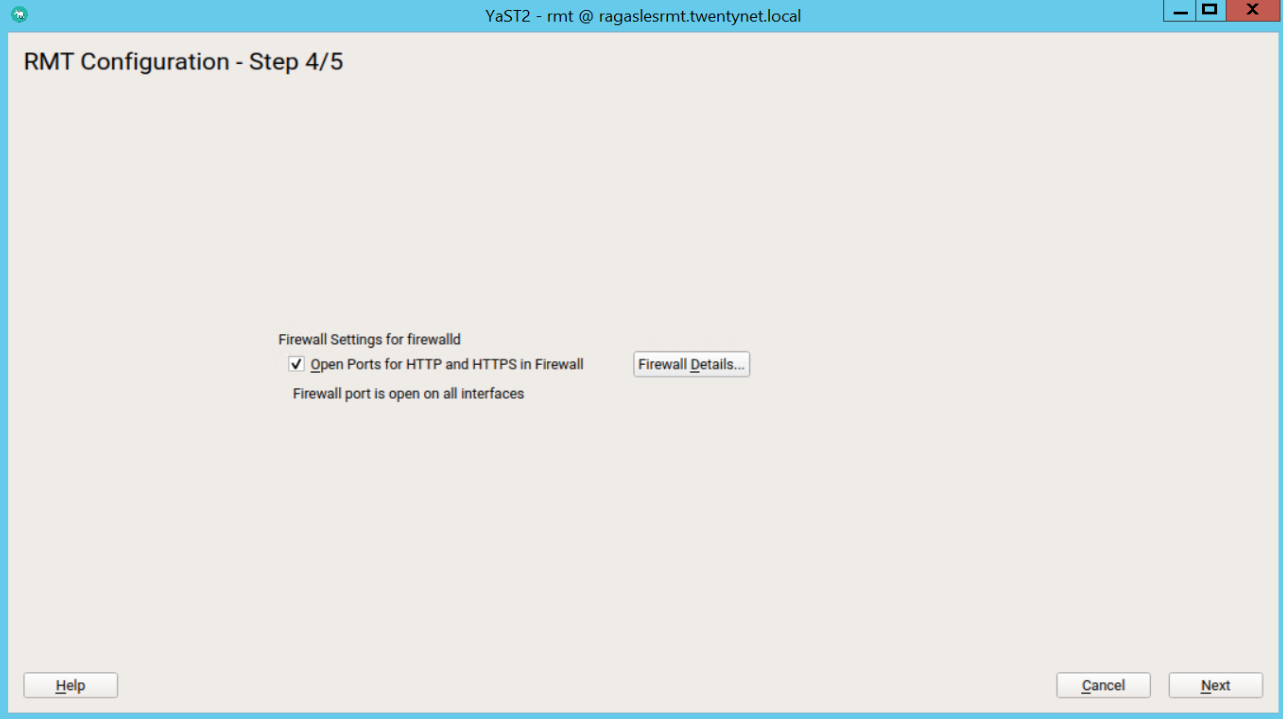
Figure 46: RMT configuration step 4
Continue with Next.
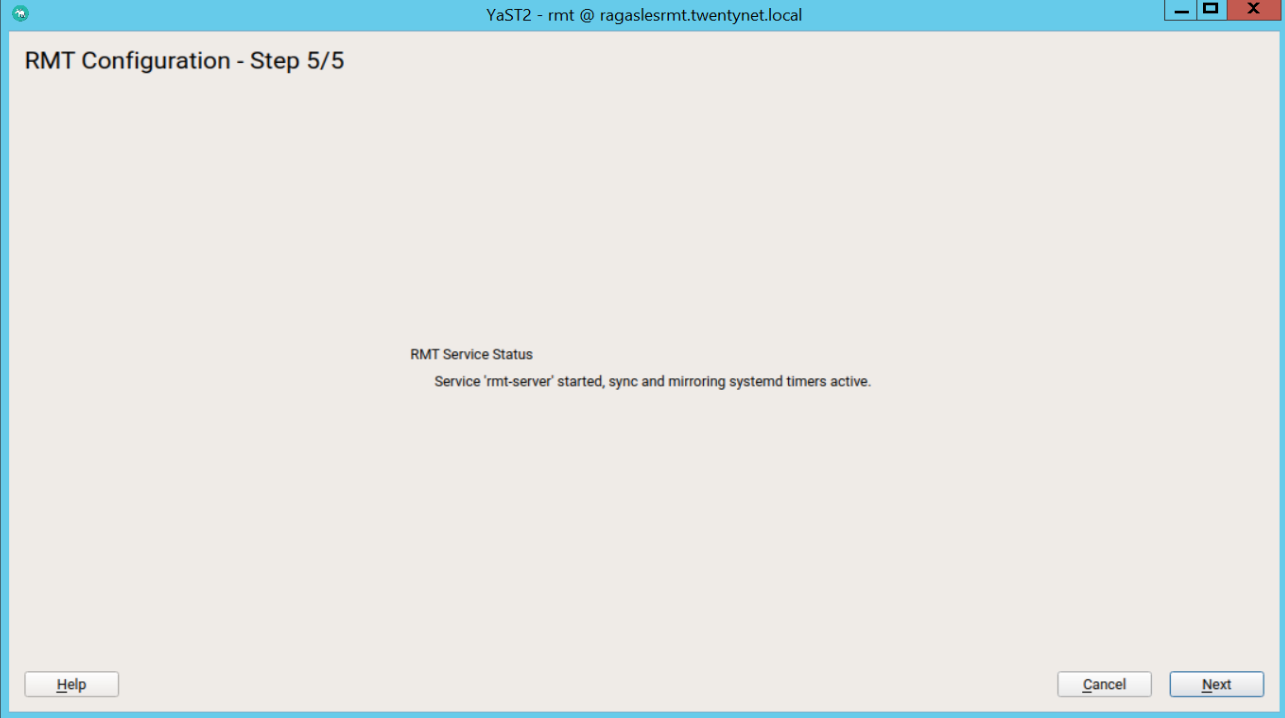
Figure 47: RMT configuration step 5
To view the summary, click Next. Close YaST by clicking Finish. YaST then enables and starts all systemd services and timers.
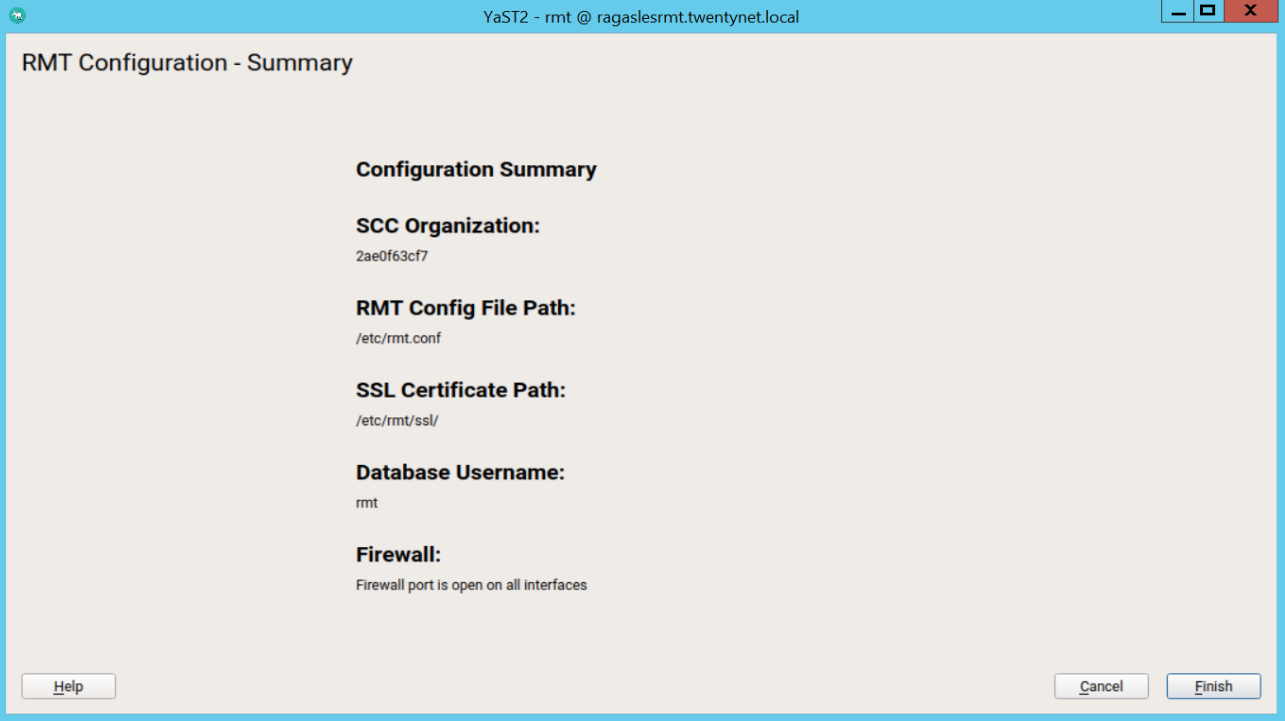
Figure 48: RMT configuration Summary
# Enabling SLP Announcements
The SLP is service discovery protocol that allows computers and other devices to find services in a LAN without prior configuration. RMT includes the SLP service description file /etc/slp.reg.d/rmt-server.reg.
To enable SLP announcements of the RMT service, follow these steps:
- If firewalld is running, open relevant ports and reload the firewalld configuration:
> firewall-cmd --permanent --add-port=427/tcp
> firewall-cmd --permanent --add-port=427/udp
> firewall-cmd --reload
- Verify that SLP server is installed and possibly install it:
> zypper install openslp-server
3.Enable and start the SLP service:
> systemctl enable slpd.service
> systemctl restart slpd.service
# Mirror SUSE products and packages
- Synchronise all repositories and ID that you have access to.
> rmt-cli sync
- List and enable all the products
> rmt-cli product list --all
> rmt-cli product enable <ID>
- Start mirror of enabled products
> screen rmt-cli mirror
Register clients to the RMT server using the following URL
- As a boot parameter
> regurl=[/]{.ul}- As a local subscription server
> SUSEConnect --url [/]{.ul}
# Download the packages
The following files, packages and RPMs are necessary for installing Kubernetes cluster in HPECP in an airgap environment. Download them when the system is connected to internet. Once they are downloaded, disconnect the server from the internet.
- Container images
Refer to appendix Images required for deploying Kubernetes deployment for detailed list of images to install HPECP & kubernetes in an airgap environment.
NOTE
For Internal QA -- link to obtain container images https://bdk8s.s3.us-east-2.amazonaws.com/5.3/3031/k8s-images.tgz (opens new window)
- Kubernetes RPMs
Refer to appendix for the RPMs required for deploying Kubernetes for a detailed list of RPMs required to install kubernetes in an airgap environment.
NOTE
For Internal link QA -- link to obtain kubernetes RPMs -- https://bdk8s.s3.us-east-2.amazonaws.com/5.3/3031/k8s-rpms.tar (opens new window)
# Disconnect from internet
Once the server is connected to SUSE customer center, up to date with the repositories, packages, RPMs and files, and they are mirrored into the local repository, it is time to disconnect the server from the internet. Refer to appendix Simulating an air gap environment for the configuration steps utilized in this document.
# Registering to RMT server
Once OS is installed, please refer to the Preparing hosts for HPECP section for registering client systems to RMT server.
Make sure following modules are enabled and up to date by running
> zypper refresh
SUSEConnect -p sle-ha/15.2/x86_64
SUSEConnect -p sle-caas/15.2/x86_64
SUSEConnect -p sle-module-containers/15.2/x86_64
SUSEConnect -p sle-module-desktop-applications/15.2/x86_64
SUSEConnect -p sle-module-development-tools/15.2/x86_64
SUSEConnect -p sle-module-cap-tools/15.2/x86_64
SUSEConnect -p PackageHub/15.2/x86_64
SUSEConnect -d -p sle-module-server-applications/15.2/x86_64
SUSEConnect -p sle-module-legacy/15.2/x86_64
SUSEConnect -p sle-module-public-cloud/15.2/x86_64
SUSEConnect -p sle-module-web-scripting/15.2/x86_64
# Docker registry and K8s RPMs repository server
# Server hardware configuration
- Network adapter - 1 interface on the production network.
- CPU - 2 vCPU
- Memory - 16GB
- Hard disk - a minimum of 500GB
- OS - SUSE Enterprise Linux 15 SP2
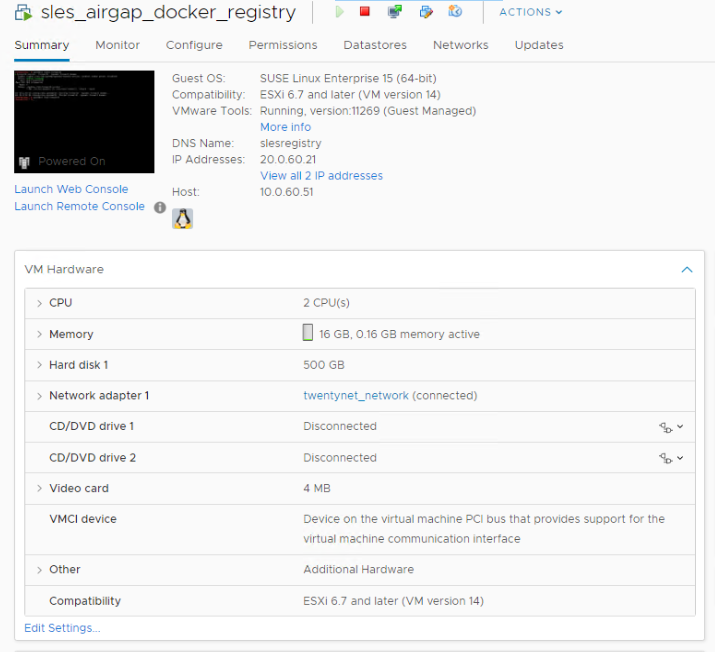 Figure 49: Server Hardware details
# Partition details
NAME MAJ:MIN RM SIZE RO TYPE MOUNTPOINT

sda 8:0 0 500G 0 disk

├─sda1 8:1 0 500M 0 part /boot/efi

└─sda2 8:2 0 499.5G 0 part

├─system-swap 254:0 0 63G 0 lvm [SWAP]

├─system-root 254:1 0 150G 0 lvm /

├─system-var 254:2 0 100G 0 lvm /var

├─system-srv 254:3 0 100G 0 lvm /srv

└─system-home 254:4 0 25G 0 lvm /home

sr0 11:0 1 1024M 0 rom

sr1 11:1 1 1024M 0 rom
# Configuring docker registry
Login to the server which would be utilized as the docker register and perform the following steps:
Register to the RMT server. Refer to section Registering to RMT server for more details.
Install and start Docker on SLES
zypper install docker
docker --version
systemctl enable docker.service
systemctl start docker.service
- Create registry on SLES as a docker container with restart policy as always.
> docker run -d -p 5000:5000 --restart=always --name registry registry:2
Disconnect the server from the internet. Refer to section Simulating an air gap environment for more details.
Pull, Tag & Push an image to the local registry
Copy the container images tar file from the repository server into this server.
Navigate to the folder containing images required for deploying HPECP
> cd <path_to_the_images_tar_file>Load the tar file containing the images required to setup the kubernetes cluster from HPECP in an airgap environment. See Appendix for detailed list of images needed.
> docker load -i <images_tar_file>Tag each of the image from the list using the following command
> docker tag <individual image name extracted from images_tar_file> /
localhost:5000/<individual image name extracted from images_tar_file>
Push each of the tagged image using the following command
> docker push localhost:5000/<individual image name extracted from images_tar_file>NOTE
There is a script available in k8simages.tgz called populate_registry.sh. Using this script, we can load, tag & push all k8s images. Instead of tagging with localhost, it's better to tag with internal registry IP address.
Eg: ./populate_registry.sh load k8s_container_metadata.txt <registry_server_IP>:5000
k8s_container_metadata.txt file should have all images and example image as shown below:
The k8s_container_metadata.txt file content as shown in below Figure
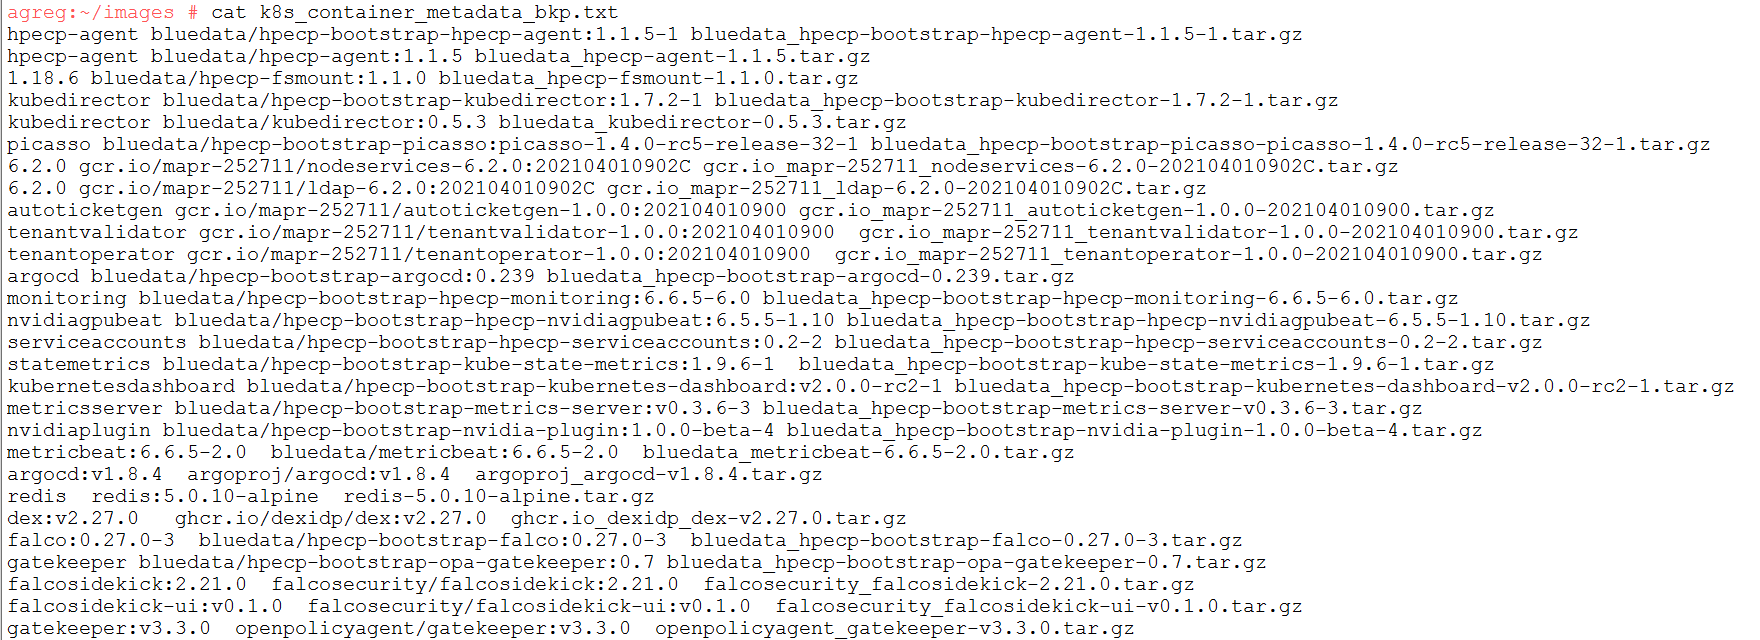
Figure 50: Registry file content
k8s_container_metada.txt file content template as shown below
<Reference_to_image> <Image_name:tag> <Image_tar_file>populate_registry.sh script content as shown below:
$ cat populate_registry.sh
#!/bin/bash
if [ "$#" -lt 3 ]; then
    echo "$0  <load | pull> <k8s_metadata_file> <registry_url> [<registry_url> <registry_url> ...]"
    exit 1
fi
case $1 in
  load|pull)
    ;;
  *)
    echo "$0 <load | pull> <k8s_metadata_file> <registry_url> [<registry_url> <registry_url> ...]"
    exit 1
    ;;
esac

LOAD_OR_PULL=$1; shift
META_FILE=$1; shift
registry_urls=$@
echo "File=$META_FILE"

   for REG_URL in $registry_urls
   do
      echo "Updating registry: $REG_URL"
      echo ""
  while read LINE
  do
        DL_IMAGE_FILE_NAME=$(echo ${LINE} | cut -d' ' -f3)
    DL_FULL_IMAGE_NAME=$(echo ${LINE} | cut -d' ' -f2)
    case ${LOAD_OR_PULL} in
      load)
        echo "load cmd: docker load -i ${DL_IMAGE_FILE_NAME}"
        docker load -i ${DL_IMAGE_FILE_NAME}
        ;;
      pull)
        echo "pull cmd: docker pull ${DL_FULL_IMAGE_NAME}"
        docker pull ${DL_FULL_IMAGE_NAME}
        ;;
    esac

    echo "tag cmd: docker tag ${DL_FULL_IMAGE_NAME} ${REG_URL}/${DL_FULL_IMAGE_NAME}"
    docker tag ${DL_FULL_IMAGE_NAME} ${REG_URL}/${DL_FULL_IMAGE_NAME}

    echo "push cmd: docker push ${REG_URL}/${DL_FULL_IMAGE_NAME}"
    docker push ${REG_URL}/${DL_FULL_IMAGE_NAME}

    echo ""
  done < ${META_FILE}
done
Other than the images in k8s-images.tgz, we need below docker images from registry.suse.com
- registry.suse.com/caasp/v4.5/kube-apiserver:v1.18.6
- registry.suse.com/caasp/v4.5/kube-controller-manager:v1.18.6
- registry.suse.com/caasp/v4.5/kube-scheduler:v1.18.6
- registry.suse.com/caasp/v4.5/kube-proxy:v1.18.6
- registry.suse.com/caasp/v4.5/pause:3.2
- registry.suse.com/caasp/v4.5/etcd:3.4.3
- registry.suse.com/caasp/v4.5/coredns:1.6.7
NOTE
Please use below script to download suse images. Use this script on a server which have internet access.
 Figure 51: Script to download suse images
- Test the presence of images
> docker images
> docker images | grep "'internal registry ip address':5000"
# Validate registry from local environment
- Within the same server
> docker pull <image_not_present_in_registry> - fail since internet isn't available
> docker pull <image_within_registry> - success
Outside of this registry server, on the hosts that need access to the local docker registry
- Create or update the /etc/docker/daemon.json on the docker hosts which needs access to the above created docker registry. Assuming there are no other settings in the file, it should have the following contents:
{
"insecure-registries" : ["<registry_server_ip_address>:5000"]
}
Substitute the "<registry_server_ip_address>" with the address of insecure registry.
- Restart Docker for the changes to take effect.
> systemctl restart docker.service- Pull the images
> docker pull <image_not_present_in_registry> - fail since internet isn't available
> docker pull <image_within_registry> - success
# Configuring Kubernetes RPMs server
- Install Nginx
> zypper in nginx
- Check the nginx configuration file (/etc/nginx/nginx.conf) to know the nginx server root directory.
> cd <nginx _server_root_directory>
- Copy and untar the kubernetes RPM tar file within the nginx server root directory.
Copy kubernetes.tar file under NGINX configuration file location
        location /kubernetes/ {
            root   /srv/www/htdocs/;
            autoindex on;
        }
> cd /srv/www/htdocs
> Copy kubernetes.tar file
> tar xvf kubernetes.tar
- Start the Nginx web service
> systemctl enable nginx
> systemctl start nginx
# Troubleshooting
In case there is an issue NGINX "403 Forbidden" Error, perform the following steps
- Ensure right file permissions are set to the files to be served by web server
> chmod 755 <path_to_k8s_rpms_in_nginx_root_directory>
- Change the ownership of all the files
> chown -R nginx:nginx *
- Restart NGINX
> nginx -s reload
# Validate the availability of Kubernetes RPMs
To validate if the kubernetes RPMs is accessible, execute the following command:
> curl http://<webserver_ip_address>/kubernetes/
# HPECP Deployment
# Operating System Deployment for HPECP hosts
The supported version of SLES for deploying HPE Container Platform is SUSE Enterprise Linux 15 SP2. This section outlines the manual steps involved in deploying OS for the servers used as HPECP controller, HPECP gateway, kubernetes master and kubernetes worker nodes.
NOTE
OS can be deployed by using the script located in https://github.com/HewlettPackard/hpe-solutions-hpecp/tree/master/DL/scripts/os_deployment (opens new window). Please refer to the "Deploying operating system on bare-metal nodes" section in this document for more details.
Boot using the installation Media select language & and the product "Sles 15 SP2".
Select you registration method as the RMT server set up previously in section RMT server and choose "yes" to receive updated repos.
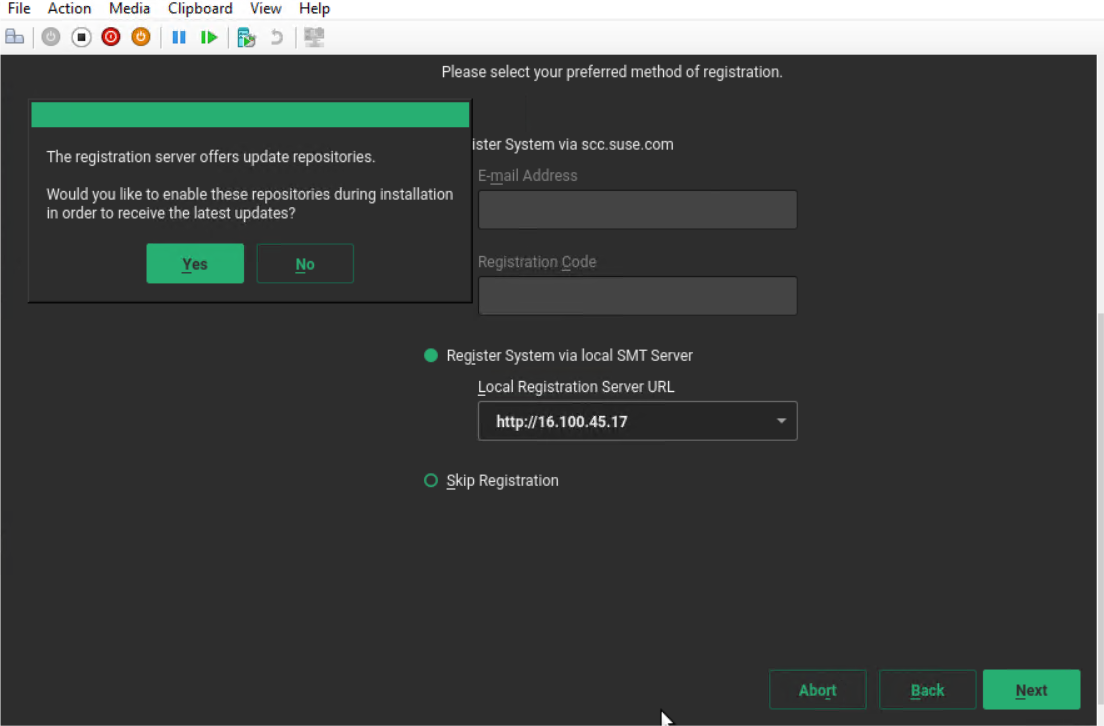 Figure 52: Registration Method
Select the following Extension and Modules:
sle-ha/15.2/x86_64
caasp/4.5/x86_64
PackageHub/15.2/x86_64
sle-module-legacy/15.2/x86_64
sle-module-python2/15.2/x86_64
sle-module-containers/15.2/x86_64
sle-module-basesystem/15.2/x86_64
sle-module-public-cloud/15.2/x86_64
sle-module-desktop-applications/15.2/x86_64
sle-module-server-applications/15.2/x86_64
sle-module-development-tools/15.2/x86_64
NOTE
Alternatively, refer to the section Registering to RMT server for registering to RMT server once OS is installed.
Using guided Partitioning setup the OS partition as shown below
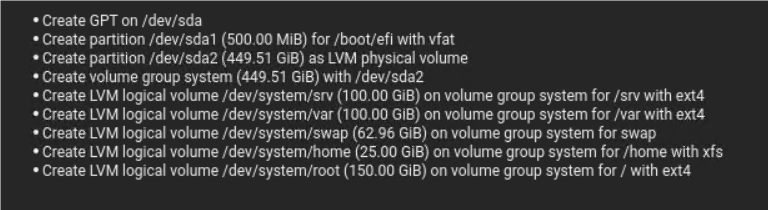
Figure 53: OS Partitioning
Choose "minimal" installation mode:
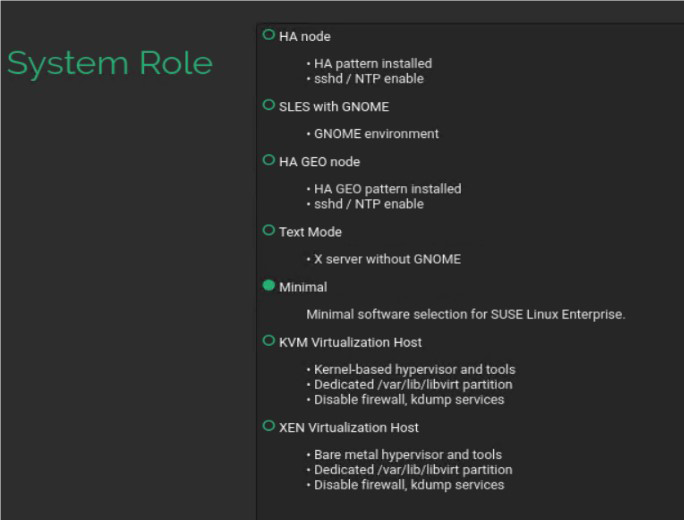
Figure 54: System Role
In the install summary ensure SSH access is enabled and then click Install.
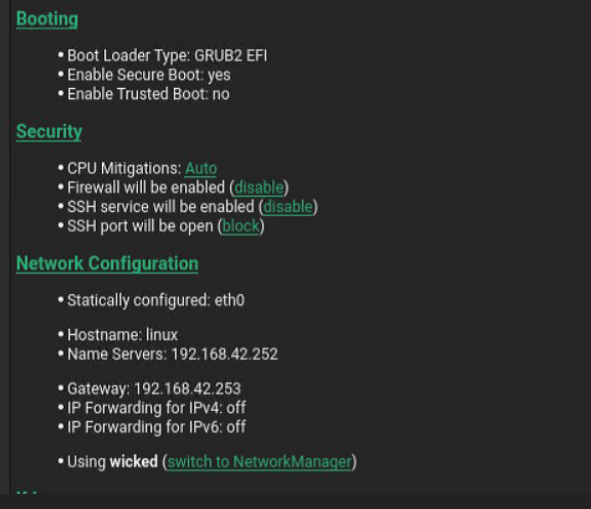
Figure 55: Enable SSH Access
NOTE
DNS/Bind A record, PTR record is required for the HPE CP installation.
# HPECP Host preparation
This section covers manual steps for preparing Hosts for ECP Ezmeral Container Platform. Automated script is available for HPECP Host preparation at https://github.com/HewlettPackard/hpe-solutions-hpecp/tree/master/DL/scripts/prepare_hpecp_hosts (opens new window). Please refer to the following section "Host Preparation" section in this document for more details.
- If using proxy or ignore, setup proxy as shown below in the configuration file - /etc/sysconfig/proxy
> NO_PROXY="localhost, 127.0.0.1l"
> HTTP_PROXY="http://<proxy server>:port/"
> HTTPS_PROXY=" http://<proxy server>:port/"
- Fix autofs configuration.
> zypper in autofs
> sed -i'' -e "s|#/net.*$|/net -hosts|g" /etc/auto.master
- Install libcgroup V1
> zypper in libcgroup1
- Reboot the server
> reboot
- Perform a system update if necessary
> zypper up --non-interactive
# Preparing legacy GPU hosts
All the above repos for worker hosts are required. In addition, perform the following steps from http://docs.bluedata.com/50_gpu-driver-installation (opens new window)
Except of course, you will be using zypper instead of yum.
For the new kernel to load.
> zypper install kernel-default-devel gcc-c++ perl pciutils
In addition, you need to install the following package before running the NVIDIA installer on the host.
> zypper in libglvnd-devel
NOTE
If the server is not rebooted platform install will fail. You may choose to not reboot now for GPU hosts.
# HPECP controller
Once the OS is installed as per the section Operating System Deployment for HPECP hosts, login to the server to be configured as the HPECP controller and perform the steps as per Host preparation section.
# Installing HPECP Controller for SLES
On the same server, perform the following steps to install HPECP controller
Copy the hpe-cp-sles-release-5.3-xxxx.bin to /root folder from the repository server.
You can download .bin file from https://bdk8s.s3.us-east-2.amazonaws.com/5.3/3031/hpe-cp-sles-release-5.3-3031.bin
Copy the feed.json file from the repository server to the /srv/bluedata/catalog folder.
> mkdir -p /srv/bluedata/catalog
> cp <location_of_feed.json_in_controller> /srv/bluedata/catalog/
- Give execute permission using the following command
> chmod +x /root/hpe-cp-sles-release-5.3-xxxx.bin
> chmod +x /srv/bluedata/catalog/
> chmod +x /srv/bluedata/catalog/*
- Execute the HPECP bin file using the following command
> ./hpe-cp-sles-release-5.3-3031.bin --default-password <password>
Once completed, Login to the controller via browser to land to the admin UI
Once logged in to the HPECP Controller UI, configure the controller by providing the details as shown in the following figure and click submit.
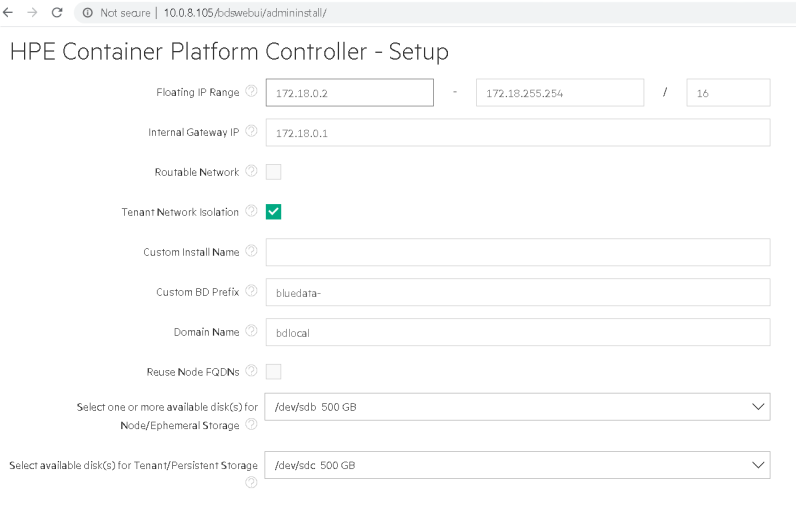
Figure 56: HPECP controller configuration
Controller installation is then instantiated, wait until it is complete.
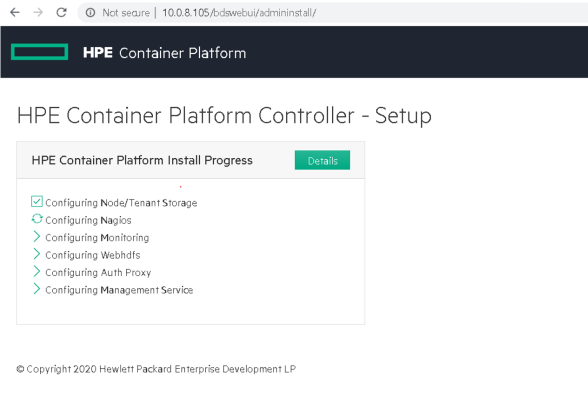
Figure 57: HPECP controller setup
Once the installation is complete, the HPECP login page would be accessible.
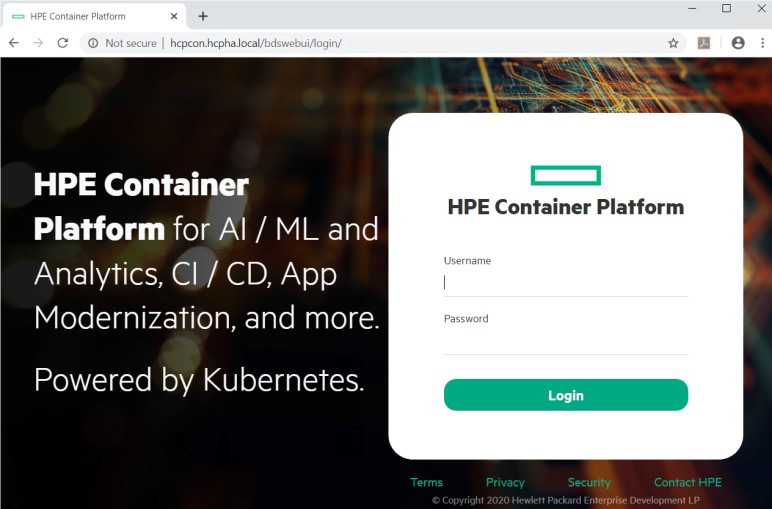
Figure 58: HPECP Login Page
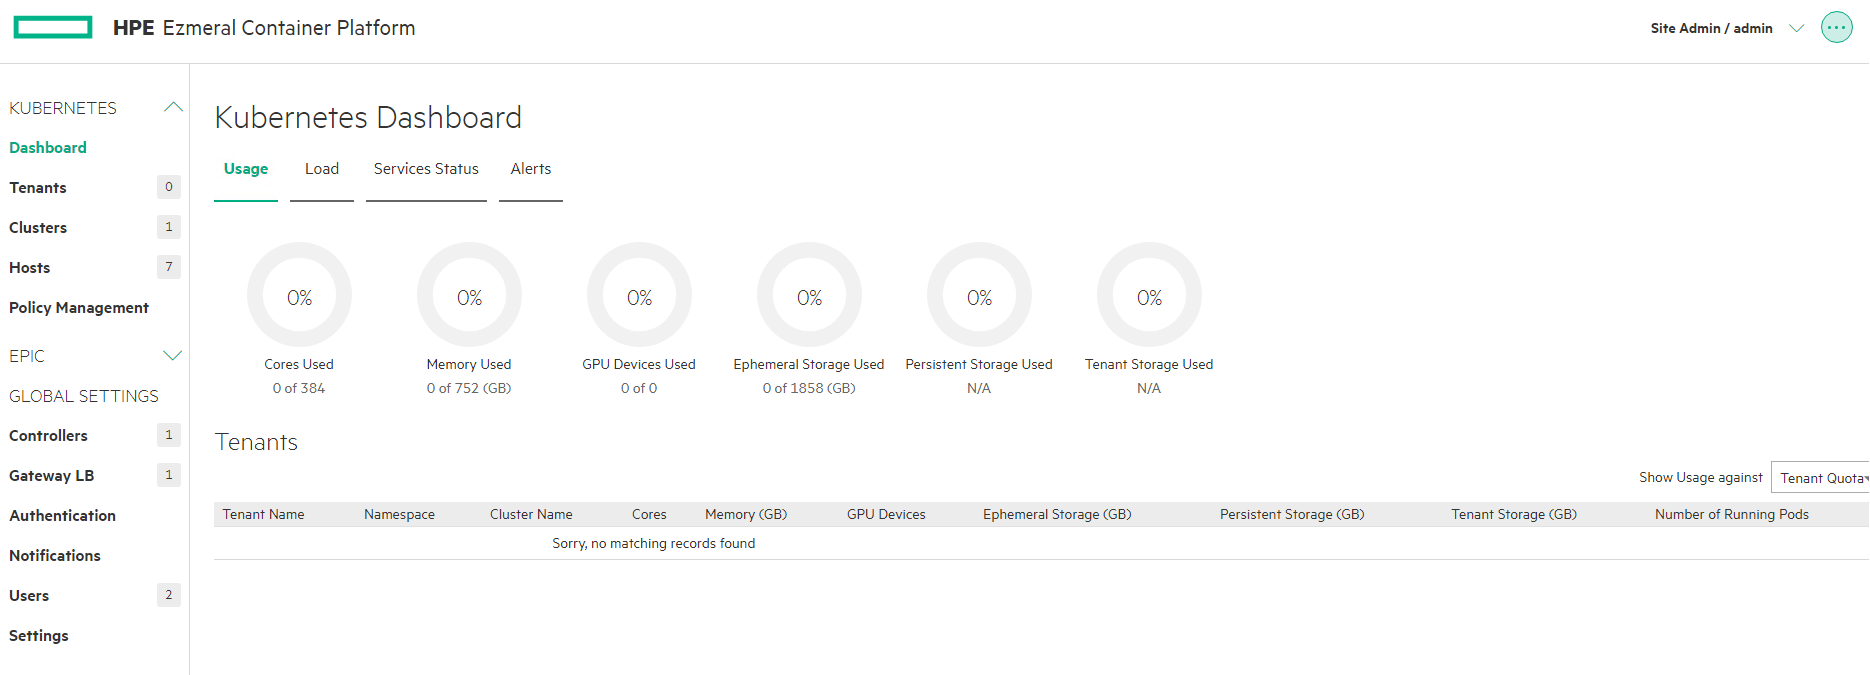
Figure 59: HPECP Dashboard
NOTE
Default credentials to HPECP login access is admin/admin123
# HPECP gateway server
Once the OS is installed as per the section Operating System Deployment for HPECP hosts, login to the server to be configured as the HPECP controller and perform the steps as per gateway section.
# Airgap settings in HPECP Controller
The Air Gap tab of the System Settings screen allows the Platform Administrator to specify "air gap" settings to be used when the Kubernetes hosts, clusters, and tenants within HPE Container Platform do not have connectivity to the Internet.
Enter the following settings:
Yum repository section of this tab:
Base URL: This is the URL to the YUM repository.
Repo GPG URL: This is the URL to the YUM repository GNU Privacy Guard (optional).
RPM GPG URL: This is the URL to the RPM repository GNU Privacy Guard (optional).
The Container Registry section of this tab:
Container URL: URL to the Docker registry that contains the images needed for air-gap Kubernetes installations within HPE Container Platform.
Username: Username to access the Docker registry, if needed.
Password: Password to access the Docker registry, if needed.
Secured: Checking the Secured checkbox indicates that the Kubernetes air-gap Docker registry is secure.
Docker Client Certificate: Location of the Docker registry certificate, if you are using a secured connection. Clicking the Browse button opens a browser-standard Open dialog box that allows you to navigate to and locate the certificate to add.
Clicking Submit saves your changes.
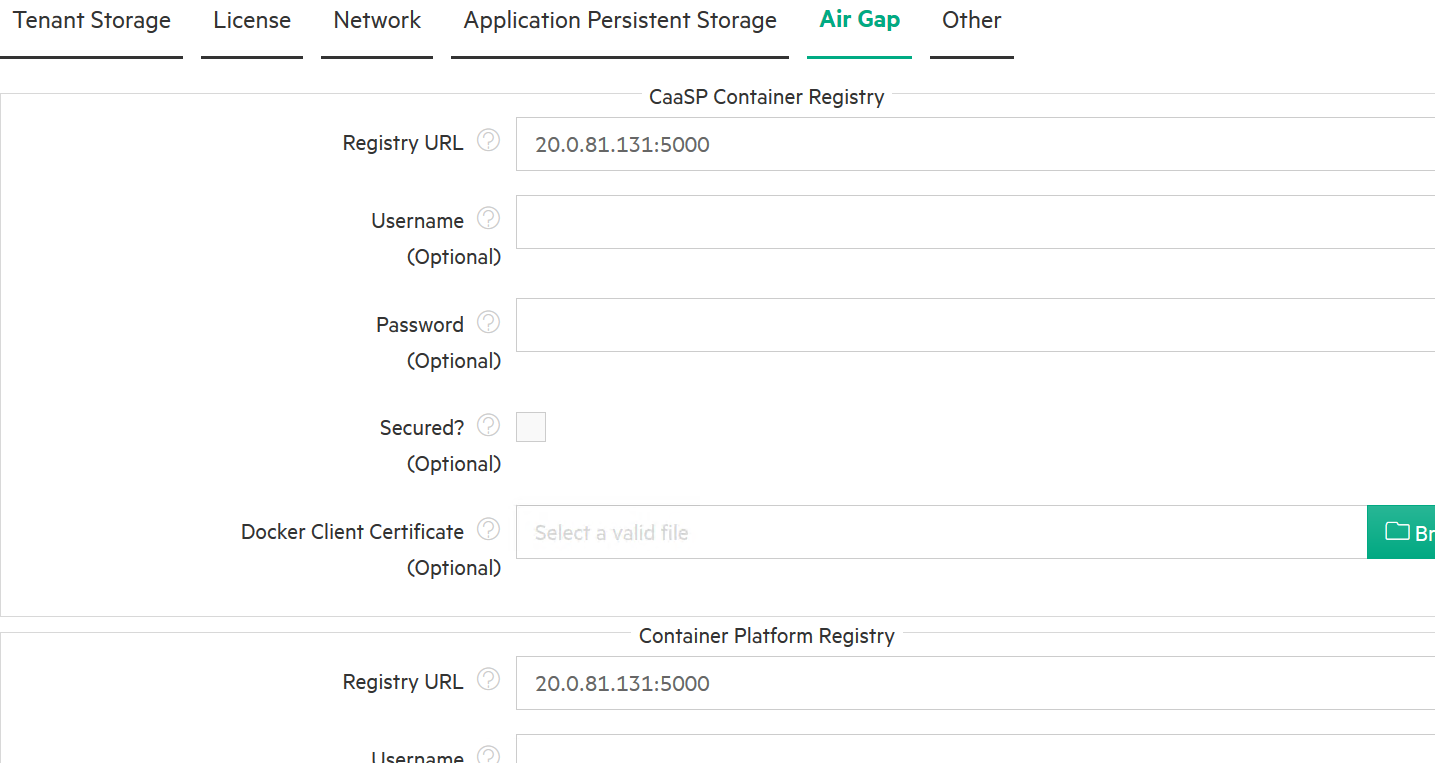
Figure 60: Airgap Settings
# Kubernetes hosts
# Preparing Kubernetes hosts
Once the OS is installed as per the section Operating System Deployment for HPECP hosts, login to the server to be configured as the HPECP controller and perform the steps as per Host preparation section.
After the hosts are prepared, login to the servers and perform the following:
Edit the /etc/sysctl.conf file and turn off reverse path filter (add the following line if necessary):
> vi /etc/sysctl.conf
> net.ipv4.conf.all.rp_filter = 0
Reboot the server for changes to reflect
> rebootTurn off swap
> swapoff -aOnce above-mentioned configurations are completed on the host, we can perform the kubernetes host installation and create the kubernetes cluster
# Kubernetes host installation
Please refer to the "Adding Kubernetes Hosts" section in this document for installing Hosts." section in this document for installing Hosts.
# Creating a Kubernetes Cluster
Please refer to the "Creating Kubernetes Cluster" section in this document for creating cluster.
# Launching Kubernetes Dashboard
Please refer to the "Launching Kubernetes Dashboard" section to launch kubernetes dashboard
# Validating the deployment
The following example is based on the WordPress and MySQL with Persistent Volume described here (opens new window).
MySQL and WordPress each require a Persistent Volume to store data. Their Persistent Volume Claims will be created at the deployment step. HPE Container Platform uses MapR as the default persistent volume.
- Begin by adding a Secret generator in kustomization.yaml by executing the following command, being sure to replace YOUR_PASSWORD with the password you want to use.
> mkdir wordpress
> cd wordpress
> cat <<EOF >./kustomization.yaml
secretGenerator:
- name: mysql-pass
literals:
- password=YOUR_PASSWORD
EOF
Next, use either of the following methods, create manifests based on the following two yaml manifest files for the MySQL and WordPress services, respectively:
If you installed HPE Container Platform with tenant storage, then MapR will already be registered as the default Storage Class in this namespace.
> kubectl get StorageClass
NAME PROVISIONER AGE
default (default) com.mapr.csi-kdf 39h
> kubectl describe StorageClass
Name : default
IsDefaultClass : Yes
Annotations : storageclass.kubernetes.io/is-default-class=true
Provisioner : com.mapr.csi-kdf
Parameters :
cldbHosts=192.168.20.131:7222,cluster=epic.mapr.cluster,csi.storage.k8s.io/provisioner-secret-name=mapr-user-secret,csi.storage.k8s.io/provisioner-secret-namespace=mapr-csi,csiNodePublishSecretName=mapr-ticket-secret,csiNodePublishSecretNamespace=mapr-csi,mountPre
fix=/mapr-csi,namePrefix=k8s-1-,platinum=true,restServers=192.168.20.131:8443,securityType=secure
AllowVolumeExpansion : <unset>
MountOptions : <none>
ReclaimPolicy : Delete
VolumeBindingMode : Immediate
Events : <none>
In these two manifest files, both the WordPress service and MySQL are requesting a persistent volume (PV)
Neither pod makes any explicit request for a specific storageClassName. Hence, they will use the default MapR StorageClass.
- Edit the WordPress manifest yaml to use the NodePort service instead of LoadBalancer service. This needs to be done in order for HPE Container Platform to re-map the ports.
Continue by adding these two manifests to the kustomization.yaml file.
> cat <<EOF >>./kustomization.yaml
resources:
- mysql-deployment.yaml
- wordpress-deployment.yaml
EOF
- The kustomization.yaml contains all of the resources for deploying a WordPress site and a MySQL database. You can apply the directory, and then verify both the MapR volumes and the services, as follows:
> kubectl apply --kustomize ./
secret/mysql-pass-9tt65k5fgm created
service/wordpress-mysql created
service/wordpress created
deployment.apps/wordpress-mysql created
deployment.apps/wordpress created
persistentvolumeclaim/mysql-pv-claim created
persistentvolumeclaim/wp-pv-claim created
- Confirm that PVC is using the MapR StorageClass (see highlighted text below).
> kubectl get pvc
NAME STATUS VOLUME CAPACITY ACCESS MODES STORAGECLASS AGE
mysql-pv-claim Bound mapr-pv-16f97a33-b8dd-488a-b6db-1d94a84286e2 20Gi
RWO default 48s
wp-pv-claim Bound mapr-pv-896b3504-e9ba-4593-b9a0-88a9ece392b5 20Gi RWO
default 48s
> kubectl get pv
NAME CAPACITY ACCESS MODES RECLAIM POLICY STATUS CLAIM STORAGECLASS
REASON AGE

mapr-pv-32850109-ef66-42db-9522-b563fbc01eae 10Gi RWO Delete Bound
bdwebterm/pvc-kd-977sb-0 default 41h

mapr-pv-a24b1733-39db-40d2-bdaf-0be7c22ed83b 10Gi RWO Delete Bound
bdwebterm/pvc-kd-nbwhn-0 default 31h

mapr-pv-dbf96aed-dafd-47b7-87d4-7d343f182d8b 20Gi RWO Delete Bound
default/mysql-pv-claim default 69s

mapr-pv-e3c1db71-2865-425c-971e-c01466e9d295 20Gi RWO Delete Bound
default/wp-pv-claim default 69s

mapr-pv-ed5f1be3-9be2-4470-83cf-67f9b31e9dbf 10Gi RWO Delete Bound
bdwebterm/pvc-kd-dl2
- Label the WordPress service so that the front-end NodePort service will be exposed via the HPE Container Platform Gateway host. This step is not necessary if the service was created in the namespace of a tenant that has the Map Services to Gateway option enabled.
> kubectl get services
NAME TYPE CLUSTER-IP EXTERNAL-IP PORT(S) AGE
kubernetes ClusterIP 10.96.0.1 <none> 443/TCP 26h
wordpress NodePort 10.96.98.248 <none> 80:30996/TCP 24s
wordpress-mysql ClusterIP None <none> 3306/TCP 24s
> kubectl label svc wordpress hpecp.hpe.com/hpecp-internal-gateway=true
service/wordpress labeled
> kubectl describe service wordpress
Name: wordpress
Namespace: default
Labels: app=wordpress
hpecp.hpe.com/hpecp-internal-gateway=true
Annotations: hpecp-internal-gateway/80: mip.storage.enterprise.net:10006
Selector: app=wordpress,tier=frontend
Type: NodePort
IP: 10.96.98.248
Port: <unset> 80/TCP
TargetPort: 80/TCP
NodePort: <unset> 30996/TCP
Endpoints: 10.244.2.11:80
Session Affinity: None
External Traffic Policy: Cluster
Events:
Type Reason Age From Message
---- ------ ---- ---- -------
Normal Service 26s kubedirector Created HPECP K8S service
Copy the IP address and port number (see highlighted text above) to your browser. You should see set-up page similar to the following screenshot:
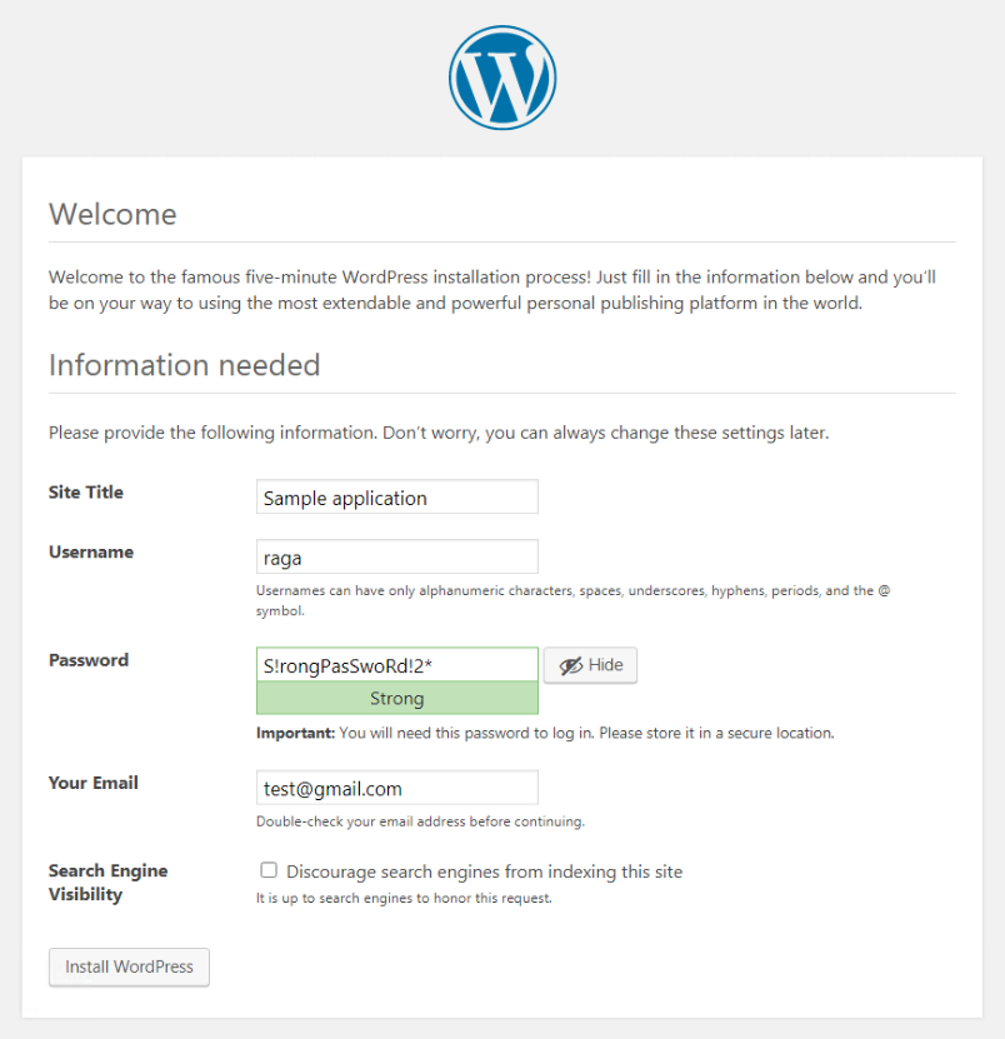
Figure 61: Wordpress Application
Destroy the application deployments (e.g. pods) and restart the deployments, making sure to preserve the WordPress application information and still preserved.
> kubectl delete deployment wordpress
deployment.extensions "wordpress" deleted
> kubectl delete deployment wordpress-mysql
deployment.extensions "wordpress-mysql" deleted
> kubectl get pods
No resources found.
> kubectl get deployments
No resources found.
The service is gone, as expected.

**Figure 62:** Wordpress application is removed
- Reapply the same deployment, and reconnect to persistent storage.
> kubectl apply -k ./
secret/mysql-pass-9tt65k5fgm unchanged
service/wordpress-mysql unchanged
service/wordpress unchanged
deployment.apps/wordpress-mysql created
deployment.apps/wordpress created
persistentvolumeclaim/mysql-pv-claim unchanged
persistentvolumeclaim/wp-pv-claim unchanged
> kubectl get pods
NAME READY STATUS RESTARTS AGE
wordpress-594759d7f6-jdnvp 1/1 Running 0 27s
wordpress-mysql-847b7b996d-dwf6s 1/1 Running 0 28s
> kubectl describe service wordpress
Name: wordpress
Namespace: default
Labels: app=wordpress
Hpecp.hpe.com/hpecp-internal-gateway=true
Annotations: hpecp-internal-gateway/80: mip.storage.enterprise.net:10006
Selector: app=wordpress,tier=frontend
Type: NodePort
IP: 10.96.35.129
Port: <unset> 80/TCP
TargetPort: 80/TCP
NodePort: <unset> 31589/TCP
Endpoints: 10.244.1.18:80
Session Affinity: None
External Traffic Policy: Cluster
Events:
Type Reason Age From Message
---- ------ ---- ---- -------
Normal Service 12m kubedirector Created HPECP K8S service
The WordPress service is restored.
- Finally, you will need to delete the entire deployment in order to free up all of the resources, including the persistent storage.
> kubectl delete -k ./
secret "mysql-pass-9tt65k5fgm" deleted
service "wordpress-mysql" deleted
service "wordpress" deleted
deployment.apps "wordpress-mysql" deleted
deployment.apps "wordpress" deleted
persistentvolumeclaim "mysql-pv-claim" deleted
persistentvolumeclaim "wp-pv-claim" deleted
# Appendix
# Simulating an air gap environment
- Update a dummy gateway IP address in either of the following files
> vi /etc/sysconfig/network/ifcfg-eth0
> vi /etc/sysconfig/network/ifroute-eth0
- Restart the network
> systemctl restart network
- Validate if the server is disconnected to internet or not
> curl api.ipify.org
This command provides the external facing IP address of the server in the event server is connected to the internet
# SUSE RMT server
This section provides a detailed list of SUSE RPMs required for bringing up the HPECP setup on SUSE Linux SP2 in an airgap environment.
# SUSE products and extensions overview
| ID | Product | Mandatory | Mirror ? |
|---|---|---|---|
| 4450 | SLE-15-SP2-Desktop-NVIDIA-Driver for | Mandatory | Mirror |
| 4001 | SLE-Module-Basesystem15-SP2-Pool for sle-15-x86_64 | Mandatory | Mirror |
| 3999 | SLE-Module-Basesystem15-SP2-Updates for sle-15-x86_64 | Mandatory | Mirror |
| 4098 | SLE-Module-Containers15-SP2-Pool for sle-15-x86_64 | Mandatory | Mirror |
| 4096 | SLE-Module-Containers15-SP2-Updates for sle-15-x86_64 | Mandatory | Mirror |
| 4118 | SLE-Module-Desktop-Applications15-SP2-Pool for sle-15-x86_64 | Mandatory | Mirror |
| 4116 | SLE-Module-Desktop-Applications15-SP2-Updates for sle-15-x86_64 | Mandatory | Mirror |
| 4138 | SLE-Module-DevTools15-SP2-Pool for sle-15-x86_64 | Mandatory | Mirror |
| 4136 | SLE-Module-DevTools15-SP2-Updates for sle-15-x86_64 | Mandatory | Mirror |
| 4173 | SLE-Module-HPC15-SP2-Pool for sle-15-x86_64 | Mandatory | Mirror |
| 4171 | SLE-Module-HPC15-SP2-Updates for sle-15-x86_64 | Mandatory | Mirror |
| 4193 | SLE-Module-Legacy15-SP2-Pool for sle-15-x86_64 | Mandatory | Mirror |
| 4191 | SLE-Module-Legacy15-SP2-Updates for sle-15-x86_64 | Mandatory | Mirror |
| 4033 | SLE-Module-Packagehub-Subpackages15-SP2-Pool for sle-15-x86_64 | Mandatory | Mirror |
| 4030 | SLE-Module-Packagehub-Subpackages15-SP2-Updates for sle-15-x86_64 | Mandatory | Mirror |
| 4223 | SLE-Module-Public-Cloud15-SP2-Pool for sle-15-x86_64 | Mandatory | Mirror |
| 4221 | SLE-Module-Public-Cloud15-SP2-Updates for sle-15-x86_64 | Mandatory | Mirror |
| 4243 | SLE-Module-Python2-15-SP2-Pool for sle-15-x86_64 | Mandatory | Mirror |
| 4241 | SLE-Module-Python2-15-SP2-Updates for sle-15-x86_64 | Mandatory | Mirror |
| 4058 | SLE-Module-Server-Applications15-SP2-Pool for sle-15-x86_64 | Mandatory | Mirror |
| 4056 | SLE-Module-Server-Applications15-SP2-Updates for sle-15-x86_64 | Mandatory | Mirror |
| 4163 | SLE-Module-Web-Scripting15-SP2-Pool for sle-15-x86_64 | Mandatory | Mirror |
| 4161 | SLE-Module-Web-Scripting15-SP2-Updates for sle-15-x86_64 | Mandatory | Mirror |
| 4078 | SLE-Product-HA15-SP2-Pool for sle-15-x86_64 | Mandatory | Mirror |
| 4076 | SLE-Product-HA15-SP2-Updates for sle-15-x86_64 | Mandatory | Mirror |
| 3934 | SLE-Product-HPC-15-SP2-Pool for sle-15-x86_64 | Mandatory | Mirror |
| 3932 | SLE-Product-HPC-15-SP2-Updates for sle-15-x86_64 | Mandatory | Mirror |
| 3939 | SLE-Product-SLED15-SP2-Pool for sle-15-x86_64 | Mandatory | Mirror |
| 3937 | SLE-Product-SLED15-SP2-Updates for sle-15-x86_64 | Mandatory | Mirror |
| 3963 | SLE-Product-SLES15-SP2-Pool for sle-15-x86_64 | Mandatory | Mirror |
| 3960 | SLE-Product-SLES15-SP2-Updates for sle-15-x86_64 | Mandatory | Mirror |
| 4278 | SLE-Product-WE15-SP2-Pool for sle-15-x86_64 | Mandatory | Mirror |
| 4276 | SLE-Product-WE15-SP2-Updates for sle-15-x86_64 | Mandatory | Mirror |
| 3962 | SLE15-SP2-Installer-Updates for sle-15-x86_64 | Mandatory | Mirror |
| 4923 | SUSE-CAASP-4.5-Pool for sle-15-x86_64 | Mandatory | Mirror |
| 4921 | SUSE-CAASP-4.5-Updates for sle-15-x86_64 | Mandatory | Mirror |
| 4028 | SUSE-PackageHub-15-SP2-Backports-Pool for sle-15-x86_64 | Mandatory | Mirror |
| 4032 | SUSE-PackageHub-15-SP2-Pool for sle-15-x86_64 | Mandatory | Mirror |