# Securing Red Hat OpenShift Container Platform using Sysdig Secure and
Sysdig Monitor
DESCRIPTION
This section contains Ansible playbooks to automate the installation of sysdig agents over the Red Hat OpenShift 4.10 Cluster. The contents of the repository includes the playbooks and input files as listed.
playbooks: This folder contains the playbook required for Sysdig agent installation over OCP 4.10.
roles: This folder contains a role called “sysdig-agent-deploy-ocp” which is responsible for performing the actions required for Sysdig agent integration.
hosts: This is the host file which will be used by Ansible installer machine to reference localhost during Sysdig agent deployment.
secrets.yml: This file contains sensitive information about the Sysdig SaaS platform access details and Red Hat OpenShift cluster access details.
Prerequisites
Ansible engine with Ansible 2.9.x and Python 3.6.x
Red Hat OpenShift 4.10 is up and running
User has SaaS-based access to Sysdig Secure and Sysdig Monitor for the purpose of container security
User has “admin rights and privilege” for Sysdig Secure and Sysdig Monitor
User has valid access token that is given by Sysdig and is specific to their credentials on Sysdig SaaS platform
User has updated the kernel to ensure that all the nodes have same kernel version. Information regarding this can be found by logging into Sysdig monitor account. Go to setting and under Agent Installation, you will find instructions to install the kernel headers
Enable password-less ssh from OpenShift installer machine to itself (OpenShift installer machine or localhost)
Create password-less ssh to installer VM by generating the ssh key
$ ssh-keygen
NOTE
Press enter to overwrite the id_rsa.pub file and also press enter for empty password.
Copy the ssh key to ~/id_rsa.pub file using following command
$ ssh-copy-id -i ~/.ssh/id_rsa.pub nonrootusername@ansible_engine_machine_ip
Software requirements
Software Version
Sysdig SaaS Agent 10.1.1
Input files
- Playbook for Sysdig SaaS integration with RedHat OpenShift Container Platform are available under $BASE_DIR/platform/security-sysdig/
NOTE
BASE_DIR is defined and set in [installer machine] section in deployment guide.
It is mandatory to update all the input files (hosts, secrets.yml, sysdig-agent-configmap.yaml) with appropriate values before running the playbook available in this repository
Input file name - hosts
This file is an inventory of host details
This file is available under $BASE_DIR/platform/security-sysdig/
Specify the Ansible engine machine IP as the value of the variable
[ocp_installer_machine_ip]
Input file name - sysdig-agent-configmap.yaml
This file is available under $BASE_DIR/platform/security-sysdig/roles/sysdig-agent-deploy-ocp/files/.
Provide the Sysdig SaaS Platform Address and Port Number along with Red Hat OpenShift cluster name to the variables as listed :
collector: <sysdig_saas_collector_address>

collector_port: <collector_port>

k8s_cluster_name: <replace_with_ocp_cluster_name>
Input file name - secrets.yml
This file is available under $BASE_DIR/platform/security-sysdig/
Provide value of project name for Sysdig integration with OpenShift Container Platform. This project will be created in OpenShift
Provide the access key or token value. You must get this value from user setting by logging into either Sysdig Secure or Sysdig Monitor GUI
Provide Red Hat OpenShift username and password to login
projectname: <sysdig_project_name>

accesskeyval: <sysdig_saas_access_key>

ocpuser: <RedHat_OpenShift_User_Name>

ocppassword: <RedHat_OpenShift_User_Password>
Input file name - sysdig-agent-deployment.yaml
This file is available under $BASE_DIR/platform/security-sysdig/playbooks/
Update the KUBECONFIG and oc command path
KUBECONFIG: <replace_with_kubeconfig_path > PATH:
<replace_with_ocp_installation_dir_path > { ansible_env.PATH }
Procedure to deploy automated Sysdig SaaS agents on Red Hat OpenShift Container Platform cluster
- Execute the following commands from the Ansible installer VM in the
python virtual environment root user
$ cd $BASE_DIR/platform/security-sysdig/
$ ansible-playbook -i hosts playbooks/sysdig-agent-deployment.yaml --ask-vault-pass
NOTE
BASE_DIR is defined in [installer machine] section in deployment guide.
- Verification of Sysdig agent deployment on Red Hat OpenShift cluster nodes after successful execution of the playbook. Run the command listed below to get the information on Sysdig pods
$ oc get pods | grep sysdig-agent
NOTE
Number of sysdig pods should be equal to number of nodes that user sees after running the following command:
$ oc get nodes
- Output of above command shows number of nodes in the Red HatOpenShift cluster
NAME STATUS ROLES AGE VERSION

master0.ocp.isv.local Ready master,worker 13d v1.23.3+e419edf

master1.ocp.isv.local Ready master,worker 13d v1.23.3+e419edf

master2.ocp.isv.local Ready master,worker 13d v1.23.3+e419edf

worker1.ocp.isv.local Ready worker 23h v1.23.5+3afdacb

worker2.ocp.isv.local Ready worker 23h v1.23.5+3afdacb

worker3.ocp.isv.local Ready worker 23h v1.23.5+3afdacb
Verification using Sydig GUI
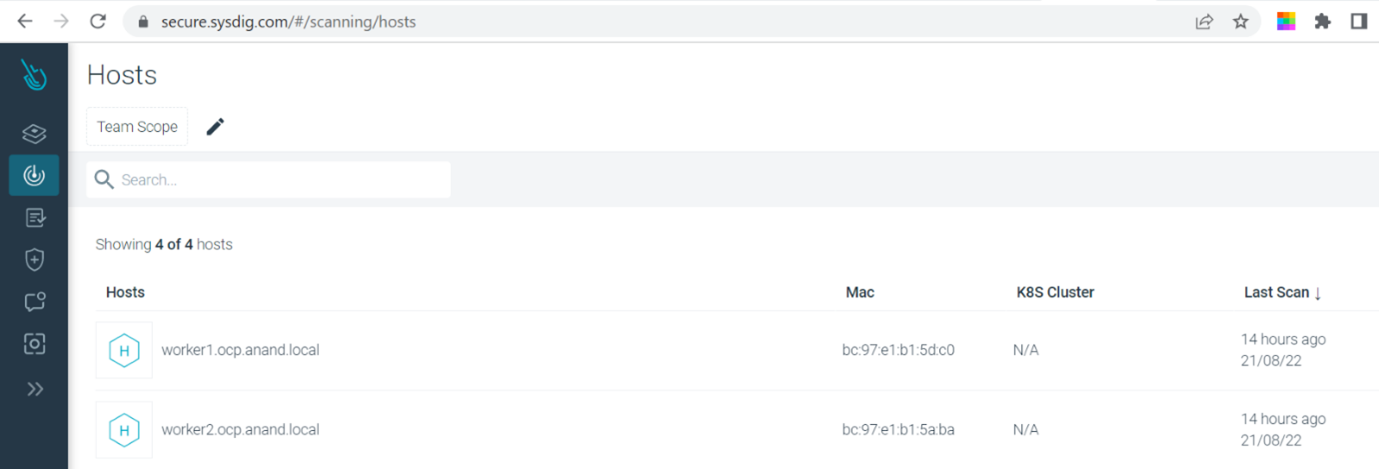
- Login to Sysdig Secure and under Policy Events –> Hosts and Containers –> user will find all the nodes that are part of your Red Hat OpenShift infra and this shows Sysdig agents are successfully installed and security checks are being run on all those nodes.

FIGURE 24 - Monitoring Red Hat OpenShift cluster nodes using Sysdig Monitor GUI