OpenShift Virtualization
Install and Configure Openshift Virtulization
Introduction
RedHat OpenShift Virtualization stands as a cornerstone of Red Hat's OpenShift Container Platform, seamlessly blending virtual machines and containers to offer a unified management interface. This integration empowers organizations to efficiently deploy both modern and traditional applications, encompassing virtual machines, containers, and serverless functions within a single platform. Built upon the "container-native virtualization" concept, driven by the KubeVirt project, it harnesses the RHEL KVM hypervisor to seamlessly merge virtual machines with Kubernetes and KubeVirt for streamlined management and orchestration. Through this infrastructure, OpenShift Virtualization enables the coexistence of virtual machines and containers within a Kubernetes environment, providing a cohesive solution for workload management.
OpenShift Virtualization adds new objects into your OpenShift Container Platform cluster via Kubernetes custom resources to enable virtualization tasks. These tasks include:
Creating and managing Linux and Windows virtual machines
Connecting to virtual machines through a variety of consoles and CLI tools
Importing and cloning existing virtual machines
Managing network interface controllers and storage disks attached to virtual machines
Live migrating virtual machines between nodes
An enhanced web console provides a graphical portal to manage these virtualized resources alongside the OpenShift Container Platform cluster containers and infrastructure.
OpenShift Virtualization is tested with OpenShift Data Foundation (ODF) and Alletra MP Storage.
OpenShift Virtualization allows the usage with either the [OVN-Kubernetes] (opens new window)or the [OpenShiftSDN] (opens new window)default Container Network Interface (CNI) network provider
Enabling OpenShift Virtualization
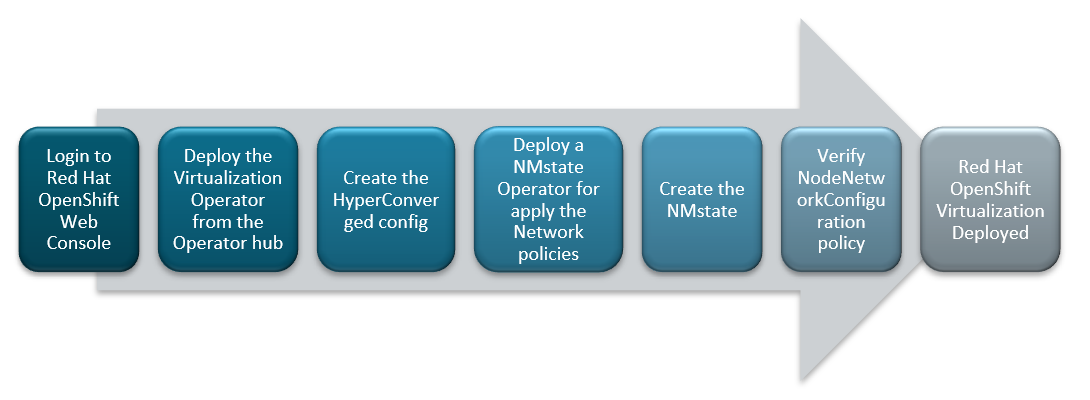
FIGURE 26. Red Hat OpenShift Virtualization deployment flow
Installing OpenShift Virtualization Operator from OperatorHub
Log into the OpenShift Container Platform web console and navigate to Ecosystem → Software Catalog.
Select an existing project name or create new project.
Type OpenShift Virtualization and Select OpenShift Virtualization tile
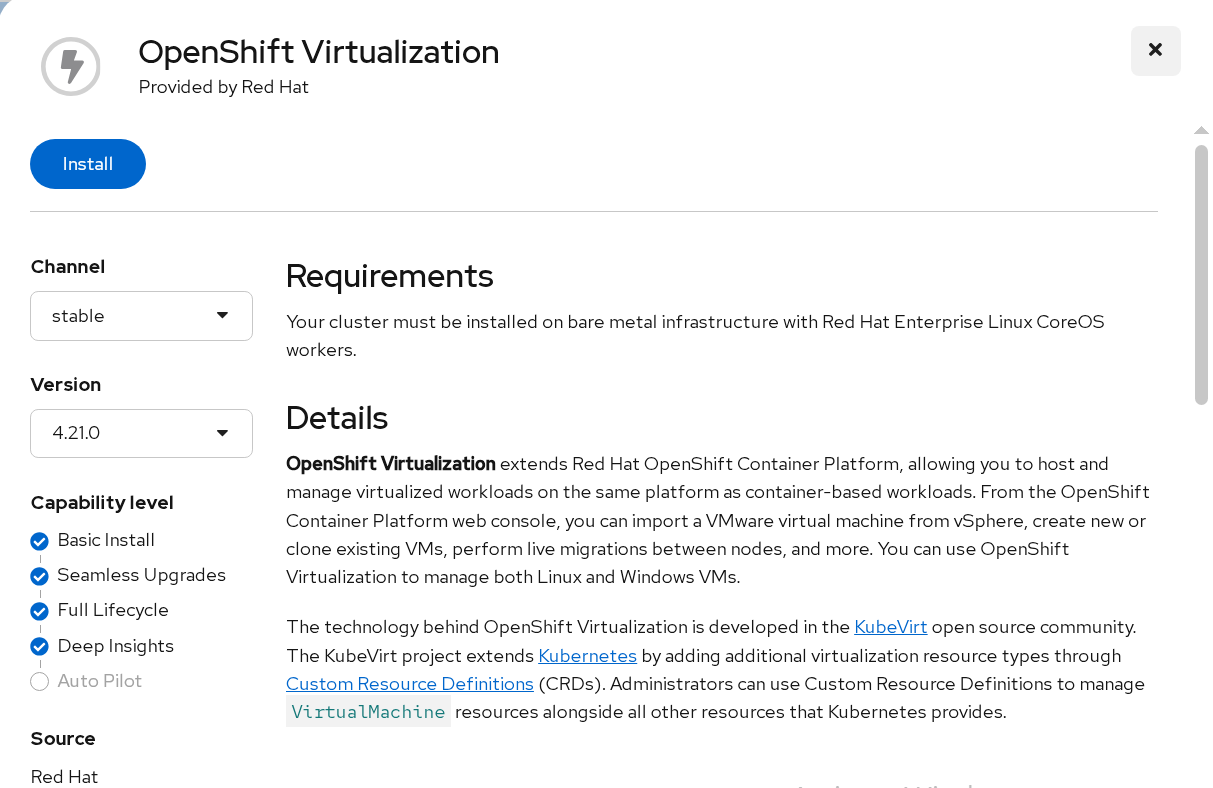
FIGURE 27. OpenShift Virtualization in Software Catalog
- Click and Install the Operator to the "openshift-cnv" namespace
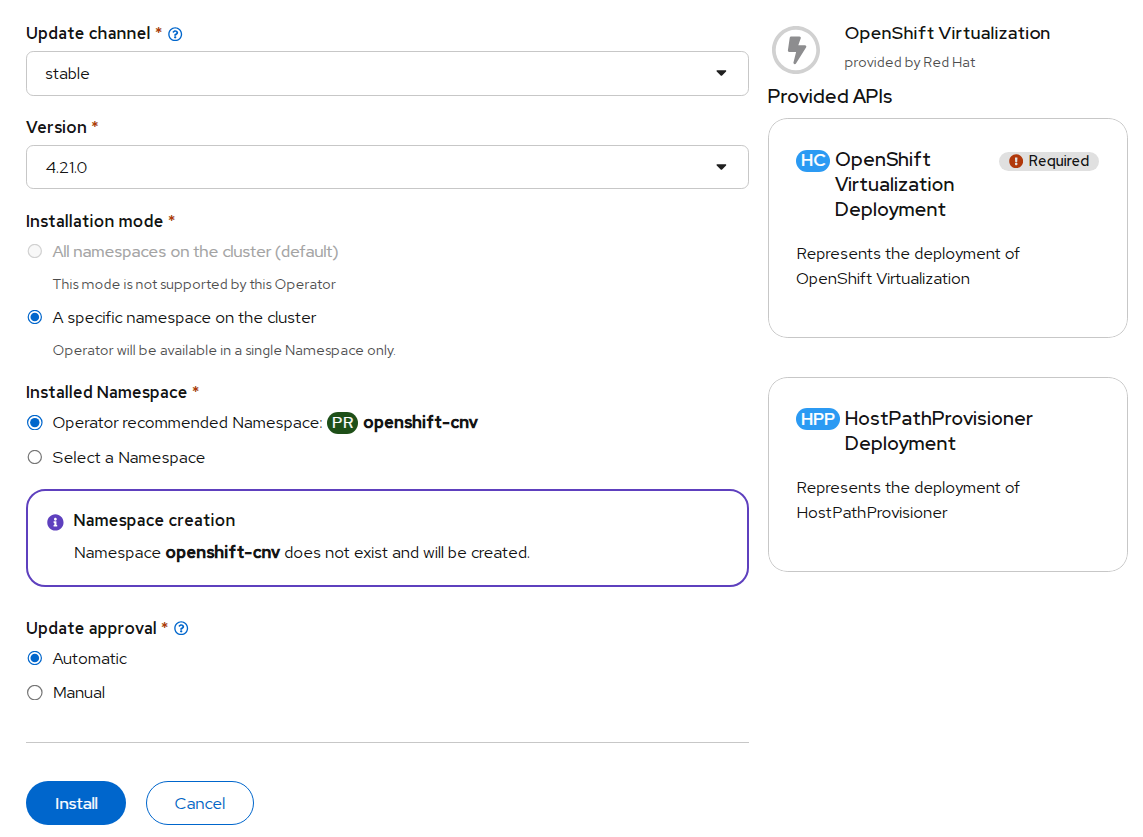
FIGURE 28. Inputs for the OpenShift Virtualization operator
- Once OpenShift Virtualization is successfully installed , Create HyperConverged Custom resource
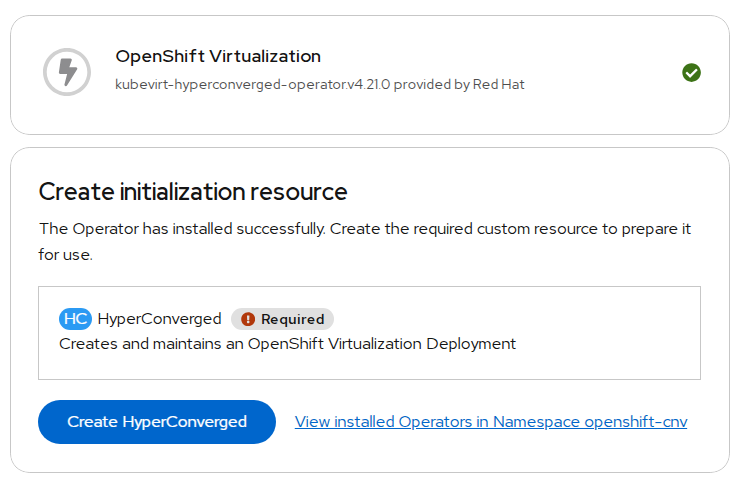
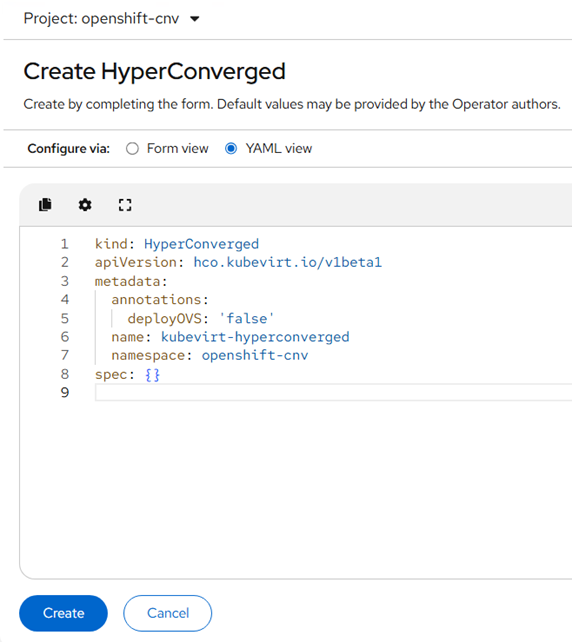
FIGURE 29. Creation of HyperConverged in OpenShift Virtualization operator
After successful deployment of operator and creation of HyderConverged. Virtualization will be enabled in webconsole.
Network configuration
You would have internal pod network as default network after successful deployment of OpenShift Virtualization. For additional network, we would deploy the network operator "NMState Operator" and configure Linux bridge network for external VM access and live migration.
Administrators can also install SR-IOV Operator to manage SR-IOV network devices and MetalLB Operator for lifecycle management.
Configuring a Linux bridge Network
To install NMState Operator, navigate to Ecosystem → Software Catalog in webconsole.
Select an existing project name or create new project.
Type NMState, Select Kubernetes NMState Operator tile and Install the Operator
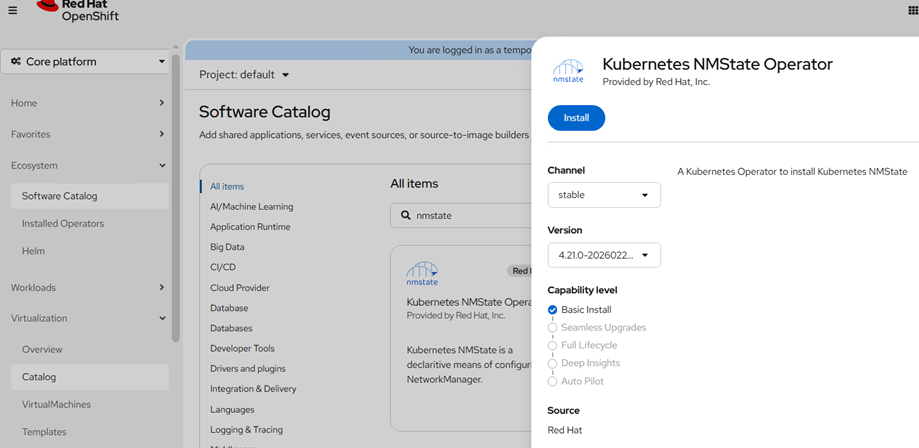
FIGURE 30. Installation of NMState in OperatorHub
- Once the NMState operator is installed, Create a instance for "nmstate"
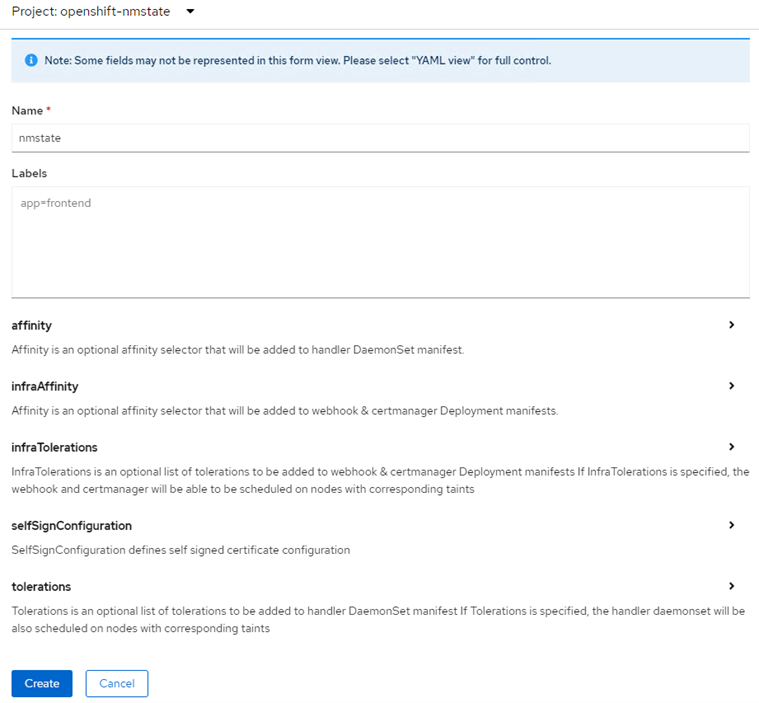
FIGURE 31. Inputs for NMState in operator
Creating a Linux bridge NNCP
Create a NodeNetworkConfigurationPolicy (NNCP) manifest for a Linux bridge network for network interface card(enp1s0) and apply the created NNCP manifest
- Click on Networking > NodeNetworkConfigurationPolicy > Click on create with yaml and add below content.
apiVersion: nmstate.io/v1
kind: NodeNetworkConfigurationPolicy
metadata:
  name: br-ex-network
spec:
  nodeSelector:
    node-role.kubernetes.io/worker: ""
  desiredState:
    ovn:
      bridge-mappings:
      - bridge: br-ex
        localnet: br-ex-network
        state: present
- Click on Create.
Creating a Linux bridge NAD
A NetworkAttachmentDefinition allows VMs to connect to secondary networks using Multus.
Log in to the OpenShift Container Platform web console and click Networking → NetworkAttachmentDefinitions
Click Create Network Attachment Definition (NAD). And provide the required details
Click the Network Type list and select OVN Kubernetes L2 overlay network
Enter the name of the bridge (Previously created NodeNetworkConfigurationPolicy object as interfaces name ex: bridge-ex-network) in the Bridge Name field
Click Create
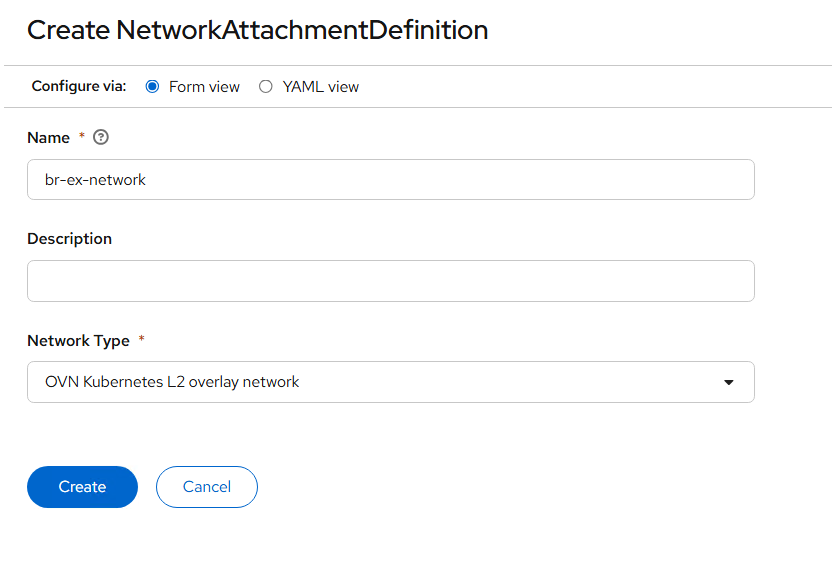
FIGURE 32. Creation of NAD
Creating a dedicated network for live migration
- Administrators have to create additional NAD for creating a dedicated live migration network. Create a NAD manifest as below
apiVersion: "k8s.cni.cncf.io/v1"
kind: NetworkAttachmentDefinition
metadata:
  name: migration-network
  namespace: openshift-cnv
spec:
  config: '{
    "cniVersion": "0.3.1",
    "name": "migration-bridge",
    "type": "macvlan",
    "master": "enp1s1",
    "mode": "bridge",
    "ipam": {
      "type": "whereabouts",
      "range": "20.0.0.0/24"
    }
  }'
- Goto the custom resource of Hydercoverged that was created during "OpenShift Virtualization" operator deployment and Specify the created network name for "spec.liveMigrationConfig"
apiVersion: hco.kubevirt.io/v1beta1
kind: HyperConverged
metadata:
  name: kubevirt-hyperconverged
spec:
  liveMigrationConfig:
    completionTimeoutPerGiB: 800
    network: migration-network  #specify migration network name
    parallelMigrationsPerCluster: 5
    parallelOutboundMigrationsPerNode: 2
    progressTimeout: 150
Create a virtual machine
The web console features an interactive wizard that guides you through General, Networking, Storage, Advanced, and Review steps to simplify the process of creating virtual machines. All required fields are marked by a *. When the required fields are completed, you can review and create your virtual machine.
Network Interface Cards (NICs) and storage disks can be created and attached to virtual machines after they have been created.
Use one of these procedures to create a virtual machine:
Creating virtual machines from templates
Creating virtual machines from instance types
Creating virtual machines from CLI
Creating virtual machines from templates
You can create virtual machines from templates provided by Red Hat using web console. You can also create customized templates as per requirements.
- Log into the OpenShift Container Platform web console and navigate to Virtualization → Catalog → Template Catalog
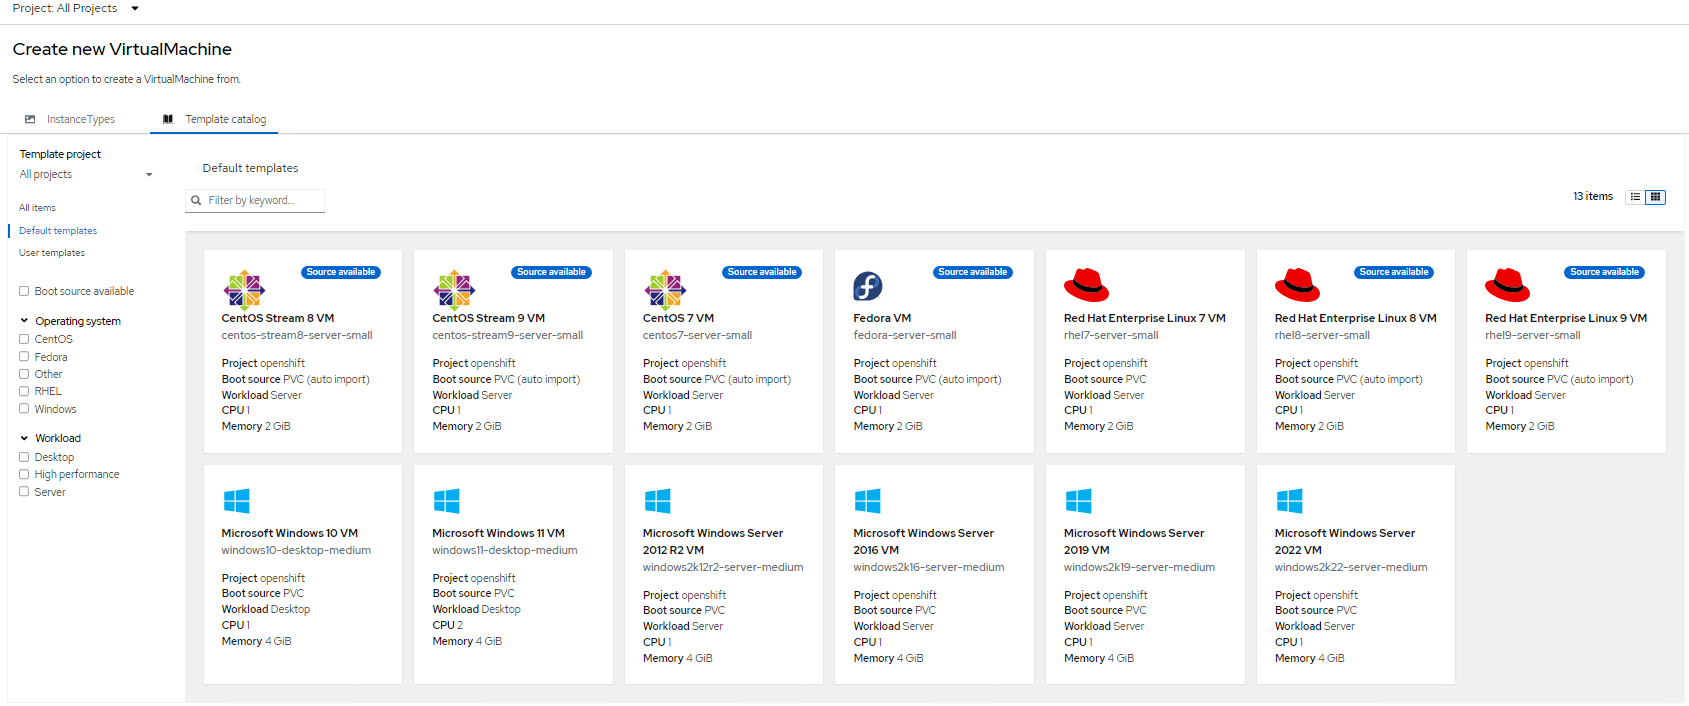
FIGURE 33. Templates available by default in Virtualization
- Click the required template to view the details (for example: rhel9)
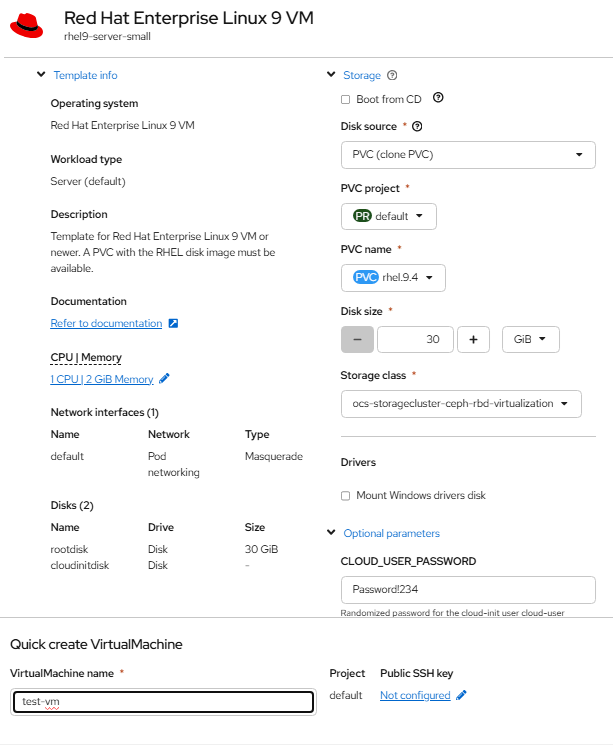
FIGURE 34. Sample deployment of RHEL VM using templates
- Click "Quick create VirtualMachine" to create a VM from the template. You can customize the CPU/Memory/Storage as required.
NOTE: If you want to assign Static IP, skip this step and follow the below steps
To assign a Static IP to VM follow the below steps:
- Click on customize configuration tab > Select Network interfaces > Add Network Interface with NAD created
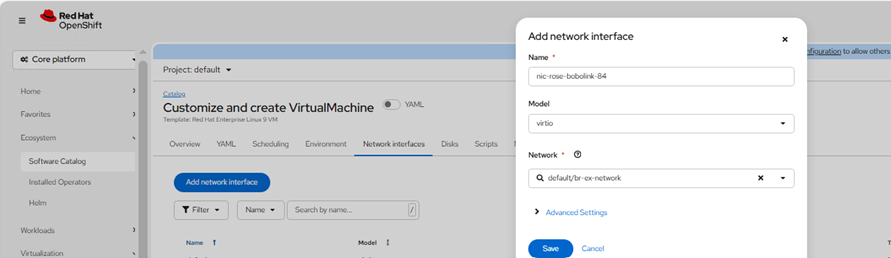
FIGURE 35. Adding Network Interface
- Click on create for VM creation and check the status of VM by selecting virtual machines > Select default namespace > Click on VM created
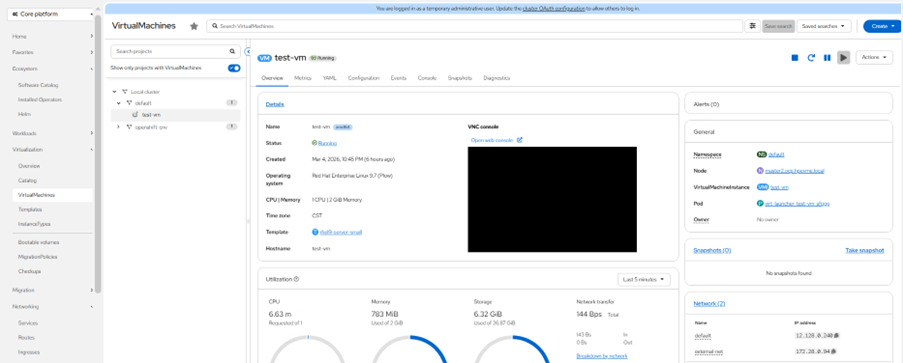
FIGURE 36. VM created
IP is assigned as shown below and we can ssh once VM is started after finished initial installation of rhel VM.
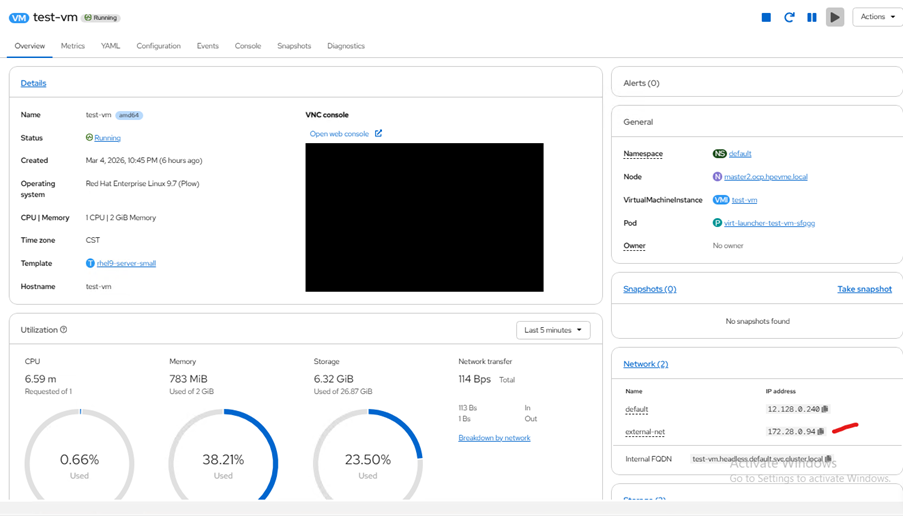
FIGURE 37. VM with a Static IP
Creating virtual machines from instance types
- Log into the OpenShift Container Platform web console and navigate to Virtualization → Catalog → Instance Types
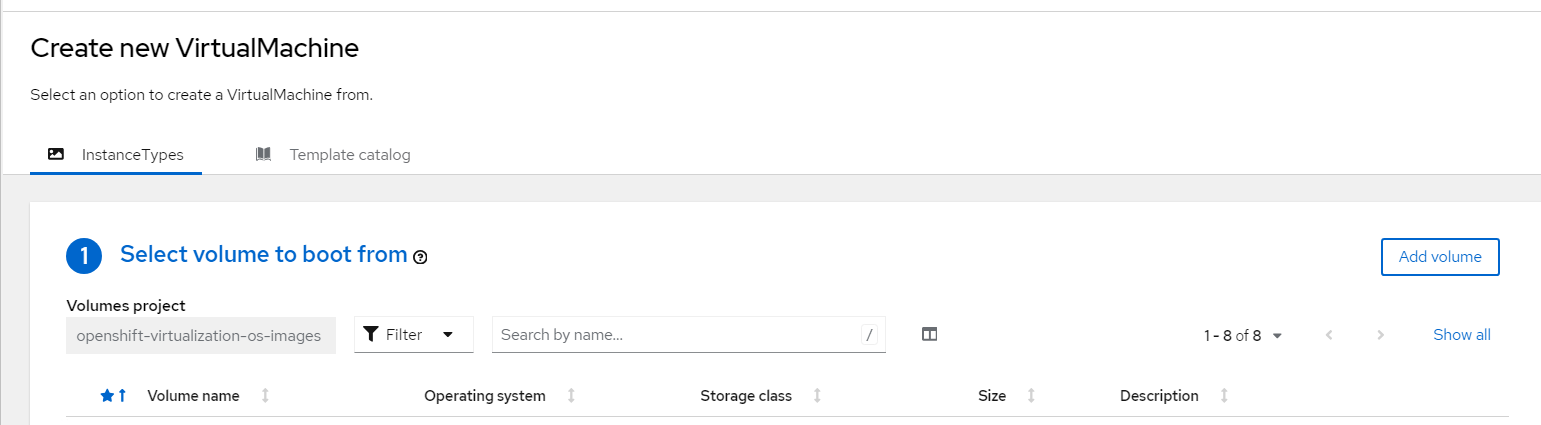
FIGURE 38. Virtual Machine creation from Catalog
Select the bootable volumes
- Images provided by RedHat, these images are available in "openshift-virtualization-os-images" namespace.
- Click Add Volume. You can either use any of the existing volume where you have the boot images or you can upload images and create a new volume(PVC) and provide the required parameter.
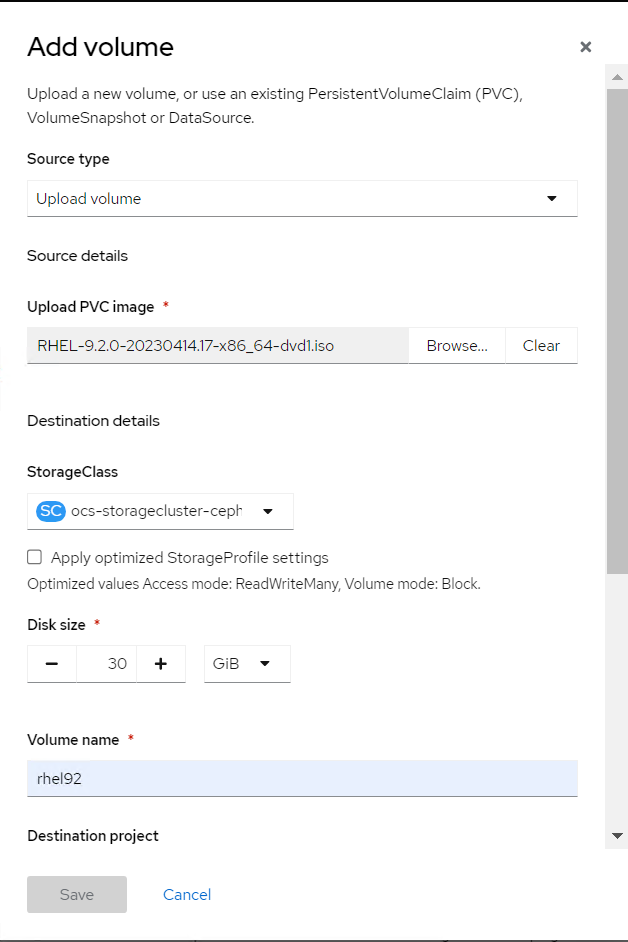
FIGURE 39. Add volumes to import OS images
Click the required boot volume.
Select the required Instance type
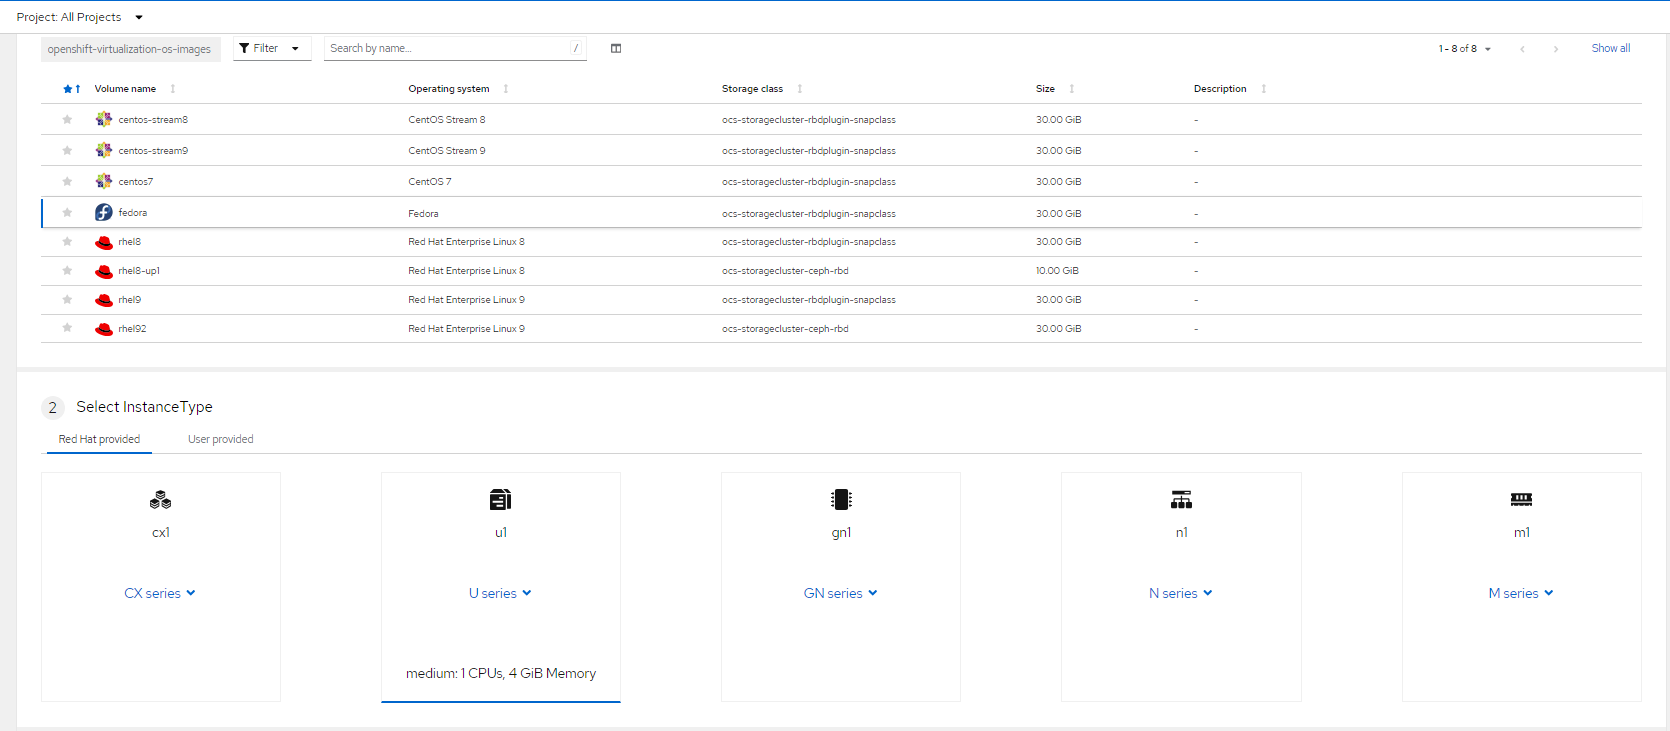
FIGURE 40. Selection of Instance type and boot image
- Click "Create VirtualMachine" to create a VM from the instance types.
You can Customize and create user Instance type as required by navigating to Virtualization → Instance Types → Create.
Creating virtual machines from CLI
- Create a VirtualMachine manifest required for creating a VM
Below is an example manifest for creating fedora VM
apiVersion: kubevirt.io/v1
kind: VirtualMachine
metadata:
  name: my-vm
spec:
  running: false
  template:
    metadata:
      labels:
        kubevirt.io/domain: my-vm
    spec:
      domain:
        devices:
          disks:
          - disk:
              bus: virtio
            name: containerdisk
          - disk:
              bus: virtio
            name: cloudinitdisk
        resources:
          requests:
            memory: 8Gi
      volumes:
      - name: containerdisk
        containerDisk:
          image: kubevirt/fedora-cloud-registry-disk-demo
      - name: cloudinitdisk
        cloudInitNoCloud:
          userData: |
            #cloud-config
            password: fedora
            chpasswd: { expire: False }
- Apply the created manifest file for virtual machine creation.
oc apply -f < file-name >.yaml
Reading/Viewing virtual machine
You can check the virtual machine status, Metrics , resources utilization (CPU, memory, storage) for overall cluster by navigate to Virtualization → Overview.
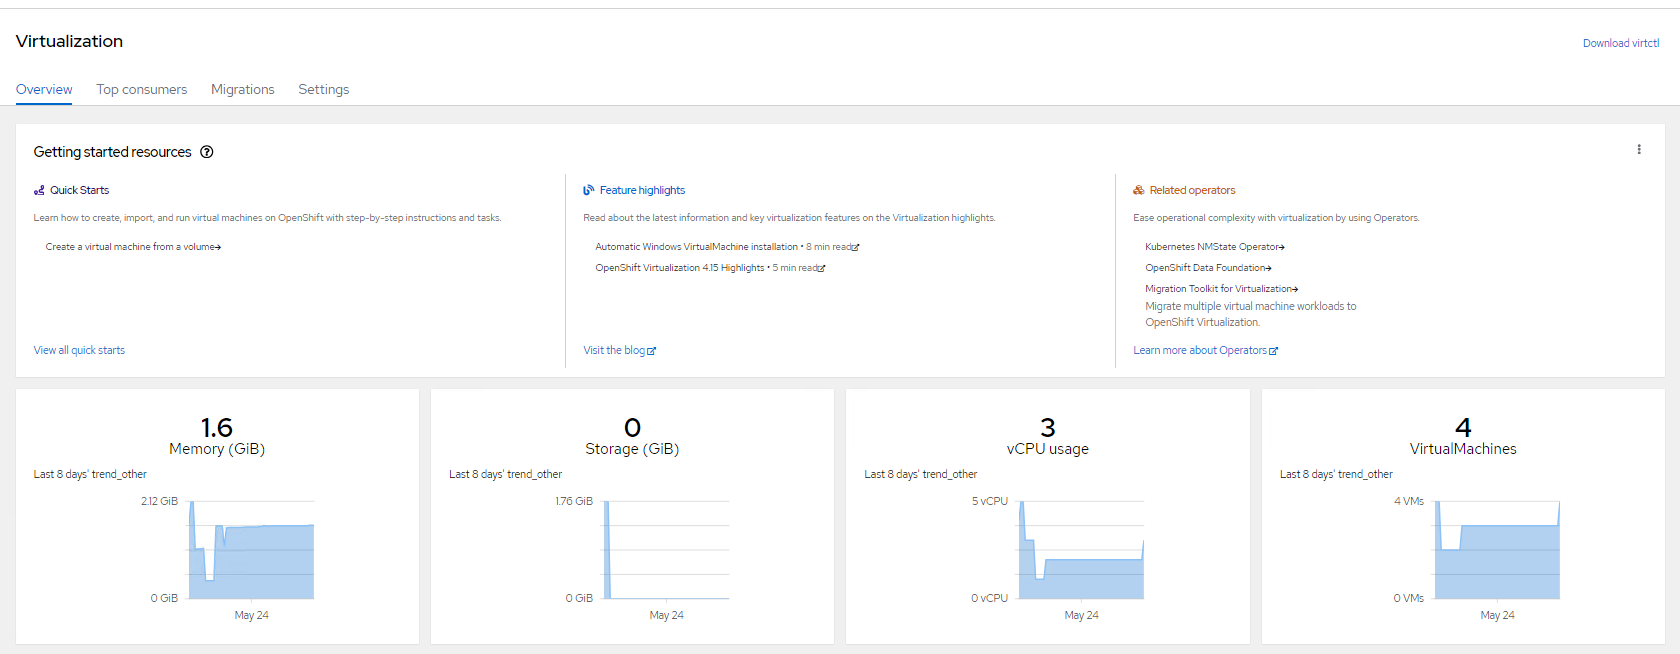
FIGURE 41. Overview Virtual machines in the Cluster
and access configuration details of VM's, networks and storage volumes.
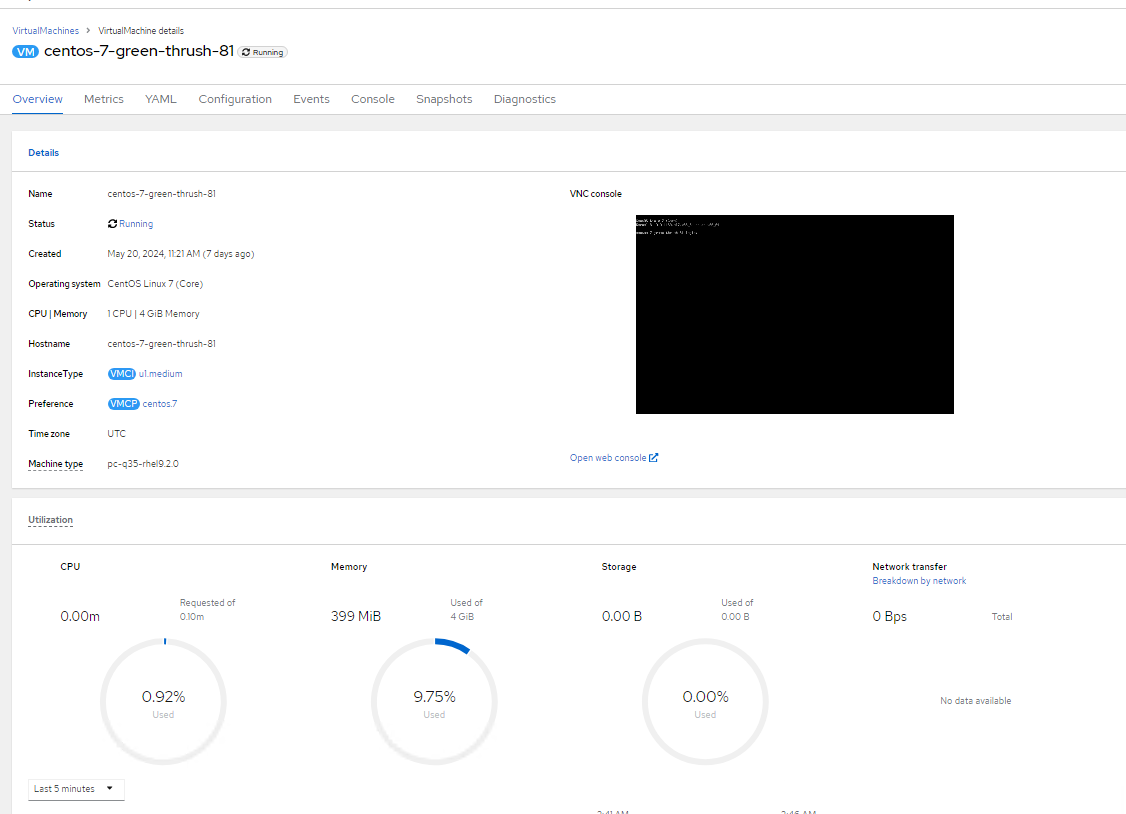
FIGURE 42. Overview of Sample Virtual machines deployed in the RHOCP platform
Updating a virtual machine
You can update virtual machine configuration using CLI or from the web console.
Virtual machine configuration using CLI
- Virtual machine configuration can be edit/updated
oc edit vm < vm-name > -n < namespace >
- Apply the updated configuration
oc apply vm < vm_name > -n < namespace >
Virtual machine configuration using web console
Log into the OpenShift Container Platform web console and navigate to Virtualization → VirtualMachines
Select the virtual machine For example: addition of the disk navigate to Configuration → Storage → Add disk
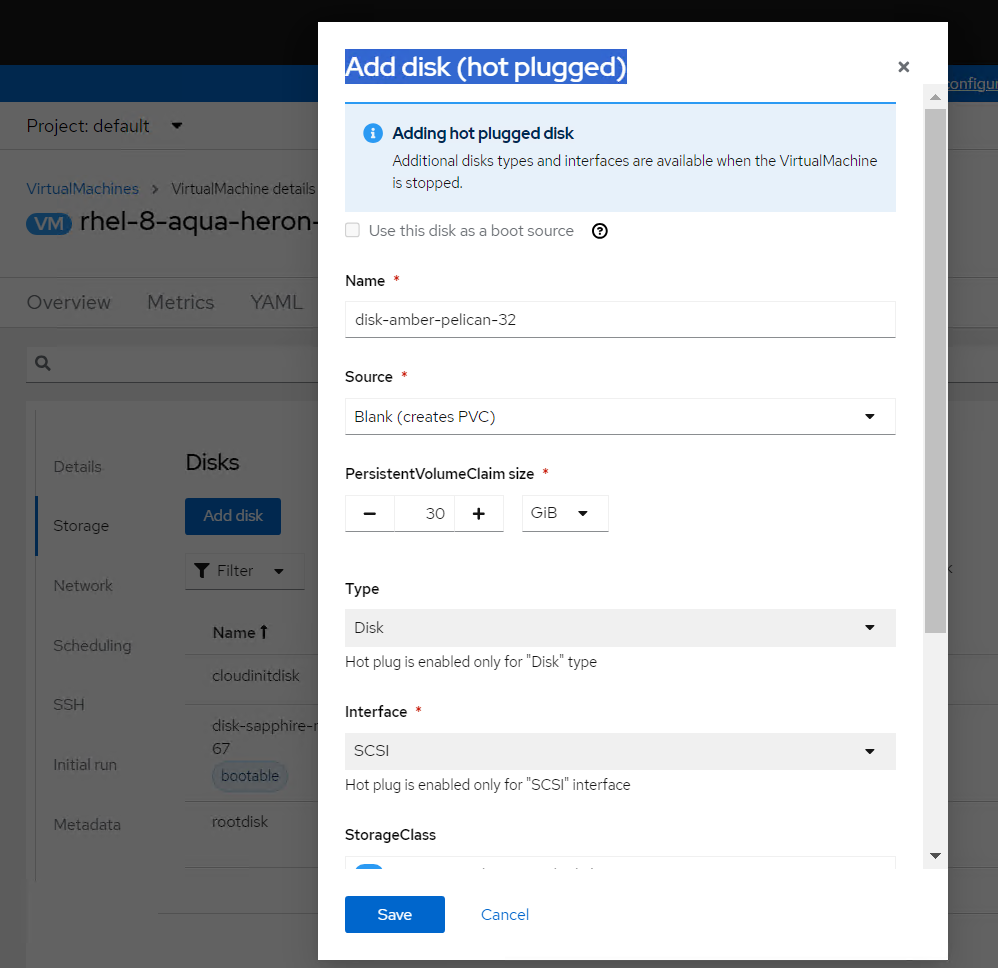
FIGURE 43. Storage disk addition
Specify the fields like Source, Size, Storage class as required
Click Add
We can add additional networks, secrets, config map to virtual machines.
Some of the changes are applied once the virtual machine are restarted only. For restarting of any virtual machines navigate to
Virtualization → VirtualMachines
Click the Options menu  beside a virtual machine name.
Select Restart or select the virtual machine → Actions → Restart
Deleting a virtual machine
You can delete a virtual machine by using CLI or from the web console.
Delete a virtual machine using CLI
- Delete the virtual machine by executing the below command:
oc delete vm < vm_name > -n < namespace >
Delete a virtual machine using web console
Log into the OpenShift Container Platform web console and navigate to Virtualization → VirtualMachines
Click the Options menu
beside a virtual machine name and select Delete or Select the virtual machine → Actions → Delete
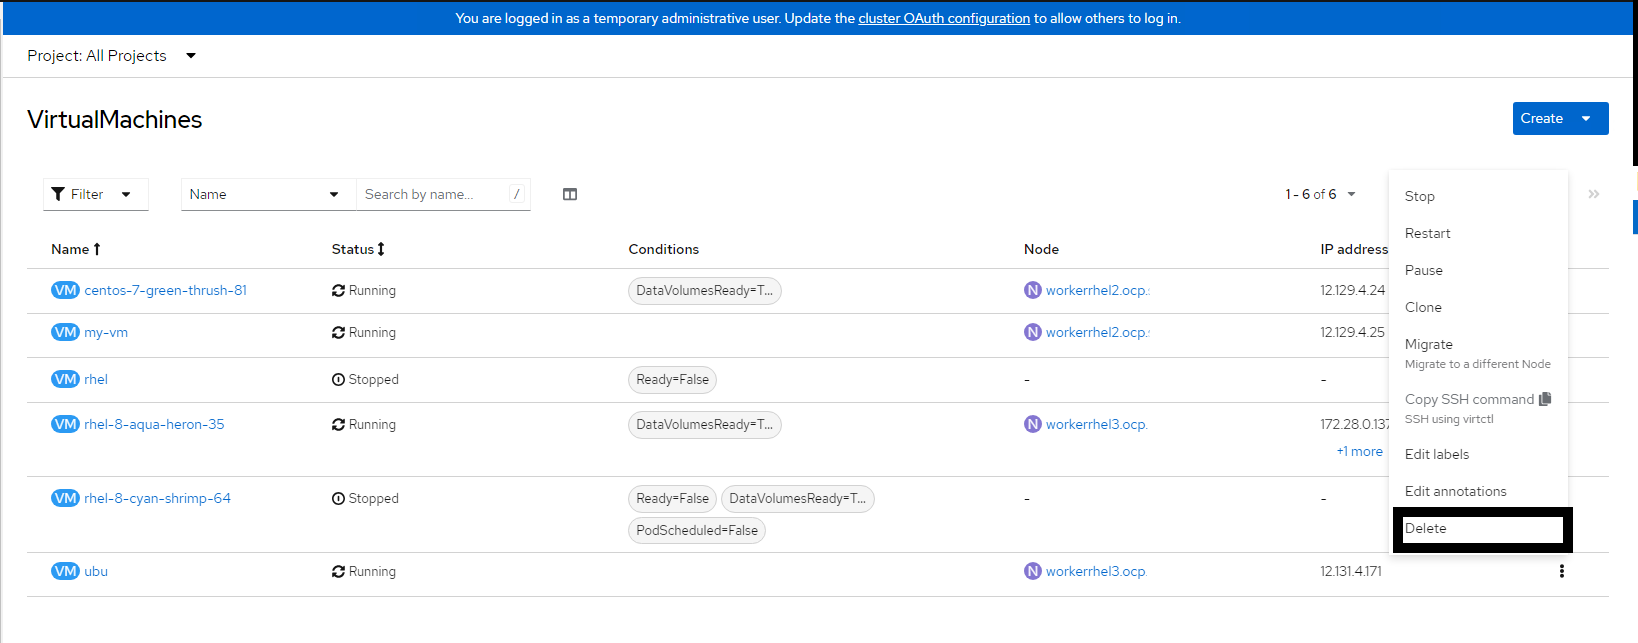
FIGURE 44. Deleting a Virtual Machine
Deploying Virtual Machines on UserDefinedNetworks (UDN)
Introduction
UserDefinedNetworks (UDN) provide a way to create isolated network environments for workloads within a namespace. When virtual machines are deployed on a UDN, they receive IP addresses from the defined subnet and operate within that isolated network. This enables better network segmentation, security, and multi-tenant workload separation.
Prerequisites
OpenShift Virtualization Operator must be installed.
Creating Namespace with UDN Label
Navigate to Administration → Namespaces.
Click Create Namespace.
Add the following label while creating the namespace:
k8s.ovn.org/primary-user-defined-network=""
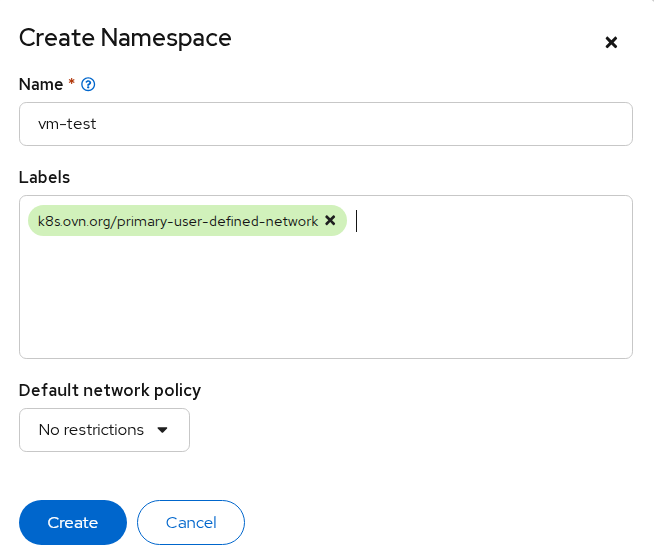
FIGURE 45. Create a new namespace
- Click Create.
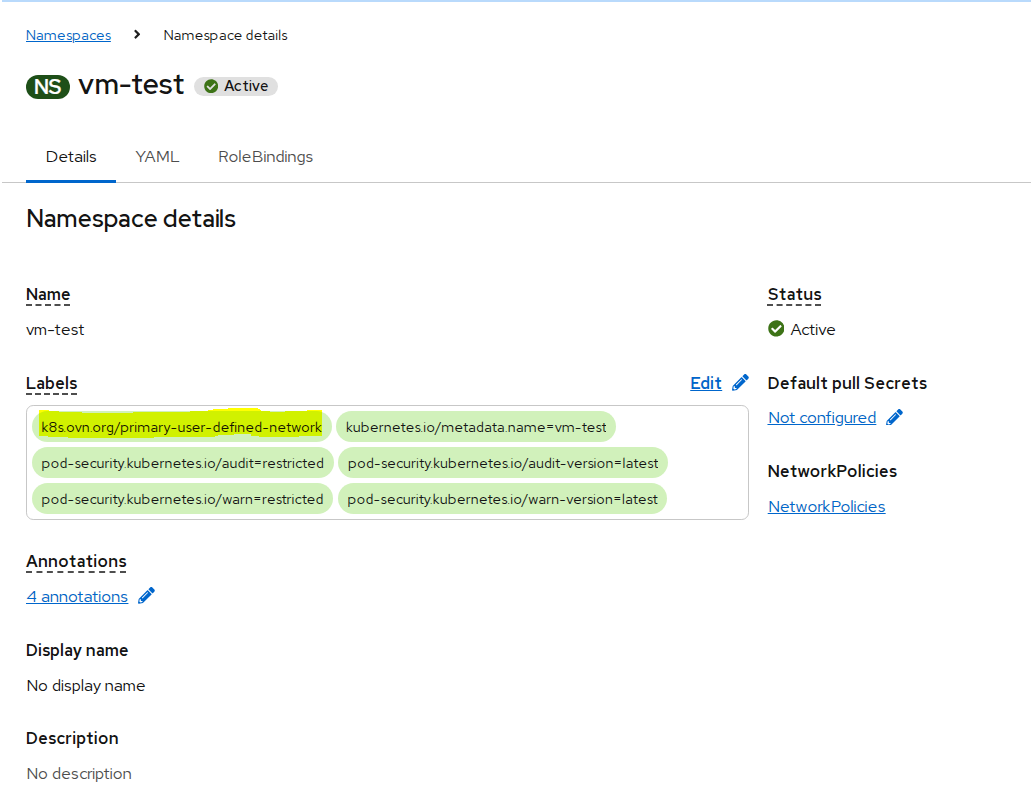
FIGURE 46. Namespace created with label
Creating UserDefinedNetwork
Navigate to Networking → User Defined Networks.
Click Create.
In the Create User Defined Network dialog:
Select the newly created namespace as the Project
Provide the Subnet CIDR
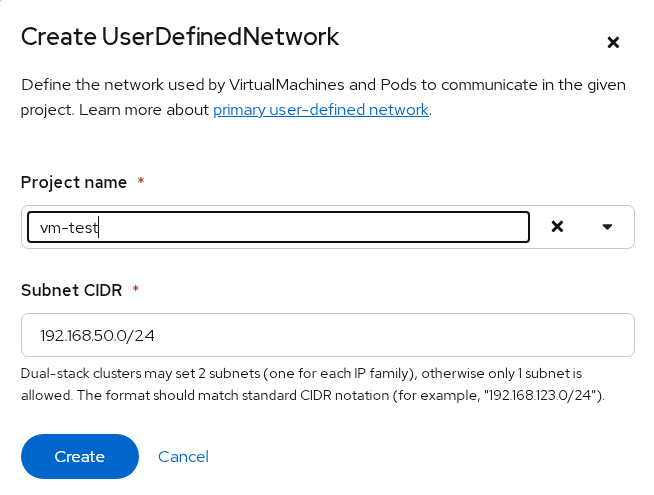
FIGURE 47. Creating a UDN for namespace
- Click Create.
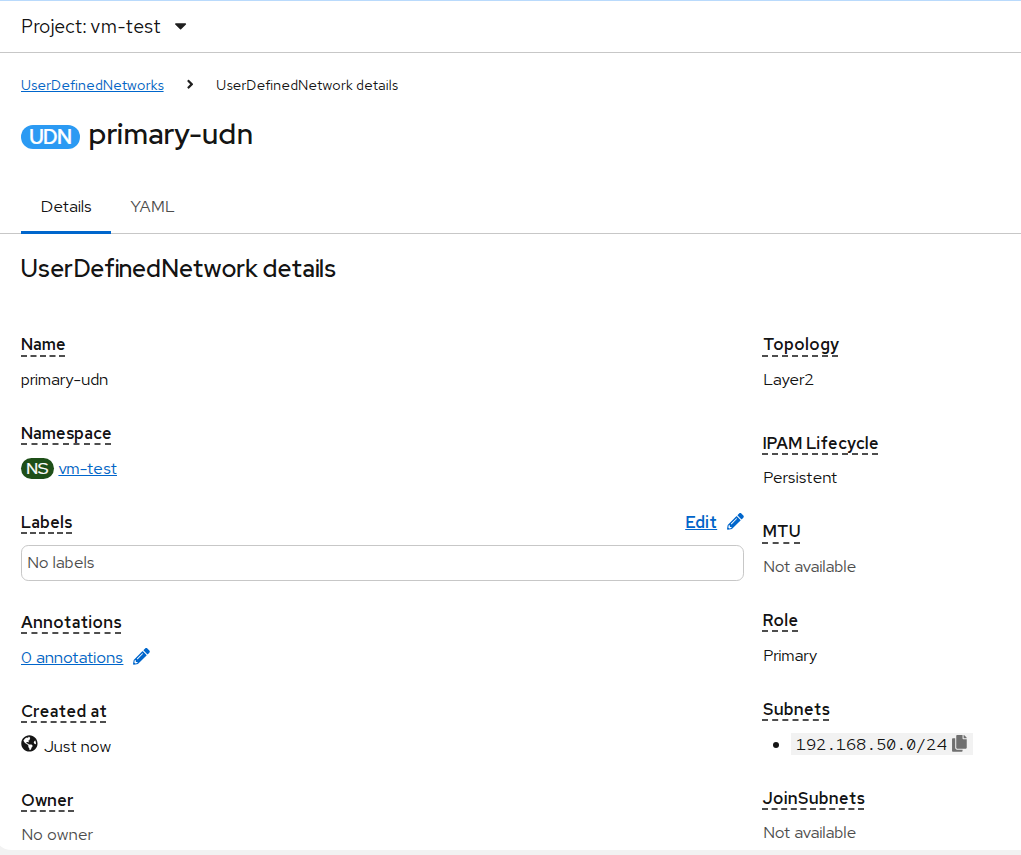
FIGURE 48. Created UDN
Creating Virtual Machine on UDN
- Navigate to Virtualization → VirtualMachines.
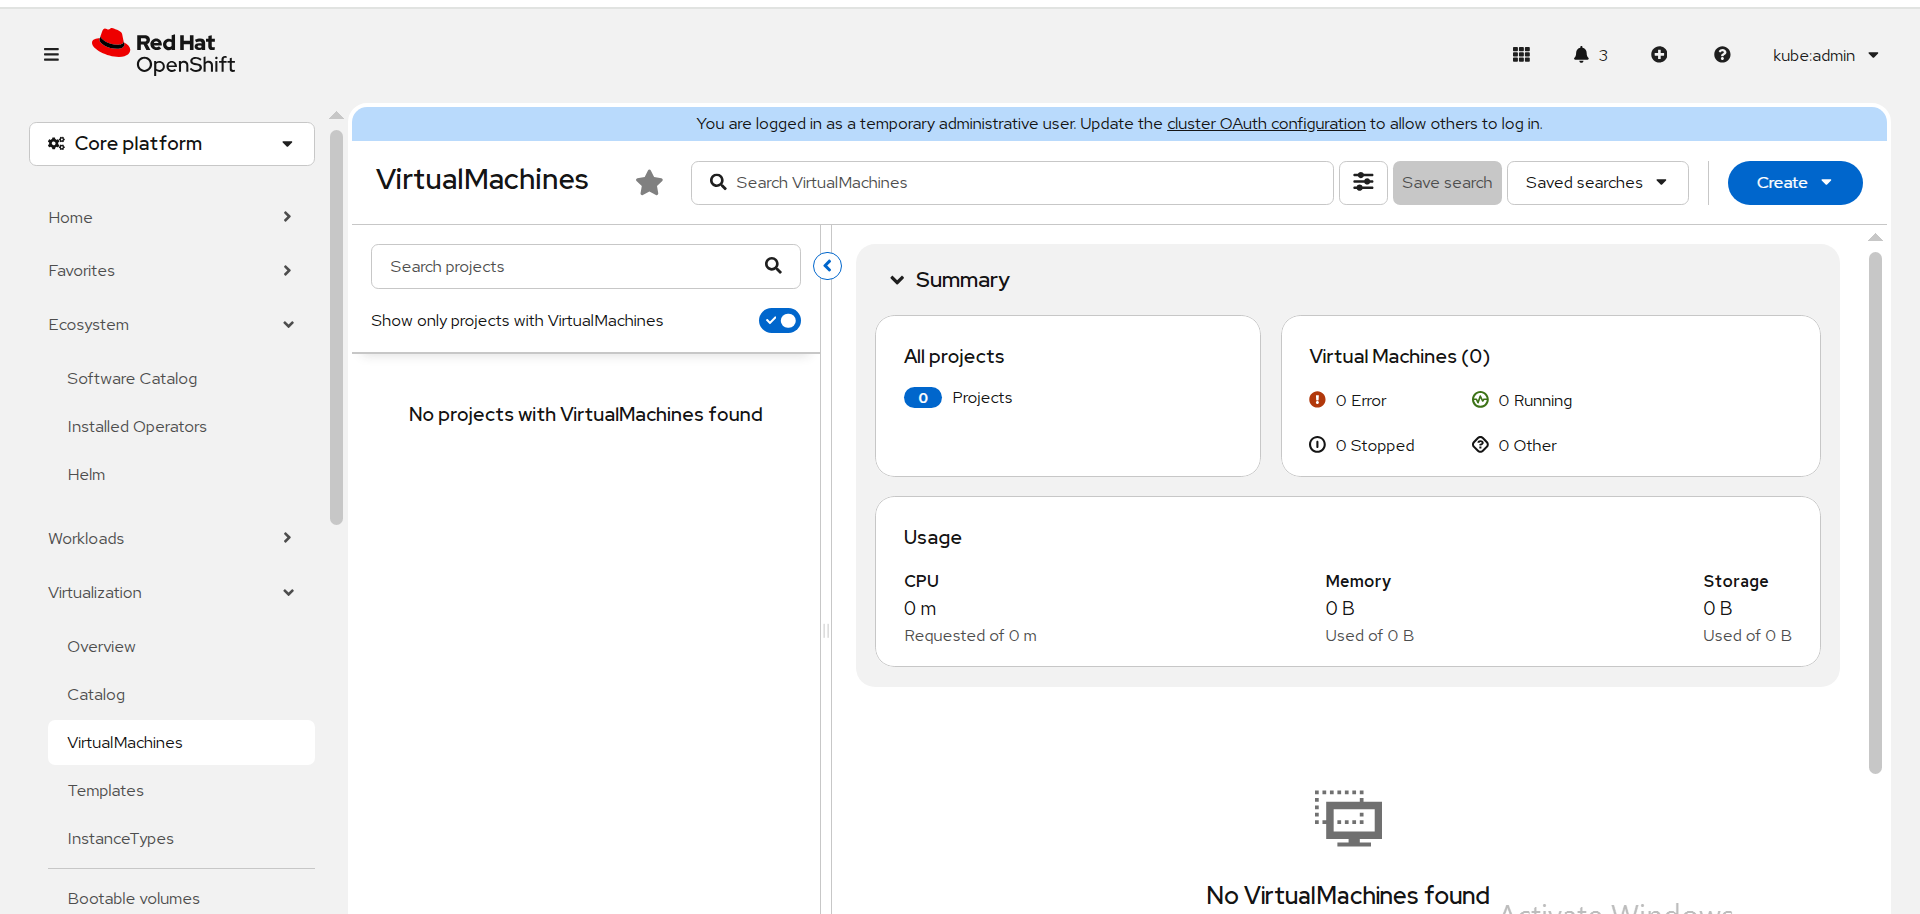
FIGURE 49. VirtualMachines
Click Create.
Select to create a VM from Instance Type or Template.
Ensure the Project selected is the namespace where UDN is configured.
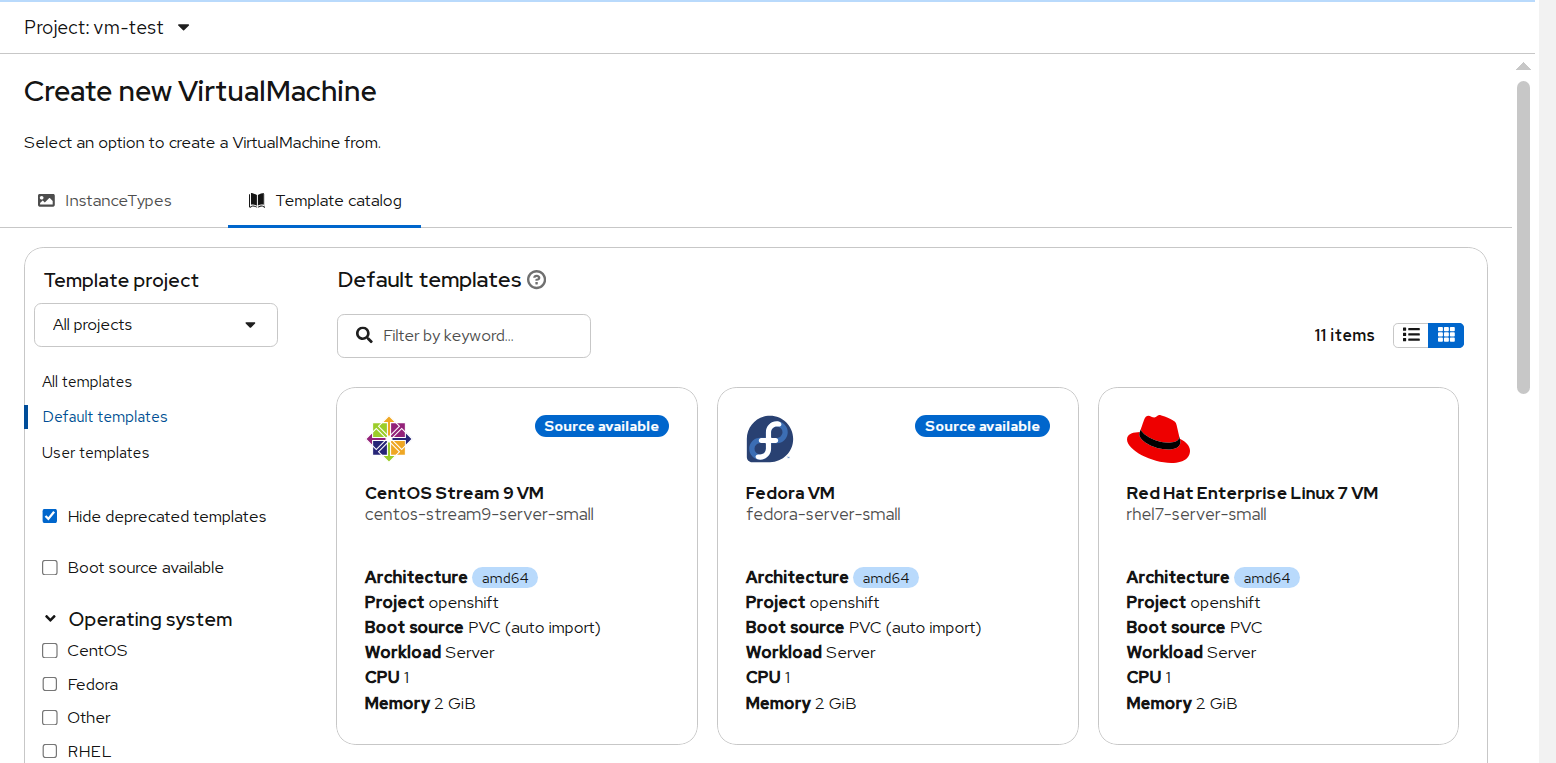
FIGURE 50. Default templates
- Configure the VM as required and click Create.
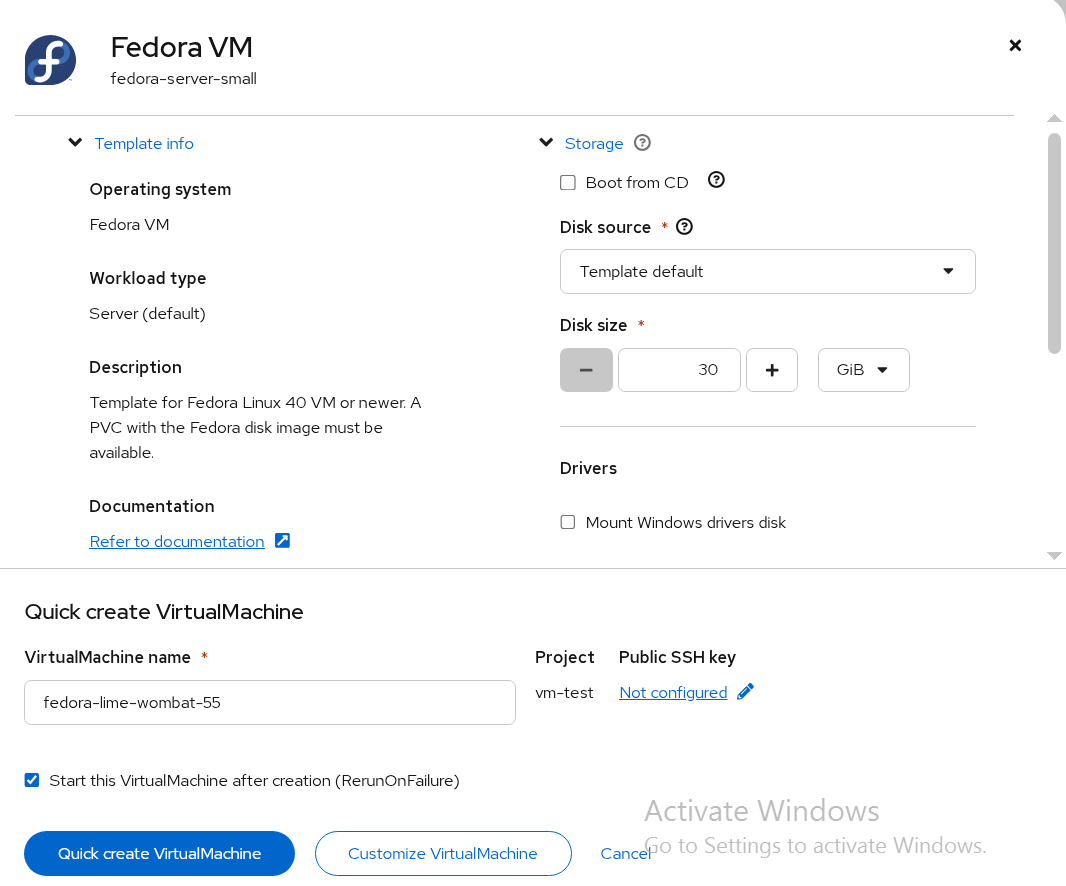
FIGURE 51. Configuring VM
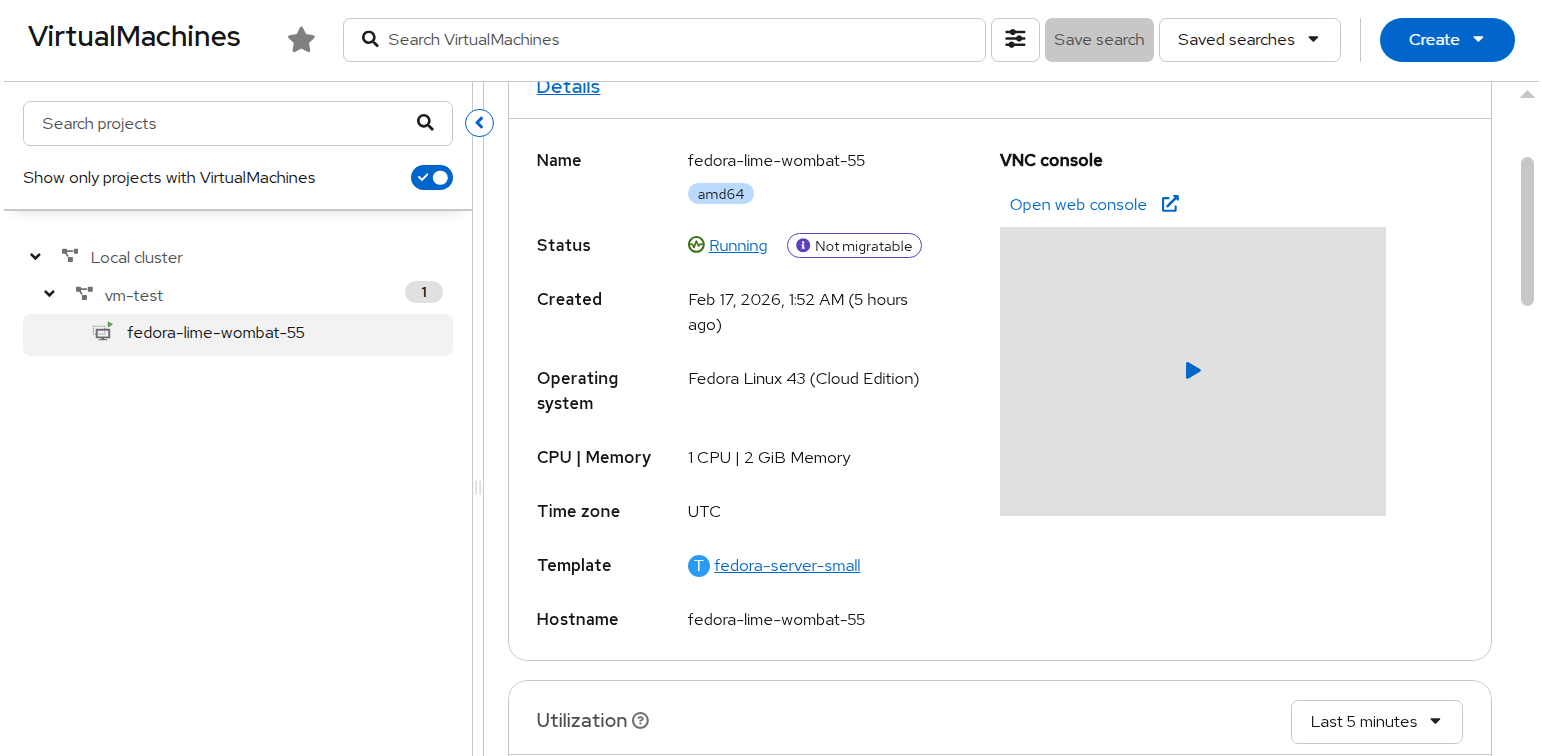
FIGURE 52. VM created
Validation
Once the VM is running, open the VM console.
Log in using the credentials displayed on the screen.
Check the network configuration:
ip a
- Verify that the assigned IP address belongs to the configured subnet.
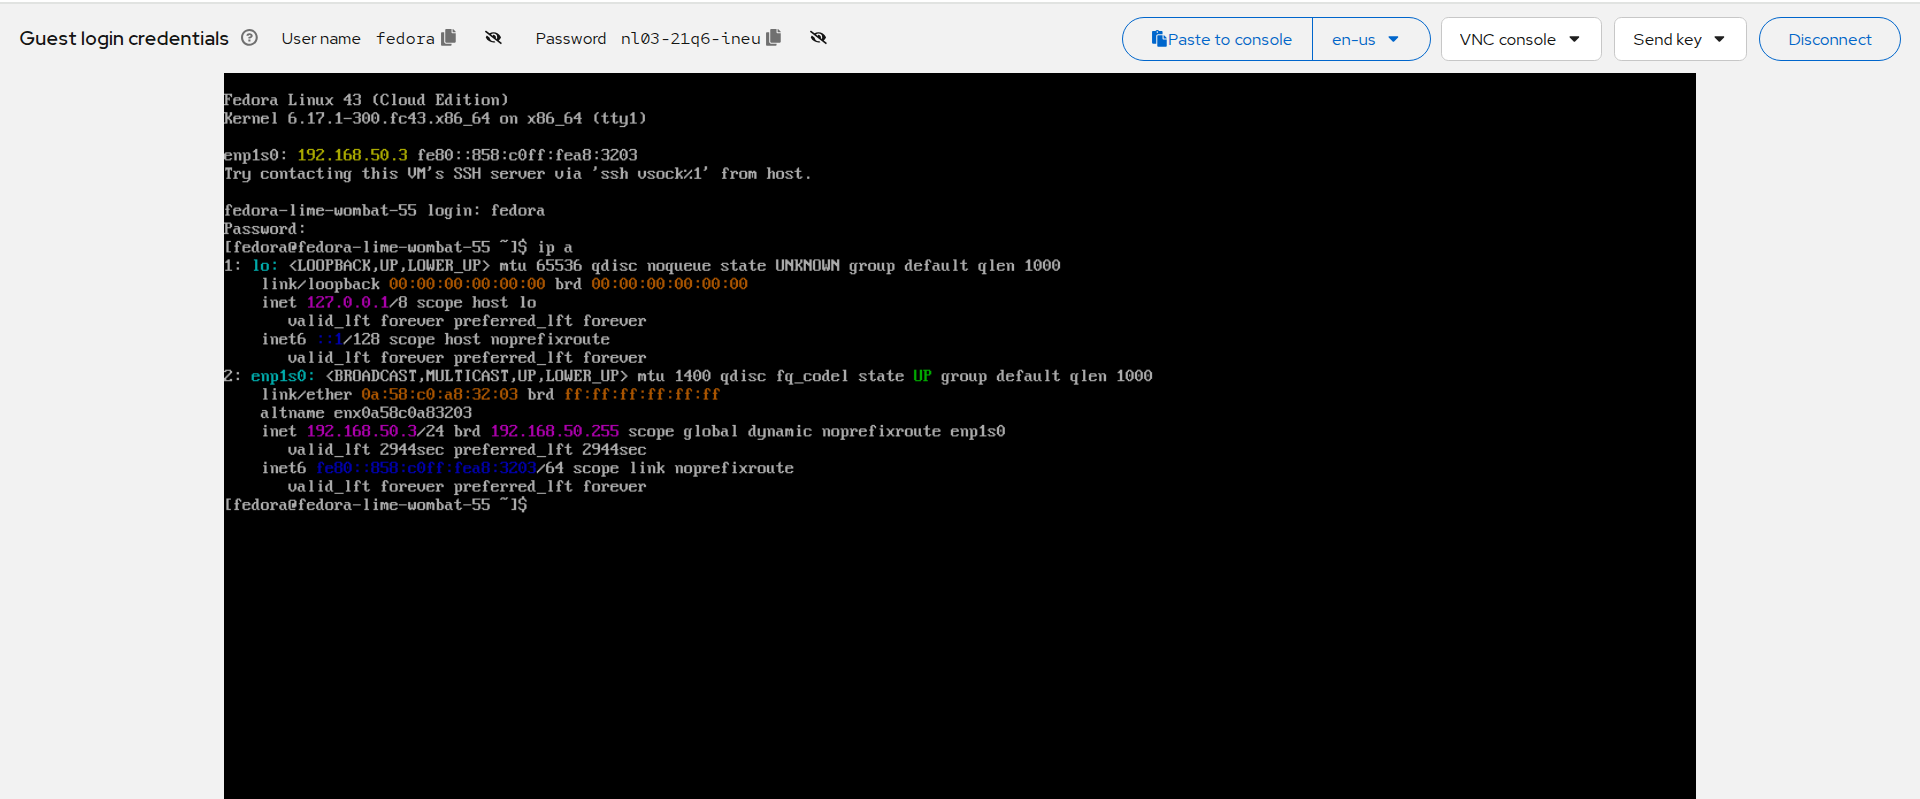
FIGURE 53. VM network configuration verification
Network Isolation Check
- Verify external connectivity:
ping google.com
The request should fail, confirming network isolation.
- Verify internal connectivity within subnet:
ping <vm-ip-in-same-subnet>
The request should succeed, confirming communication within the UDN.
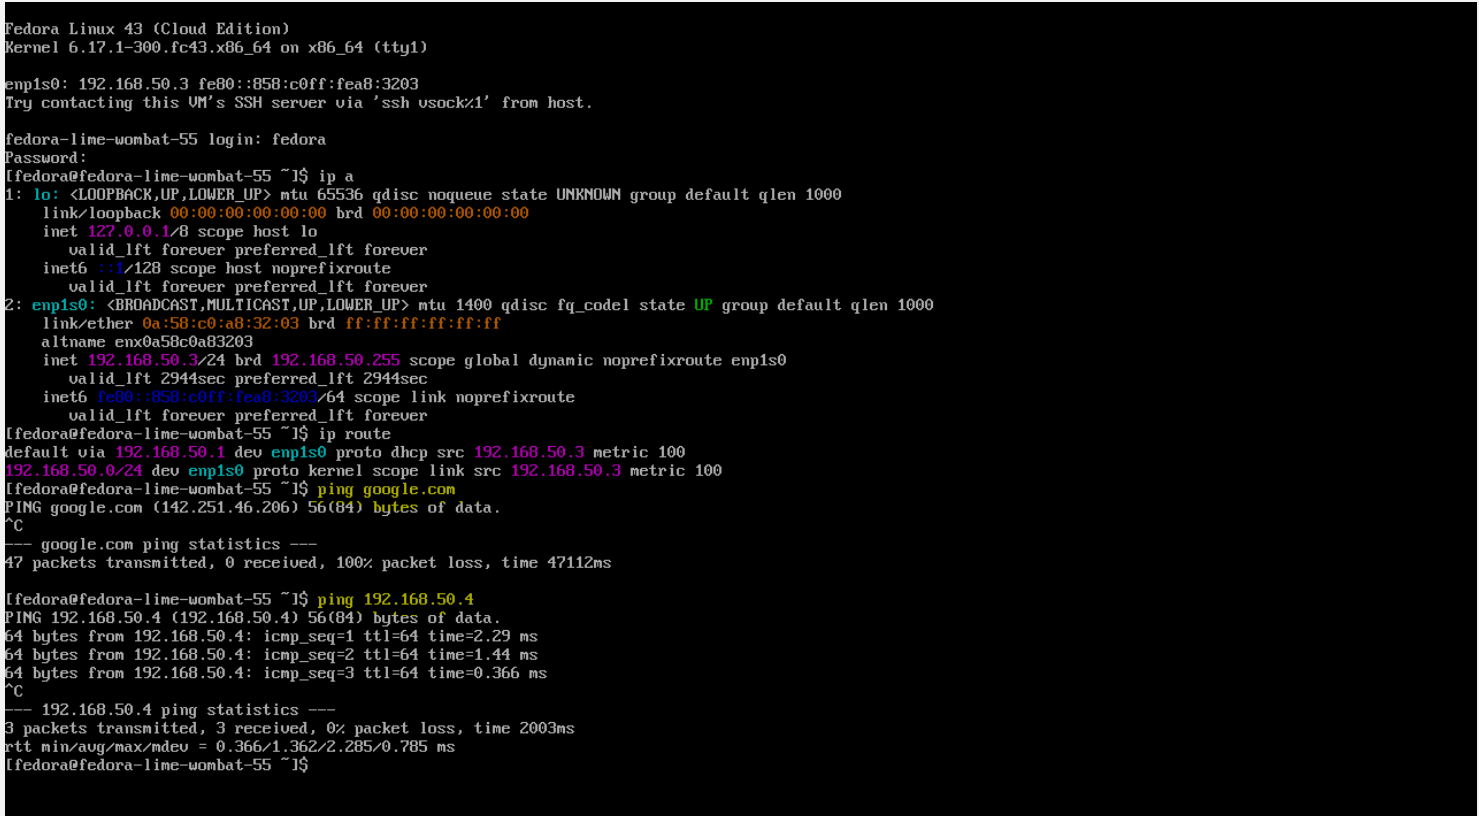
FIGURE 54. Network isolation and internal connectivity validation
HotPlugging
Hot Plugging vCPUs
Hot plugging means enabling or disabling devices while a virtual machine is running.
Prerequisites:
Required minimum 2 worker nodes in cluster
Steps:
In the Virtualization tab, Navigate to VirtualMachine.
Select a running virtual machine that required changes
Navigate to Configuration tab and Click Details.
Edit the CPU | Memory details

FIGURE 55. Paramter for hot plugging vCPU- 1
- Change the value of Virtual Sockets as required.
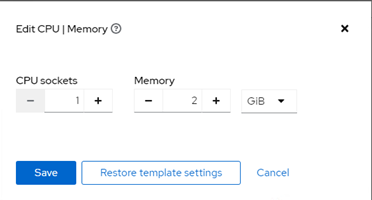
FIGURE 56. Paramter for hot plugging vCPU- 2
- Click Save.
Note: Hot Plugging of CPU and Memory is not possible when Virtual machines are created from the Instance type.
Hot Plugging Memory
You can hot plug virtual memory. Each time memory is hot plugged, it appears as a new memory device in the VM Devices tab in the details view of the virtual machine, up to a maximum of 16 available slots. When the virtual machine is restarted, these devices are cleared from the VM Devices tab without reducing the virtual machine’s memory, allowing you to hot plug more memory devices.
Prerequisites:
Required minimum 2 worker nodes in cluster
Steps:
In the Virtualization tab, Navigate to VirtualMachine.
Select a running virtual machine that required changes
Navigate to Configuration tab and Click Details.
Edit the CPU | Memory details
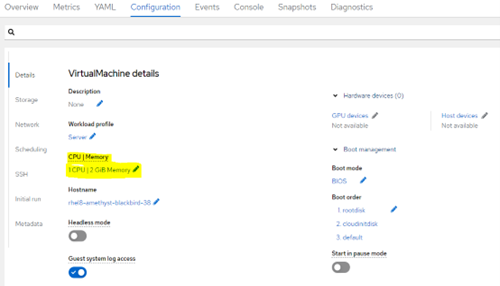
FIGURE 57. Paramter for hot plugging Memory
Change the value of Virtual Sockets as required.
Click Save.
Note: Hot Plugging of CPU and Memory is not possible when Virtual machines are created from the Instance type.
Hot-plugging VM disks
You can add or remove virtual disks without stopping your virtual machine (VM) or virtual machine instance (VMI). Only data volumes and persistent volume claims (PVCs) can be hot plugged and hot-unplugged. You cannot hot plug or hot-unplug container disks.
Prerequisites
You must have a data volume or persistent volume claim (PVC) available for hot plugging.
Steps:
In the Virtualization tab, Navigate to VirtualMachines
Select a running virtual machine that required changes
On the VirtualMachine details page, click Configuration Storage
Add a hot plugged disk:
i. Click Add disk.
ii. In the Add disk (hot plugged) window, select the disk from the Source list and click Save.
Note: Each VM must have Virtio-scsi Controller so that Hot Plug disk can use SCSI bus.
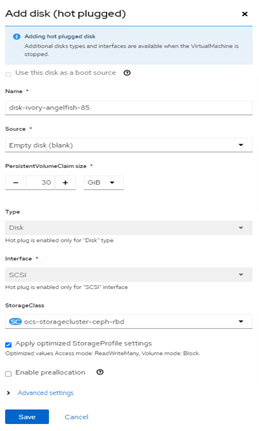
FIGURE 58. Paramter for hot plugging VM disks
Hot-plugging Network Interface
You can add or remove network interfaces without stopping your virtual machine (VM). OpenShift Virtualization supports hot plugging for interfaces that use the VirtIO device driver.
Prerequisites
• A network attachment definition is configured in the same namespace as your VM.
• Required minimum 2 nodes in cluster
Steps:
In the Virtualization tab, Navigate to VirtualMachines
Select a running virtual machine that required changes
On the VirtualMachine details page, click Configuration Network Add network interface
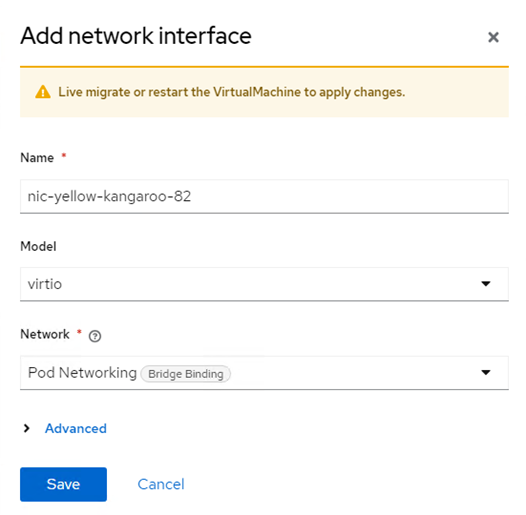
FIGURE 59. Paramter for hot plugging Network Interface
Add the respective Pod Networking (NAD) that needs to be added to network interface
Click Save the network setting.
Navigate to Actions Click Migrate
Once the VM is Successfully migrated to different node. The newly added network interface is available in the virtual machine.
Live migration
Introduction
Live migration is the process of moving a running virtual machine (VM) to another node in the cluster without interrupting the virtual workload. By default, live migration traffic is encrypted using Transport Layer Security (TLS).
An enhanced web console provides a graphical portal to manage these virtualized resources alongside the OpenShift Container Platform cluster containers and infrastructure.
Requirements of Live migration
A dedicated Multus network for live migration is highly recommended.
Persistent Volume Claim (Storage) must have ReadWriteMany (RWX) access mode.
All CPU in cluster which hosts Virtual machines must support the host model.
Configuring live migration
You can configure the following live migration settings to ensure the migration process do not saturate the cluster.
Limits and timeouts
Maximum number of migrations per node or cluster
Edit the HyperConverged CR and add the necessary live migration parameters:
oc edit hyperconverged kubevirt-hyperconverged -n openshift-cnv
sample configuration parameters
apiVersion: hco.kubevirt.io/v1beta1
kind: HyperConverged
metadata:
  name: kubevirt-hyperconverged
  namespace: openshift-cnv
spec:
  liveMigrationConfig:
    bandwidthPerMigration: 64Mi
    completionTimeoutPerGiB: 800
    parallelMigrationsPerCluster: 5
    parallelOutboundMigrationsPerNode: 2
    progressTimeout: 150
Initiating Live Migration
Live migration of virtual machines can be done using web console or CLI. prerequisites must be met for the live migration of any virtual machines.
Initiating Live Migration using web console
Navigate to Virtualization → VirtualMachines in the web console.
Select Migrate from the Options menu
beside a VM.

FIGURE 60. Live Migration between nodes
- Click Migrate.
Initiating Live Migration using CLI
- Create and apply the VirtualMachineInstanceMigration manifest for the VM
apiVersion: kubevirt.io/v1
kind: VirtualMachineInstanceMigration
metadata:
  name: < migration_name >
spec:
  vmiName: < vm_name >
Migration Toolkit for Virtualization
Introduction
The Migration Toolkit for Virtualization (MTV) enables you to migrate virtual machines from VMware vSphere, Red Hat Virtualization, or OpenStack to OpenShift Virtualization running on Red Hat OpenShift Virtualization platform.
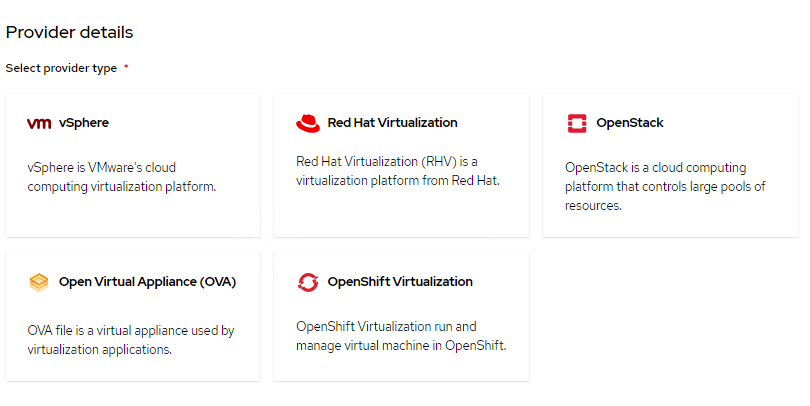 FIGURE 61. Migration Toolkit for Virtualization supported providers
MTV simplifies the migration process, allowing you to seamlessly move VM workloads to OpenShift Virtualization
MTV supports Cold migration which is the default migration type. The source virtual machines are shutdown while the data is copied. Cold migration from
VMware vSphere
Red Hat Virtualization (RHV)
OpenStack
Remote OpenShift Virtualization clusters
MTV supports warm migration from VMware vSphere and from RHV. In warm migration most of the data is copied during the pre-copy stage while the source virtual machines (VMs) are running. Then the VMs are shut down and the remaining data is copied during the cutover stage
Installing MTV Operator
You can install MTV operator using web console and CLI
Installing MTV Operator using web console
- In the web console, navigate to Ecosystem -> Software Ctaalog.
- Select an existing project name or create new project.
- Use the Filter by keyword field to search for mtv-operator.
- Click the Migration Toolkit for Virtualization Operator tile and then click Install.
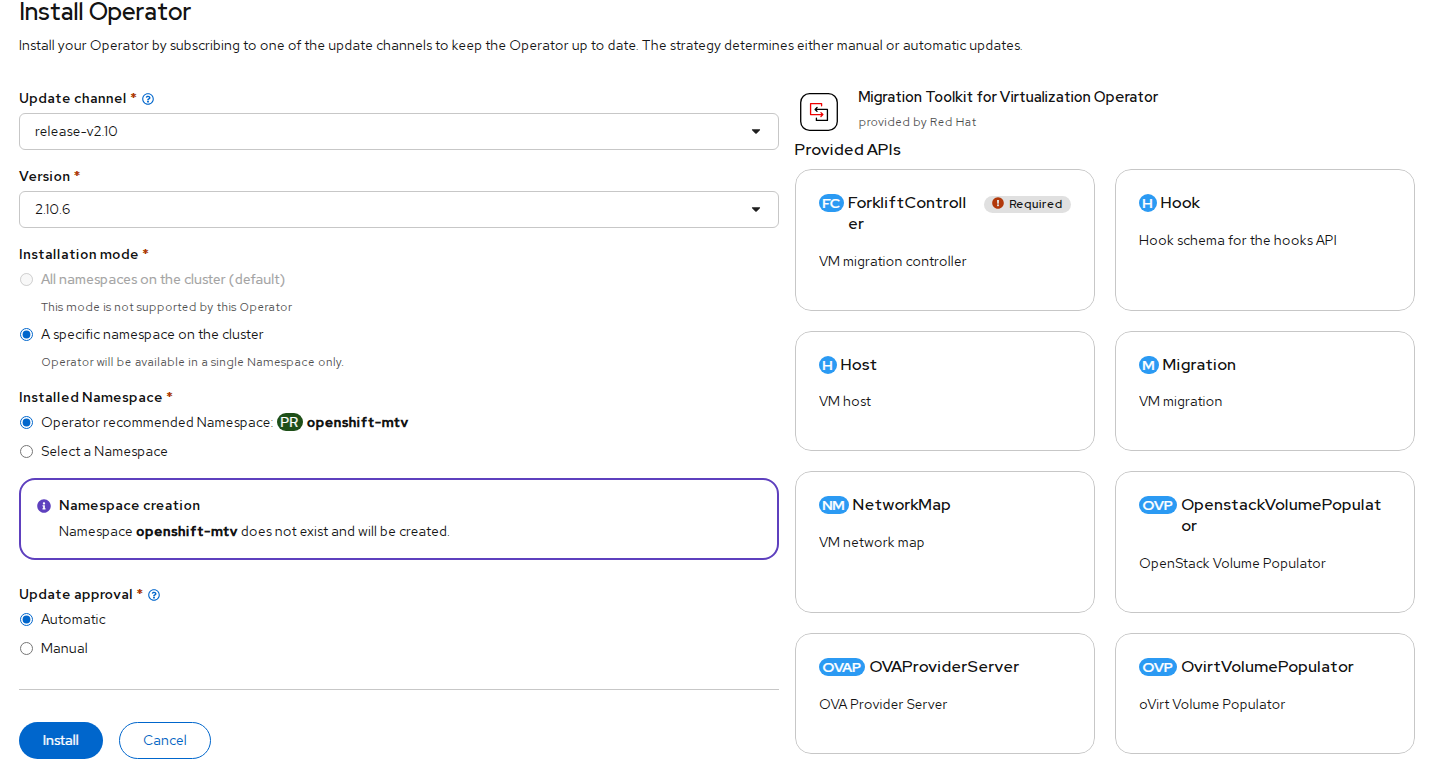 FIGURE 62. Migration Toolkit Operator deployment
- After the Migration Toolkit for Virtualization Operator is installed successfully create ForkliftController Instance.
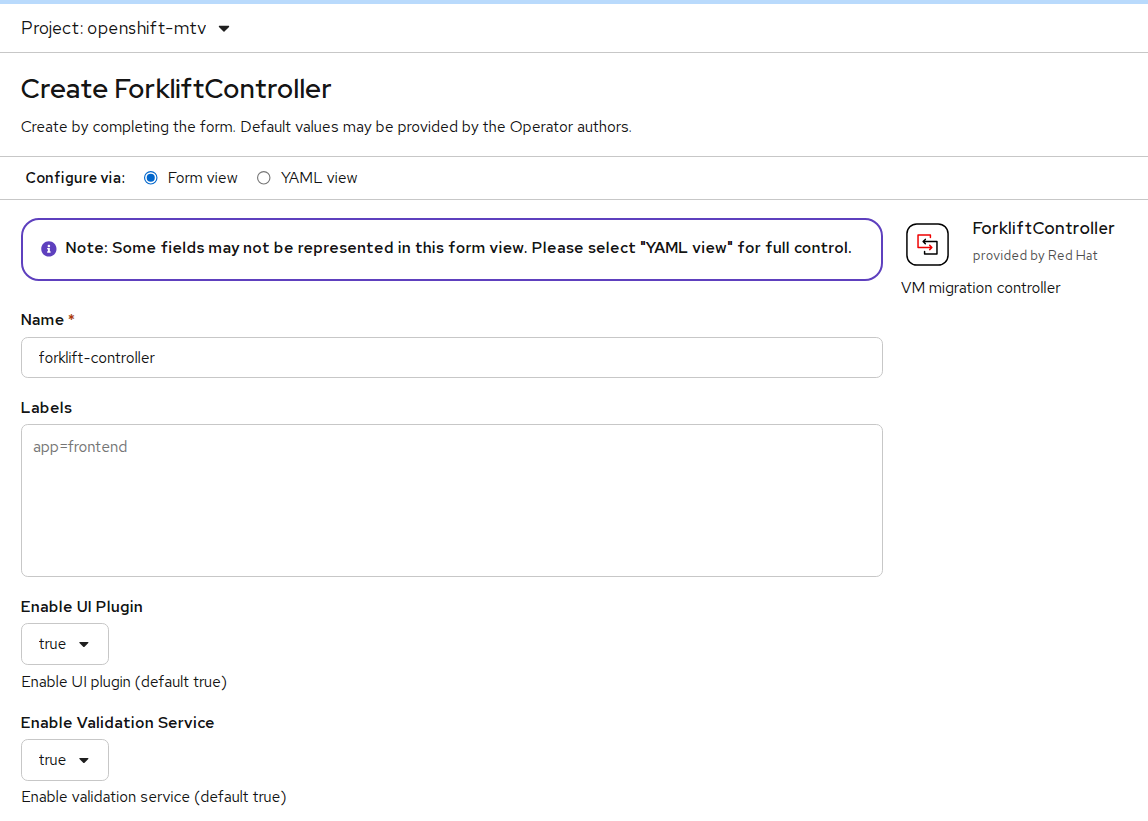 FIGURE 63. ForliftController Instance creation
Installing MTV Operator using CLI
- Create the openshift-mtv project:
$ cat << EOF | oc apply -f -
apiVersion: project.openshift.io/v1
kind: Project
metadata:
  name: openshift-mtv
EOF
- Create an OperatorGroup CR called migration:
$ cat << EOF | oc apply -f -
apiVersion: operators.coreos.com/v1
kind: OperatorGroup
metadata:
  name: migration
  namespace: openshift-mtv
spec:
  targetNamespaces:
    - openshift-mtv
EOF
- Create a Subscription CR for the Operator:
$ cat << EOF | oc apply -f -
apiVersion: operators.coreos.com/v1alpha1
kind: Subscription
metadata:
  name: mtv-operator
  namespace: openshift-mtv
spec:
  channel: release-v2.6
  installPlanApproval: Automatic
  name: mtv-operator
  source: redhat-operators
  sourceNamespace: openshift-marketplace
  startingCSV: "mtv-operator.v2.6.1"
EOF
- Create a ForkliftController CR:
$ cat << EOF | oc apply -f -
apiVersion: forklift.konveyor.io/v1beta1
kind: ForkliftController
metadata:
  name: forklift-controller
  namespace: openshift-mtv
spec:
  olm_managed: true
EOF
Cross-Cluster Migration
Introduction
Cross-cluster migration enables the movement of virtual machines between two OpenShift clusters. This is commonly used for workload redistribution, infrastructure upgrades, and disaster recovery scenarios. The migration is performed using the Migration Toolkit for Virtualization (MTV), which facilitates data transfer and VM recreation across clusters.
MTV supports three types of cross-cluster migration:
Cold Migration — The virtual machine is powered off on the source cluster. Disk data is copied to the target cluster, and the VM is recreated on the destination.
Warm Migration — The virtual machine remains running during the initial disk synchronization. During the final cutover stage, the VM is briefly shut down, remaining data is synced, and the VM is recreated on the target cluster. This reduces downtime but does not eliminate it.
Live Migration — The virtual machine remains running throughout the migration. Memory state, CPU state, and disk data are transferred in real-time between clusters, enabling near-zero downtime. This requires a shared L2 network between the source and target clusters and additional feature gates to be enabled.
Prerequisites
- OpenShift Virtualization Operator must be installed on both clusters
- Migration Toolkit for Virtualization (MTV) must be installed and configured
- Forklift controller pods must be running
- VM must be in stopped state (for cold migration), running state (for warm migration), or running state (for live migration) on source cluster
- For live migration:
decentralizedLiveMigrationfeature gate must be enabled on both clusters - For live migration: A shared L2 network (same VLAN and subnet) must be configured between worker nodes of both clusters
- For live migration:
virt-synchronization-controllerpod must be running on both clusters - For live migration:
feature_ocp_live_migrationmust be enabled in the ForkliftController on both clusters
NOTE
Cold Migration
The virtual machine must be powered off manually on the source cluster before starting the migration plan.
Warm Migration
The virtual machine can remain running when the migration plan is started. MTV will perform an initial disk synchronization while the VM is running.
During the final phase (cutover stage), MTV will:
- Gracefully shut down the virtual machine on the source cluster
- Perform a final incremental sync of disk data
- Recreate and start the virtual machine on the destination cluster
Note: Warm migration reduces downtime but does not eliminate it. A brief interruption occurs during the cutover phase when the VM is stopped.
Live Migration
The virtual machine remains running throughout the entire migration process. MTV transfers memory state, CPU state, and disk data in real-time between the source and target clusters. There is near-zero downtime as the VM is not shut down during the transfer. This requires a shared L2 network between both clusters and the decentralizedLiveMigration feature gate to be enabled.
Configuring Providers for Cross-Cluster Migration
To enable migration, the target cluster must be able to communicate with the source cluster.
Preparing Source Cluster (Cluster A)
- Create ServiceAccount for MTV:
oc create sa mtv -n openshift-mtv
- Grant required permissions:
oc adm policy add-cluster-role-to-user cluster-admin -z mtv -n openshift-mtv
- Create token secret:
apiVersion: v1
kind: Secret
metadata:
  name: mtv-token
  namespace: openshift-mtv
  annotations:
    kubernetes.io/service-account.name: mtv
type: kubernetes.io/service-account-token
- Apply:
oc apply -f mtv-token.yaml
- Extract token:
oc get secret mtv-token -n openshift-mtv -o jsonpath='{.data.token}' | base64 -d
Creating Provider on Target Cluster (Cluster B)
Navigate to Migration for Virtualization → Providers.
Click Create Provider.
Provide the following details:
- Type: OpenShift Virtualization
- Name: sno1 (change as per requirement)
- URL: Source cluster API (e.g. https://<api-ip>:6443)
- Token: Token generated from Cluster A
- Enable: Skip certificate validation
 FIGURE 64. Creating Provider for Source Cluster
- Click Create.
Verifying Provider Status
On Target Cluster, navigate to Virtualization → Migration → Providers.
You should see:
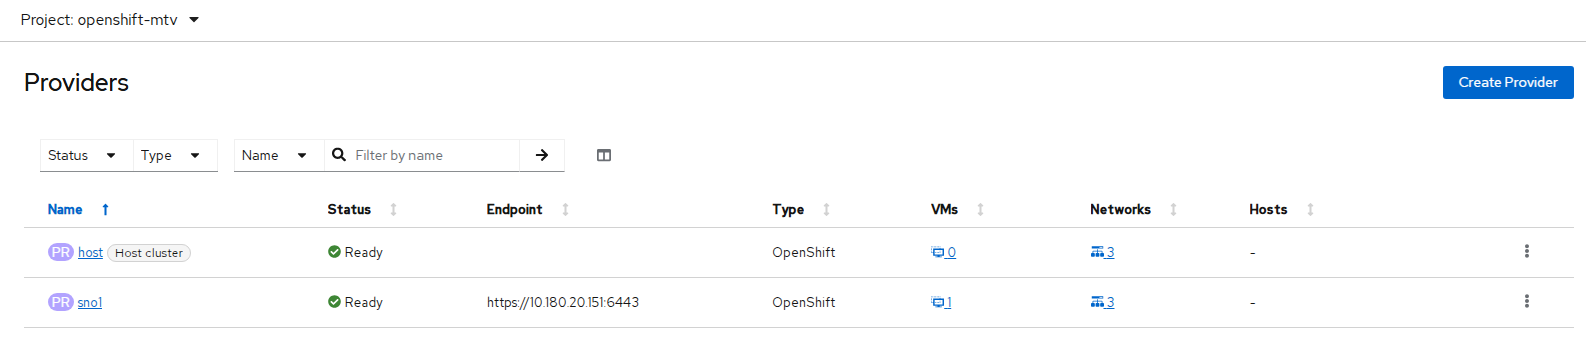 FIGURE 65. Provider Status on Target Cluster
Additional Configuration for Live Migration
NOTE
The following steps are required only for live migration. If you are performing a cold or warm migration, skip to Creating Migration Plan.
Enabling Feature Gates
The decentralizedLiveMigration feature gate must be enabled in OpenShift Virtualization and the feature_ocp_live_migration feature must be enabled in MTV on both clusters.
- Enable the
decentralizedLiveMigrationfeature gate in OpenShift Virtualization on both clusters:
oc patch hyperconverged kubevirt-hyperconverged \
  -n openshift-cnv --type json \
  -p '[{"op":"replace", "path": "/spec/featureGates/decentralizedLiveMigration", "value": true}]'
- Verify that the
virt-synchronization-controllerpod is running on both clusters:
oc get pods -n openshift-cnv | grep virt-synchronization
You should see the following output:
virt-synchronization-controller-xxxxx Running
NOTE
If the virt-synchronization-controller pod is not present, cross-cluster live migration will not work. Verify that the feature gate was applied correctly before proceeding.
- Enable
feature_ocp_live_migrationin the ForkliftController on both clusters:
oc patch ForkliftController forklift-controller \
  -n openshift-mtv --type json \
  -p '[{"op": "add", "path": "/spec/feature_ocp_live_migration", "value": "true"}]'
- Verify the ForkliftController configuration:
oc get ForkliftController forklift-controller -n openshift-mtv -o yaml
Confirm that the output contains:
feature_ocp_live_migration: "true"
Configuring Migration Network
Cross-cluster live migration requires that virt-handler pods on both clusters communicate over the same L2 network. A NetworkAttachmentDefinition (NAD) must be created on both clusters to establish this shared migration network.
NOTE
Ensure the following requirements are met:
- The master interface (e.g.,
ens1f0np0) must exist on all worker nodes of both clusters - Both clusters must use the same subnet (e.g.,
10.180.30.0/24) - Both clusters must be connected to the same VLAN
- The migration network subnet must not overlap with the pod network
- Create a NetworkAttachmentDefinition on Cluster A in the
openshift-cnvnamespace:
apiVersion: "k8s.cni.cncf.io/v1"
kind: NetworkAttachmentDefinition
metadata:
  name: my-secondary-network
  namespace: openshift-cnv
spec:
  config: '{
    "cniVersion": "0.3.1",
    "name": "migration-bridge",
    "type": "macvlan",
    "master": "ens1f0np0",
    "mode": "bridge",
    "ipam": {
      "type": "whereabouts",
      "range": "10.180.30.0/24",
      "exclude": [
        "10.180.30.128/25"
      ]
    }
  }'
- Apply the manifest on Cluster A:
oc apply -f nad-clusterA.yaml
- Create a NetworkAttachmentDefinition on Cluster B in the
openshift-cnvnamespace. The exclude range is different from Cluster A to avoid IP overlap:
apiVersion: "k8s.cni.cncf.io/v1"
kind: NetworkAttachmentDefinition
metadata:
  name: my-secondary-network
  namespace: openshift-cnv
spec:
  config: '{
    "cniVersion": "0.3.1",
    "name": "migration-bridge",
    "type": "macvlan",
    "master": "ens1f0np0",
    "mode": "bridge",
    "ipam": {
      "type": "whereabouts",
      "range": "10.180.30.0/24",
      "exclude": [
        "10.180.30.0/25"
      ]
    }
  }'
- Apply the manifest on Cluster B:
oc apply -f nad-clusterB.yaml
- Create the same NetworkAttachmentDefinition on Cluster B in the VM namespace:
apiVersion: "k8s.cni.cncf.io/v1"
kind: NetworkAttachmentDefinition
metadata:
  name: my-secondary-network
  namespace: <vm_namespace>
spec:
  config: '{
    "cniVersion": "0.3.1",
    "name": "migration-bridge",
    "type": "macvlan",
    "master": "ens1f0np0",
    "mode": "bridge",
    "ipam": {
      "type": "whereabouts",
      "range": "10.180.30.0/24",
      "exclude": [
        "10.180.30.0/25"
      ]
    }
  }'
- Apply the manifest:
oc apply -f nad.yaml
- Attach the migration network to the HyperConverged CR on both clusters:
oc patch hyperconverged kubevirt-hyperconverged \
  -n openshift-cnv \
  --type merge \
  -p '{"spec":{"liveMigrationConfig":{"network":"openshift-cnv/my-secondary-network"}}}'
Creating Migration Plan
Navigate to Migration for Virtualization → Migration Plans.
Click Create Plan.
Enter the Plan Name.
Select the Plan Project.
Select the Source Provider, Target Provider, and Target Namespace. Click Next.
Select the Virtual Machine(s) to be migrated.
NOTE
Ensure the virtual machine is stopped if you want to perform a cold migration and powered on if performing a live migration.

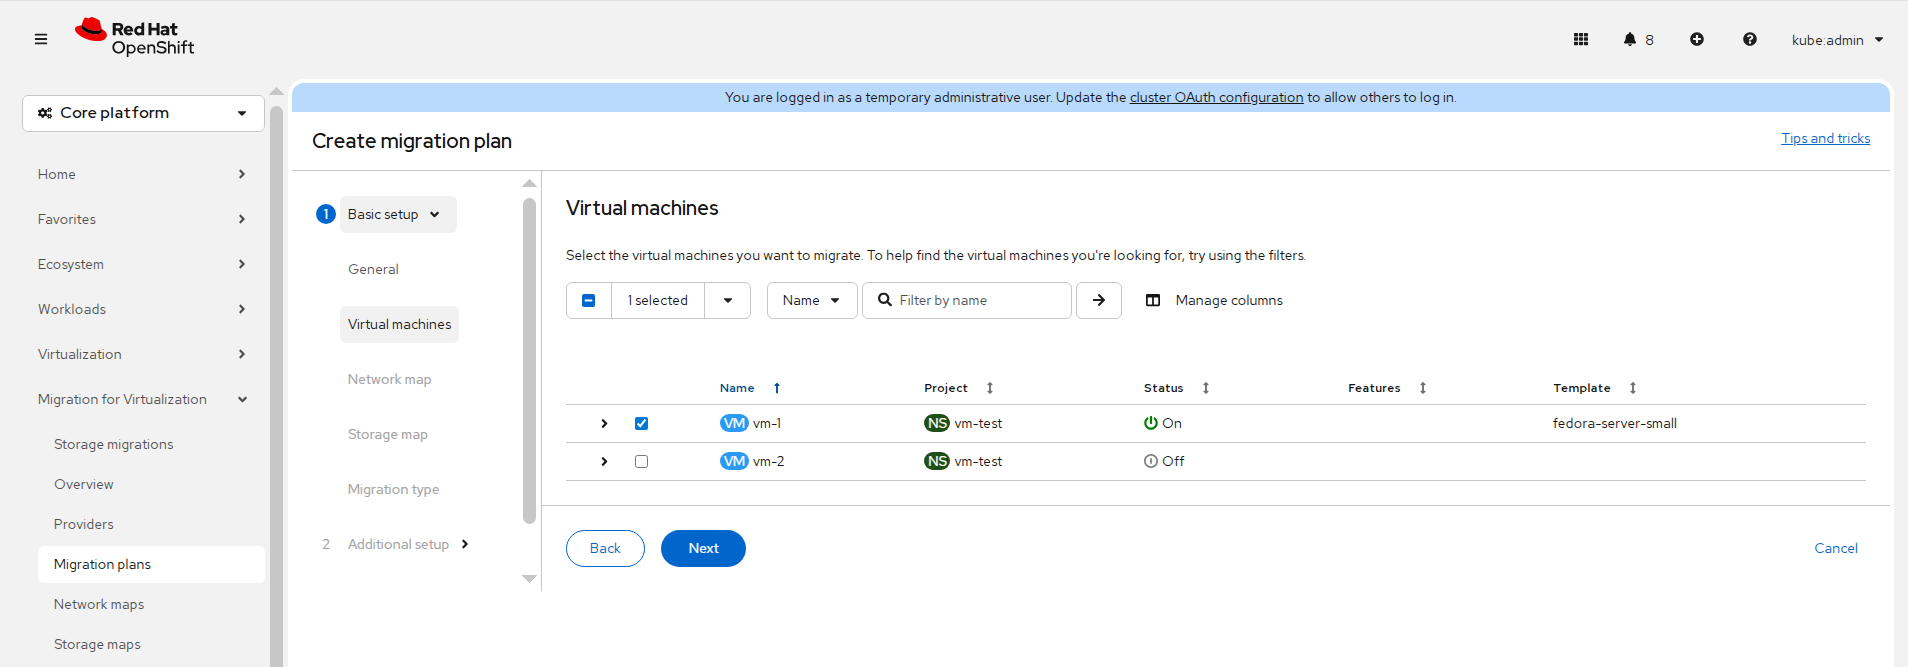 FIGURE 66. Selecting Source Provider, Target Provider, Target Namespace and Virtual Machine(s)
Configure Network Mapping.
Configure Storage Mapping.
Select the Migration Type.
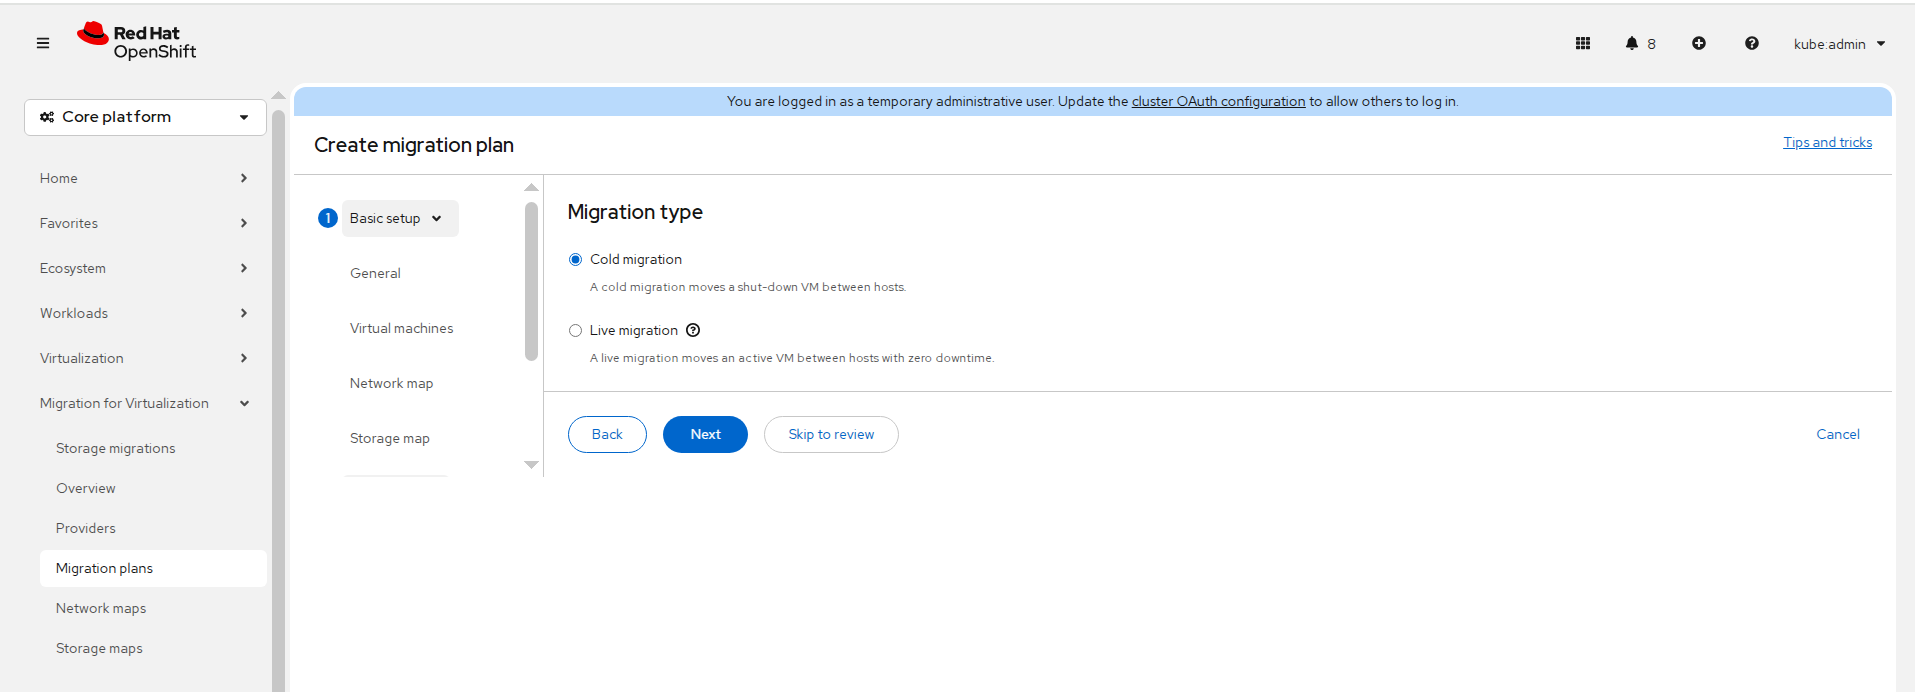 FIGURE 67. Select Migration Type
Configure optional settings, review the configuration, and click Create.
For live migration, patch the migration plan to specify the transfer network:
oc patch plans.forklift.konveyor.io <plan-name> -n openshift-mtv --type=merge \
  -p '{"spec":{"transferNetwork":{"name":"my-secondary-network","namespace":"<vm_namespace>"}}}'
NOTE
This step is required only for live migration. The transfer network cannot be configured from the web console during plan creation. Skip this step for cold or warm migration.
- Click Start Migration.
Monitoring Migration
- Check MTV pods:
oc get pods -n openshift-mtv
- Check target namespace:
oc get pods -n <target-namespace>
oc get pvc -n <target-namespace>
PVC status progression: Pending → Bound
Validation
- Verify VM on target cluster:
oc get vm -n <namespace>
- Start the virtual machine:
oc start vm <vm-name>
- Verify VM instance:
oc get vmi -n <namespace>
- Access VM console and validate workload.