Storage Options
Alletra Storage MP
HPE CSI Driver Architecture
A diagramatic representation of the HPE CSI driver architecture is illustrated in the figure 16.
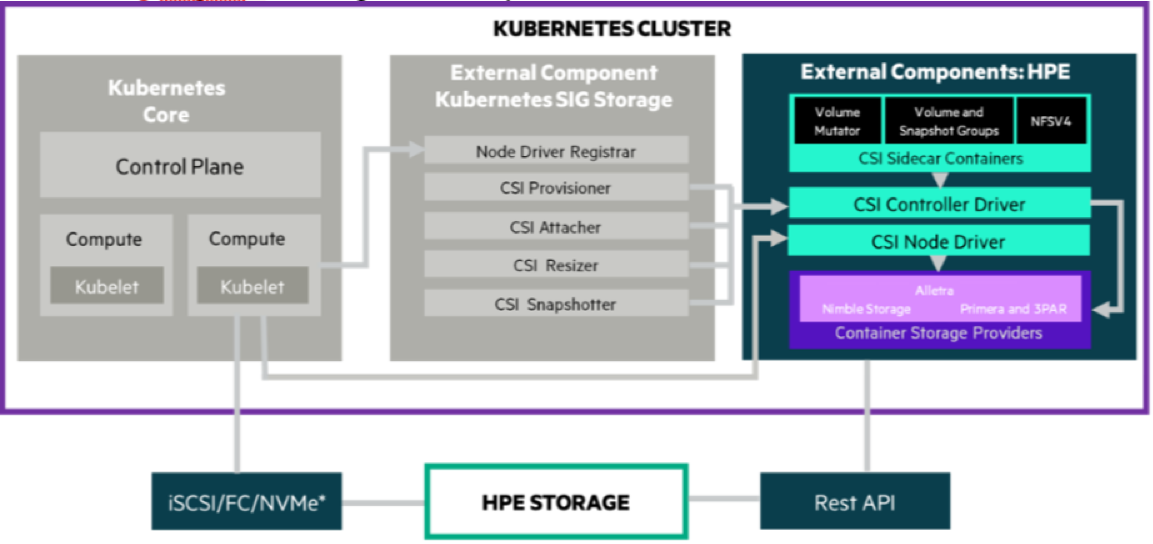
FIGURE 16. CSI Driver Architecture
The OpenShift Container Platform 4.22 cluster comprises the master and worker nodes (physical and virtual) with CoreOS deployed as the operating system. The iSCSI interface configured on the host nodes establishes the connection with the HPE Alletra array to the cluster. Upon successful deployment of HPE CSI Driver, the CSI controller, CSI Driver, and 3PAR CSP and Nimble CSP gets deployed which communicates with the HPE Alletra array via REST APIs. The associated features on Storage Class such as CSI Provisioner, CSI Attacher, and others are configured on the Storage Class.
Deploying HPE CSI Driver for HPE Alletra storage on RHOCP 4.22
This section describes how to deploy HPE CSI Driver for HPE Alletra storage on an existing RHOCP 4.22.
Prerequisites:
Before configuring the HPE CSI Driver, the following prerequisites must be met:
RHOCP 4.22 must be successfully deployed, and console should be accessible.
iSCSI interface must be configured on the HPE Alletra Storage array.
Additional iSCSI network interfaces must be configured on physical worker nodes.()
Deploy scc.yaml file to enable Security Context Constraints (SCC).
Configuring iSCSI interface on worker nodes
The RHOCP 4.22 cluster comprises the master and physical worker nodes with CoreOS deployed as the operating system. The iSCSI interface is configured on the host nodes to establish the connection with the HPE Alletra array to the cluster. Apart from the host nodes, additional iSCSI interface needs to be configured on all the worker (physical and virtual) nodes for establishing the connection between the RHOCP cluster and HPE Alletra arrays.
To configure iSCSI interface on physical RHEL worker nodes:
- Configure iSCSI A connection as a storage interface and iSCSI B connection as an additional storage for redundancy
For example, the iSCSI_A and iSCSI_B interface connection is configured on worker1 node, as shown in Figure 17.

FIGURE 17. iSCSI_A and iSCSI_B interface connection
Creating namespace
To create a namespace, in this case, hpe-storage:
Open Red Hat OpenShift Container Platform Console on a supported web browser.
Click Administration → Namespaces on the left pane.
Click Create Namespaces.
On the Create Namespace dialog box, enter hpe-storage.
Click Create.
Deploying Security Context Constraints (SCC)
The HPE CSI Driver needs to run in the privileged mode to get access to the host ports, host network, and to mount the host path volume. Before deploying HPE CSI Driver operator on RHOCP cluster, deploy SCC to allow HPE CSI Driver to run with these privileges.
Prerequisites:
- Ensure that you can access the scc.yaml file from the following GitHub link:
https://scod.hpedev.io/csi_driver/partners/redhat_openshift/examples/scc/hpe-csi-scc.yaml
To deploy SCC:
- On the installer VM, download scc.yaml file from the GitHub link using the following command:
$ curl -sL https://scod.hpedev.io/csi_driver/partners/redhat_openshift/examples/scc/hpe-csi-scc.yaml > hpe-csi-scc.yaml
- Deploy SCC using the following command and check the output:
$ oc create -f hpe-csi-scc.yaml
or
$ oc apply -f https://scod.hpedev.io/csi_driver/partners/redhat_openshift/examples/scc/hpe-csi-scc.yaml
The following output is displayed:
oc apply -f https://scod.hpedev.io/csi_driver/partners/redhat_openshift/examples/scc/hpe-csi-scc.yaml
securitycontextconstraints.security.openshift.io/hpe-csi-controller-scc created
securitycontextconstraints.security.openshift.io/hpe-csi-node-scc created
securitycontextconstraints.security.openshift.io/hpe-csi-csp-scc created
securitycontextconstraints.security.openshift.io/hpe-csi-nfs-scc created
Installing and configuring HPE CSI Driver
NOTE
Installing HPE CSI Driver Operator using Red Hat OperatorHub Option Will be available from JAN 2026.
Prerequisites:
Before installing the HPE CSI Driver from the Red Hat OpenShift Container Platform Console:
Create a namespace for HPE CSI Driver
Deploy SCC for the created namespace
Creating HPE CSI Driver
Run below commands:
helm repo add hpe-storage https://hpe-storage.github.io/co-deployments/
helm repo update
Create Namespace:
oc create ns hpe-storageInstall CSI Driver:
Replace
<version>with the desired one (e.g.,v3.0.1orv3.3.1).helm install hpe-csi-driver hpe-storage/hpe-csi-driver \ --namespace hpe-storage \ --version <version>
Check Pods in hpe-storage Namespace Run:
oc get pods -n hpe-storage
If all controller and node pods are Running, CSI is installed successfully.
- Validate CSI Driver is Registered with Kubernetes
oc get csidrivers
Expected:

csi.hpe.com   true   1min
Creating HPE Alletra StorageClass
After HPE CSI Driver is deployed, two additional objects, Secret and StorageClass, must be created to initiate the provisioning of persistent storage.
Creating Alletra Secret
To create a new Secret via CLI that will be used with HPE Alletra:
- Add the name, Namespace, backend username, backend password and the backend IP address in the Alletra-secret.yaml file and save it to be used by the CSP.
The following details are provided in the Alletra-secret.yaml file:
apiVersion: v1

kind: Secret

metadata:

  name: hpe-backend

  namespace: hpe-storage

stringData:

  serviceName: alletrastoragemp-csp-svc

  servicePort: "8080"

  backend: <alletramgmtip >:443      # update alletramgmtip

  username: admin

  password: admin
- Create the Alletra-secret.yaml file with the following command:
$ oc create -f Alletra-secret.yaml
- The following output displays the status of the alletra-secret with the "hpe-csi" namespace.

FIGURE 18. HPE Alletra Secret status
Creating StorageClass with HPE Alletra Secret
This section describes how to create a new StorageClass using the existing Alletra-secret and the necessary StorageClass parameters.
To create a new StorageClass using the Alletra-secret:
- Edit the following parameters in the Alletra-storageclass.yaml file:
apiVersion: storage.k8s.io/v1
kind: StorageClass
metadata:
  annotations:
    storageclass.kubernetes.io/is-default-class: "true"
  name: hpe-standard
provisioner: csi.hpe.com
parameters:
  csi.storage.k8s.io/fstype: xfs
  csi.storage.k8s.io/controller-expand-secret-name: hpe-backend
  csi.storage.k8s.io/controller-expand-secret-namespace: hpe-storage
  csi.storage.k8s.io/controller-publish-secret-name: hpe-backend
  csi.storage.k8s.io/controller-publish-secret-namespace: hpe-storage
  csi.storage.k8s.io/node-publish-secret-name: hpe-backend
  csi.storage.k8s.io/node-publish-secret-namespace: hpe-storage
  csi.storage.k8s.io/node-stage-secret-name: hpe-backend
  csi.storage.k8s.io/node-stage-secret-namespace: hpe-storage
  csi.storage.k8s.io/provisioner-secret-name: hpe-backend
  csi.storage.k8s.io/provisioner-secret-namespace: hpe-storage
  description: "Volume created by the HPE CSI Driver for Kubernetes"
reclaimPolicy: Delete
allowVolumeExpansion: true
- Create the Alletra-storageclass.yml file with the following command:
$ oc create -f Alletra-storageclass.yml
- Verify the name of the storage class (in this case, Alletra-storageclass).

FIGURE 19. HPE Alletra StorageClass status
Sample application deployment using AlletraMP Storage
A sample application deployed on the existing Red Hat OpenShift Container Platform utilizes the volume from AlletraMP array through HPE CSI Driver. A sample application such as mariadb is deployed and scheduled on the worker nodes. Follow the steps to deploy a sample application.Deploying MariaDB application using AlletraMP storage
Run the following command to deploy a sample application.
oc new-app mariadb-persistent
Check the status of PVC, PV and mariadb Pod
Deploying HPE Alletra Storage MP X10000 on Red Hat OpenShift
This section describes how to provision NFS file volumes with the HPE CSI Driver and S3 buckets with the HPE COSI Driver on HPE Alletra Storage MP X10000.
Architecture overview
Red Hat OpenShift Container Platform integrates with HPE Alletra Storage MP X10000 through two separate drivers. The HPE CSI Driver provisions persistent NFS file volumes. The HPE COSI Driver provisions S3 buckets. Both run on the same OpenShift cluster and talk to the same X10000 platform.
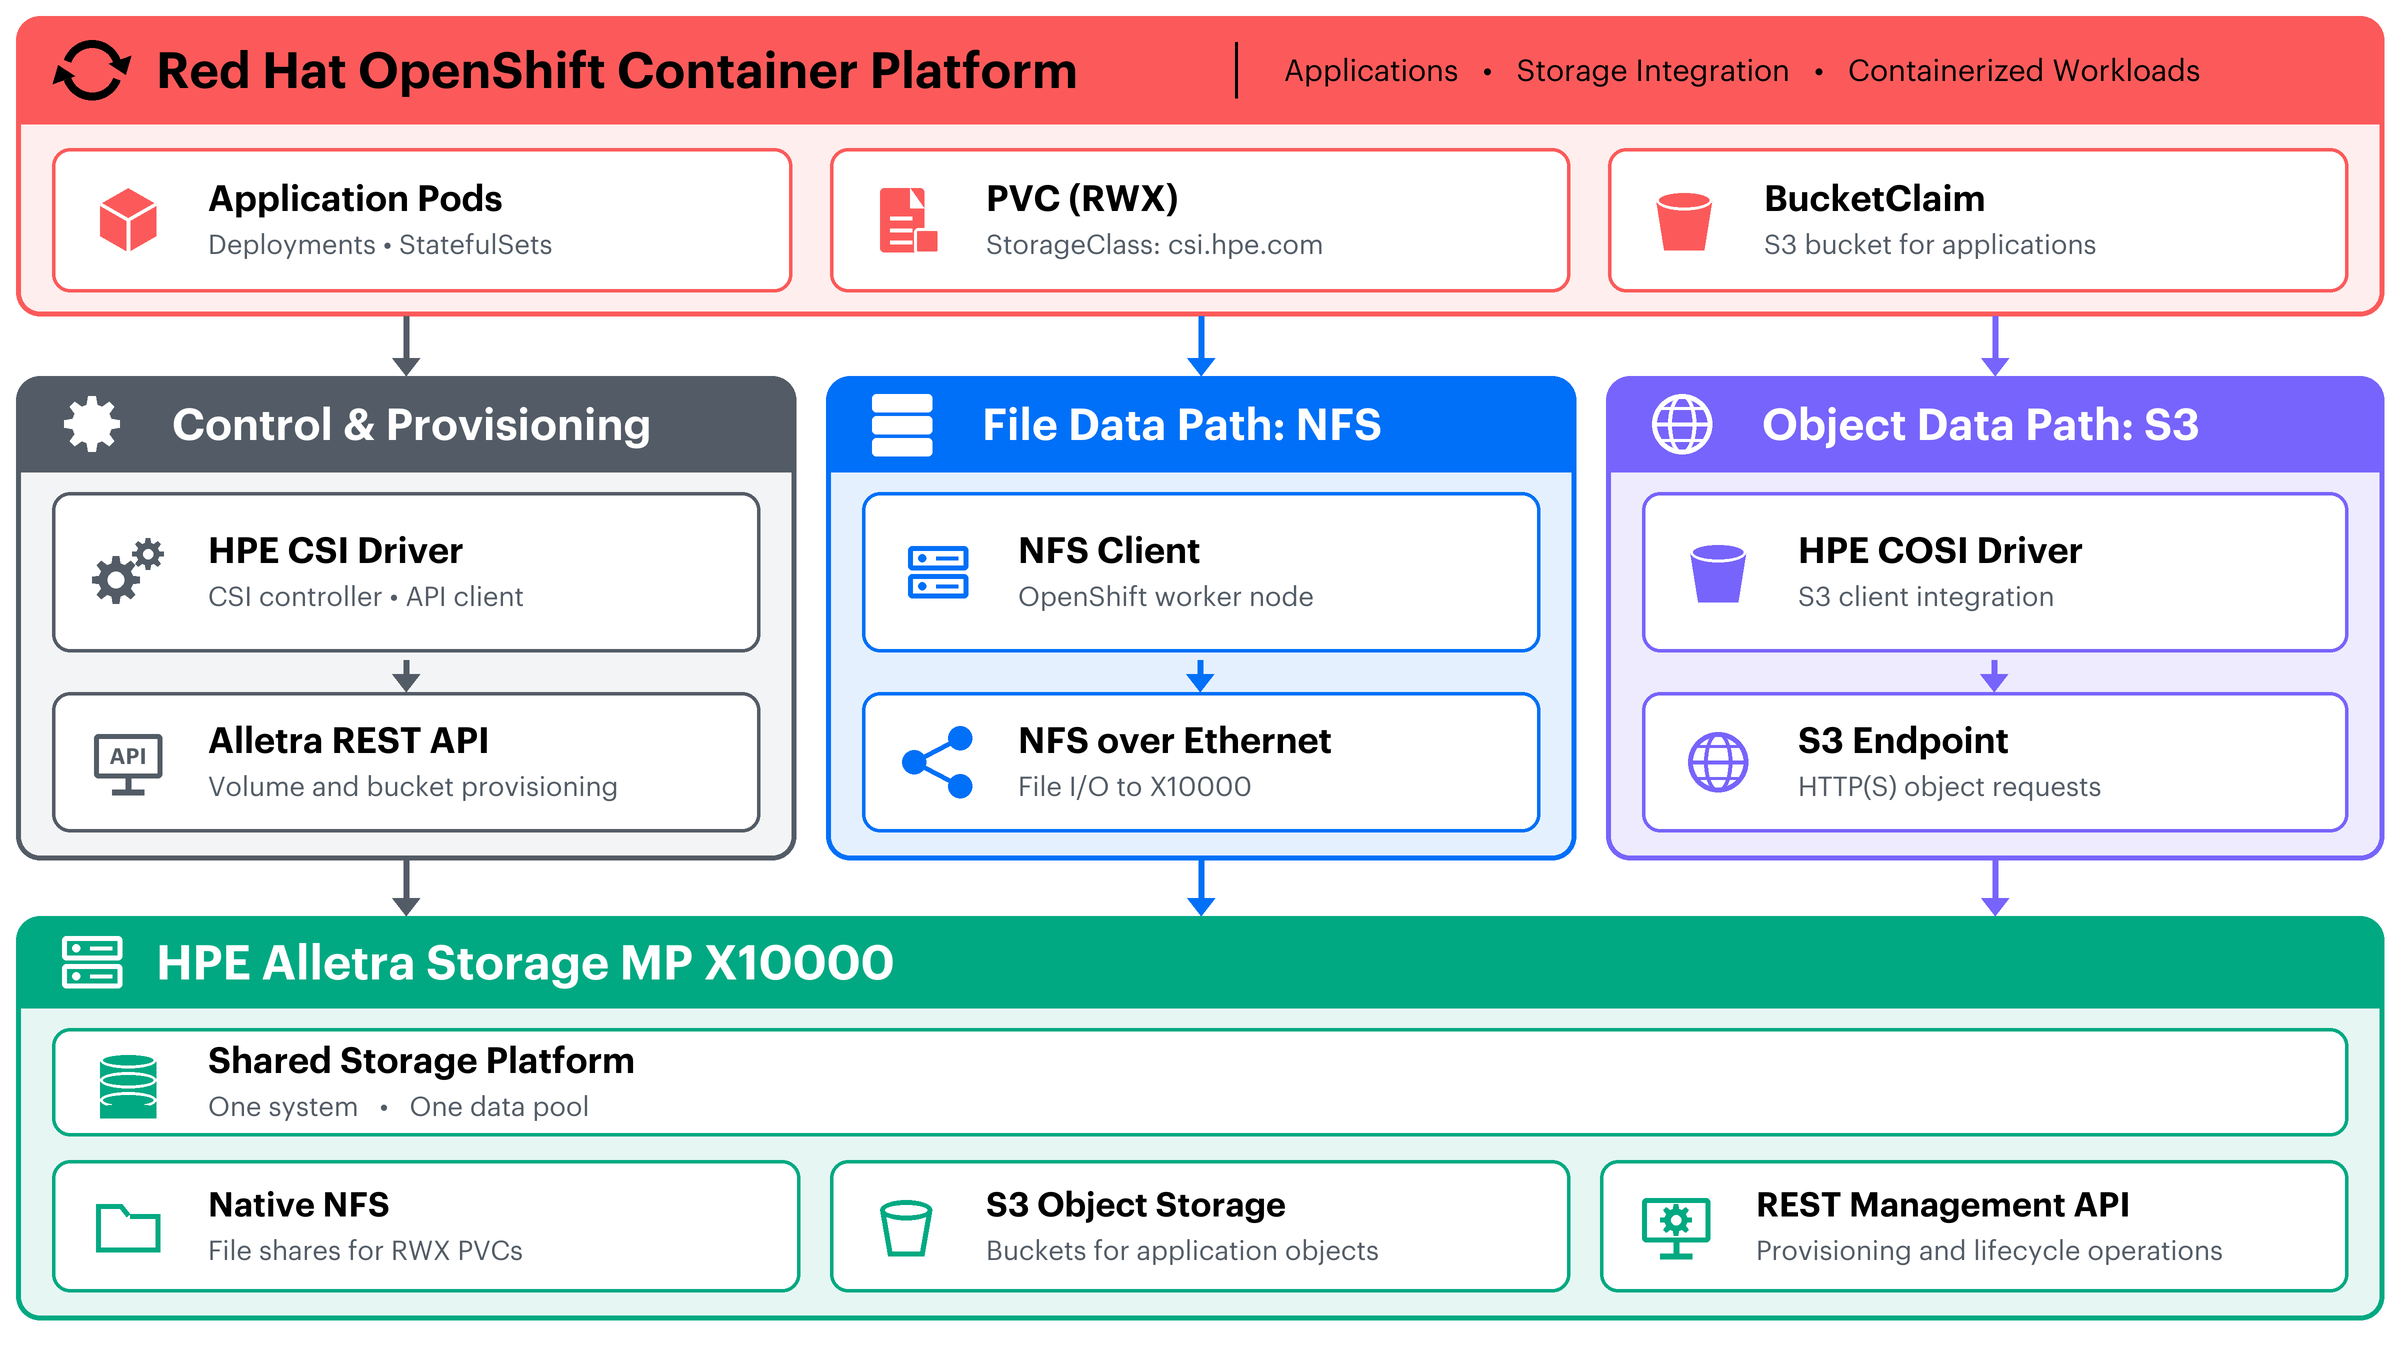
FIGURE 20. OpenShift, HPE CSI and COSI drivers, and Alletra Storage MP X10000
How the layers fit together
- OpenShift application layer. Applications run as Deployments and StatefulSets. They request file storage with a PersistentVolumeClaim (RWX) and object storage with a BucketClaim.
- Control path (dashed). The HPE CSI Operator and driver, with the X10000 file service CSP, manage the volume lifecycle through the X10000 REST management API. This path manages resources. It does not carry application data.
- Data path: NFS. Worker nodes mount NFS exports from the X10000 frontend data IPs over Ethernet.
- Data path: S3. Applications use the S3 HTTPS endpoint with credentials generated through BucketAccess.
- Alletra platform. The X10000 provides native NFS, S3 object storage and REST management on one shared data fabric.
CSI driver compared with COSI driver
| Item | HPE CSI Driver | HPE COSI Driver |
|---|---|---|
| Purpose | NFS file volumes (PVC / PV) | S3 buckets (BucketClaim / BucketAccess) |
| Install method | OperatorHub (OLM) in the web console | Helm chart only |
| Namespace | hpe-storage | hpe-object (or reuse hpe-storage) |
| Kubernetes objects | Secret, StorageClass, PVC | Secret, BucketClass, BucketClaim, BucketAccessClass, BucketAccess |
| Privileges | Privileged mode, host network, hostPath (custom SCC needed) | No privileged containers documented |
Prerequisites
Cluster-admin (
kubeadmin) access to the OpenShift web console and theocCLI.HPE Alletra Storage MP X10000 running platform version 2.0.0.0 or later.
HPE CSI Driver for Kubernetes 3.2.0 or later (satisfied by operator 3.3.0).
Frontend NFS data IP range already provisioned on the X10000 platform.
An X10000 admin account to generate the CSP API client credentials (see Generate the X10000 CSP API client credentials).
For COSI: Helm 3 installed, plus access to HPE Data Services Cloud Console (DSCC) and HPE GreenLake.
Do not enable Automatic Updates on the HPE CSI Operator subscription.
Part A. HPE CSI Driver for NFS
Create the project and apply SecurityContextConstraints
The CSI driver needs privileged mode, host ports and network, and hostPath mounts. Apply the SCC before installing the operator.
oc new-project hpe-storage --display-name="HPE CSI Operator for OpenShift"
oc apply -f https://scod.hpedev.io/csi_driver/partners/redhat_openshift/examples/scc/hpe-csi-scc.yaml
Expected output
securitycontextconstraints.security.openshift.io/hpe-csi-controller-scc created
securitycontextconstraints.security.openshift.io/hpe-csi-node-scc created
securitycontextconstraints.security.openshift.io/hpe-csi-csp-scc created
securitycontextconstraints.security.openshift.io/hpe-csi-nfs-scc created
NOTE
If you use a namespace other than hpe-storage, edit the SCC file first to update the ServiceAccount namespace references.
Install the HPE CSI Operator from OperatorHub
Log in to the OpenShift web console as
kubeadmin.Go to Operators > OperatorHub.
Search for HPE CSI and select the non-marketplace version (the certified Red Hat Operator, not the community Helm-based listing).
Click Install.
Set Installed Namespace to
hpe-storageand Update approval to Manual. Manual approval is required. Click Install.Go to Installed Operators, open the HPE CSI Operator, and click Approve on the pending install plan.
Confirm the status shows Succeeded.
Create the HPECSIDriver instance
From Installed Operators > HPE CSI Operator, open the HPECSIDriver API and click Create instance. In most cases no customization is needed, so leave the defaults and click Create. The equivalent YAML is:
apiVersion: storage.hpe.com/v1
kind: HPECSIDriver
metadata:
  name: hpecsidriver-sample
  namespace: hpe-storage
spec: {}
Key points for the X10000:
- Leave
disable.x10000FileService: false. This is the CSP needed for X10000 NFS exports. - Leave
disableNodeConformance,disableNodeConfiguration,disableNodeMonitor,disableHostDeletion,disableHostnameanddisablePreInstallHooksatfalse. Setting them totrueskips required node setup. imagePullPolicy: IfNotPresentandlogLevel: infoare fine defaults.
Verify the rollout
oc get pods -n hpe-storage
oc get hpecsidriver -n hpe-storage
oc get csidriver
Expect csi.hpe.com in the CSI driver list, and the controller, node and CSP pods in Running state.
Generate the X10000 CSP API client credentials
Run these steps on the X10000 platform CLI (glsctl) as an admin user.
IMPORTANT
The X10000 CLI is a restricted shell (rbash). mktemp, tee and output redirection are unavailable. glsctl create extoauthclient accepts only a real file path with -f, not /dev/stdin, because it needs a real TTY to read client_secret with echo disabled. If vim cannot write to the home directory, write the file to /tmp instead.
Create the client definition file
vim /tmp/extoauthclient.yaml
In vim, press i, paste the YAML below, then press Esc and type :wq. Leave client_secret empty so glsctl prompts for it securely.
apiVersion: sc.hpe.com/v1
kind: ExtOAuthClient
metadata:
  name: hpe-csi-driver
spec:
  client_name: csp
  groups:
    - ext:file-provisioner
  client_secret: ""  # Leave empty - you will be prompted
Create the client (no pipe, so the prompt gets a real TTY)
glsctl create extoauthclient -f /tmp/extoauthclient.yaml
# Enter extoauthclient client secret: <type a password meeting the rules below>
rm -f /tmp/extoauthclient.yaml
The client_secret must contain a number, an uppercase letter and a special character, with a minimum of 8 characters. If /tmp is not writable either, ask HPE support or the platform admin for an unrestricted shell session or a writable scratch directory.
Extract the client ID (used as the Secret username)
glsctl describe extoauthclient hpe-csi-driver | grep hf_client_id | awk -F= '{print $2}'
Create the backend Secret for the CSI driver
hpe-backend-secret.yaml
apiVersion: v1
kind: Secret
metadata:
  name: hpe-backend
  namespace: hpe-storage
stringData:
  serviceName: alletrastoragemp-x10000-nfs-csp-svc
  servicePort: "8080"
  backend: xx.xx.xx.xx:443     # X10000 management IP/hostname
  username: xxxxxxxxxxx    # client ID from the CSP API client credentials
  password: my-password-X10000   # the client_secret from the CSP API client credentials
oc apply -f hpe-backend-secret.yaml
oc -n hpe-storage get secret/hpe-backend
Create the StorageClass
The X10000 CSP is NFS-only. accessProtocol: nfs is mandatory, and mountOptions: vers=4.1 is required or NFS mount negotiation fails. This single hpe-standard-file StorageClass serves regular Pods and OpenShift Virtualization VMs. local_lock=all is harmless for Pods.
storageclass-hpe-standard-file.yaml
apiVersion: storage.k8s.io/v1
kind: StorageClass
metadata:
  annotations:
    storageclass.kubernetes.io/is-default-class: "true"
  name: hpe-standard-file
provisioner: csi.hpe.com
parameters:
  csi.storage.k8s.io/controller-publish-secret-name: hpe-backend
  csi.storage.k8s.io/controller-publish-secret-namespace: hpe-storage
  csi.storage.k8s.io/node-publish-secret-name: hpe-backend
  csi.storage.k8s.io/node-publish-secret-namespace: hpe-storage
  csi.storage.k8s.io/provisioner-secret-name: hpe-backend
  csi.storage.k8s.io/provisioner-secret-namespace: hpe-storage
  description: "Volume created by the HPE CSI Driver for Kubernetes"
  accessProtocol: nfs
  accessControlList: "*"          # restrict with CIDR/hostnames in production
reclaimPolicy: Delete
allowVolumeExpansion: false        # X10000 has no export-level capacity limit
mountOptions:
  - vers=4.1
  - local_lock=all                 # needed for VM disks; harmless for Pods
  - 'context="system_u:object_r:container_file_t:s0"'
oc apply -f storageclass-hpe-standard-file.yaml
oc get storageclass
NOTE
mountOptions are immutable. To change them, delete and recreate the StorageClass. Existing PVs keep their original mount options, so recreate those PVCs to pick up the change.
IMPORTANT
accessControlList supports IP, hostname or wildcard (needs DNS), CIDR, or wildcard-CIDR entries, up to 50 comma-separated entries and 253 characters. Restrict it in production instead of using "*".
Set the StorageProfile (OpenShift Virtualization only)
CDI auto-generates a StorageProfile for every StorageClass. For the HPE provisioner it lists Block modes first and sets cloneStrategy: csi-clone. The X10000 CSP is file-only with no clone support, so CDI creates PVCs such as tmp-pvc-<uid> with volumeMode: Block. They stay Pending with volume mode can't be block for File. Pin the profile to Filesystem and the copy clone strategy. The profile is deleted with the StorageClass, so redo this whenever you recreate it.
oc patch storageprofile hpe-standard-file --type merge -p '{"spec":{"claimPropertySets":[{"accessModes":["ReadWriteMany"],"volumeMode":"Filesystem"}],"cloneStrategy":"copy"}}'

oc get storageprofile hpe-standard-file -o yaml    # status.claimPropertySets should show only Filesystem
oc get pvc -n default | grep tmp-pvc               # delete any stuck Pending tmp PVC
Fix SCC restrictions for non-root workloads (if needed)
OpenShift runs containers as an arbitrary UID by default. If Pods cannot write to the mounted volume under a restricted SCC, add fsMode to the StorageClass parameters:
  fsMode: "0770"   # RWO claims
  # or
  fsMode: "0777"   # RWX claims
Validate with a test PVC
pvc-x10k-test.yaml
apiVersion: v1
kind: PersistentVolumeClaim
metadata:
  name: pvc-x10k-test
  namespace: default
spec:
  accessModes:
    - ReadWriteMany
  storageClassName: hpe-standard-file
  resources:
    requests:
      storage: 10Gi
oc apply -f pvc-x10k-test.yaml
oc get pvc pvc-x10k-test -n default
oc get pv
Expected result: the PVC becomes Bound.
Validate with a test Pod (mount and write)
pod-x10k-test.yaml
apiVersion: v1
kind: Pod
metadata:
  name: x10k-mount-test
  namespace: default
spec:
  containers:
    - name: app
      image: registry.access.redhat.com/ubi9/ubi-minimal
      command: ["/bin/sh", "-c", "sleep 3600"]
      volumeMounts:
        - name: data
          mountPath: /data
  volumes:
    - name: data
      persistentVolumeClaim:
        claimName: pvc-x10k-test
oc apply -f pod-x10k-test.yaml
oc get pod x10k-mount-test -n default
oc exec -n default x10k-mount-test -- sh -c "echo ok > /data/test.txt; cat /data/test.txt"
Expected output: ok
Part B. HPE COSI Driver for S3
The HPE COSI Driver is a separate driver from the CSI driver in Part A. Use it for Kubernetes-native S3 bucket provisioning against the X10000 object storage front end, through the upstream Container Object Storage Interface API (BucketClass, BucketClaim, BucketAccessClass, BucketAccess).
- It is delivered only as a Helm chart. There is no OperatorHub packaging today.
- It can coexist with the CSI driver on the same cluster.
- SCOD does not publish OpenShift-specific COSI steps. The commands below follow the upstream Helm and kustomize process, adapted to use
ocand a dedicated project.
IMPORTANT
Part B assumes a fresh deployment. Create objects in this order: ConfigMap, Secret with CA, BucketClass, BucketClaim, BucketAccessClass, BucketAccess. Creating the Secret or BucketClaim earlier causes x509: certificate signed by unknown authority errors and forces you to redo the section.
References:
- HPE Community blog: Enhanced Kubernetes scalability and automation with COSI
- HPE CSI Driver for Kubernetes documentation (SCOD): CSP client authorization for the HPE Alletra Storage MP X10000
Compatibility
| Driver version | X10000 OS / protocol |
|---|---|
| COSI v2.0.0 | 2.0.0.0 / S3 only |
- Known limitation: creating
BucketClaimorBucketAccessobjects in parallel can fail intermittently. Create them one at a time. - OpenShift 4.22 is newer than the listed v2.0.0 ceiling (4.21). Treat 4.22 as field test, not yet certified until HPE updates the matrix. Validate that the pods run cleanly under the
restricted-v2SCC.
Create a project for the COSI driver
oc new-project hpe-object --display-name="HPE COSI Driver for OpenShift"
You can reuse hpe-storage instead. Keep the -n <namespace> flags consistent with whichever project you choose.
Install the upstream COSI controller and CRDs
oc kustomize "github.com/kubernetes-sigs/container-object-storage-interface//?ref=release-0.2" \
  | sed -e "s/container-object-storage-system/hpe-object/g" \
  | oc apply -f-
The upstream manifests default to the container-object-storage-system namespace. The sed substitution retargets them to the hpe-object project.
Install the HPE COSI Driver with Helm
helm repo add hpe-storage https://hpe-storage.github.io/co-deployments/
helm repo update
helm install my-hpe-cosi-driver hpe-storage/hpe-cosi-driver \
  -n hpe-object --version 2.0.0

oc get pods -n hpe-object
- See the chart on ArtifactHub (
hpe-storage/hpe-cosi-driver) for the full values reference. Air-gapped mirroring is documented on SCOD if nodes cannot reach quay.io or registry.k8s.io. - If a Pod fails under the default SCCs,
oc describe podshows the denial reason. Assign an SCC to themy-hpe-cosi-driverServiceAccount inhpe-object, the same way as when applying the SecurityContextConstraints for the CSI driver. - By default the chart targets the production GreenLake endpoint
https://common.cloud.hpe.com. OverrideaccessManagement.glcpCommonCloudonly if your workspace is registered against a non-production GLCP environment. Check Quick links > Manage Workspace in DSCC first.
Gather the values for the backend Secret
| # | Value | Where to find it |
|---|---|---|
| 1 | S3 accessKey / secretKey | Create an access policy (All Buckets, with CreateBucket, DeleteBucket, PutBucketTagging) and an S3 user in DSCC. The user name and password become the keys. |
| 2 | S3 endpoint | DSCC > Data Ops Manager > Systems > your X10000 > Networking > Frontend Network > Network DNS Subdomains. Format: http://<Network DNS Subdomains>. |
| 3 | glcpUserClientId / glcpUserSecretKey | From the HPE GreenLake API client documentation. |
| 4 | dsccZone | From the DSCC service URL. For example https://console-us1.data.cloud.hpe.com gives us1.data.cloud.hpe.com. |
| 5 | clusterSerialNumber | X10000 system details in DSCC. |
| 6 | glcpWorkspaceId | Required from v2.0.0. DSCC > Quick links > Manage Workspace. |
| 7 | onPremCloudCA | Base64 CA bundle. This driver version requires it even on connected deployments. Build it in the onPremCloudCA bundle section before creating the Secret. |
Trust the X10000 array certificate (OS-level ConfigMap)
The array S3 endpoint usually presents a self-signed certificate. DriverCreateBucket and DriverDeleteBucket validate it through the container OS trust store, not through onPremCloudCA. Fix this first, because it blocks the earliest step (bucket creation).
Step 1. Fetch the full certificate chain
oc run cert-fetch --rm -i --tty --restart=Never \
  --image=registry.access.redhat.com/ubi9/ubi-minimal \
  -n hpe-object -- sh -c "microdnf install -y openssl 2>/dev/null; \
  openssl s_client -showcerts -connect <array-s3-fqdn>:443 -servername <array-s3-fqdn> </dev/null 2>/dev/null"
IMPORTANT
Do not pipe through openssl x509. That keeps only the leaf certificate. Copy every BEGIN CERTIFICATE to END CERTIFICATE block, in order, into a local file named array-root-ca.pem.
Step 2. Create the ConfigMap
oc create configmap alletra-ca-bundle --from-file=custom-ca.crt=array-root-ca.pem -n hpe-object
Step 3. Mount it into both containers of hpe-cosi-provisioner
Mount it at a path that Go crypto/x509.SystemCertPool() scans automatically (/etc/ssl/certs/<any>.crt). First inspect the existing volumes so you append and do not replace them. A fresh Helm install already has a socket emptyDir volume shared between the driver and sidecar. Replacing the array destroys it and crashes the driver with failed to listen on unix socket: bind: no such file or directory.
oc get deployment hpe-cosi-provisioner -n hpe-object -o yaml | grep -B2 -A8 "volumeMounts:\|^ volumes:"
Append with the JSON Patch /- syntax
oc patch deployment hpe-cosi-provisioner -n hpe-object --type='json' -p='[
  {"op":"add","path":"/spec/template/spec/volumes/-","value":{"name":"alletra-ca-volume","configMap":{"name":"alletra-ca-bundle"}}},
  {"op":"add","path":"/spec/template/spec/containers/0/volumeMounts/-","value":{"name":"alletra-ca-volume","mountPath":"/etc/ssl/certs/custom-ca.crt","subPath":"custom-ca.crt"}},
  {"op":"add","path":"/spec/template/spec/containers/1/volumeMounts/-","value":{"name":"alletra-ca-volume","mountPath":"/etc/ssl/certs/custom-ca.crt","subPath":"custom-ca.crt"}}
]'
Step 4. Verify the rollout and the mount
oc rollout status deployment/hpe-cosi-provisioner -n hpe-object
oc get pods -n hpe-object
oc exec -n hpe-object deployment/hpe-cosi-provisioner -c hpe-cosi-driver -- cat /etc/ssl/certs/custom-ca.crt
Build the onPremCloudCA bundle (GLCP and DSCC chains)
onPremCloudCA builds one shared x509.CertPool used for both the GLCP OAuth2 token request and the DSCC user and access-policy lookup during DriverGrantBucketAccess. For publicly signed certificates (Amazon for GLCP, Sectigo/COMODO for DSCC) you must supply the full chain (leaf, all intermediates and root). A leaf-only certificate fails Go chain verification.
Step 1. Fetch the GLCP full chain
oc run cert-fetch2 --rm -i --tty --restart=Never \
  --image=registry.access.redhat.com/ubi9/ubi-minimal \
  -n hpe-object -- sh -c "microdnf install -y openssl 2>/dev/null; \
  openssl s_client -showcerts -connect <glcpCommonCloud-fqdn>:443 -servername <glcpCommonCloud-fqdn> </dev/null 2>/dev/null"
Save all certificate blocks (leaf, intermediate, root) as glcp-full-chain.pem, in the order shown.
Step 2. Fetch the DSCC full chain
oc run cert-fetch3 --rm -i --tty --restart=Never \
  --image=registry.access.redhat.com/ubi9/ubi-minimal \
  -n hpe-object -- sh -c "microdnf install -y openssl 2>/dev/null; \
  openssl s_client -showcerts -connect <dsccZone-fqdn>:443 -servername <dsccZone-fqdn> </dev/null 2>/dev/null"
Save all certificate blocks as dscc-full-chain.pem.
Step 3. Combine and encode
cat glcp-full-chain.pem dscc-full-chain.pem > combined-ca.pem
base64 -w0 combined-ca.pem
Copy the single-line base64 output exactly as produced. Do not retype or reformat it. Manual copying of long base64 strings often corrupts them and causes failed to parse CA certificate errors.
Create the backend Secret for the COSI driver
hpe-object-backend-secret.yaml
apiVersion: v1
kind: Secret
metadata:
  name: hpe-object-backend
  namespace: hpe-object
stringData:
  accessKey: <s3-access-key>
  secretKey: <s3-secret-key>
  endpoint: https://<array-s3-fqdn>
  glcpUserClientId: <glcp-client-id>
  glcpUserSecretKey: <glcp-client-secret>
  glcpWorkspaceId: <glcp-workspace-id>
  dsccZone: <dscc-zone-fqdn>
  clusterSerialNumber: <array-serial-number>
  onPremCloudCA: <base64 output from step 3 of the onPremCloudCA bundle section, as one unbroken line>
oc apply -f hpe-object-backend-secret.yaml
Create a BucketClass
COSI has no StorageClass object. A StorageClass is a CSI concept for block and file storage. For S3, BucketClass is the cluster-scoped resource that plays the same role, and BucketClaim is the namespaced equivalent of a PersistentVolumeClaim. Create one BucketClass per backend or policy.
hpe-standard-object-bucketclass.yaml
kind: BucketClass
apiVersion: objectstorage.k8s.io/v1alpha1
metadata:
  name: hpe-standard-object
driverName: cosi.hpe.com
deletionPolicy: Delete
parameters:
  cosiUserSecretName: hpe-object-backend
  cosiUserSecretNamespace: hpe-object
  compression: Enabled
  versioning: Enabled
  # locking: Enabled            # requires versioning: Enabled
  # retentionMode: COMPLIANCE   # only with locking: Enabled
  # defaultRetentionInterval: 30d
oc apply -f hpe-standard-object-bucketclass.yaml
Create a BucketClaim
my-first-bucketclaim.yaml
kind: BucketClaim
apiVersion: objectstorage.k8s.io/v1alpha1
metadata:
  name: my-first-bucketclaim
  namespace: hpe-object
spec:
  bucketClassName: hpe-standard-object
  protocols:
    - s3
oc apply -f my-first-bucketclaim.yaml
oc get bucketclaim,bucket
To map an existing (brownfield) bucket, see the Brownfield example on SCOD using existingBucketID or existingBucketName.
Create a BucketAccessClass and BucketAccess
hpe-standard-access-bucketaccessclass.yaml
kind: BucketAccessClass
apiVersion: objectstorage.k8s.io/v1alpha1
metadata:
  name: hpe-standard-access
driverName: cosi.hpe.com
authenticationType: Key
parameters:
  cosiUserSecretName: hpe-object-backend
  cosiUserSecretNamespace: hpe-object
my-first-bucketaccess.yaml
kind: BucketAccess
apiVersion: objectstorage.k8s.io/v1alpha1
metadata:
  name: my-first-bucketaccess
  namespace: hpe-object
spec:
  bucketAccessClassName: hpe-standard-access
  credentialsSecretName: my-first-access-secret
  bucketClaimName: my-first-bucketclaim
  protocol: s3
oc apply -f hpe-standard-access-bucketaccessclass.yaml
oc apply -f my-first-bucketaccess.yaml
oc get bucketaccess,secret
Inspect the generated S3 credentials
oc get secret my-first-access-secret -o jsonpath='{.data.BucketInfo}' | base64 --decode | jq
The result contains accessKeyID, accessSecretKey, endpoint, bucketName and more. Mount my-first-access-secret into a Pod to build an S3 client (boto3 or an AWS SDK).
End-to-end S3 test (boto3 read and write)
Validate that the generated credentials work against the real S3 endpoint, not only that the Secret exists.
Step 1. Create the test script ConfigMap
s3-test-configmap.yaml
apiVersion: v1
kind: ConfigMap
metadata:
  name: s3-test-script
  namespace: hpe-object
data:
  test.py: |
    import json, boto3

    with open('/creds/BucketInfo') as f:
        info = json.load(f)

    s3cfg = info['spec']['secretS3']
    endpoint = s3cfg['endpoint']
    access_key = s3cfg['accessKeyID']
    secret_key = s3cfg['accessSecretKey']
    bucket = info['spec']['bucketName']

    s3 = boto3.client(
        's3',
        endpoint_url=endpoint,
        aws_access_key_id=access_key,
        aws_secret_access_key=secret_key,
        region_name=s3cfg.get('region', 'us-east-1'),
        verify=False,  # array uses a self-signed cert; lab/test only
    )

    key = 'hello.txt'
    body = b'hello from cosi s3 test\n'

    print(f"Writing object '{key}' to bucket '{bucket}'...")
    s3.put_object(Bucket=bucket, Key=key, Body=body)

    print(f"Reading object '{key}' back...")
    resp = s3.get_object(Bucket=bucket, Key=key)
    data = resp['Body'].read()
    print("Content:", data.decode())

    assert data == body, "Mismatch between written and read content!"
    print("SUCCESS: S3 read/write test passed.")
Step 2. Create the test Pod
s3-test-pod.yaml
apiVersion: v1
kind: Pod
metadata:
  name: s3-test-pod
  namespace: hpe-object
spec:
  restartPolicy: Never
  containers:
    - name: s3-test
      image: python:3.12-slim
      command: ["/bin/sh", "-c"]
      args:
        - "pip install --no-cache-dir boto3 >/dev/null 2>&1 && python /app/test.py"
      volumeMounts:
        - name: creds
          mountPath: /creds
        - name: script
          mountPath: /app
  volumes:
    - name: creds
      secret:
        secretName: my-first-access-secret
    - name: script
      configMap:
        name: s3-test-script
Step 3. Run and check
oc apply -f s3-test-configmap.yaml
oc apply -f s3-test-pod.yaml
oc logs -n hpe-object pod/s3-test-pod -f
Expected output: SUCCESS: S3 read/write test passed.
Clean up the test resources
oc delete pod s3-test-pod -n hpe-object
oc delete configmap s3-test-script -n hpe-object
Cleanup order
oc delete bucketaccess my-first-bucketaccess      # revokes S3 credentials
oc delete bucketclaim my-first-bucketclaim        # deletes the Bucket (per deletionPolicy)
Troubleshooting
CSI: stuck or Pending PVC
oc describe pvc pvc-x10k-test -n default
oc get events -n default --sort-by=.lastTimestamp
oc get pods -n hpe-storage
oc logs -n hpe-storage deployment/hpe-csi-controller --tail=200
Wrong
serviceName,backendor credentials in thehpe-backendSecret.A firewall or NetworkPolicy blocks worker nodes from the X10000 management endpoint (443) or the NFS data IPs.
Missing
mountOptions: vers=4.1on the StorageClass.The CSP client authorization (see Generate the X10000 CSP API client credentials) is missing, expired or in the wrong group (
ext:file-provisioner).disable.x10000FileServicewas set totrueon the HPECSIDriver.
CSI: OpenShift Virtualization VM in CrashLoopBackOff (lock error 524)
Symptom. The VM shows CrashLoopBackOff. The virt-launcher pod is deleted on every retry, so oc logs returns NotFound. The VMI event shows qemu-kvm: ... Failed to lock byte 100: Unknown error 524.
Cause. QEMU takes byte-range locks on the disk image. Error 524 (ENOTSUPP) means the NFS export rejected the lock request. Confirm with a plain pod on the same PVC (stop the VM first):
apiVersion: v1
kind: Pod
metadata: {name: locktest, namespace: default}
spec:
  containers:
  - name: t
    image: registry.access.redhat.com/ubi9/ubi
    command: ["sh","-c","touch /d/f && flock -x /d/f -c 'echo LOCK_OK' ; sleep 3600"]
    volumeMounts: [{name: d, mountPath: /d}]
  volumes:
  - name: d
    persistentVolumeClaim: {claimName: <vm-pvc-name>}
flock: /d/f: Unknown error 524 in oc logs locktest confirms the problem.
Fix. Add local_lock=all to the StorageClass mountOptions (see Create the StorageClass). Recreate the StorageClass, re-apply the StorageProfile patch (see Set the StorageProfile), then recreate the VM and its DataVolume and PVC. The client then handles locks locally. Locks are no longer enforced across nodes, so use one VM per disk and take care with RWX live migration. The server-side fix is to have HPE enable byte-range locking on the X10000 NFS export.
COSI: TLS and certificate trust
| # | Call | Endpoint | Trust mechanism |
|---|---|---|---|
| 1 | DriverCreateBucket / DriverDeleteBucket | X10000 S3 frontend | OS trust store (/etc/ssl/certs) in the hpe-cosi-driver container. Fixed in the array certificate trust section. |
| 2 | DriverGrantBucketAccess step 1 (GLCP OAuth2 token) | https://<glcpCommonCloud>/authorization/v2/oauth2/.../token | onPremCloudCA in the backend Secret. Built in the onPremCloudCA bundle section. |
| 3 | DriverGrantBucketAccess step 2 (DSCC lookup) | https://<dsccZone>/api/v1/... | Same onPremCloudCA (shared cert pool). Built in the onPremCloudCA bundle section. |
The COSI driver makes HTTPS calls to three separate endpoints, each with its own trust requirement.
- The X10000 S3 endpoint usually has a self-signed certificate that the OS default bundle does not trust. Without the array certificate trust step, bucket create and delete fail with
x509: certificate signed by unknown authority. onPremCloudCAis one sharedx509.CertPool. The X10000 certificate does not help with GLCP or DSCC, which are different trust domains.- If
onPremCloudCAis empty, some driver versions crash withfailed to decode base64 CA certificate: illegal base64 data at input byte 0. - Publicly signed certificates need the full chain. A leaf-only certificate fails verification. Only self-signed certificates (issuer equals subject) work by coincidence.
IMPORTANT
If you created BucketClaim or BucketAccess before finishing the array certificate trust and onPremCloudCA bundle steps, delete and recreate them after the Secret is fixed. Use oc delete bucketaccess <name> -n hpe-object --ignore-not-found and oc delete bucketclaim <name> -n hpe-object --ignore-not-found, then reapply from Create a BucketClass. A Bucket stuck in Terminating after a failed DriverDeleteBucket can be force-cleared with oc patch bucket <name> -p '{"metadata":{"finalizers":[]}}' --type=merge. That skips the real backend delete, so use it only as a last resort in a lab.
Known limitations (X10000 CSP)
The following limitations apply to the HPE CSI Driver and the X10000 Container Storage Provider (CSP) in this release. Review them before you plan capacity, networking and workloads.
| Area | Limitation | What to do |
|---|---|---|
| Protocol and data protection | Only NFS is supported. Snapshots and clones are not available yet. | Use NFS StorageClasses. Use application-level or external backup methods until snapshots and clones are available. |
| File locking | The X10000 NFS export does not support byte-range locks (error 524). | Add local_lock=all to the StorageClass mountOptions (see Create the StorageClass). This is required for OpenShift Virtualization VM disks. Locks are then handled on the local node only, so use one VM per disk. See the "CSI: OpenShift Virtualization VM in CrashLoopBackOff (lock error 524)" troubleshooting topic. |
| Capacity | .spec.resources.requests.storage on the PVC is not enforced by the backend. Volume expansion is not implemented. | Set allowVolumeExpansion: false on the StorageClass. Plan volume sizes in advance and monitor capacity on the array. |
| IPv6 | IPv6 is not supported by the CSI driver or the CSP on the X10000. | Use IPv4 for management and data connectivity. |
| Data IP range | The NFS frontend data IPs use the same range as S3. | Do not change the range until all dependent NFS and S3 workloads are scaled to zero. Scale them back up after the change. |
| COSI | Creating BucketClaim or BucketAccess objects in parallel can fail intermittently. | Create these objects one at a time and wait for each to become ready. If an object fails, delete it and recreate it (see Compatibility). |
Deploying Internal Openshift Data Foundation
This section covers deploying OpenShift Data Foundation 4.22 on existing Red Hat OpenShift Container Platform 4.22 worker nodes.
The OpenShift Data Foundation operator installation will be using Local Storage operator which will use file system storage of 10GB for monitoring purpose and block storage of 500GB/2TB for OSD (Object Storage Daemon) volumes. These OSD are useful for configuring any application on top of OCP cluster using ODF configuration.
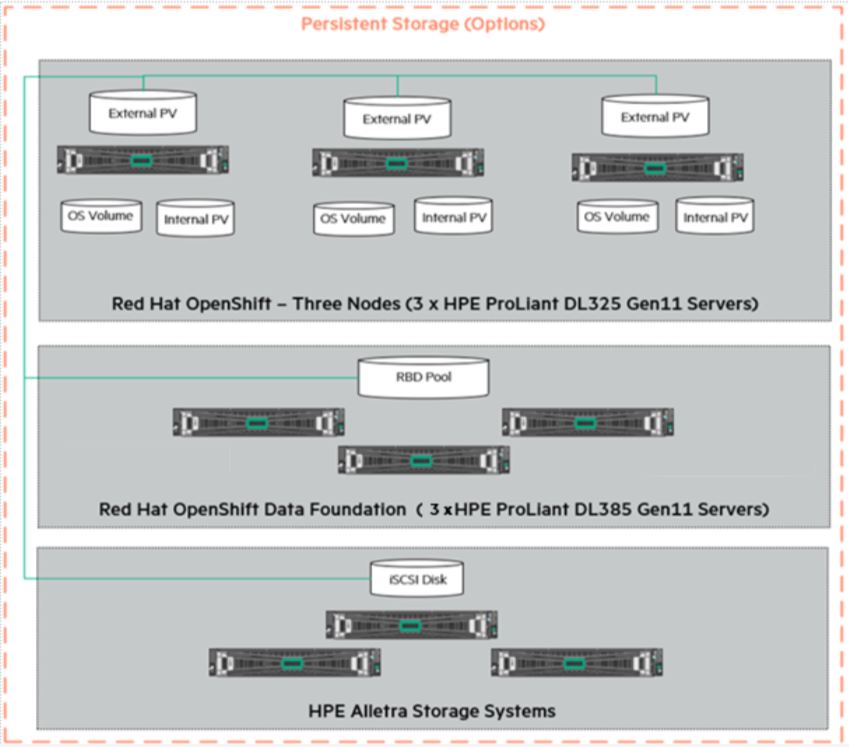
FIGURE 21. Logical storage Layout in Solution
The below operators are required to create ODF cluster and deployed through automation fashion.
Local Storage Operator
OpenShift Data Foundation Operator
Flow Diagram
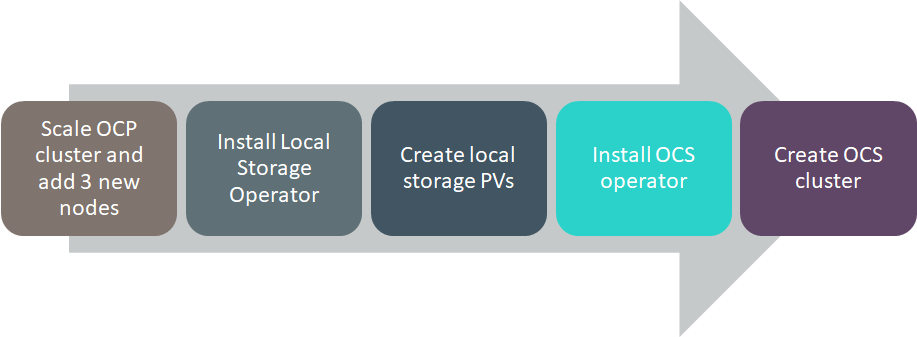
FIGURE 22. Deploying OpenShift Container Storage Solution Flow Diagram
Configuration requirements
The below table shows about all required worker node configuration.
| Server Role | CPU | RAM | HardDisk1 | HardDisk2 | HardDisk3 |
|---|---|---|---|---|---|
| Worker | 16 | 64 | 120 GB | 10 GB | 500 GB/2 TB |
Pre-requisites
Red Hat OpenShift Container Platform 4.22 cluster console is required with the login credentials.
Availability of any local storage from any storage (i.e Nimble,Alletra,Local Storage) in OpenShift Container Platform.
ODF installation on OCP 4.22 cluster requires a minimum of 3 worker nodes but ODF should have exact 3 worker nodes which use two more hard disks with 10GB for mon POD (3 in total using always a PVC) + 500GB (or more than 500GB) volume (a PVC using the default "thin" storage class) for the OSD volumes. It also requires 16 CPUs and 64GB RAM for each node and worker node hard disk configuration as shown in above figure.
Scripts for deploying ODF cluster
NOTE
BASE_DIR - is a base directory path for all automated scripts directories are in place and path is /opt/hpe-solutions-openshift/DL-LTI-Openshift/
This section provides details on the scripts developed to automate the installation of ODF operator on the OCP cluster. The scripts used to deploy ODF can be found in the installer VM at $BASE_DIR/odf_installation.
install_odf_operator.py - main python script which installs Local Storage operator, OpenShift Container Storage operators, creates file system & block storage and also creates SCs, PVs, PVCs.
config.py - This python script is used to convert user input values into program variables for usage by the install_odf_operator.py script.
userinput.json - The userinput.json file needs to be modified as per user configuration and requirements for installing and scaling ODF cluster.
create_local_storage_operator.yaml -- Creates Local Storage operator's Namespace, installs Local Storage operator.
auto_discover_devices.yaml -– Creates the LocalVolumeDiscovery resource using this file.
localvolumeset.yaml -– Creates the LocalVolumeSets
odf_operator.yaml -- This playbook creates OpenShift Container Storage Namespace and OpenShift Data Foundation Operator.
storagecluster.yaml -– This playbook creates storage classes, PVCs (Persistent Volume Claim), pods to bring up the ODF cluster.
Installing OpenShift Container Storage on OpenShift Container Platform
Login to the installer machine as non-root user and browse to python virtual environment as per DG.
Update the userinput.json file is found at $BASE_DIR/odf_installation with the following setup configuration details:
OPENSHIFT_DOMAIN: "<OpenShift Server sub domain fqdn (api.domain.base_domain)>",

OPENSHIFT_PORT: "<OpenShift Server port number (OpenShift Container Platform runs on port 6443 by default)>",

LOCAL_STORAGE_VERSION": "<OCP_cluster_version>",

OPENSHIFT_CONTAINER_STORAGE_VERSION": "",

OPENSHIFT_CLIENT_PATH: "<Provide oc absolute path ending with / OR leave empty in case oc is available under /usr/local/bin>",

"OPENSHIFT_CONTAINER_PLATFORM_WORKER_NODES": <Provide OCP worker nodes fqdn list ["sworker1.fqdn", "sworker2.fqdn","sworker3.fqdn"]>,

"OPENSHIFT_USERNAME": "",
"OPENSHIFT_PASSWORD": "",
"DISK_NUMBER": "" ```
Execute the following command to deploy ODF cluster.
> cd $BASE_DIR/odf_installation> python -W ignore install_odf_operator.pyThe output of the above command as shown below:
> python -W ignore install_odf_operator.pyEnter key for encrypted variables: Logging into your OpenShift Cluster Successfully logged into the OpenShift Cluster Waiting for 1 minutes to 'Local Storage' operator to be available on OCP web console..!! 'Local Storage' operator is created..!! Waiting for 2 minutes to OCS operator to be available on OCP web console..!! 'OpenShift Container Storage' operator is created..!! INFO: 1) Run the below command to list all PODs and PVCs of OCS cluster. 'oc get pod,pvc -n openshift-storage' 2) Wait for 'pod/ocs-operator-xxxx' pod to be up and running. 3) Log into OCP web GUI and check Persistant Stoarge in dashboard. $
Validation of the OpenShift Data Foundation cluster
The required operators will be created after the execution of the script and they will be reflected in the OpenShift console. This section outlines the steps to verify the operators created through script and are reflected in the GUI:
Login to the OpenShift Container Platform web console as the user with administrative privileges.
Navigate to Ecosystem -> Project (local-storage) -> Installed Operators select your project name.
The Openshift data foundation operator will be available in the OpenShift web console as shown in below Figure.
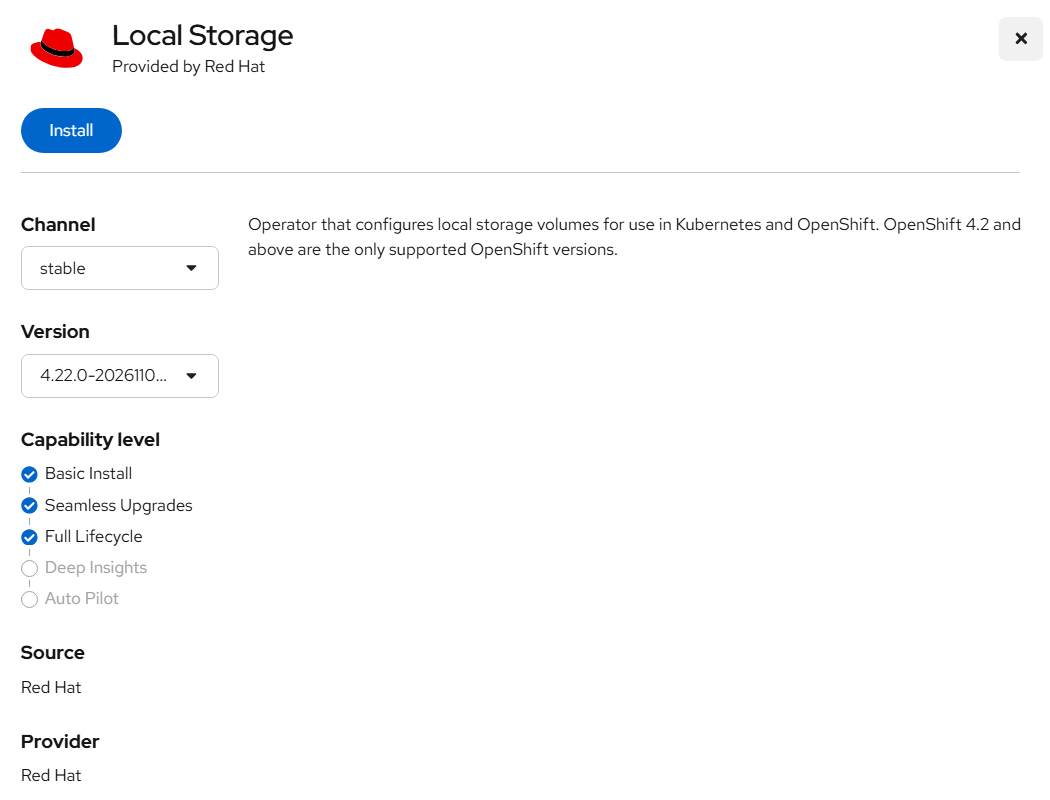
FIGURE 23. Deploying local storage operator
Navigate to Ecosystem -> Installed Operators select your project name openshift-storage for OpenShift Container Storage operator.
The OpenShift Container Storage operator will be available on the OpenShift Container Platform web console as shown in below Figure.

FIGURE 24. Deployed OpenShift Data Foundation operator
SCs of OpenShift Data Foundation operator on CLI as shown in below.
> oc get scNAME PROVISIONER RECLAIMPOLICY VOLUMEBINDINGMODE ALLOWVOLUMEEXPANSION AGE local-sc kubernetes.io/no-provisioner Delete WaitForFirstConsumer false 45h localblock-sc kubernetes.io/no-provisioner Delete WaitForFirstConsumer false 45h odf-storagecluster-ceph-rbd openshift-storage.rbd.csi.ceph.com Delete Immediate false 45h odf-storagecluster-cephfs openshift-storage.cephfs.csi.ceph.com Delete Immediate false 45h openshift-storage.noobaa.io openshift-storage.noobaa.io/obc Delete Immediate false 45hPVs of OpenShift Data Foundation operator on CLI as shown in below.
> oc get pvNAME CAPACITY ACCESS MODES RECLAIM POLICY STATUS CLAIM STORAGECLASS REASON AGE local-pv-2febb788 500Gi RWO Delete Bound openshift-storage/odf-deviceset-1-0-lhtvh localblock-sc 45h local-pv-5f19c0e5 10Gi RWO Delete Bound openshift-storage/rook-ceph-mon-b local-sc 45h local-pv-b73b1cd5 500Gi RWO Delete Bound openshift-storage/odf-deviceset-2-0-jmmck localblock-sc 45h local-pv-b8ba8c38 10Gi RWO Delete Bound openshift-storage/rook-ceph-mon-a local-sc 45h local-pv-c3a372f6 10Gi RWO Delete Bound openshift-storage/rook-ceph-mon-c local-sc 45h local-pv-e5e3d596 500Gi RWO Delete Bound openshift-storage/odf-deviceset-0-0-5jxg7 localblock-sc 45h pvc-8f3e3d8b-6be7-4ba8-8968-69cbc866c89f 50Gi RWO Delete Bound openshift-storage/db-noobaa-db-0 ocs-storagecluster-ceph-rbd 45h $PVCs of OpenShift Data Foundation operator on CLI as shown in below.
> oc get pvc -n openshift-storageNAME STATUS VOLUME CAPACITY ACCESS MODES STORAGECLASS AGE db-noobaa-db-0 Bound pvc-8f3e3d8b-6be7-4ba8-8968-69cbc866c89f 50Gi RWO odf-storagecluster-ceph-rbd 45h odf-deviceset-0-0-5jxg7 Bound local-pv-e5e3d596 500Gi RWO localblock-sc 45h odf-deviceset-1-0-lhtvh Bound local-pv-2febb788 500Gi RWO localblock-sc 45h odf-deviceset-2-0-jmmck Bound local-pv-b73b1cd5 500Gi RWO localblock-sc 45h rook-ceph-mon-a Bound local-pv-b8ba8c38 10Gi RWO local-sc 45h rook-ceph-mon-b Bound local-pv-5f19c0e5 10Gi RWO local-sc 45h rook-ceph-mon-c Bound local-pv-c3a372f6 10Gi RWO local-sc 45h $PODs of OpenShift Data Foundation operator on CLI as shown in below.
> oc get pod -n openshift-storageNAME READY STATUS RESTARTS AGE csi-cephfsplugin-6xpsk 3/3 Running 0 45h csi-cephfsplugin-7khm6 3/3 Running 0 17m csi-cephfsplugin-bb48n 3/3 Running 0 45h csi-cephfsplugin-cfzx6 3/3 Running 0 15m csi-cephfsplugin-provisioner-79587c64f9-2dpm6 5/5 Running 0 45h csi-cephfsplugin-provisioner-79587c64f9-hf46x 5/5 Running 0 45h csi-cephfsplugin-w6p6v 3/3 Running 0 45h csi-rbdplugin-2z686 3/3 Running 0 45h csi-rbdplugin-6tv5m 3/3 Running 0 45h csi-rbdplugin-jgf5z 3/3 Running 0 17m csi-rbdplugin-provisioner-5f495c4566-76rqm 5/5 Running 0 45h csi-rbdplugin-provisioner-5f495c4566-pzvww 5/5 Running 0 45h csi-rbdplugin-v7lfx 3/3 Running 0 45h csi-rbdplugin-ztdjs 3/3 Running 0 15m noobaa-core-0 1/1 Running 0 45h noobaa-db-0 1/1 Running 0 45h noobaa-endpoint-6458fc874f-vpznd 1/1 Running 0 45h noobaa-operator-7f4495fc6-lmk9k 1/1 Running 0 45h odf-operator-5d664769f-59v8j 1/1 Running 0 45h rook-ceph-crashcollector-sworker1.socp.twentynet.local-84dddddb 1/1 Running 0 45h rook-ceph-crashcollector-sworker2.socp.twentynet.local-8b5qzzsz 1/1 Running 0 45h rook-ceph-crashcollector-sworker3.socp.twentynet.local-699n9kzp 1/1 Running 0 45h rook-ceph-drain-canary-sworker1.socp.twentynet.local-85bffzm66m 1/1 Running 0 45h rook-ceph-drain-canary-sworker2.socp.twentynet.local-66bcfjjfkr 1/1 Running 0 45h rook-ceph-drain-canary-sworker3.socp.twentynet.local-5f6b57c9nt 1/1 Running 0 45h rook-ceph-mds-ocs-storagecluster-cephfilesystem-a-67fbb67dkb4kz 1/1 Running 0 45h rook-ceph-mds-ocs-storagecluster-cephfilesystem-b-db66df7dtqkmx 1/1 Running 0 45h rook-ceph-mgr-a-6f5f7b58dc-fjvjc 1/1 Running 0 45h rook-ceph-mon-a-76cc49c944-5pcgf 1/1 Running 0 45h rook-ceph-mon-b-b9449cdd7-s6mct 1/1 Running 0 45h rook-ceph-mon-c-59d854cd8-gn6sd 1/1 Running 0 45h rook-ceph-operator-775cd6cd66-sdfph 1/1 Running 0 45h rook-ceph-osd-0-7644557bfb-9l7ns 1/1 Running 0 45h rook-ceph-osd-1-7694c74948-lc9sf 1/1 Running 0 45h rook-ceph-osd-2-794547558-wjcpz 1/1 Running 0 45h rook-ceph-osd-prepare-ocs-deviceset-0-0-5jxg7-t89zh 0/1 Completed 0 45h rook-ceph-osd-prepare-ocs-deviceset-1-0-lhtvh-f2znl 0/1 Completed 0 45h rook-ceph-osd-prepare-ocs-deviceset-2-0-jmmck-wsrb2 0/1 Completed 0 45h rook-ceph-rgw-ocs-storagecluster-cephobjectstore-a-67b7865qx276 1/1 Running 0 45h $Storage capacity of ODF cluster with 3 worker nodes (3x500Gi) on OCP web cluster as shown below figure.
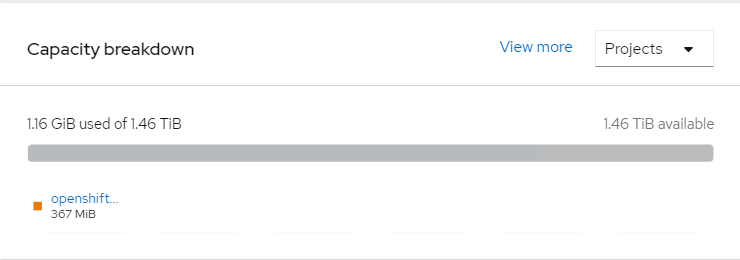
FIGURE 25. Storage capacities of workers
Deploying External Openshift Data Foundation
This section covers deploying External OpenShift Data Foundation 4.22 on existing Red Hat OpenShift Container Platform 4.22 platform.
Lite touch Installation of external ODF(CEPH) cluster using Ansible playbook
Installer Machine Prerequisite:
RHEL 9.8 Installer machine the following configurations(we can utilise the same installer machine used for RHOCP cluster deployment).
At least 500 GB disk space (especially in the "/" partition), 4 CPU cores and 16GB RAM.
RHEL 9.8 Installer machine should be subscribed with valid Redhat credentials.
Sync time with NTP server.
SSH Key pair should be there on the installer machine, if not kindly generate a new SSH key pair using the below command.
ssh-keygen
- Use the following commands to create and activate a Python3 virtual environment for deploying this solution.
  'python3 -m venv \<virtual_environment_name\>  Example:virtual_environment_name=ocp
  source \<virtual_environment_name\>/bin/activate'
*Note:
if you have already downloaded the git repo for RHOCP cluster deployment,ignore the step6
- Execute the following commands in the Ansible Engine to download the repositories.
  'mkdir /opt
   cd /opt
   yum install -y git
   git clone <https://github.com/HewlettPackard/hpe-solutions-openshift.git>>'
- Setup the installer machine to configure the nginx, development tools and other python packages required for LTI installation. Navigate to the directory, /opt/hpe-solutions-openshift/DL-LTI-Openshift/external-ceph_deployment and run the below command.
'sh setup.sh'
As part of setup.sh script it will create nginx service, so user must download and copy Rhel DVD ISO to /usr/share/nginx/html/
Minimum Storage requirement for external odf cluster servers
Servers Host OS disk Storage Pool disk Server 1 2 x 1.6 TB 8 x 1.6 TB Server 2 2 x 1.6 TB 8 x 1.6 TB Server 3 2 x 1.6 TB 8 x 1.6 TB Host OS disk – raid1 for redundancy
For Creating and deleting of logical drives refer to the Readme of the Openshift platform installation
Playbook Execution:- To delete all the existing logical drives in the server in case if any and to create new logical drives named 'RHEL Boot Volume' in respective ILO servers run the site.yml playbook inside create_delete_logicaldrives directory with the below mentioned command
# ansible-playbook site.yml --ask-vault-pass
*Note: If you do not have proxy or VLAN based setup leave these variables empty as shown below
        servers:
          Host_VlanID:
          SquidProxy_IP:
          SquidProxy_Port:

        squid_proxy_IP:
        corporate_proxy:
        squid_port:
Input files
We can provide the input variables in below method
Input.yaml: Manually editing input file
Go to the directory $BASE_DIR(/opt/hpe-solutions-openshift/DL-LTI-Openshift/external-ceph_deployment), here we will have input.yaml and hosts files.
- A preconfigured Ansible vault file (input.yaml) is provided as a part of this solution, which consists of sensitive information to support the host and virtual machine deployment.
cd $BASE_DIR
Run the following commands on the installer VM to edit the vault to match the installation environment.
ansible-vault edit input.yaml
NOTE
The default password for the Ansible vault file is changeme
Sample input_sample.yml can be found in the $BASE_DIR along with description of each input variable.
A sample input.yaml file is as follows with a few filled parameters.
     '- Server_serial_number: 2M20510XXX
          ILO_Address: 172.28.*.*
          ILO_Username: admin
          ILO_Password: *****
          Hostname: ceph01.XX.XX                #ex. ceph01.isv.local
          Host_Username: root
          Host_Password: ******
          HWADDR1: XX:XX:XX:XX:XX:XX             #mac address for server physical interface1
          HWADDR2: XX:XX:XX:XX:XX:XX             #mac address for server physical interface2
          Host_OS_disk: sda
          Host_VlanID: 230                         #solution VLAN ID ex. 230
          Host_IP: 172.28.*.*
          Host_Netmask: 255.*.*.*
          Host_Prefix: XX                          #ex. 8,24,32
          Host_Gateway: 172.28.*.*
          Host_DNS: 172.28.*.*
          Host_Domain: XX.XX                       #ex. isv.local
          SquidProxy_IP:               #provide Squid proxy, ex. proxy.houston.hpecorp.net
          SquidProxy_Port:
Note
The First Machine details provided in the server section of input file will be considered for Manager/admin node in the ceph Cluster.
    config:
      HTTP_server_base_url: https://172.28.*.*/  #Installer IP address
      HTTP_file_path: /usr/share/nginx/html/
      OS_type: rhel
      OS_image_name: rhel-9.8-x86_64-dvd.iso
      base_kickstart_filepath: '/opt/hpe-solutions-openshift/DL-LTI-Openshift/external-ceph_deployment/playbooks/roles/rhel9_os_deployment/tasks/ks_rhel9.cfg'
      dashboard_user: xxx                      # provide the ceph user who needs admin access
      dashboard_password: xxxxxxxxxxx          # provide the temporary password that needs to be setup for user
      client_user: xxxx                        # provide the user who needs access with read only permission to dashboard.
      client_pwd: xxxxxxxxxxx                  # provide the password for user who needs access with read only permission to dashboard.
      ceph_adminuser: xxxxxxxxx                # provide the ceph user who will deploy the cluster
      ceph_adminuser_password: xxxxxxx         # provide the password for the user who willdeploy the cluster.
      rbd_pool_name: xxxxxx                    # provide the block name which will be created in cluster
      rgw_pool_name: xxxx                      # provde the gateway name which will be created inside the cluster
      ceph_fs:
      - fs_pool_name: xxxxxx               # provide the ceph file system name which will be created in cluster
        number_of_daemons: x               # provide the number of daemons which has to be created for mds
        hosts:
        -  xxxx.xxxxxx.xxxx                # provide the fqdn name of the nodes where mds damons has to run. If number of daemons are provide 3 fqdn details of the nodes in cluster.
        -  xxxx.xxxxxx.xxxx
        -  xxxx.xxxxxx.xxxx
- The installation user should review hosts file (located on the installer VM at $BASE_DIR/hosts) and ensure that the information within the file accurately reflects the information in their environment.
Use an editor such as vi or nano to edit the inventory file.
vi $BASE_DIR/hosts
   [ceph_nodes]
   installer.isv.local
   ceph01.isv.local
   ceph02.isv.local
   ceph03.isv.local

   [OSD]
   ceph01.isv.local
   ceph02.isv.local
   ceph03.isv.local

   [admin]
   ceph01.isv.local
In the above sample file: ,Installer is the Asnbile machine, ceph01 is the ceph adminstration machine and ceph01,ceph02,ceph03 are the machines with Object storage daemon disk machines.
Playbook execution
External OpenShift Data Foundation(CEPH) cluster can be deployed by running site.yml or by running individual playbooks. Each playbook description can be found further in this document.
Run the below command to execute the Lite Touch Installation.
'ansible-playbook -i hosts site.yml --ask-vault-pass'
In case if user want to deploy through individual playbooks. Sequence of playbooks to be followed are:
 '- import_playbook: playbooks/rhel9_os_deployment.yaml
  - import_playbook: playbooks/ssh.yaml
  - import_playbook: playbooks/subscriptions.yaml
  - import_playbook: playbooks/ntp.yaml
  - import_playbook: playbooks/user_req.yaml
  - import_playbook: playbooks/deploy_cephadm.yaml
  - import_playbook: playbooks/registry.yaml
  - import_playbook: playbooks/preflight.yaml
  - import_playbook: playbooks/bootstrap.yaml
  - import_playbook: playbooks/add_hosts.yaml
  - import_playbook: playbooks/add_osd.yaml
  - import_playbook: playbooks/client_user.yaml
  - import_playbook: playbooks/copy_script.yaml
  - import_playbook: playbooks/rbd.yaml              # execute this playbook for rbd storage
  - import_playbook: playbooks/fs.yaml               # execute this playbook for cephfs
  - import_playbook: playbooks/rgw.yaml'             # execute this playbook for rgw
we should excute the last three playbooks as per the customer requirement.
Playbook description
site.yaml
- This playbook contains the script to deploy external Openshift Data Foundation(ODF) platform starting from the OS_deployment until cluster up.
rhel9_os_deployment.yaml
- This playbook contains the scripts to deploy rhel9.8 OS on baremetal servers.
ssh.yaml
- This playbook contains the script to create and copy the ssh public key from installer machine to other nodes in the cluster.
subscriptions.yaml
- This playbook contains the script to RHEL subscription and enables the required repositories required for the building the ceph cluster.
ntp.yaml
- This playbook contains the script to create NTP setup on head nodes to make sure time synchronization.
user_req.yaml
- This playbook contains the script to create a user on all nodes and copy the required ssh keys to the newly created user.
deploy_cephadm.yaml
- This playbook contains the script to deploy the cephadm packages to the administration node.
registry.yaml
- This playbook contains the script to create the registry on the installer node.
preflight.yaml
- This playbook contains the script to call the Redhat provided playbooks to execute the some more prerequites required for the environment.
bootstrap.yaml
- This playbook contains the script to bootstrap the ceph cluster.
add_hosts.yaml
- This playbook contains the script to add the servers to the ODF cluster.
add_osd.yaml
- This playbook contains the script to add the OSD disks.
client_user.yaml
- This playbook contains the script to create a user with read only access to the cluster.
copy_script.yaml
- This playbook contains the script to copy scrpits to administration node
rbd.yaml
- This playbook contains the script to create rados block device in cluster.
fs.yaml
- This playbook contains the script to create ceph fs.
rgw.yaml
- This playbook contains the script to create Ceph Object Gateway.
Integration of external ODF with OpenShift Container Platform
Prerequisites:
- OpenShift Data Foundation operator is deployed in the Openshift container platform and dashboard is available.
Steps for integration:
Navigate to Storage -> External Systems.
Click Connect external systems.
Select Connect an external storage platform from the available options.
Select Red Hat for Storage platform and click Next
Click on the Download Script link to download the python script for extracting Ceph cluster details.
Execute the python script by providing the ceph cluster details.
In the below example we are executing the script to extract the details from a ceph cluster for rbd data pool "odf-rbd" and gateway services endpoint at "172.28.0.163" on port 80
python3 ceph-external-cluster-details-exporter.py --rbd-data-pool-name odf-rbd --rgw-endpoint 172.28.0.163:80 --format json
Upload the output in the Openshift container platform container dashboard and click Next.
After sucessful importing of the ceph details, required storage class are created.
For validation deploy the wordpress application as demonstrate above.
Validating Persistent Storage
Validating ODF with deploying WordPress application
This section covers the steps to validate the OpenShift Data Foundation deployment (ODF) by deploying 2-tier application along with MySQL database.
Prerequisites
OCP 4.22 cluster must be installed.
ODF to claim persistent volume (PV).
NOTE
BASE_DIR - is a base directory path for all automated scripts directories are in place and path is /opt/hpe-solutions-openshift/DL-LTI-Openshift
Login to the installer machine as a non-root user.
From within the repository, navigate to the WordPress script folder
> cd $BASE_DIR/odf_installation/wordpressRun below script to deploy Wordpress application along with MySQL
> ./deploy_wordpress.sh
The deploy_wordpress.sh scripts does the following activities.
Creates project
Sets default storage class
Deploys Wordpress and MySQL app
Create routes
Below is the output of the scripts
> ./deploy_wordpress.shOutput of the command follows:
Already on project "wordpress" on server "https://api.socp.twentynet.local:6443".

You can add applications to this project with the 'new-app' command.
For example, try:

oc new-app ruby~https://github.com/sclorg/ruby-ex.git

to build a new example application in Ruby. Or use kubectl to deploy a simple Kubernetes application:

kubectl create deployment hello-node --image=gcr.io/hello-minikube-zero-install/hello-node

Already on project "wordpress" on server "https://api.socp.twentynet.local:6443".

clusterrole.rbac.authorization.k8s.io/system:openshift:scc:anyuid
added: "default"error: --overwrite is false but found the following declared annotation(s):
'storageclass.kubernetes.io/is-default-class' already has a value (true)

service/wordpress-http created

service/wordpress-mysql created

persistentvolumeclaim/mysql-pv-claim created

persistentvolumeclaim/wp-pv-claim created

secret/mysql-pass created

deployment.apps/wordpress-mysql created

deployment.apps/wordpress created

route.route.openshift.io/wordpress-http created

URL to access application

wordpress-http-wordpress.apps.socp.twentynet.local
Verifying the WordPress deployment
Execute the following command to verify the persistent volume associated with WordPress application and MySQL database.
> oc get pods,pvc,route -n wordpressNAME READY STATUS RESTARTS AGE pod/wordpress-6f69797b8f-hqpss 1/1 Running 0 5m52s pod/wordpress-mysql-8f4b599b5-cd2s2 1/1 Running 0 5m52sNAME STATUS VOLUME CAPACITY ACCESS MODES STORAGECLASS AGE persistentvolumeclaim/mysql-pv-claim Bound pvc-ccf2a578-9ba3-4577-8115-7c80ac200a9c 5Gi RWO ocs-storagecluster-ceph-rbd 5m50s persistentvolumeclaim/wp-pv-claim Bound pvc-3acec0a0-943d-4138-bda9-5b57f8c35c5d 5Gi RWO ocs-storagecluster-ceph-rbd 5m50sNAME HOST/PORT PATH SERVICES PORT TERMINATION WILDCARD route.route.openshift.io/wordpress-http wordpress-http-wordpress.apps.socp.twentynet.local wordpress-http 80-tcp NoneAccess the route url in browser to access the WordPress application as shown below.
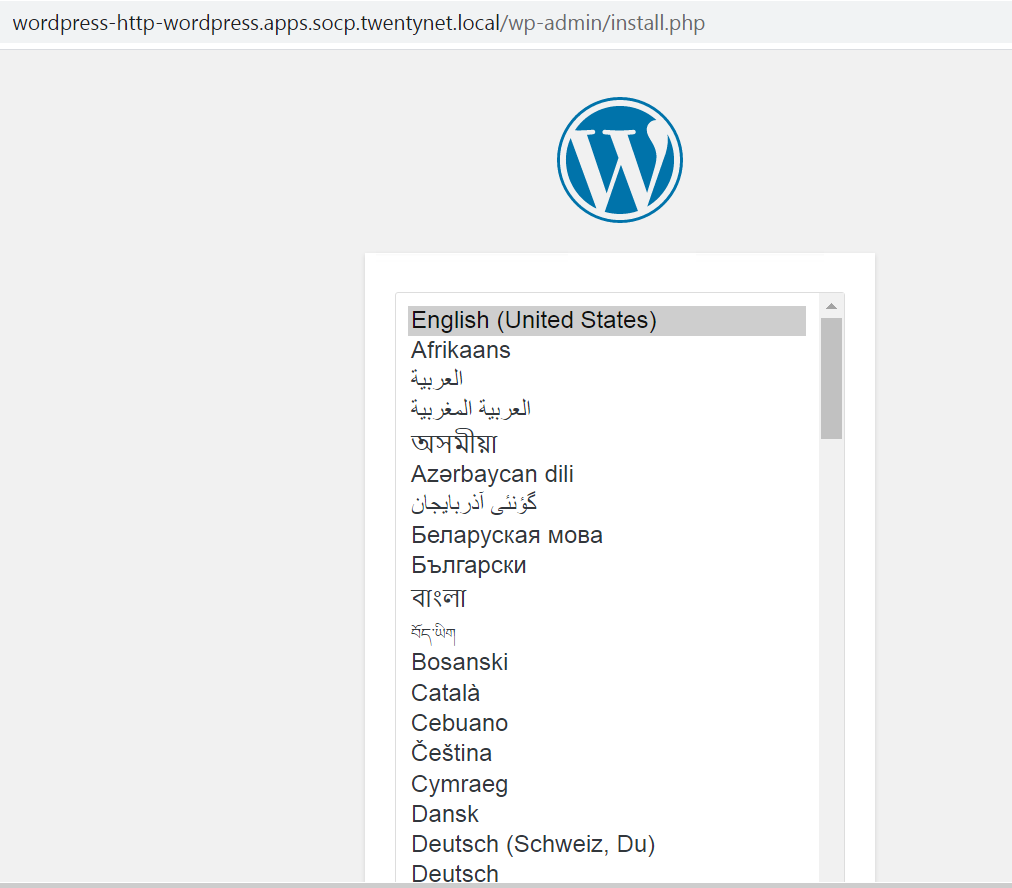
FIGURE 26. Sample application (WordPress)