Splunk configuration
This solution supports two types of Splunk deployments. Firstly, there is a built-in deployment useful for demos and for getting up to speed with Splunk. Alternatively, the solution can be configured to interact with a standalone, production Splunk deployment that you set up independently. In this case, you must explicitly configure the universal forwarders with external "forward servers" (Splunk indexers), whereas this happens automatically with the built-in option.
In the standalone deployment, you can enable SSL authentication between the universal forwarders and the indexers, by setting the splunk_ssl variable to yes in the file group_vars/vars. The built-in deployment does not support SSL and so, in this instance, the value of the splunk_ssl variable is ignored. For more information on enabling SSL, see Appendix C.
Splunk prerequisites
You should select the Splunk deployment type that you require by setting the variable monitoring_stack in the group_vars/vars file to either splunk, for a standalone Splunk deployment, or splunk_demo for the built-in version. If you omit this variable, or if it has an invalid value, no Splunk deployment will be configured.
For both types of deployment, you need to download the Splunk Universal forwarder images/packages from https://www.splunk.com/en_us/download/universal-forwarder.html. Packages are available for 64-bit Linux and 64-bit Windows 8.1/Windows 10. Download the RPM package for Linux 64-bit (2.6+ kernel Linux distributions) to ./files/splunk/linux. If you are deploying Windows nodes, download the MSI package for Windows 64 bit to ./files/splunk/windows. For a dual Linux/Windows deployment, the images and packages must have same name and version, along with the appropriate extensions, for example:
- files/splunk/windows/splunkforwarder-7.1.2.msi
- files/splunk/linux/splunkforwarder-7.1.2.rpm
You need to set the variable splunk_architecture_universal_forwarder_package to the name you selected for the package(s), not including the file extension. Depending on the Splunk deployment you have chosen, edit the file templates/splunk/splunk/vars.yml or the file templates/splunk/splunk_demo/vars.yml and set the variable, for example:
splunk_architecture_universal_forwarder_package: 'splunkforwarder-7.1.2'
As of Splunk version 7.1, the Splunk universal forwarder must be deployed with a password. This password is specified using the variable splunk_uf_password which is configured in group_vars/vault.
If you are using a standalone Splunk deployment, you must specify the list of indexers using the variable splunk_architecture_forward_servers in group_vars/vars, for example:
splunk_architecture_forward_servers:
- splunk-indexer1.cloudra.local:9997
- splunk-indexer2.cloudra.local:9997
By default, the indexers are configured in a single load balancing group. This can be changed by editing the file outputs.conf.j2 in the folder templates/splunk/splunk/. For more information on forwarding using Universal Forwarder, see the Splunk documentation at http://docs.splunk.com/Documentation/Forwarder/7.1.2/Forwarder/Configureforwardingwithoutputs.conf.
On your standalone Splunk installation, you need to install the following add-ons and apps.
To monitor Linux worker nodes, the Docker app should be installed on central Splunk. More information on this Docker app can be found at https://github.com/splunk/docker-itmonitoring and at https://hub.docker.com/r/splunk/universalforwarder/.
To monitor the Windows worker nodes, install the Splunk App for Windows Infrastructure on central Splunk along with its dependencies:
- Splunk App for Windows Infrastructure version 1.4.4. The Splunk App for Windows Infrastructure is not compatible with the Splunk Add-on for Windows 5.0 at this time. See https://splunkbase.splunk.com/app/1680/
- Splunk Add-on for Microsoft Windows version 4.8.4 - see https://splunkbase.splunk.com/app/742/
- Splunk Add-On for Microsoft Active Directory version 1.0.0 - see https://splunkbase.splunk.com/app/3207/
- Splunk Add-on for Microsoft Windows DNS version 1.0.1 (if this is not installed on central Splunk, you will see yellow icons on some dashboards with the message
eventtype wineventlog-dns does not exist or is disabled) - see https://splunkbase.splunk.com/app/3208/ - Splunk Supporting Add-on for Active Directory version 2.1.7 (if this is not installed on central Splunk, you will see yellow icons on some dashboards with the message
eventtype wineventlog-ds does not exist or is disabled) - see https://splunkbase.splunk.com/app/1151/
If you want to use your own certificates in your standalone Splunk deployment to secure the communications between the indexers and the universal forwarders, see the subsequent section Enabling SSL.
You can specify advanced Splunk configuration in the following files:
- files/splunk/linux/SPLUNK_HOME
- files/splunk/linux/DOCKER_TAS
- files/splunk/windows/SPLUNK_HOME
These files will be copied as-is to the systems running the universal forwarder.
Configuring syslog in UCP
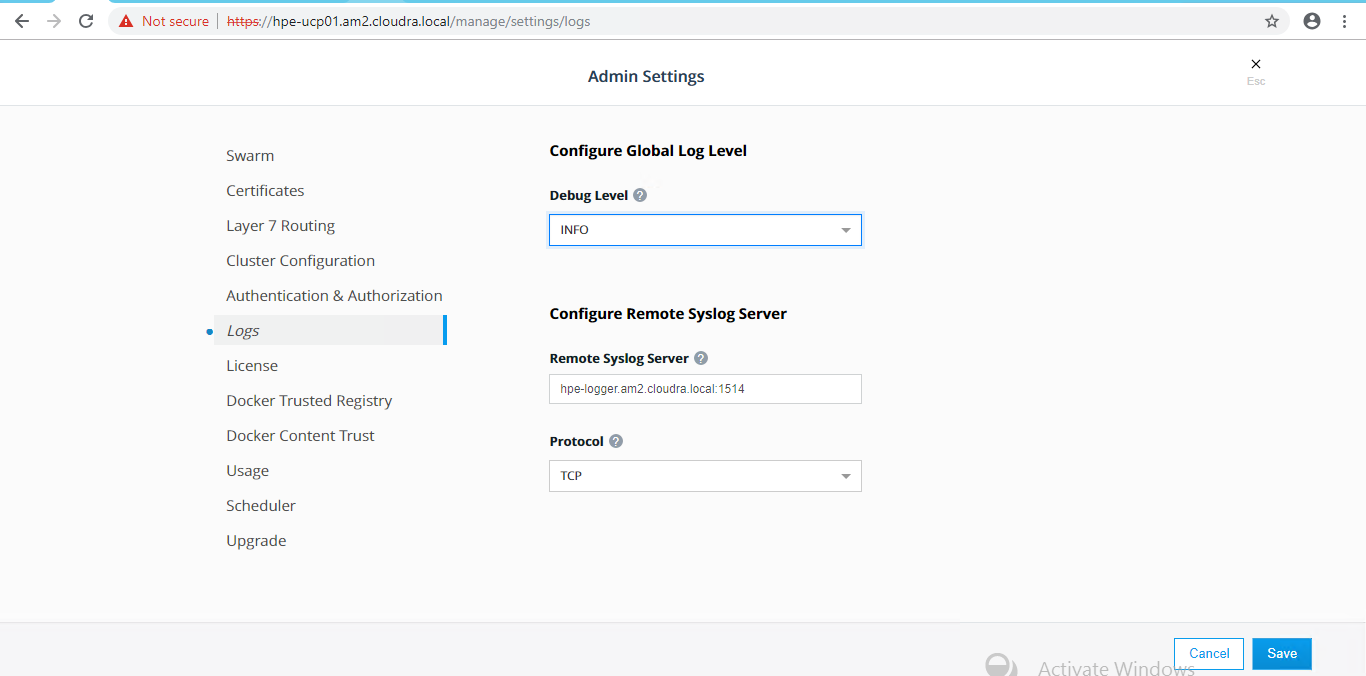
In order to see some data in the UCP operational dashboard, you need to have UCP send its logs to the VM configured in the [logger] group. For example, for the following vm_host file:
[logger]
hpe-logger ip_addr='10.60.59.24/16' esxi_host='esxi-hpe-2.cloudra.local'
This will configure UCP to send its logs to hpe-logger.cloudra.local:1514. You need to select the TCP protocol as shown in the following diagram.

Figure 13. Configure Remote Syslog Server in UCP
Configuring syslog in ESX
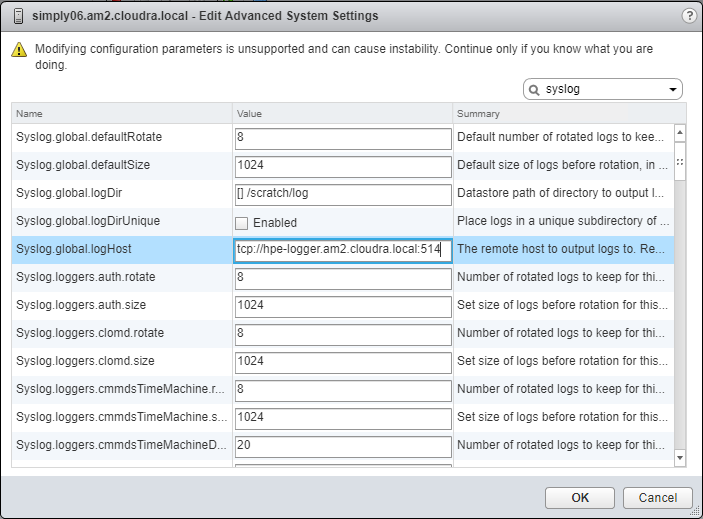
This configuration must be done manually for each ESX server. The syslog server should be the server configured in the [logger] group in your vm_hosts inventory. The protocol should be tcp and the port 514 as shown in Figure 14.

Figure 14. Configure Syslog on ESXi Hosts
For more information, see the VMware documentation at https://docs.vmware.com/en/VMware-vSphere/6.5/com.vmware.vsphere.security.doc/GUID-9F67DB52-F469-451F-B6C8-DAE8D95976E7.html.
Limitations
- The Dockerized Splunk App has a number of open issues
- The Docker events tab is not working