RHEL Golden Images
OS installation and configuration with HPE Synergy Image Streamer
The bare metal RHEL worker nodes will be deployed and customized using HPE Synergy Image Streamer. This section outlines the steps required to install the host. At a high level, these steps can be described as:
- Download the artifacts for HPE Image Streamer from the HPE GitHub site.
- Add the artifact bundles to HPE Image Streamer.
- Prepare a compute module for the installation of the Operating System.
- Create a Server Profile.
- Install and customize the Operating System.
- Capture a Golden Image from the compute module.
- Deploy the hosts.
Download the artifacts for HPE Synergy Image Streamer
Red Hat Enterprise Linux bundles for HPE Image Streamer may be downloaded from https://github.com/HewlettPackard/image-streamer-rhel/tree/V4.1/artifact-bundles/.
Sample foundation artifact bundles should be downloaded from https://github.com/HewlettPackard/image-streamer-tools/tree/v4.0/foundation/artifact-bundles.
Add the artifact bundles to HPE Image Streamer
- From within the HPE Image Streamer interface navigate to the Artifact Bundles page.
- From the Actions menu, Add the downloaded RHEL artifact bundle. If not already present, add the sample foundation bundle.
- From the Actions menu, select Extract to extract the artifacts from each downloaded bundle.
Prepare the compute module for the installation of the Operating System
- Attach a Red Hat Enterprise Linux 7.* Server ISO to the iLO of a worker node host by selecting the Action menu and then Launch Console.
- When the console launches, select Virtual Drives and then Image File CD-ROM/DVD. Browse to the location where your ISO resides and select it.
Create a Server Profile
- Use a Server Profile Template to deploy a new Server Profile to the worker node host you attached the ISO to in the prior step.
- Select the new
Server Profileand chooseEdit. - Under the OS Deployment section, choose
HPE-Create Empty Volumeand enter a Volume Size of30720 MB. - Validate the network and SAN connections exist on the host.
- Ensure that, under boot settings, Boot mode is set to
UEFI optimizedand that the Primary boot device isHard disk. - Click
OK. It will take some time for the profile to create. - While waiting on profile creation to complete, select the
Actionsmenu and then clickLaunch Console. ClickAllowto launch the console.
Install and customize the Operating System
After profile creation is completed, power on the server. From the console window, select
Power Switchand thenMomentary Press.When the screen shown in the following figure appears, select
Install Red Hat Enterprise Linux 7.*and then hit the letter‘e’on the keyboard.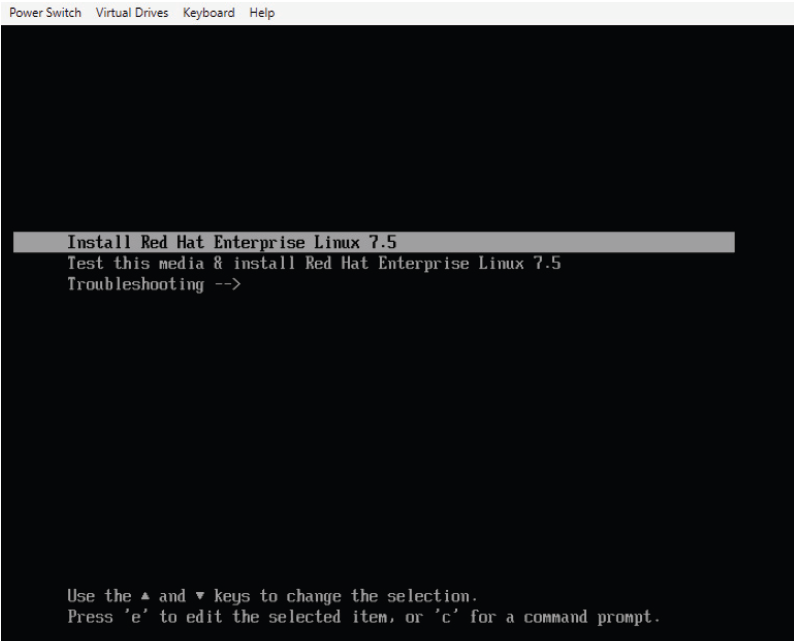
Figure. Selecting OS to install
Append the following to the install kernel boot parameter:
rd.iscsi.ibft=1Type
Ctrl-xto continue the boot process.When the installer screen appears, insure you select your local language, set the date and time, keyboard layout and language support. When done, click
Installation Destination.At the Installation Destination screen, select
Add a disk…and then choose the30 GiBvolume from HPE Image Streamer. SelectDoneonce you have chosen this disk.Under
Other Storage Options, select the radio button forI will configure partitioningand then clickDone.At the
Manual Partitioningscreen, selectClick here to create them automatically. This will display a new Manual Partitioning screen.Highlight the
/bootpartition and on the right side of the page selectext4as theFile System. Click theUpdate Settingsbutton.Highlight the
/partition and on the right side of the screen, reduce theDesired Capacityto8 GiBand then chooseext4as the File System. Click theUpdate Settingsbutton.Highlight the
swappartition and on the right side of the screen, changeDesired Capacityfrom3000 MiBto4092 MiB. Click theUpdate Settingsbutton.Click the
“+”button below the list of partitions. ForMount Point, select/varfrom the dropdown and leave theDesired Capacityblank. This will allow the/varpartition to use all remaining space.At the
Manual Partitioningscreen, highlight the/varpartition and choose/ext4for theFile System. ClickUpdate Settings.The screen should appear as shown in the following figure.
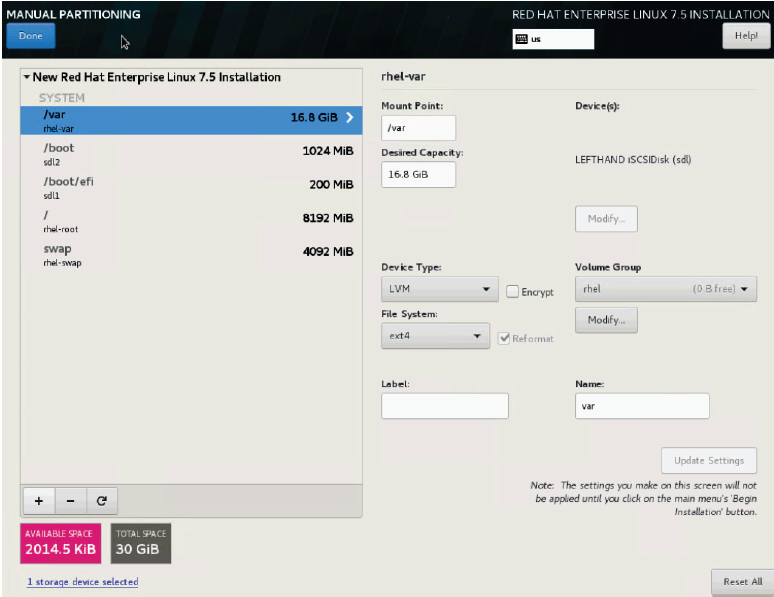
Figure. Manual partitioning
Once you have validated the file systems and partition sizes are correct, click
Done.When prompted, click
Accept Changes.Click the
Network & Hostnamelink. At the resulting screen, highlightEthernet (ens3f4)and set it to‘ON’in the descriptor screen as in the following figure. ClickDone.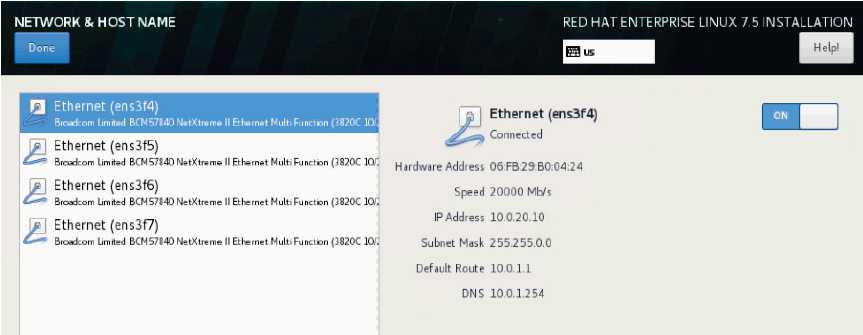
Figure. Network & Hostname
Click
Begin Installation. Set a root password for the host. Do not configure extra users. ClickDone.Once the OS installation is complete you can reboot the host. Log on at the iLO console when the host becomes active again.
Configure a temporary hostname for the system
Configure your networking and ensure you have connectivity.
Register the host with Red Hat by running the following command. Enter the username and password when prompted.
# subscription-manager registerUse Red Hat subscription manager to register your system to give you access to the official Red Hat repositories. Use the subscription-manager register command as follows.
# subscription-manager auto-attachEnable the required repos:
# subscription-manager repos \
--enable=rhel-7-server-rpms \
--enable=rhel-7-server-extras-rpms
Update the host by running the following command.
# yum updateCopy the SSH public key from your Ansible box. This will allow your Ansible node to SSH without the need for a password to all the bare metal REHL nodes.
# ssh-copy-id root@<IP of your bare metal node>
- Gracefully shut down the host.
# shutdown -h now