# Install and configure OpenShift Virtualization
# Introduction
RedHat OpenShift Virtualization stands as a cornerstone of Red Hat's OpenShift Container Platform, seamlessly blending virtual machines and containers to offer a unified management interface. This integration empowers organizations to efficiently deploy both modern and traditional applications, encompassing virtual machines, containers, and serverless functions within a single platform. Built upon the "container-native virtualization" concept, driven by the KubeVirt project, it harnesses the RHEL KVM hypervisor to seamlessly merge virtual machines with Kubernetes and KubeVirt for streamlined management and orchestration. Through this infrastructure, OpenShift Virtualization enables the coexistence of virtual machines and containers within a Kubernetes environment, providing a cohesive solution for workload management.
OpenShift Virtualization adds new objects into your OpenShift Container Platform cluster via Kubernetes custom resources to enable virtualization tasks. These tasks include:
Creating and managing Linux and Windows virtual machines
Connecting to virtual machines through a variety of consoles and CLI tools
Importing and cloning existing virtual machines
Managing network interface controllers and storage disks attached to virtual machines
Live migrating virtual machines between nodes
An enhanced web console provides a graphical portal to manage these virtualized resources alongside the OpenShift Container Platform cluster containers and infrastructure.
OpenShift Virtualization is tested with OpenShift Data Foundation (ODF) and Alletra 6070.
OpenShift Virtualization allows the usage with either the [OVN-Kubernetes] (opens new window)or the [OpenShiftSDN] (opens new window)default Container Network Interface (CNI) network provider
# Enabling OpenShift Virtualization
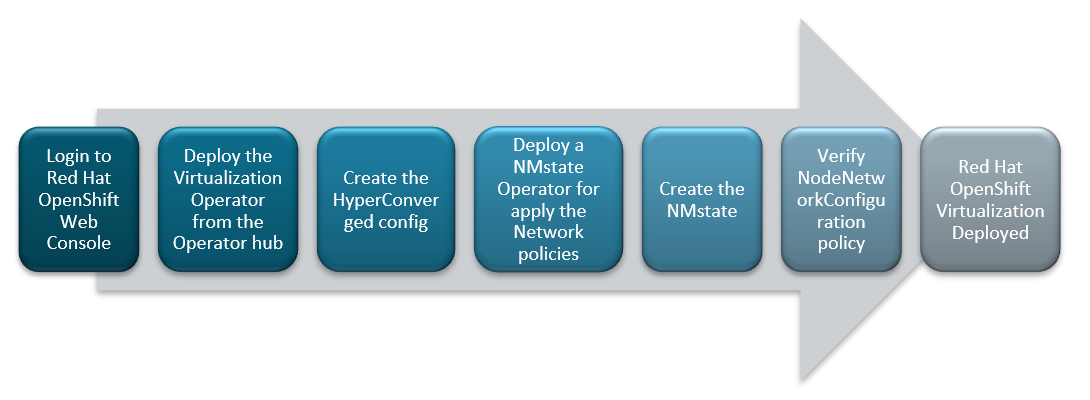
FIGURE 23 Red Hat OpenShift Virtualization deployment flow
# Installing OpenShift Virtualization Operator from OperatorHub
Log into the OpenShift Container Platform web console and navigate to Operators → OperatorHub
Type OpenShift Virtualization and Select OpenShift Virtualization tile
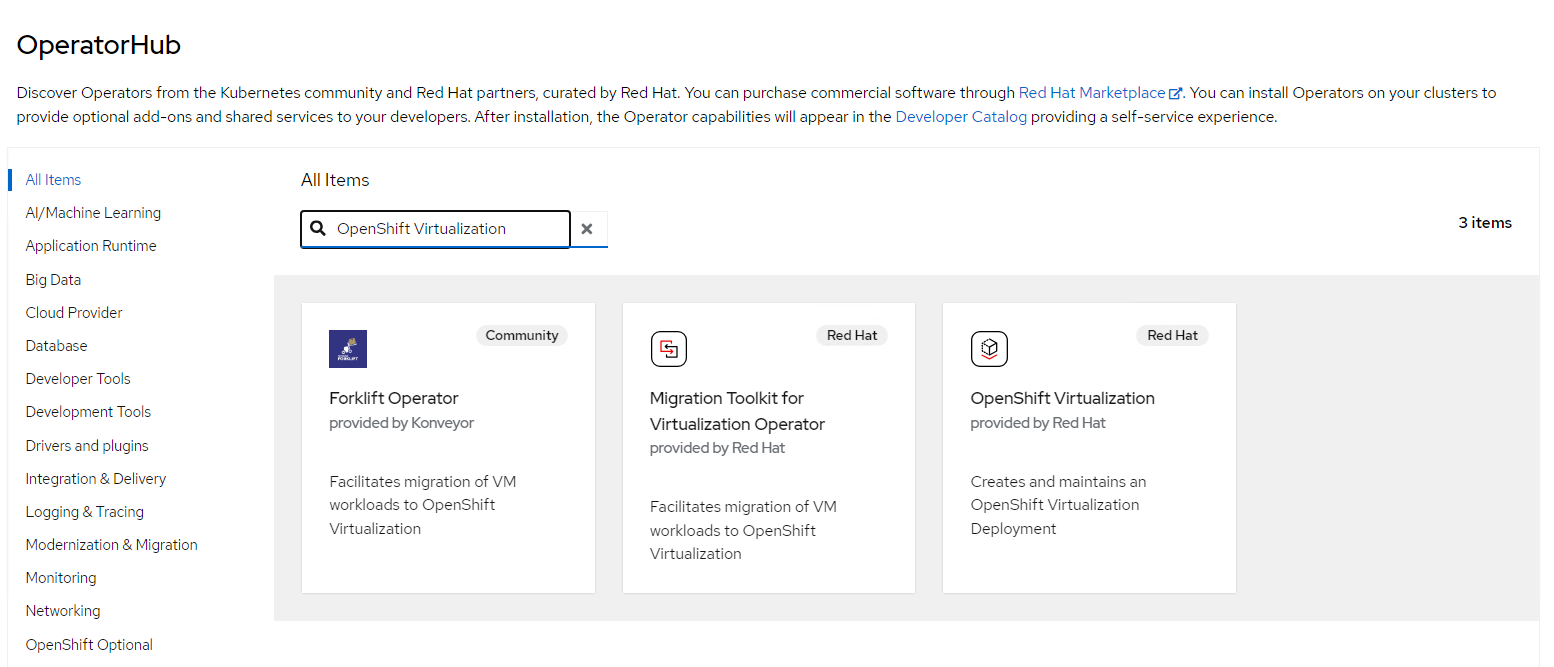
FIGURE 24 OpenShift Virtualization in OperatorHub
- Click and Install the Operator to the "openshift-cnv" namespace
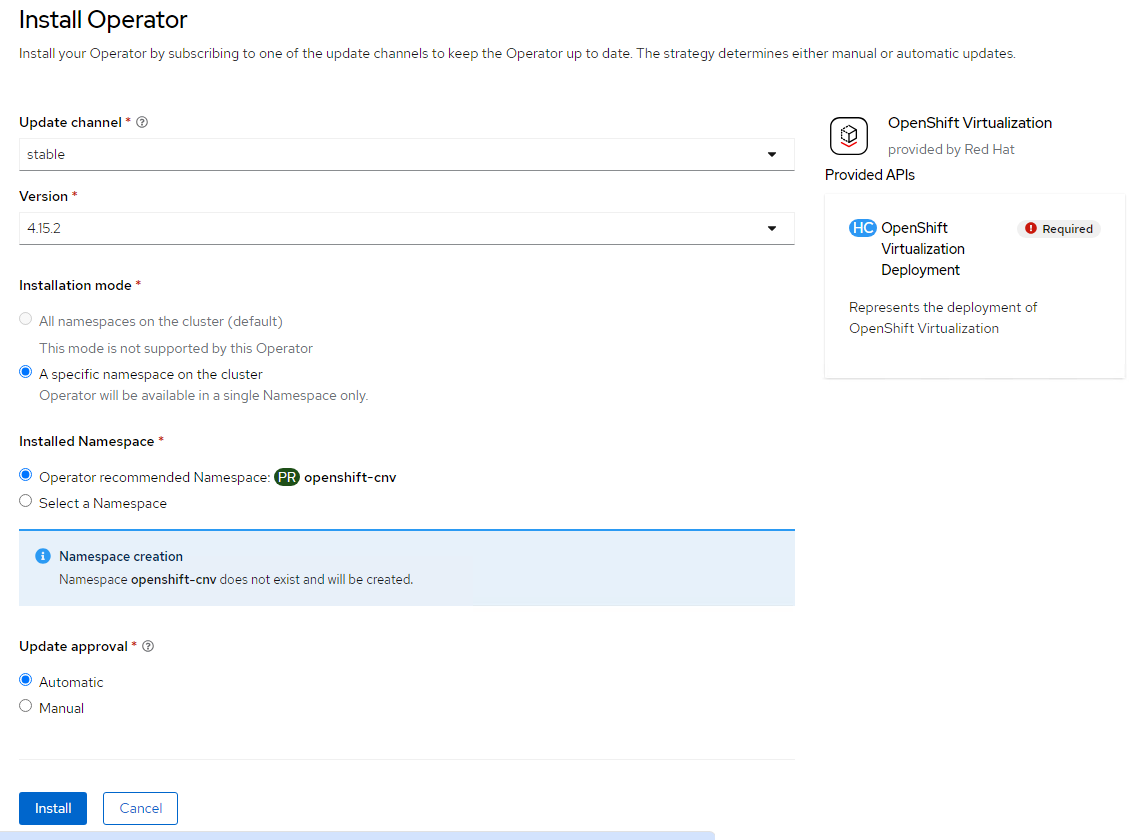
FIGURE 25 Inputs for the OpenShift Virtualization operator
- Once OpenShift Virtualization is successfully installed , Create HyperConverged Custom resource
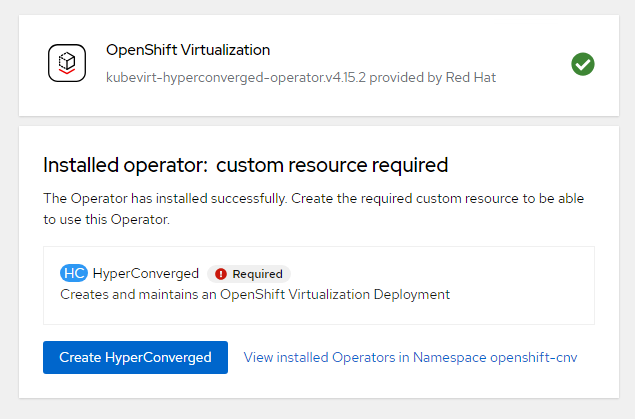
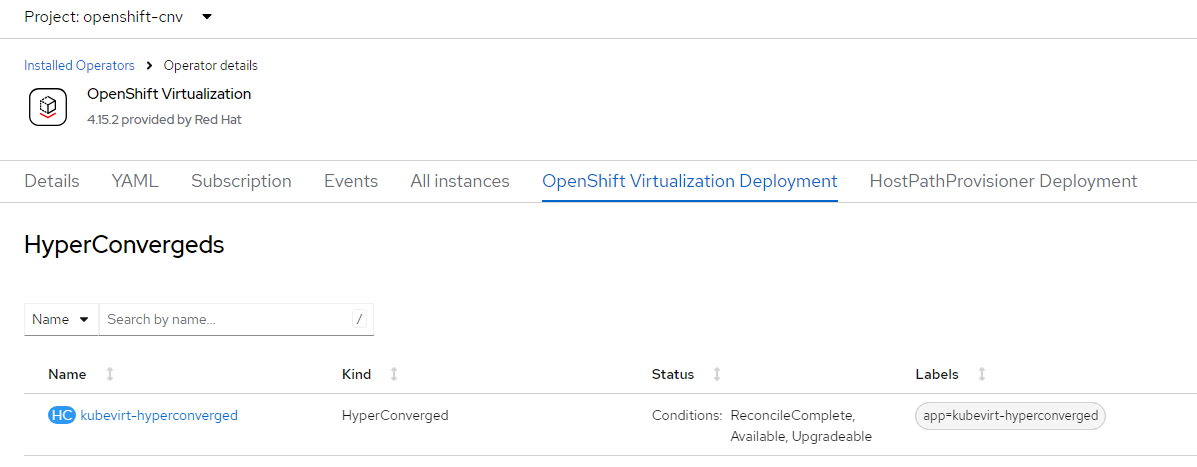
FIGURE 26 Creation of HyperConverged in OpenShift Virtualization operator
After successful deployment of operator and creation of HyderConverged. Virtualization will be enabled in webconsole.
# Network configuration
You would have internal pod network as default network after successful deployment of OpenShift Virtualization. For additional network, we would deploy the network operator "NMState Operator" and configure Linux bridge network for external VM access and live migration.
Administrators can also install SR-IOV Operator to manage SR-IOV network devices and MetalLB Operator for lifecycle management.
# Configuring a Linux bridge Network
To install NMState Operator, navigate to Operators → OperatorHub in webconsole
Type NMState, Select Kubernetes NMState Operator tile and Install the Operator
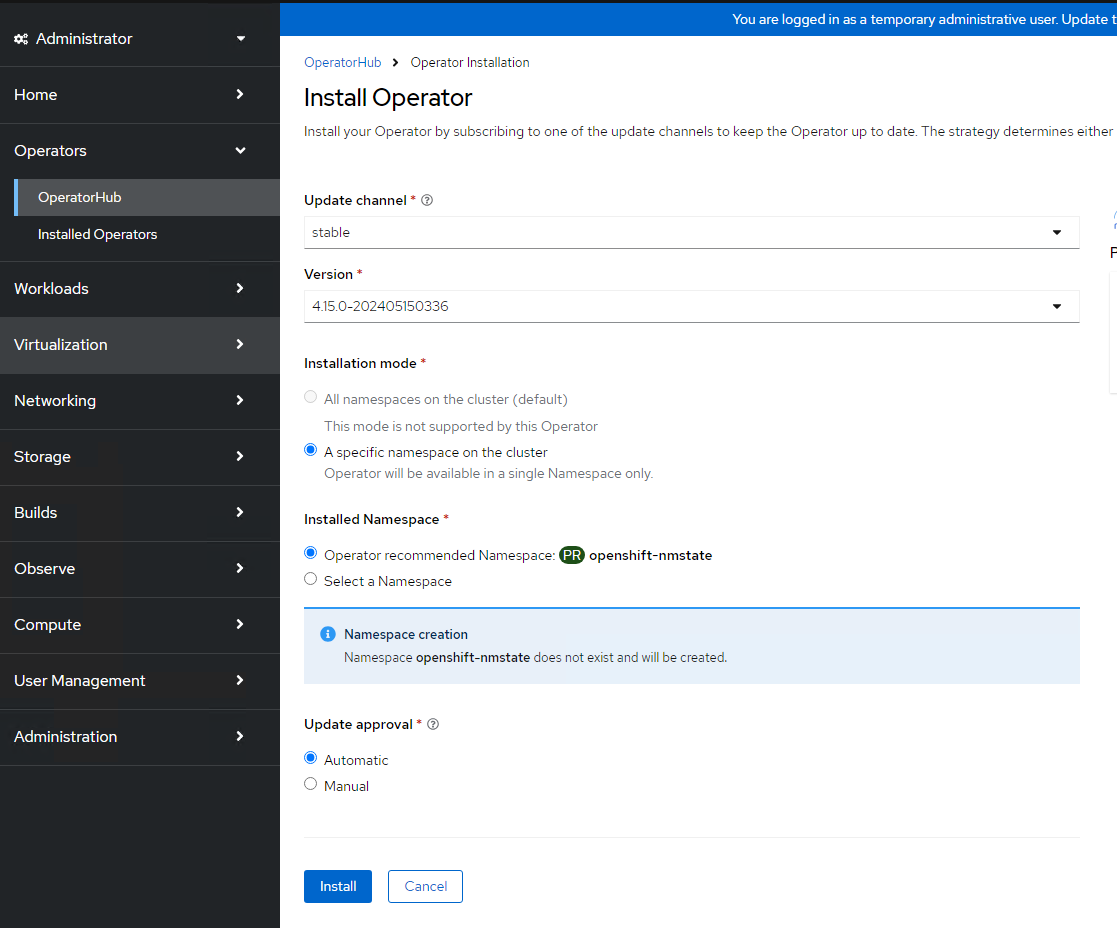
FIGURE 27 Installation of NMState in OperatorHub
- Once the NMState operator is installed, Create a instance for "nmstate"
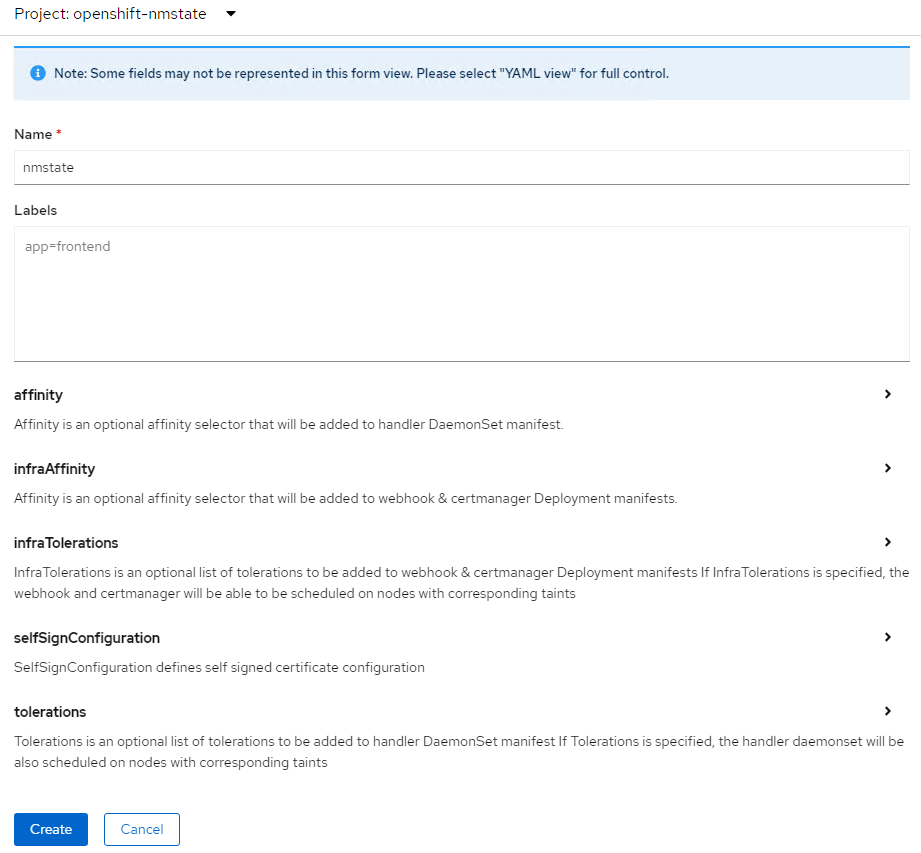
FIGURE 28 Inputs for NMState in operator
# Creating a Linux bridge NNCP
Create a NodeNetworkConfigurationPolicy (NNCP) manifest for a Linux bridge network for network interface card(enp1s0) and apply the created NNCP manifest
apiVersion: nmstate.io/v1
kind: NodeNetworkConfigurationPolicy
metadata:
  name: br1-policy
spec:
  desiredState:
    interfaces:
      - name: bridge1
        type: linux-bridge
        state: up
        ipv4:
          dhcp: true
          enabled: true
        bridge:
          options:
            stp:
              enabled: false
          port:
             - name: enp1s0           #NIC/Bond
# Creating a Linux bridge NAD
Log in to the OpenShift Container Platform web console and click Networking → NetworkAttachmentDefinitions
Click Create Network Attachment Definition (NAD). And provide the required details
Click the Network Type list and select CNV Linux bridge
Enter the name of the bridge (Previously created NodeNetworkConfigurationPolicy object as interfaces name ex: bridge1) in the Bridge Name field
Click Create
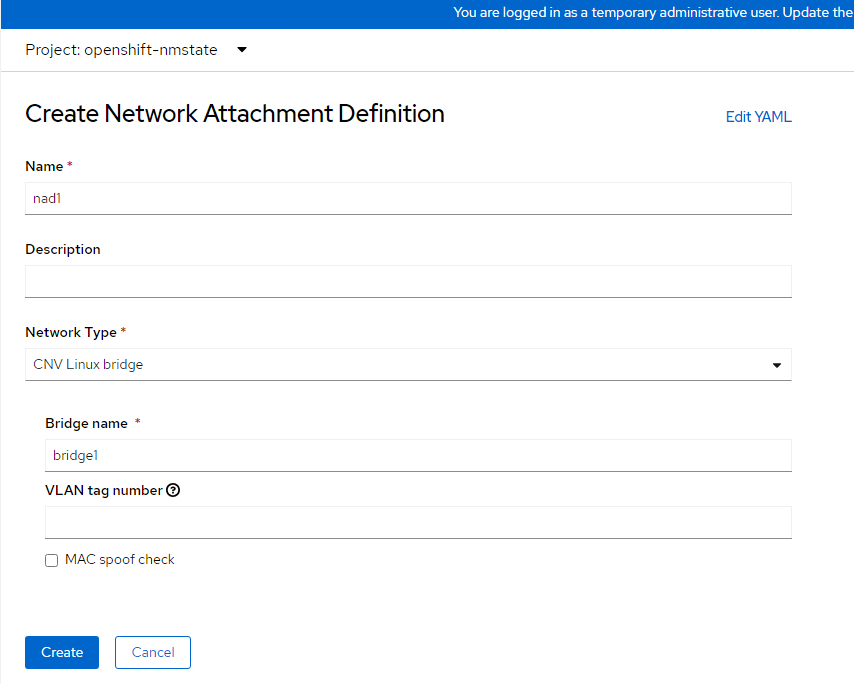
FIGURE 29 Creation of NAD
# Creating a dedicated network for live migration
- Administrators have to create additional NAD for creating a dedicated live migration network. Create a NAD manifest as below
apiVersion: "k8s.cni.cncf.io/v1"
kind: NetworkAttachmentDefinition
metadata:
  name: migration-network
  namespace: openshift-cnv
spec:
  config: '{
    "cniVersion": "0.3.1",
    "name": "migration-bridge",
    "type": "macvlan",
    "master": "enp1s1",
    "mode": "bridge",
    "ipam": {
      "type": "whereabouts",
      "range": "20.0.0.0/24"
    }
  }'
- Goto the custom resource of Hydercoverged that was created during "OpenShift Virtualization" operator deployment and Specify the created network name for "spec.liveMigrationConfig"
apiVersion: hco.kubevirt.io/v1beta1
kind: HyperConverged
metadata:
  name: kubevirt-hyperconverged
spec:
  liveMigrationConfig:
    completionTimeoutPerGiB: 800
    network: migration-network  #specify migration network name
    parallelMigrationsPerCluster: 5
    parallelOutboundMigrationsPerNode: 2
    progressTimeout: 150
# Storage configuration
Configure storage as stated in [Storage options] (../Additional-Features-and-Functionality/Storage.md#Storage options)
# Create a virtual machine
The web console features an interactive wizard that guides you through General, Networking, Storage, Advanced, and Review steps to simplify the process of creating virtual machines. All required fields are marked by a *. When the required fields are completed, you can review and create your virtual machine.
Network Interface Cards (NICs) and storage disks can be created and attached to virtual machines after they have been created.
Use one of these procedures to create a virtual machine:
Creating virtual machines from templates
Creating virtual machines from instance types
Creating virtual machines from CLI
# Creating virtual machines from templates
You can create virtual machines from templates provided by Red Hat using web console. You can also create customized templates as per requirements.
- Log into the OpenShift Container Platform web console and navigate to Virtualization → Catalog → Template Catalog
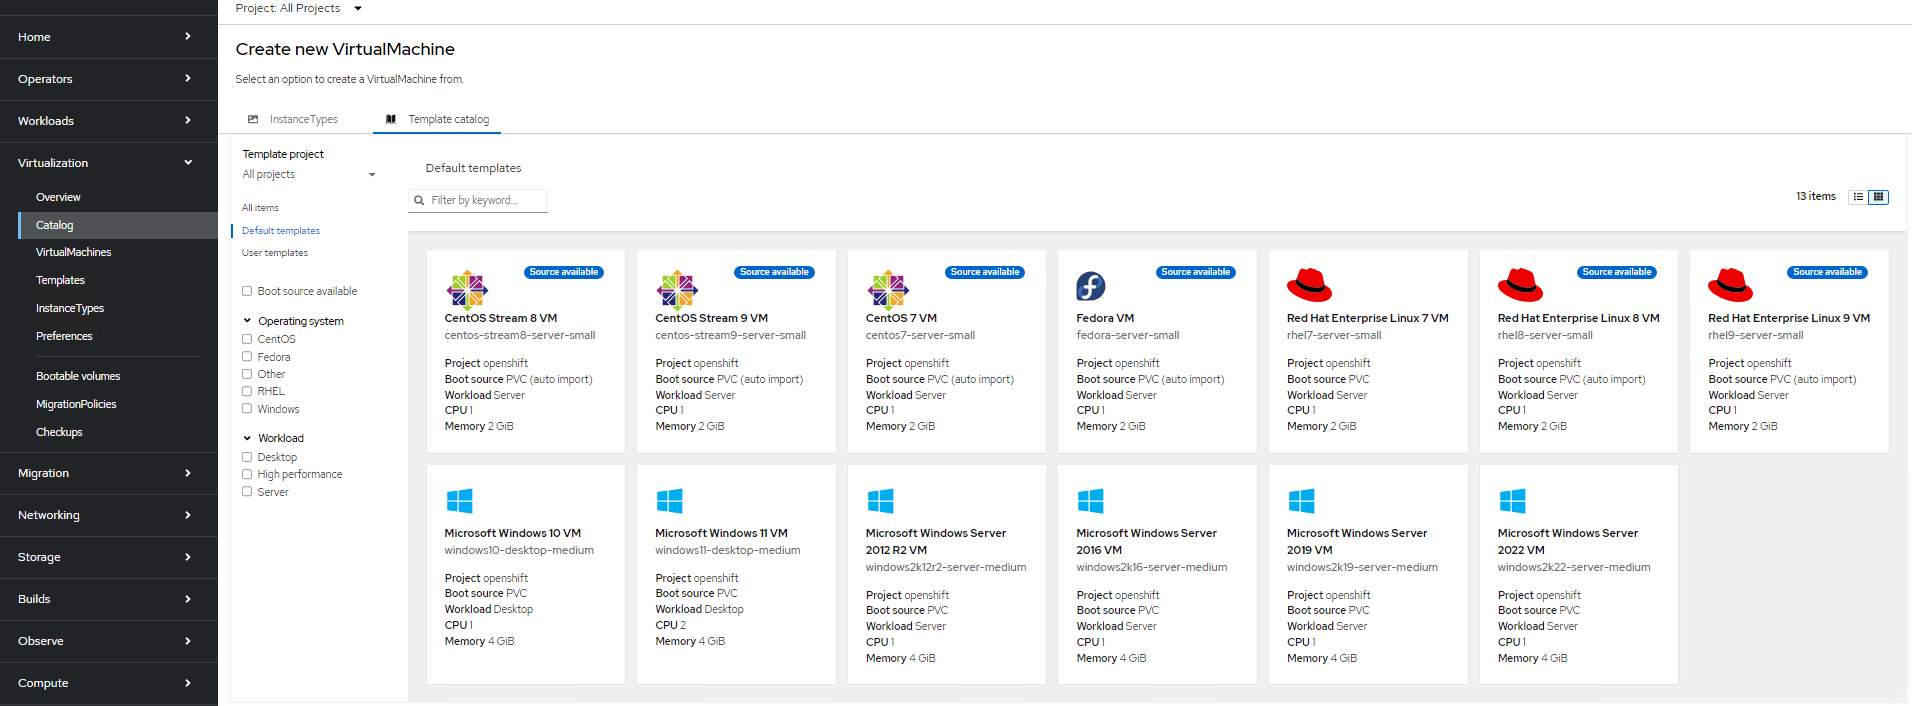
FIGURE 30 Templates available by default in Virtualization
Apply the filter "Boot source available".
Click the required template to view the details (for example: fedora)
Click "Quick create VirtualMachine" to create a VM from the template. You can customize the CPU/Memory/Storage as required.
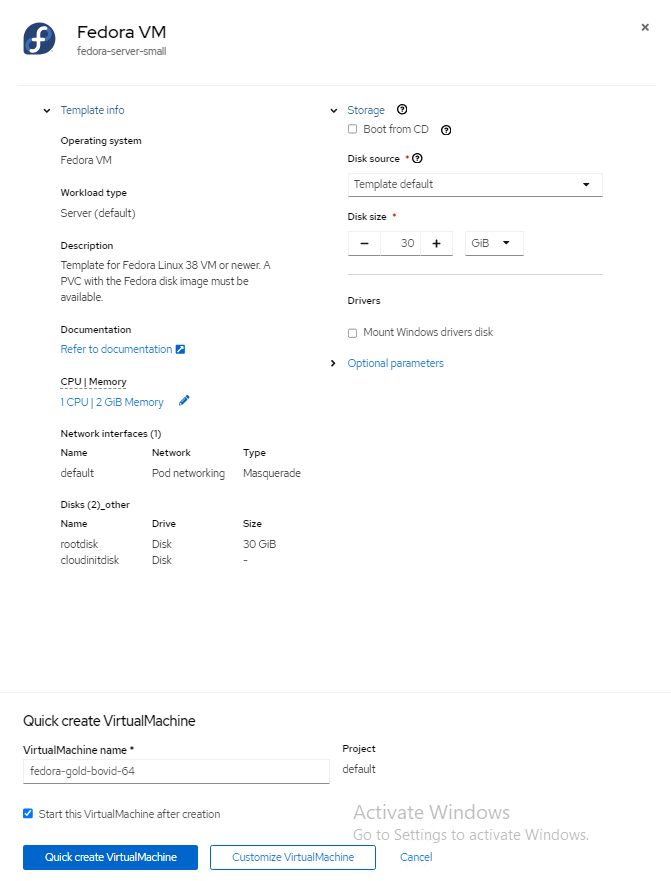
FIGURE 31 Sample deployment of fedora VM using templates
# Creating virtual machines from instance types
- Log into the OpenShift Container Platform web console and navigate to Virtualization → Catalog → Instance Types
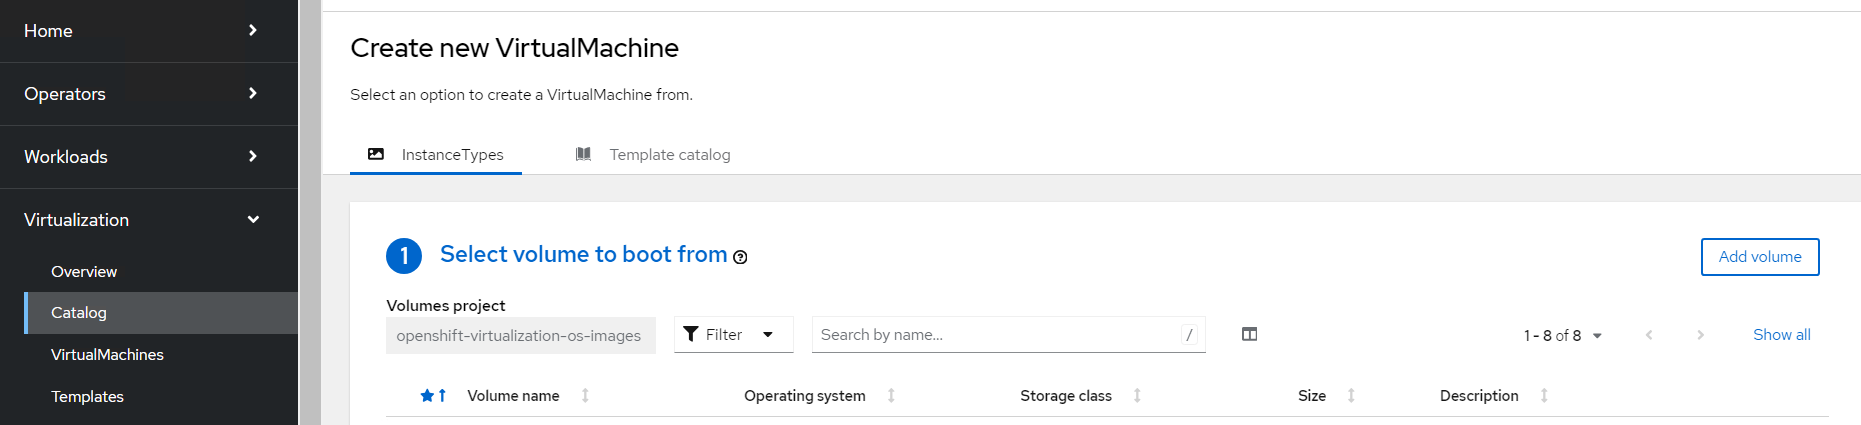
FIGURE 32 Virtual Machine creation from Catalog
Select the bootable volumes
- Images provided by RedHat, these images are available in "openshift-virtualization-os-images" namespace.
- Click Add Volume. You can either use any of the existing volume where you have the boot images or you can upload images and create a new volume(PVC) and provide the required parameter.
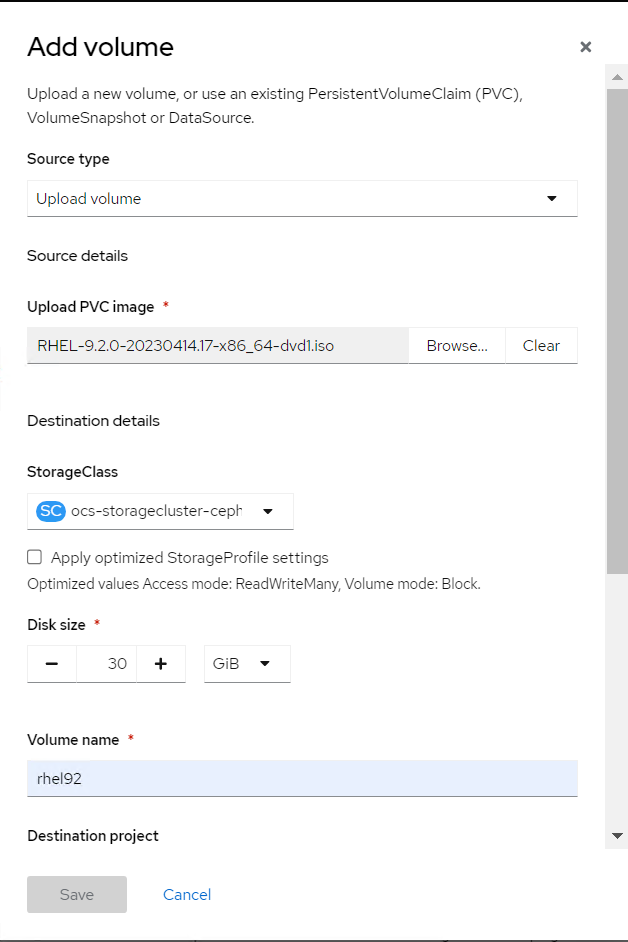
FIGURE 33 Add volumes to import OS images
Click the required boot volume.
Select the required Instance type

FIGURE 34 Selection of Instance type and boot image
- Click "Create VirtualMachine" to create a VM from the instance types.
You can Customize and create user Instance type as required by navigating to Virtualization → Instance Types → Create.
# Creating virtual machines from CLI
- Create a VirtualMachine manifest required for creating a VM
Below is an example manifest for creating fedora VM
apiVersion: kubevirt.io/v1
kind: VirtualMachine
metadata:
  name: my-vm
spec:
  running: false
  template:
    metadata:
      labels:
        kubevirt.io/domain: my-vm
    spec:
      domain:
        devices:
          disks:
          - disk:
              bus: virtio
            name: containerdisk
          - disk:
              bus: virtio
            name: cloudinitdisk
        resources:
          requests:
            memory: 8Gi
      volumes:
      - name: containerdisk
        containerDisk:
          image: kubevirt/fedora-cloud-registry-disk-demo
      - name: cloudinitdisk
        cloudInitNoCloud:
          userData: |
            #cloud-config
            password: fedora
            chpasswd: { expire: False }
- Apply the created manifest file for virtual machine creation.
oc apply -f < file-name >.yaml
# Reading/Viewing virtual machine
You can check the virtual machine status, Metrics , resources utilization (CPU, memory, storage) for overall cluster by navigate to Virtualization → Overview.
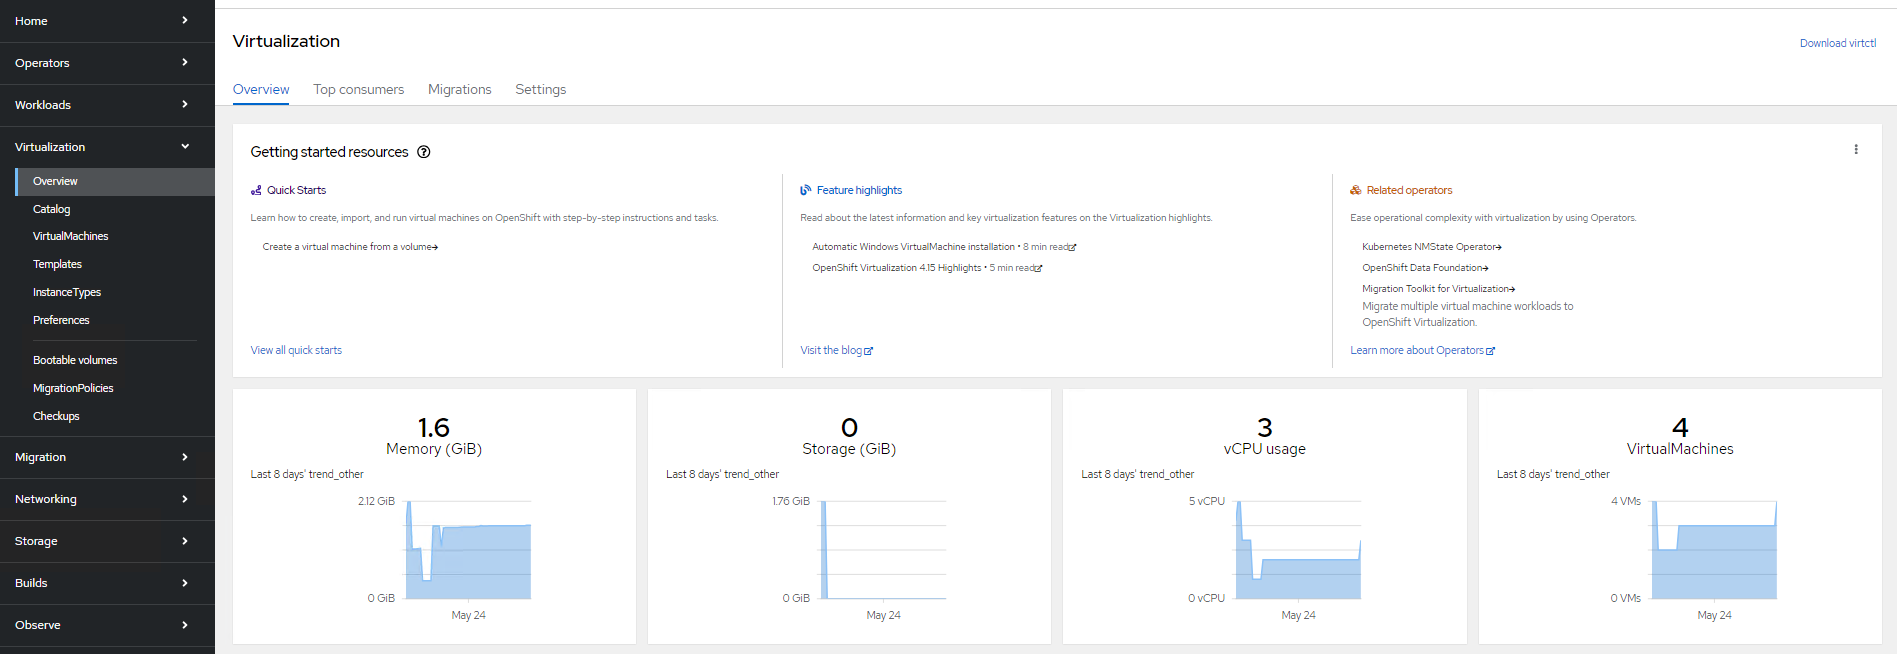
FIGURE 35 Overview Virtual machines in the Cluster
and access configuration details of VM's, networks and storage volumes.
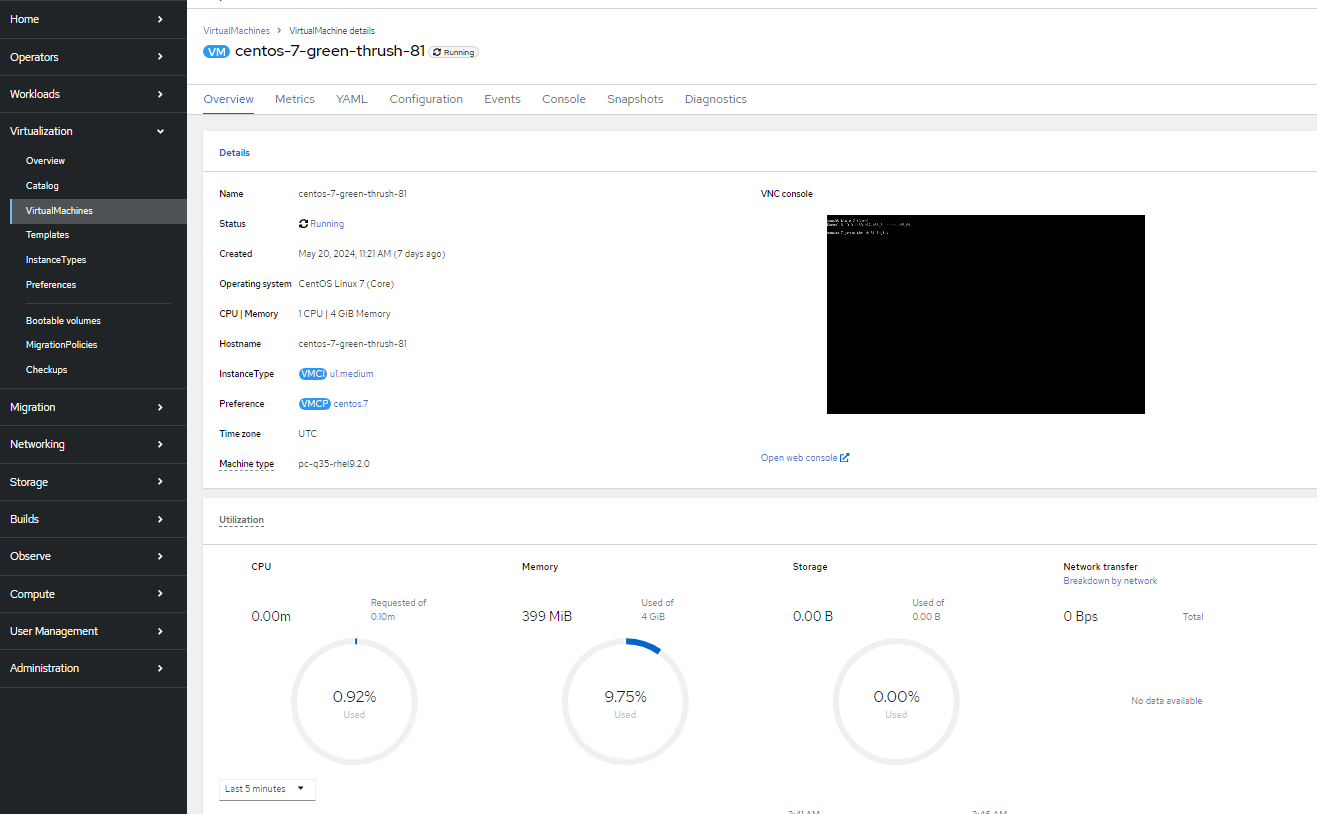
FIGURE 36 Overview of Sample Virtual machines deployed in the RHOCP platform
# Updating a virtual machine
You can update virtual machine configuration using CLI or from the web console.
# virtual machine configuration using CLI
- Virtual machine configuration can be edit/updated
oc edit vm < vm-name > -n < namespace >
- Apply the updated configuration
oc apply vm < vm_name > -n < namespace >
# virtual machine configuration using web console
Log into the OpenShift Container Platform web console and navigate to Virtualization → VirtualMachines
Select the virtual machine For example: addition of the disk navigate to Configuration → Storage → Add disk
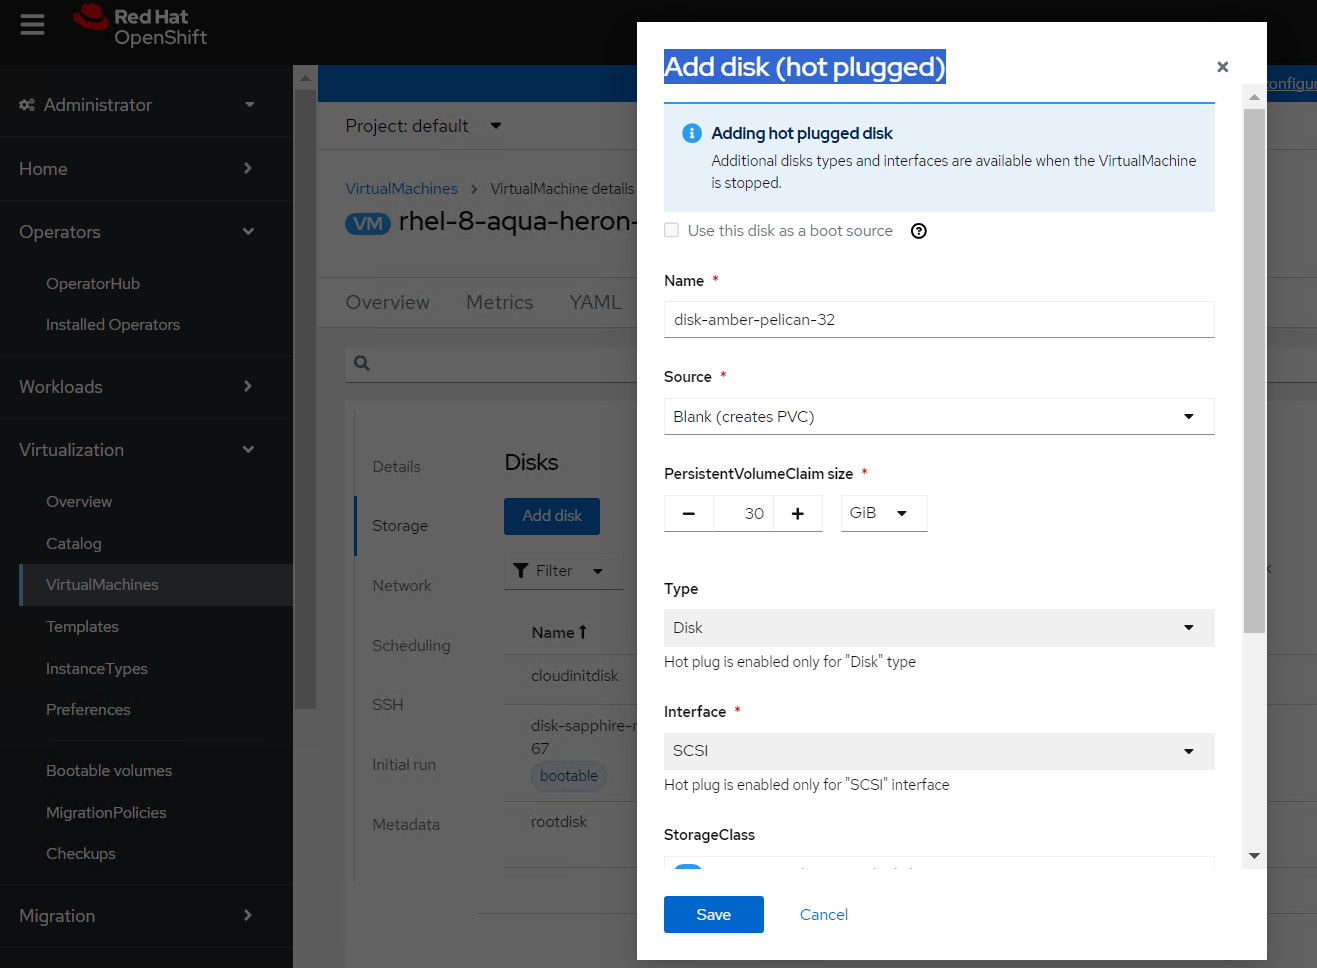
FIGURE 37 Storage disk addition
Specify the fields like Source, Size, Storage class as required
Click Add we can add additional networks, secrets, config map to virtual machines.
Some of the changes are applied once the virtual machine are restarted only. For restarting of any virtual machines
navigate to Virtualization → VirtualMachines
Click the Options menu  beside a virtual machine name and select Restart or select the virtual machine → Actions → Restart
# Deleting a virtual machine
You can delete a virtual machine by using CLI or from the web console.
# Delete a virtual machine using CLI
- Delete the virtual machine by executing the below command:
oc delete vm < vm_name > -n < namespace >
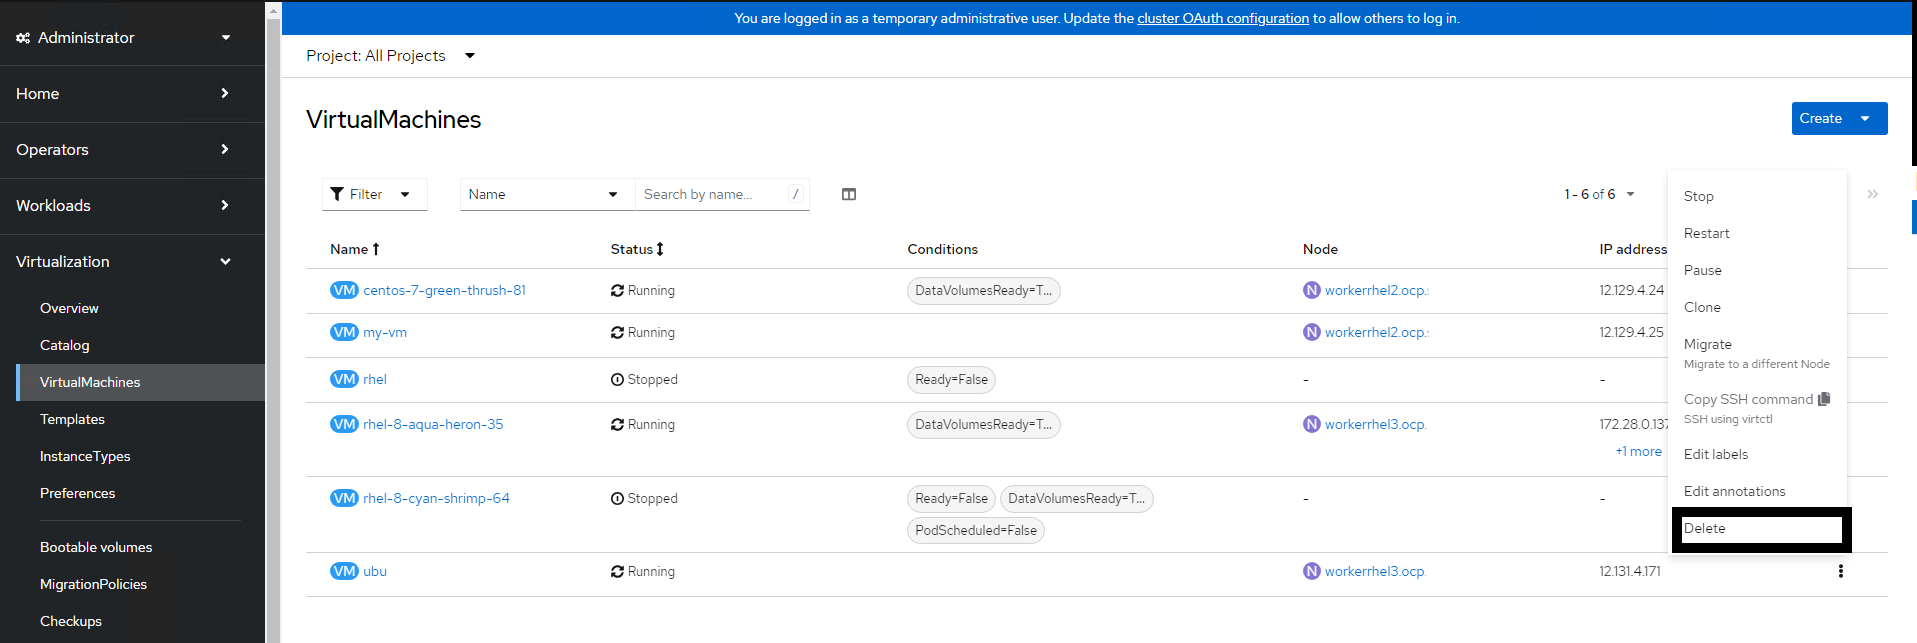
# Delete a virtual machine using web console
Log into the OpenShift Container Platform web console and navigate to Virtualization → VirtualMachines
Click the Options menu
beside a virtual machine name and select Delete or Select the virtual machine → Actions → Delete
# Hot-plugging a VM disks
You can add or remove virtual disks without stopping your virtual machine (VM). However, only data volumes and persistent volume claims (PVCs) can be hot-plugged and hot-unplugged; container disks cannot. A hot-plugged disk stays attached to the VM even after a reboot, and you must detach it to remove it from the VM.
# Adding a disk using web console
Log into the OpenShift Container Platform web console and navigate to Virtualization → VirtualMachines
Select any running virtul machine and navigate to Configuration → Storage → Add disk
Provide the details for the disk to be added and Save.
# Adding disk using CLI
You can hot plug and hot unplug a disk while a virtual machine (VM) is running by using the command line.
virtctl addvolume <virtual-machine|virtual-machine-instance> --volume-name=<datavolume|PVC> [--persist] [--serial=<label-name>]