Additional Features and Functionality
OpenShift API Data Protection
Introduction
OpenShift API for Data Protection (OADP) product safeguards customer applications on OpenShift Container Platform. It offers comprehensive disaster recovery protection, covering OpenShift Container Platform applications, application-related cluster resources, persistent volumes, and internal images. OADP is also capable of backing up both containerized applications and virtual machines (VMs).
However, OADP does not serve as a disaster recovery solution for etcd or OpenShift Operators.
Installation
In the OpenShift Container Platform web console, click Operators → OperatorHub.
Use the Filter by keyword field to find the OADP Operator.
Select the OADP Operator and click Install.
Click Install to install the Operator in the openshift-adp project.
Click Operators → Installed Operators to verify the installation.
Creating secret:
Create a Secret with the default name:
$ oc create secret generic cloud-credentials -n openshift-adp --from-file cloud=credentials-velero
The Secret is referenced in the spec.backupLocations.credential block of the DataProtectionApplication CR when you install the Data Protection Application.
Configuring the Data Protection Application
Configure the client-burst and the client-qps fields in the DPA as shown in the following example:
apiVersion: oadp.openshift.io/v1alpha1
kind: DataProtectionApplication
metadata:
  name: test-dpa
  namespace: openshift-adp
spec:
  backupLocations:
    - name: default
      velero:
        config:
          insecureSkipTLSVerify: "true"
          profile: "default"
          region: <bucket_region>
          s3ForcePathStyle: "true"
          s3Url: <bucket_url>
        credential:
          key: cloud
          name: cloud-credentials
        default: true
        objectStorage:
          bucket: <bucket_name>
          prefix: velero
        provider: aws
  configuration:
    nodeAgent:
      enable: true
      uploaderType: restic
    velero:
      client-burst: 500
      client-qps: 300
      defaultPlugins:
        - openshift
        - aws
        - kubevirt
Setting Velero CPU and memory resource allocations
You can set the CPU and memory resource allocations for the Velero pod by editing the DataProtectionApplication custom resource (CR) manifest.
Prerequisites
- You must have the OpenShift API for Data Protection (OADP) Operator installed.
Procedure
- Edit the values in the spec.configuration.velero.podConfig.ResourceAllocations block of the DataProtectionApplication CR manifest, as in the following example:
apiVersion: oadp.openshift.io/v1alpha1
kind: DataProtectionApplication
metadata:
  name: <dpa_sample>
spec:
# ...
  configuration:
    velero:
      podConfig:
        nodeSelector: <node_selector>
        resourceAllocations:
          limits:
            cpu: "1"
            memory: 1024Mi
          requests:
            cpu: 200m
            memory: 256Mi
Specify the node selector to be supplied to Velero podSpec.
The resourceAllocations listed are for average usage.
Backup process:
Goto Installed Operators -> OADP Operator -> backup -> create backup
Provide name and required details:
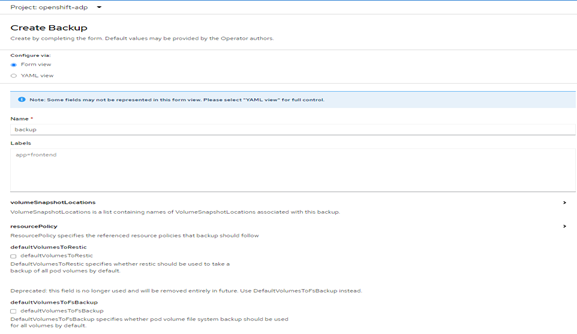
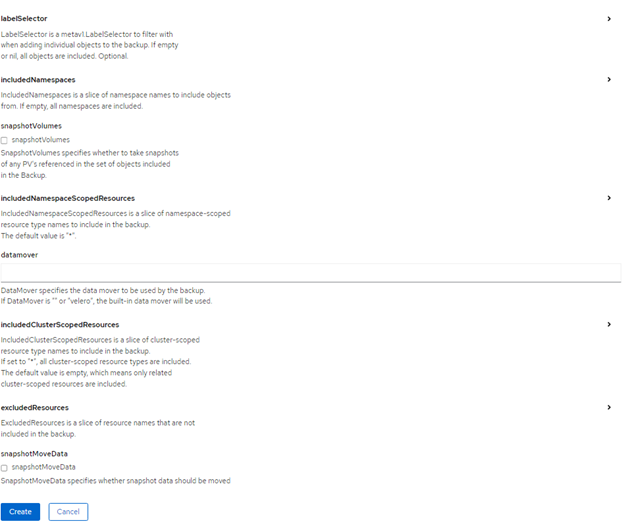
Figure 60. Creating a backup using OADP
- Click create
AirGap Deployment
Deploy OpenShift Container Platform using Airgap Method
This sections of documents describes about deploying the OpenShift Container Platform through disconnected environment.
Create YUM repo server
Create Mirror registry
OpenShift Deployment
- Prerequisites:
we will be using one server for all the below services and which will be having internet access to download the images.
Download server
YUM server
Mirror Registry
Download/YUM/Mirror registry server requirements
a) Recommended Operating system RHEL 9.4
b) At least 500 GB disk space (especially in the "/" partition), 4 CPU cores and 16GB RAM.
c) OS disk: 2x 1.6 TB ; Data disk: ~2 TB
d) Provide the required values in input.yaml file (vi /opt/hpe-solutions-openshift/DL-LTI-Openshift/input.yaml )
e) Setup the Download server to configure the nginx, development tools and other python packages required for LTI installation.
Navigate to the directory, cd /opt/hpe-solutions-openshift/DL-LTI-Openshift/ and run the below command.
'sh setup.sh'
As part of setup.sh script it will create nginx service, so user must download and copy rhel 9.4 DVD ISO to /usr/share/nginx/html/
- Create Yum Repo server
a) Navigate to /opt/hpe-solutions-openshift/DL-LTI-Openshift/ folder and update the hosts file with the yumrepo server details.
b) Navigate to yum folder
cd /opt/hpe-solutions-openshift/DL-LTI-Openshift/airgap/yum
c) Run the below command to create yum repo server
ansible-playbook -i /opt/hpe-solutions-openshift/DL-LTI-Openshift/hosts playbooks/create_local_yum_repo.yaml
- Mirror Registry
a) Navigate to folder "/opt/hpe-solutions-openshift/DL-LTI-Openshift/".
For airgap deployment provide the below values in input.yaml file
vi /opt/hpe-solutions-openshift/DL-LTI-Openshift/input.yaml

# fill the below values for the airgap deployment
is_environment_airgap: 'yes'
mirror_registry_ip:
mirror_registry_fqdn:
LOCAL_REGISTRY:
LOCAL_REPOSITORY:
ARCHITECTURE:
b) Navigate to mirror_registry folder
cd /opt/hpe-solutions-openshift/DL-LTI-Openshift/airgap/mirror_registry
c) Download and install the mirror registry
ansible-playbook playbooks/download_mirror_registry_package.yaml
ansible-playbook playbooks/install_mirror_registry.yaml
generate ssl certificates
ansible-playbook playbooks/generate_ssl_certs.yaml
run the below commands to copy the above generated ssl certs
  cp certs/ssl.key quay-install/quay-config/
  cp certs/ssl.cert quay-install/quay-config/
  cat certs/rootCA.pem >> quay-install/quay-config/ssl.cert
  mkdir -p /etc/containers/certs.d/<mirror_registry_fqdn>        # Here provide you mirror registryg fqdn
  cp certs/rootCA.pem  /etc/containers/certs.d/<mirror_registry_fqdn>/ca.crt
  cp certs/rootCA.pem /etc/pki/ca-trust/source/anchors/
  sudo update-ca-trust extract
  systemctl restart quay-app
d) execute the playbook site.yaml
site.yaml file contains the following playbooks
    - import_playbook: playbooks/download_openshift_components.yaml  # it will download ocp related images, client and installer
    - import_playbook: playbooks/create_json_pull_secret.yaml
    - import_playbook: playbooks/update_json_pull_secret.yaml
    - import_playbook: playbooks/mirroring_ocp_image_repository.yaml
- For OpenShift Solution Deployment follow the existing process listed for OpenShift Deployment
Red Hat Advanced Cluster Management for Kubernetes
Introduction
Red Hat Advanced Cluster Management for Kubernetes provides end-to-end management visibility and control to manage your Kubernetes environment. Take control of your application modernization program with management capabilities for cluster creation, application lifecycle, and provide security and compliance for all of them across data centers and hybrid cloud environments. Clusters and applications are all visible and managed from a single console, with built-in security policies Run your operations from anywhere that Red Hat OpenShift Container Platform runs, and manage your Kubernetes clusters.
With Red Hat Advanced Cluster Management for Kubernetes:
Work across a range of environments, including multiple data centers, private clouds and public clouds that run Kubernetes clusters.
Easily create OpenShift Container Platform Kubernetes clusters and manage cluster lifecycle in a single console.
Enforce policies at the target clusters using Kubernetes-supported custom resource definitions.
Deploy and maintain day two operations of business applications distributed across your cluster landscape.
Figure 19 shows Architecture of Advanced Cluster Management for Kubernetes
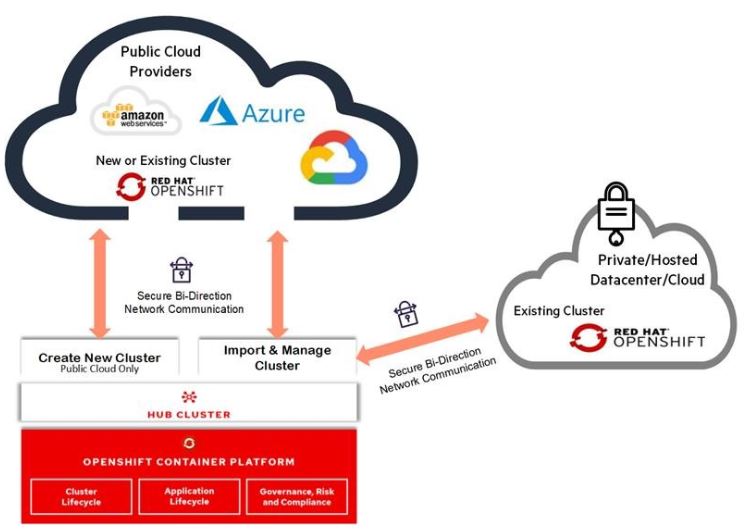
Figure 61. Multi-Cluster Management with Red Hat Advanced Cluster Management
Installing Red Hat Advanced Cluster Management from the console
Prerequisites
Hub Cluster
OpenShift Container Platform 4.x successfully deployed.
Operator Hub availability.
Managed Clusters
OpenShift 4.x on from public cloud providers (Amazon Web Services, Google Cloud, IBM and Microsoft Azure) or Private clouds (Openstack, OpenShift).
Flow Diagram
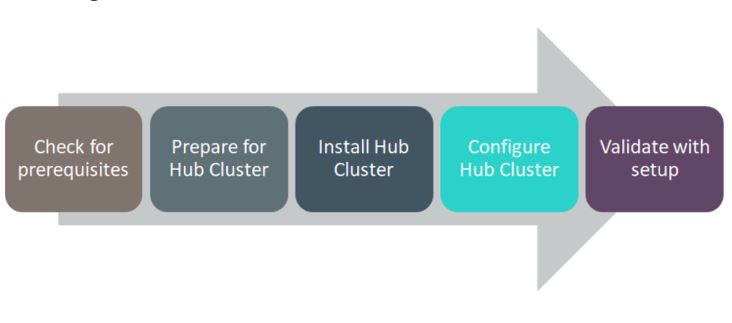
Figure 62. RedHat Advanced Cluster Management Solution Flow Diagram
Installation
Following steps needs to perform prior to installing Advanced Cluster Management from the OpenShift Console.
Create Namespace
Create Pull Secrets
Follow below steps to creating namespace.
Create a hub cluster namespace for the operator requirements:
In the OpenShift Container Platform console navigation, select Administration -> Namespaces.
Select create Namespace.
Provide a name for your namespace. This is the namespace that you use throughout the installation process.
NOTE
The value for namespace might be referred to as Project in the OpenShift Container Platform environment.
Follow below steps to create secrets.
Switch your project namespace to the one that you created in step 1. This ensures that the steps are completed in the correct namespace. Some resources are namespace specific.
I. In the OpenShift Container Platform console navigation, select Administration -> Namespaces.
II. Select the namespace that you created in step 1 from the list.
Create a pull secret that provides the entitlement to the downloads.
I. Copy your OpenShift Container Platform pull secret from cloud.redhat.com
II. In the OpenShift Container Platform console navigation, select Workloads -> Secrets.
III. Select Create -> Image Pull Secret.
IV. Enter a name for your secret.
V. Select Upload Configuration File as the authentication type.
VI. In the Configuration file field, paste the pull secret that you copied from cloud.redhat.com.
VII. Select Create to create the pull secret.
Installing Advanced Cluster Management Operator
In the OpenShift Container Platform console navigation, select Operators -> OperatorHub.
Select Red Hat Advanced Cluster Management.
Select Install.
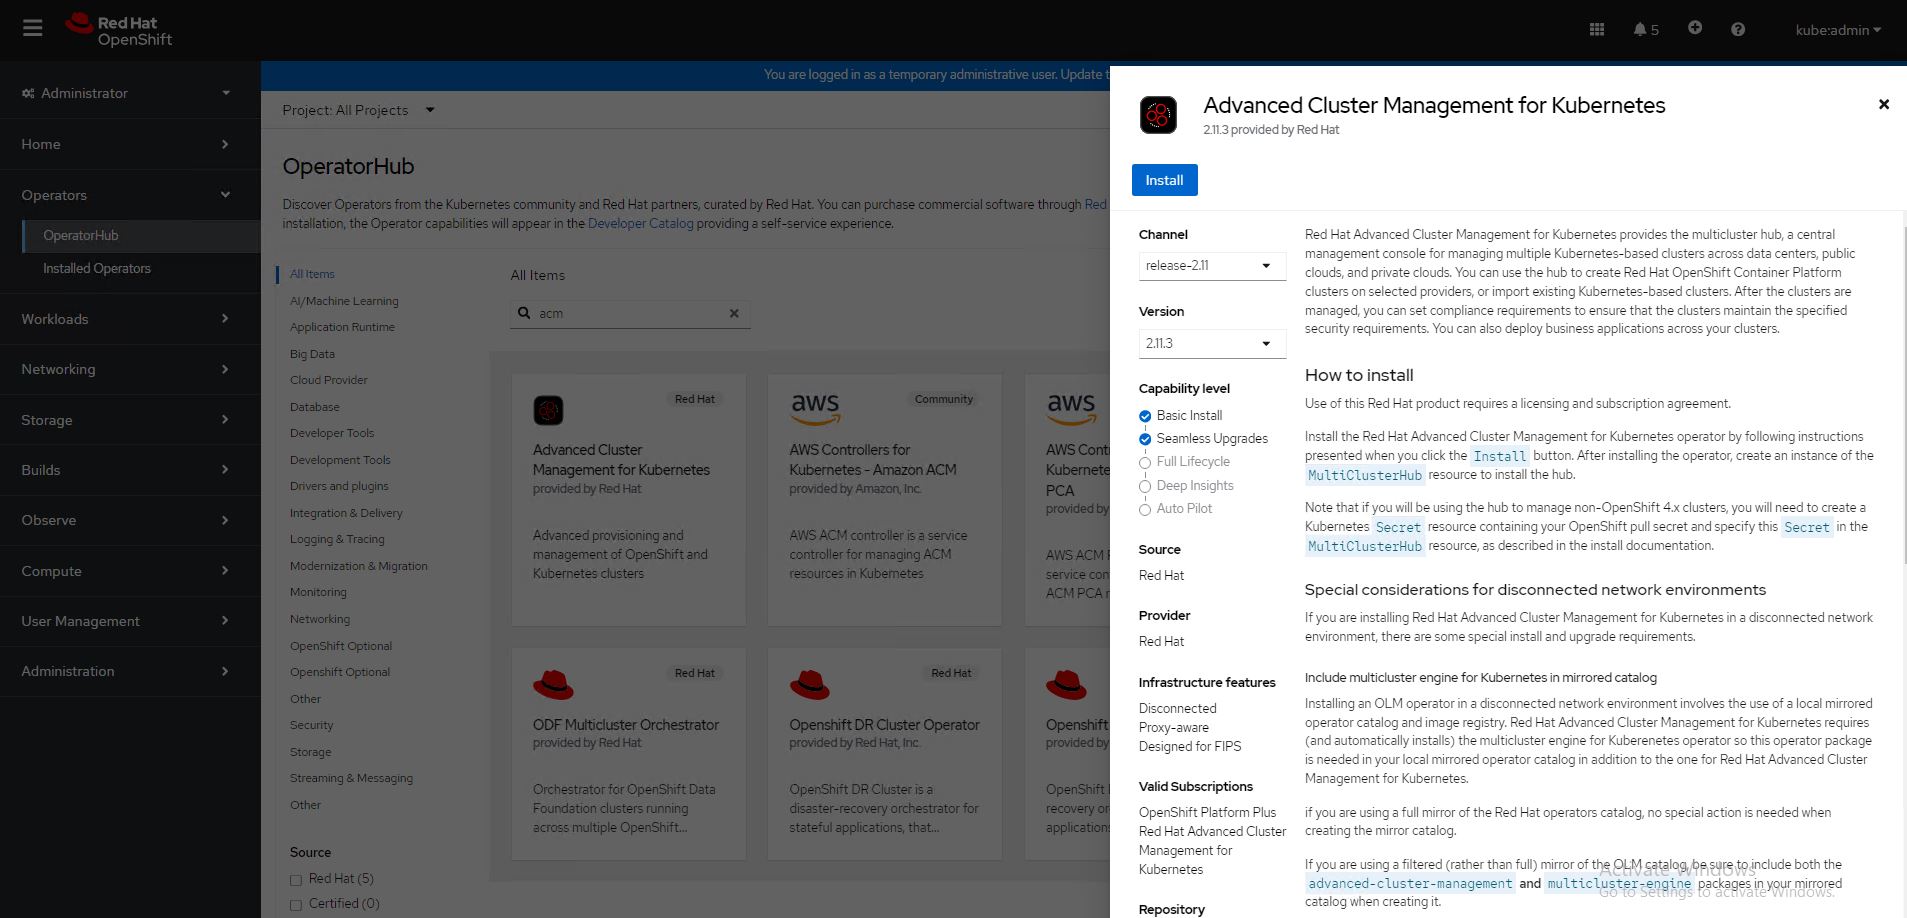
Figure 63. RedHat Advanced Cluster Management Operator deployment
Update the values, if necessary.
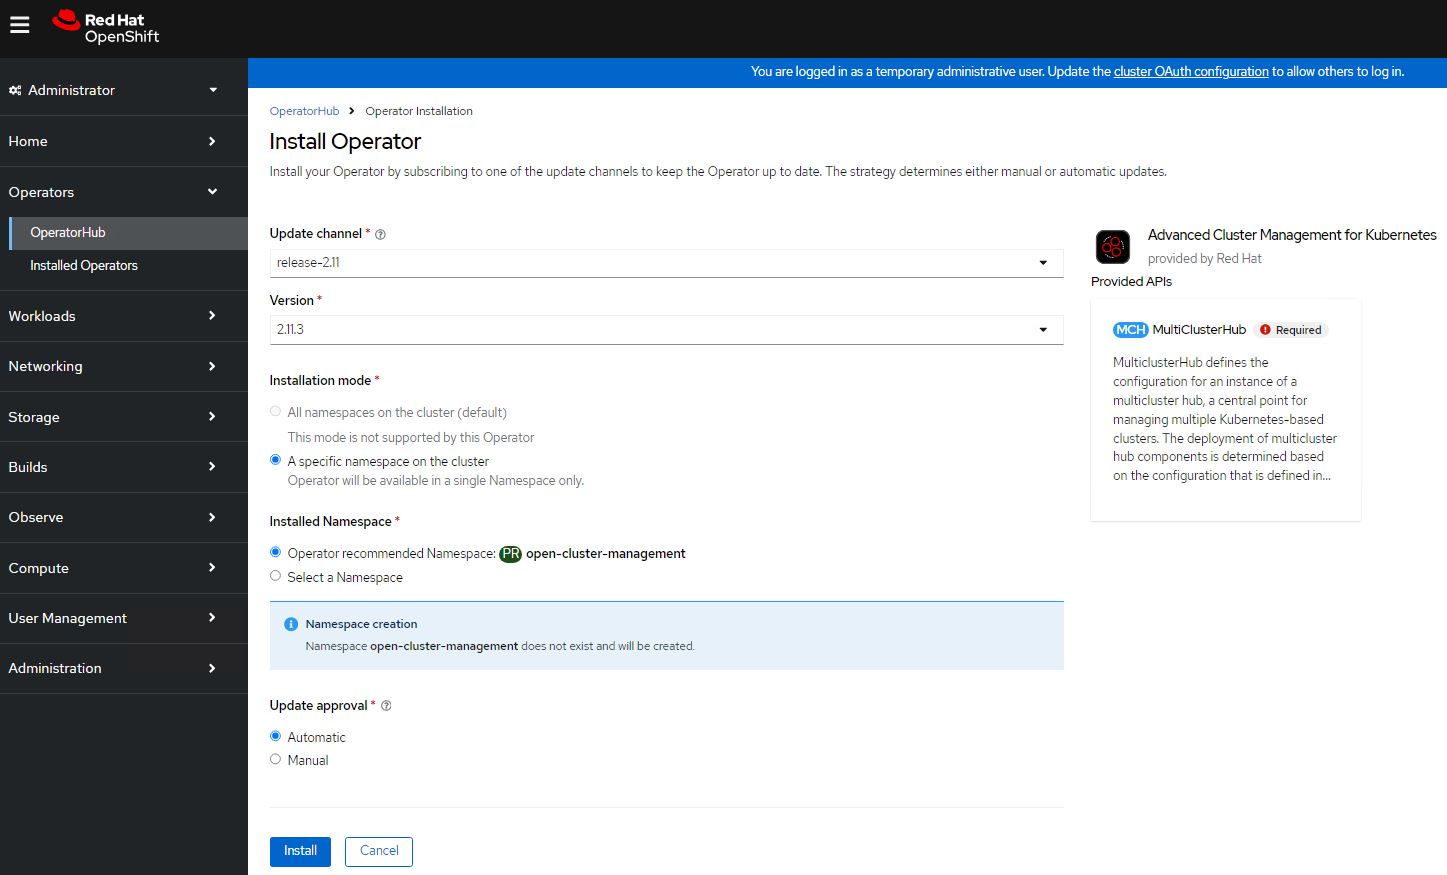
Figure 64. RedHat Advanced Cluster Management Operator
Select specific namespace on the cluster for the Installation Mode option.
I. Select open-cluster-management namespace from the drop down menu.
selected by default for the Update Channel option.
Select an Approval Strategy:
I. Automatic specifies that you want OpenShift Container Platform to upgrade Advanced Cluster Management for kubernetes Operator.
II. Manual specifies that you want to have control to upgrade Advanced Cluster Management for kubernetes Operator manually
Select Install.

Figure 65. Deployed RedHat ACM Operator
The Installed Operators page is displayed with the status of the operator.
Create the MultiClusterHub custom resource
In the OpenShift Container Platform console navigation, select Installed Operators -> Advanced Cluster Management for Kubernetes.
Select the MultiClusterHub tab.
Select Create MultiClusterHub.
Update the values, according to your needs.
Tip: You can edit the values in the YAML file by selecting YAML View. Some of the values are only available in the YAML view. The following example shows some sample data in the YAML view:
apiVersion: operator.open-cluster-management.io/v1

kind: MultiClusterHub

metadata:

namespace: << newly created namespace>>

name: multiclusterhub

spec:

imagePullSecret: <secret>
Add the pull secret that you created to the imagePullSecret field on the console. In t he YAML View, confirm that the namespace is your project namespace.
Select Create to initialize the custom resource. It can take up to 10 minutes for the hub to build and start.
After the hub is created, the status for the operator is Running on the Installed Operators page.
Access the Advanced Cluster Management console for the hub
In the OpenShift Container Platform console navigation, select Networking -> Routes.

Figure 66. Routes for the ACM console
Click the URL for Advanced Cluster Management console hub in the list and navigate it to access the console for Advanced Cluster Management console hub using your Hub openshift console username and password.
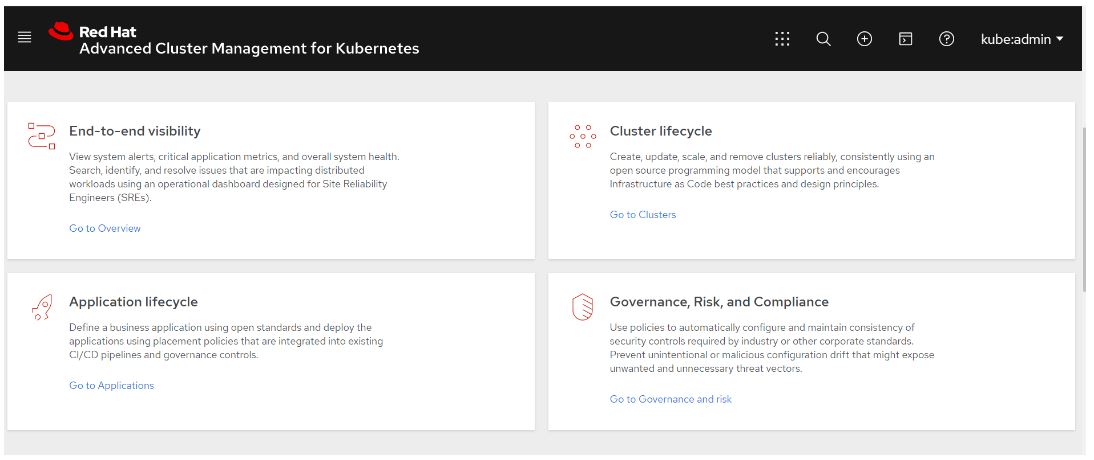
Figure 67. ACM console
To create/ import an existing cluster from Advanced Cluster Management console, click on Go to Cluster.
Import an existing Cluster using Advanced Cluster Management console
Navigate to Add cluster, Click Import an existing cluster.
It displays a window as below, there you can provide Cluster name, Cloud (public or on-premise), Environment and labels are optional.
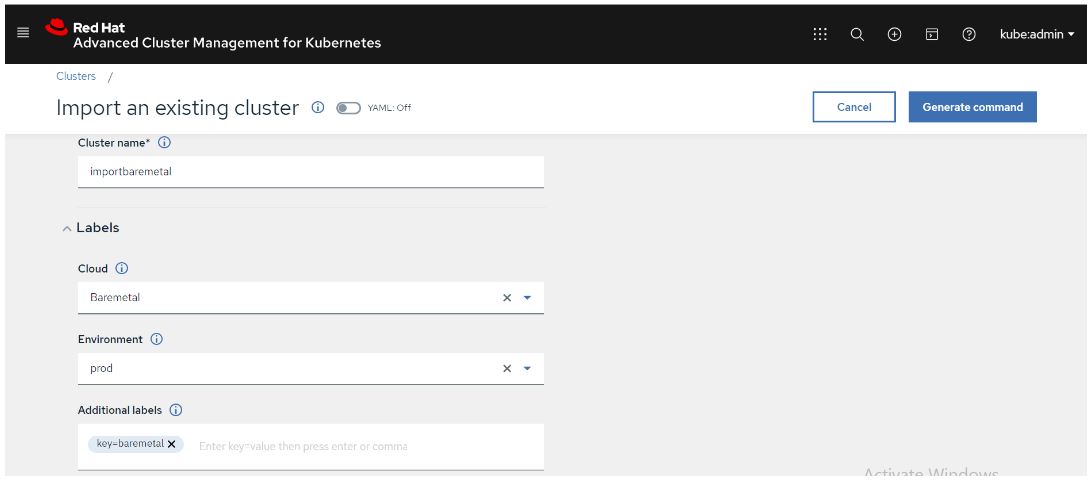
Figure 68. Importing existing cluster to ACM
Once you provide all the details, Click on Generate Command.

Figure 69. Generated command from ACM
Copy the command generated, Run it on imported cluster.
After running the command, we should navigate to Advanced Cluster Management console there we can find the status of imported cluster details in cluster option as per below snap.
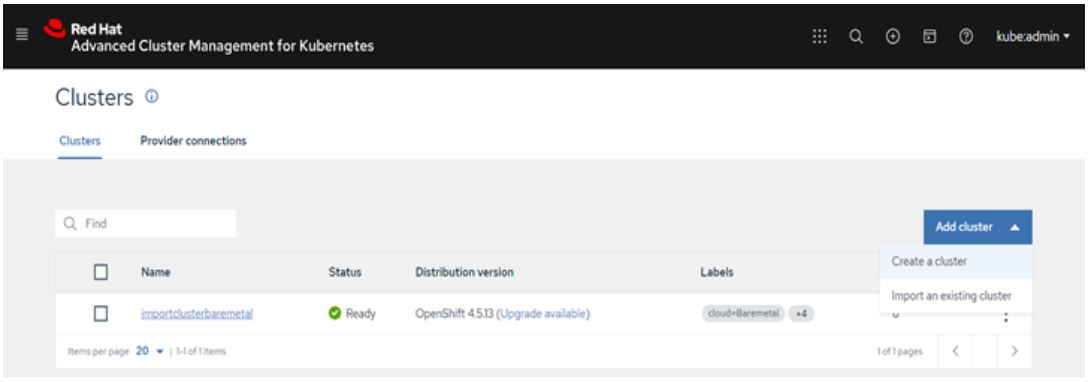
Figure 70. Imported cluster details to ACM Console
Red Hat Advanced Cluster security for Kubernetes
Red Hat Advanced Cluster Security (RHACS) for Kubernetes is the pioneering Kubernetes-native security platform, equipping organizations to build, deploy, and run cloud-native applications more securely. The solution helps protect containerized Kubernetes workloads in all major clouds and hybrid platforms. Central services include the user interface (UI), data storage, RHACS application programming interface (API), and image scanning capabilities. RHACS Cloud Service allows you to secure self-managed clusters that communicate with a Central instance. The clusters you secure, called Secured Clusters.
Prerequisites
- Access to a Red Hat OpenShift Container Platform cluster using an account with Operator installation permissions.
- Red Hat OpenShift Container Platform 4.16 or later. For more information, see Red Hat Advanced Cluster Security for Kubernetes Support Policy
Install the Red Hat Advanced Cluster Security Operator
Navigate in the web console to the Operators > OperatorHub page.
If Red Hat Advanced Cluster Security for Kubernetes is not displayed, enter Advanced Cluster Security into the Filter by keyword box to find the Red Hat Advanced Cluster Security for Kubernetes Operator.
Select the Red Hat Advanced Cluster Security for Kubernetes Operator to view the details page.
Read the information about the Operator, and then click Install.
On the Install Operator page:
a. Keep the default value for Installation mode as All namespaces on the cluster.
b. Choose a specific namespace in which to install the Operator for the Installed namespace field. Install the Red Hat Advanced Cluster Security for Kubernetes Operator in the rhacs-operator namespace.
c. Select automatic or manual updates for Update approval.
Click Install.
Verification: After the installation completes, navigate to Operators > Installed Operators to verify that the Red Hat Advanced Cluster Security for Kubernetes Operator is listed with the status of Succeeded.
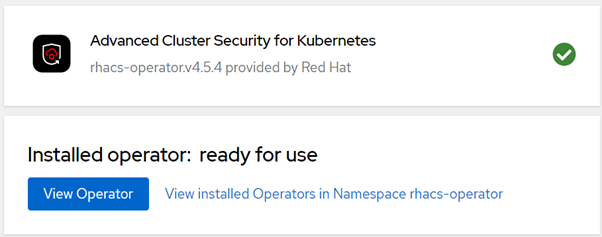
Figure 71. Red Hat ACS Operator Installation Install the Central Red Hat Advanced Cluster Security
- On the Red Hat OpenShift Container Platform web console, navigate to the Operators > Installed Operators page.
- Select the Red Hat Advanced Cluster Security for Kubernetes Operator from the list of installed Operators.
- If you have installed the Operator in the recommended namespace, OpenShift Container Platform lists the project as rhacs-operator, Select Project: rhacs-operator → Click Create project.
- Enter the new project name (stackrox) and click Create. Red Hat recommends that you use stackrox as the project name.
- Under the Provided APIs section, select Central. Click Create Central.
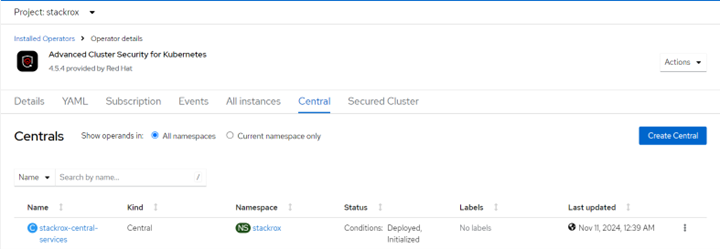
Figure 72. Central Red Hat Advanced Cluster Security (ACS) Installation 6. Configure via yaml view, keep default values, and click create. 7. In stackrox-central-services details we will find Admin credentials information.
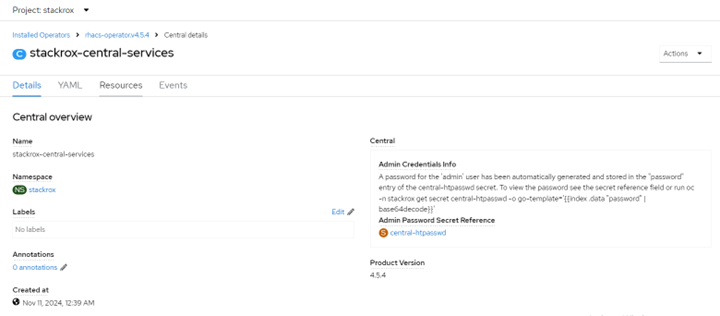
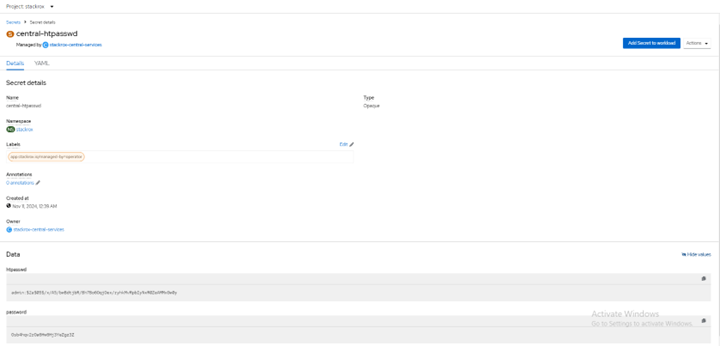
Figure 73. Stackrox-central-services details
Click central-htpasswd below Admin Password Secret Reference to find the central login credentials and note the htpasswd username(admin) and password.
Navigate to Networking > Routes to find the central url.

Figure 74. Stackrox central urlLog in to the central console using htpasswd credentials.
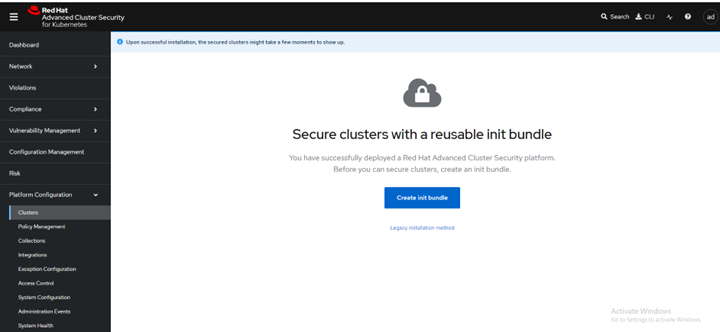
Figure 75. Central console dashboard Create init bundle using RHACS portalOn the RHACS portal, navigate to Platform Configuration > Integrations.
Navigate to the Authentication Tokens section and click Cluster Init Bundle.
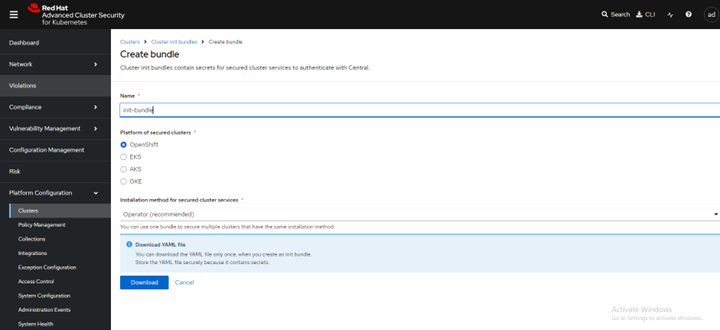
Figure 76. Create init bundleClick Create bundle.
Enter a name for the cluster init bundle and click Download. Apply the init bundle by creating a resource on the secured cluster Before installing secured clusters, we must use the init bundle to create the required resources on the cluster that will allow the services on the secured clusters to communicate with Central. Use any one of the following methods.
Method 1: Using the CLI
a. Run the following commands to create the resources:
oc create namespace stackroxb. (Specify the file name of the init bundle containing the secrets)
oc create -f <init_bundle.yaml> -n <stackrox>c. Specify the name of the project where secured cluster services will be installed
Method 2 : using the web console
a. In the OpenShift Container Platform web console on the cluster that you are securing, in the top menu, click + to open the Import YAML page. You can drag the init bundle file or copy and paste its contents into the editor, and then click Create.
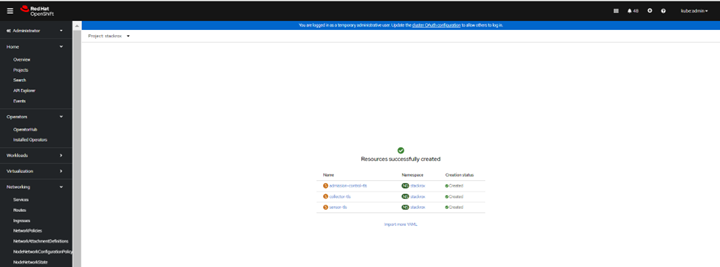
Figure 77. Resource creation on secured cluster
Install secured cluster services within same cluster
Prerequisites
- If using OpenShift Container Platform, ensure the installation of version 4.16 or later.
- Installation of the RHACS Operator and generation of an init bundle that is applied to the cluster. Procedure
- On the OpenShift Container Platform web console, navigate to the Operators > Installed Operators page and select the RHACS Operator.
- Click Secured Cluster from the central navigation menu in the Operator details page.
- Click Create Secured Cluster.
- Select one of the following options in the Configure via field: either Form view or Yaml view.
- Enter the new project name by accepting or editing the default name. The default value is stackrox-secured-cluster-services.
- Keep all values default for stackrox-secured-cluster-services for same cluster.
- Now the stackrox-secured-cluster-services are ready to perform activity.

Figure 78. Secured Cluster installation
Red Hat Quay
Red Hat Quay is an enterprise-quality container registry. Use Red Hat Quay to build and store container images, then make them available to deploy across your enterprise. The Red Hat Quay Operator provides a simple method to deploy and manage Red Hat Quay on an OpenShift cluster.
Note
This section is required to executed only if user has selected Red Hat OpenShift Data Foundation (ODF) as storage option. Skip this section if HPE Alletra is the storage option.
This section explains configuring Red Hat Quay v3.13 container registry on existing OpenShift Container Platform 4.16 using the Red Hat Quay Operator.
Installation of Red Hat Quay Operator
Log in to Red Hat OpenShift Container Platform console, select Operators → OperatorHub.
In the search box, type Red Hat Quay and select the official Red Hat Quay Operator provided by Red Hat. This directs you to the Installation page, which outlines the features, prerequisites, and deployment information.
Select Install. This directs you to the Operator Installation page.
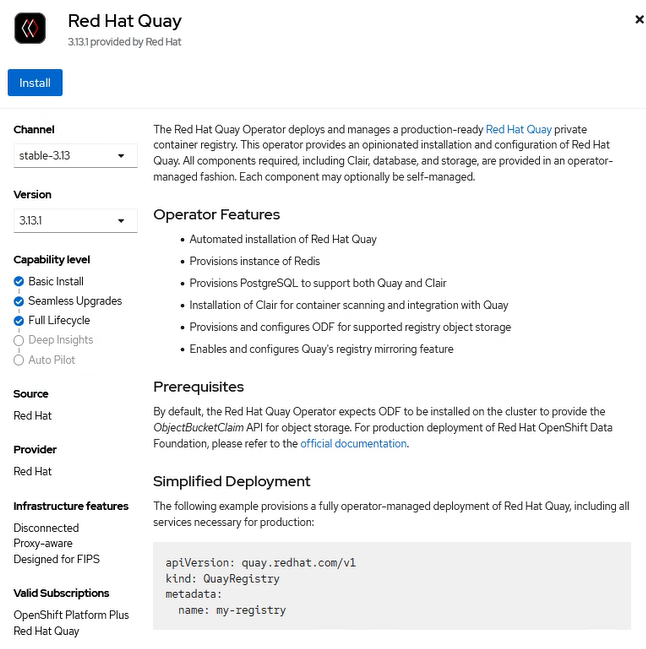
Figure 79. Red Hat Quay operator installation
- Update the details for Update channel, Installation mode, Installed Namespace, and update approval as shown in the following figure.
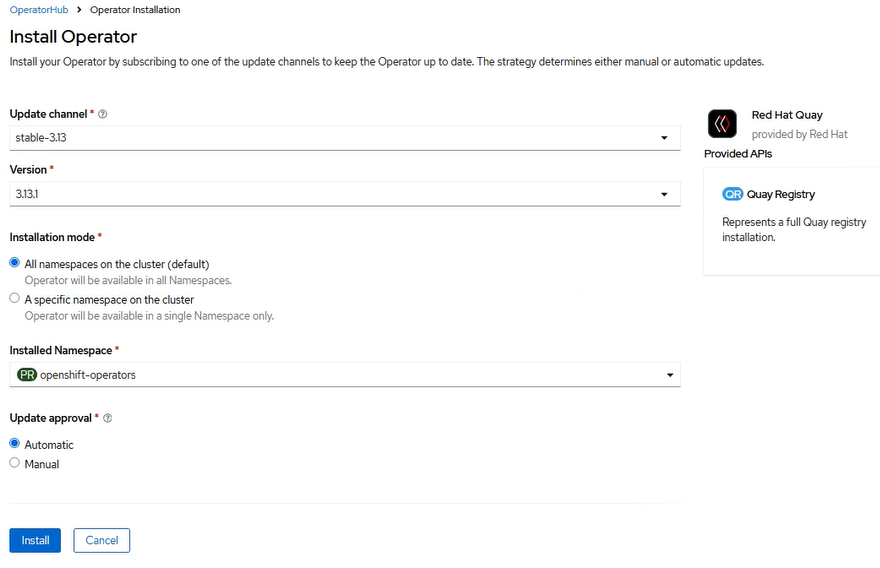
Figure 80. Red Hat Quay operator installation details
Select Install.
After installation you can view the operator in the Installed Operators tab.

Figure 81. Red Hat Quay operator installed successfully
Create the Red Hat Quay Registry
- Click the Quay Registry tab → Create QuayRegistry.

Figure 82. Red Hat Quay registry creation
- Provide details like name and click create.
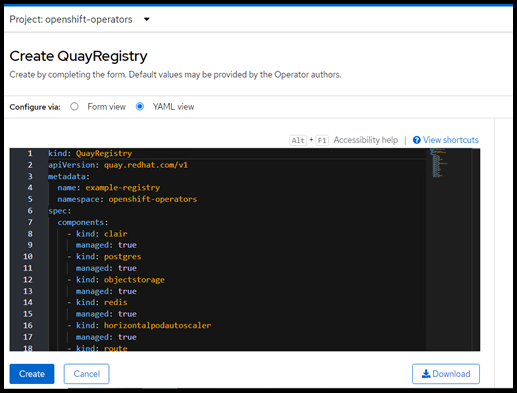
Figure 83. Red Hat Quay registry creation yaml details
- Quay registry is created and appears as shown in the following figure.
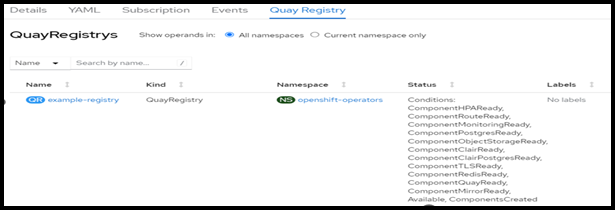
Figure 84. Red Hat Quay registry created successfully
- Click Create Quay Registry to see registry information.

Figure 85. Red Hat Quay registry created details
- Click Registry Endpoint to open registry dashboard.
If dashboard is not accessible add the entry of registry url to /etc/hosts as follows.
haproxy-ip  <Registry Endpoint URL>
haproxy-ip example-registry-quay-openshift-operators.apps.ocp.ocpdiv.local
- Quay registry dashboard login page appears as shown in the following figure.
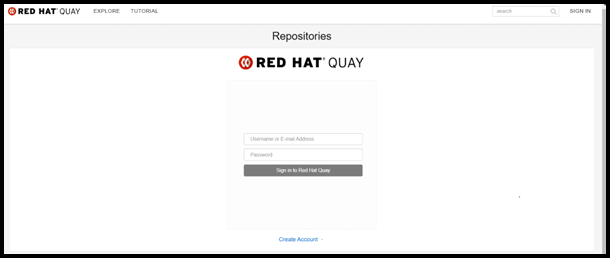
Figure 86. Red Hat Quay account login page
Enter details as shown and click Create Account.
Click sign in and enter details provided while creating the account.