# Integrating External Ezmeral DataFabric with Ezmeral Runtime Enterprise 5.6.x
HPE EXternal Ezmeral data fabric deployed on 5x HPE ProLiant DL380 Gen11 Servers. The HPE Ezmeral Runtime Enterprise out of the box supports the installation and configuration of the persistent data fabric for AI and analytics and K8s workload. This persistent volume is provided by HPE Ezmeral DataFabric which is a distributed file and object store that manages both structured and unstructured data. It is designed to store data at an Exabyte scale, support trillions of files, and combine analytics and operations into a single platform. It supports industry-standard protocols and APIs, including POSIX, NFS, S3, and HDFS.
# External Data Fabric installation and configuration
1, Host Configuration
we need to follow all the steps at this location Installing Core and Ecosystem Components (hpe.com) (opens new window) post OS installation. OS installation can be done using the same steps used in os installation section.
Pre-requisites
OS installation automation can be done by following below link “Deploying operating system on bare-metal nodes” or Perform steps below manually which are pre-requisites
- Set the hostnames
- Set the DNS
- Set the resolv.conf
- Set the etc hosts
- Set the time sync across nodes
- Check the raw disk, should not have any partitions
- Set the password less ssh (ssh-keygen, ssh-copy-id -i ~/.ssh/id_rsa.pub remote-host)
- Apply packages
- Regiter servers using the valid suse subscription
SUSEConnect -r ******** -e example@xyz.com #Base June 2022
SUSEConnect -p sle-module-basesystem/15.3/x86_64
SUSEConnect -p sle-module-containers/15.3/x86_64
SUSEConnect -p PackageHub/15.3/x86_64
SUSEConnect -p sle-module-legacy/15.3/x86_64
SUSEConnect -p sle-module-python2/15.3/x86_64
SUSEConnect -p sle-module-public-cloud/15.3/x86_64
SUSEConnect -p sle-module-desktop-applications/15.3/x86_64
SUSEConnect -p sle-module-desktop-applications/15.3/x86_64
SUSEConnect -p sle-module-python2/15.3/x86_64
SUSEConnect -p sle-module-development-tools/15.3/x86_64
- Install Java 11 zypper install java-11-openjdk-11.0.9.0-3.48.1
- easy_install pip
- Install python zypper in python-2.7.18
- zypper in java-11-openjdk-devel
- zypper install -y python3-devel python3-setuptools
- Disable firewall and apparmor
- systemctl stop apparmor
- systemctl stop firewalld
- Create a user named mapr on all the nodes
- groupadd -g 5000 mapr
- useradd mapr -u 5000 -g 5000 -m -s /bin/bash
- usermod -aG wheel mapr
- passwd mapr
- visudo and comment the below line
- Defaults targetpw # ask for the password of the target user i.e. root
Note
The password should be same on all the nodes as later it will be used for EDF installation by mapr-installer-cli
# Preparing installer node for mapr installation
Follow the steps mentioned in https://docs.datafabric.hpe.com/72/MapRInstaller.html (opens new window).
Download the installer bits on to installer server (https://mapr.com/download/ (opens new window)) and run the file
Or
wget https://package.mapr.hpe.com/releases/installer/mapr-setup.sh (opens new window) -P /tmp
chmod +x /tmp/mapr-setup.sh
./mapr-setup.sh -y You will receive the url (https://abc.domainname:9443 (opens new window)) to access mapr installer UI. To login use Username mapr and password mapr configured previously.
Perform the following steps to change the location of the temporary directory used by Java processes using java.io.tmpdir variable:
Create a custom tmp directory for mapr and set its permission similar to /tmp.
> mkdir /opt/mapr/tmp
> chmod 777 /opt/mapr/tmp
- Set the custom tmp directory as java.io.tmpdir
> export JDK_JAVA_OPTIONS="-Djava.io.tmpdir=/opt/mapr/tmp"
- Start the Installer. Open the Installer URL:
https://<Installer Node hostname/IPaddress>:9443
You are prompted to log in as the cluster administrator user that you configured while running the mapr-setup.sh script. Credentials: mapr/mapr
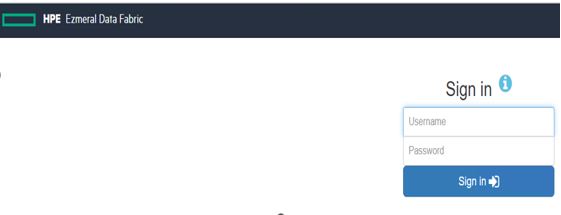
Figure 61. Sign in Dashboard
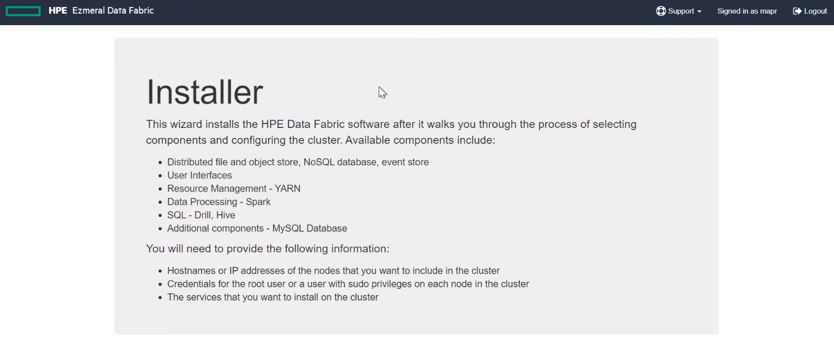
Figure 62. Dashboard page
Check the mapr & MEP version.
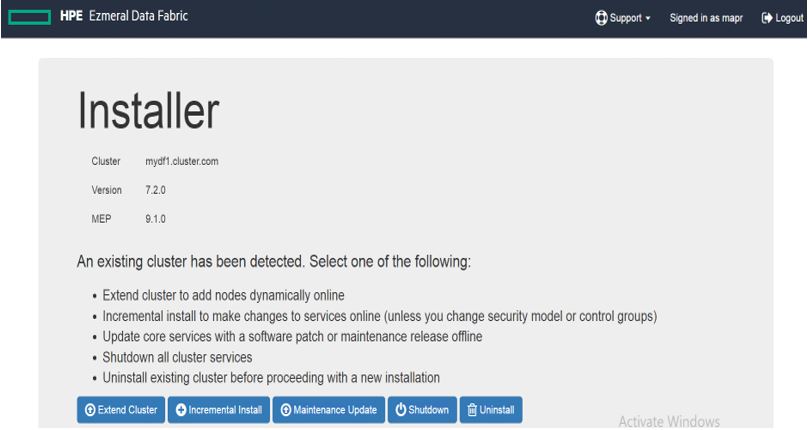
Figure 63. Mapr & MEP Version information
MapR Control System (MCS): Click on cldb node list to login MCS, below is the cldb node list.
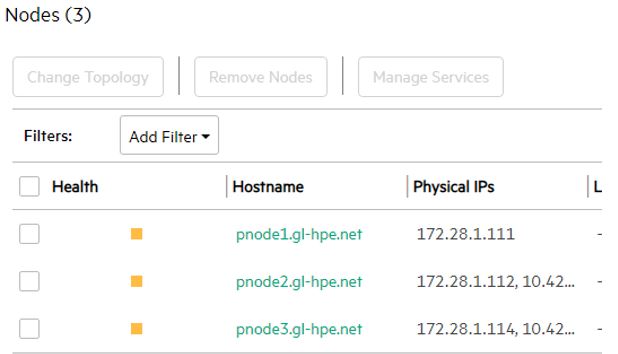
Figure 64. Nodes information
Services:
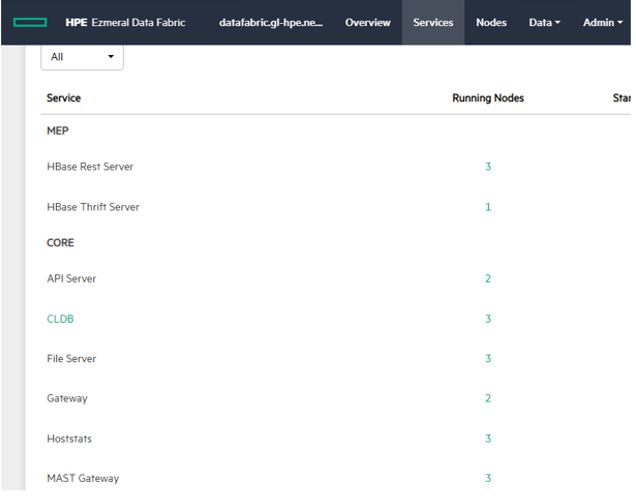
Figure 65. Services information
Adding license is mandatory for date fabric services to functional.
Click on get free trail license and proceed with providing login HPE account credentials and Cluster ID. Then download the license and upload it here.
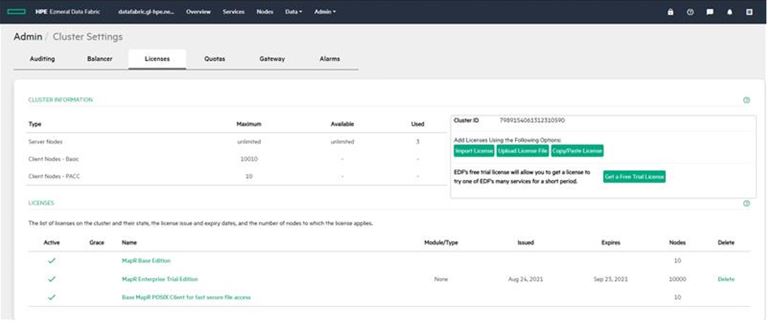
Figure 66. License information
# Ezmeral External Data Fabric Integration with HPE Ezmeral Runtime Enterprise 5.6.x
Pre-requisites
::: tip NOTE
Please read the complete procedure before you start this registration process.
The HPE Ezmeral Runtime Enterprise deployment must not have configured tenant storage.
When deploying the Data Fabric on Bare Metal cluster:
Keep the UID for the mapr user at the default of 5000.
Keep the GID for the mapr group at the default of 5000.
The Data Fabric (DF) cluster on Bare Metal must be a SECURE cluster.
From HPE Ezmeral Runtime Enterprise 5.6.x Primary controller
- Verify the directory /opt/bluedata/tmp/ext-bm-mapr exist. If not create a directory.
# Procedure
After Data Fabric registration is completed, the configuration will look as follows:
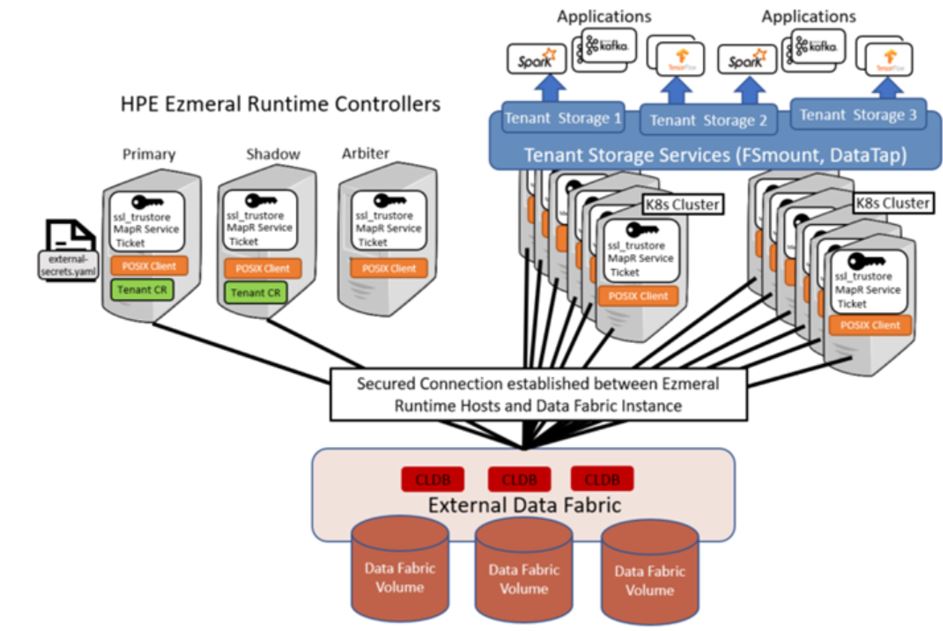
Figure 67. Data fabric
Registration Steps:
- Log in as mapr user, to a CLDB node of an HPE Ezmeral Data Fabric on Bare Metal cluster, and:
> mkdir <working-dir-on-bm-df>
- On the Primary Controller of HPE Ezmeral Runtime Enterprise installation, do the following:
> scp /opt/bluedata/common-install/scripts/mapr/gen-external-secrets.sh mapr@<cldb_node_ip_address>:<working-dir-on-bm-df>/
> scp /opt/bluedata/common-install/scripts/mapr/prepare-bm-tenants.sh > mapr@<cldb_node_ip_address>:<working-dir-on-bm-df>/
> mkdir /opt/bluedata/tmp/ext-bm-mapr/
- Create a user-defined manifest for the procedure:
- If you are not specifying any keys (i.e. to generate default values for all keys):
> touch /opt/bluedata/tmp/ext-bm-mapr/ext-dftenant-manifest.user-defined- Else, specify the following parameters:
> cat << EOF > /opt/bluedata/tmp/ext-bm-mapr/ext-dftenant-manifest.user-defined EXT_MAPR_MOUNT_DIR="/<user_specified_directory_in_mount_path_for_volumes>" TENANT_VOLUME_NAME_TAG="<user_defined_tag_to_be_included_in_tenant_volume_names>" EOF - On the CLDB node of the HPE Ezmeral Data Fabric on BareMetal cluster:
> cd <working-path-on-bm-df>/
> ./prepare-bm-tenants.sh
On the Primary Controller of HPE Ezmeral Runtime Enterprise:
- Move or remove any existing “bm-info-*.tar” from /opt/bluedata/tmp/ext-bm-mapr/
> scp bm-info-*.tar root@<**controller_node_ip_address**>/opt/bluedata/tmp/ext-bm-mapr/
> cd /opt/bluedata/tmp/ext-bm-mapr/
> LOG_FILE_PATH=./<**log_file_name**>/opt/bluedata/bundles/hpe-cp-*/startscript.sh --action ext-bm-df-registration
When prompted, enter the Platform Administrator username and password. HPE Ezmeral Runtime Enterprise uses this information for REST API access to its management module.
NOTE
The ext-bm-df-registration action validates the contents of bm-info-<8_byte_uuid>.tar, and finalizes the ext-dftenant-manifest. The following keys-values will be automatically added to the manifest:
CLDB_LIST="<comma-separated;FQDN_or_IP_address_for_each_CLDB_node>"
CLDB_PORT="<port_number_for_CLDB_service>"
SECURE="<true_or_false>" (Default is true)
CLUSTER_NAME="<name_of_DataFabric_cluster>"
REST_URL="<REST_server_hostname:port>" (or space-delimited list of <REST_server_hostname:port> values)
TICKET_FILE_LOCATION="<path_to_service_ticket_for_HCP_admin>"
SSL_TRUSTSTORE_LOCATION="<path_to_ssl_truststore>"
EXT_SECRETS_FILE_LOCATION="<path_to_external_secrets_file>"
# Validation:
To confirm that the Registration is completed, check the following:
- On the HPE Ezmeral Runtime Enterprise, view the Kubernetes and EPIC Dashboards, and ensure that the POSIX Client and Mount Path services on all hosts are in normal state.
# Reference Links
Below is the reference for Integration Reference HPE Ezmeral Runtime Enterprise 5.6.x Documentation | HPE Support (opens new window)
Below is the reference link for EDF cluster creation Installer Prerequisites and Guidelines (hpe.com) (opens new window)