Solution Deployment Workflow
The following figure shows the high-level workflow of the installation process:

FIGURE 7. End to End Solution Deployment Workflow
The following steps provide an overview of each step that needs to be performed for deploying the HPE ProLiant NGS-optimized solution for Red Hat OpenShift Container Platform 4.16:
The way you interact with the installation program differs depending on your installation type.
- For clusters with installer-provisioned infrastructure, you delegate the infrastructure bootstrapping and provisioning to the installation program instead of doing it yourself. The installation program creates all of the networking, machines, and operating systems that are required to support the cluster.
- If you provision and manage the infrastructure for your cluster, you must provide all of the cluster infrastructure and resources, including the bootstrap machine, networking, load balancing, storage, and individual cluster machines.
- Set up iPXE, TFTP, and DHCP for RHCOS
In this step, the iPXE server is leveraged to boot the machine. The iPXE and TFTP server is set up to boot RHCOS. The PXE boot process is the initial stage for deploying the solution and configuring DHCP is an integral part of this process. This configuration can be done using the sudo access.
For more information on configuring the iPXE set up, see the Deploy iPXE guide.
- Configure a load balancer for RHOCP 4 nodes
In the multi-node RHOCP cluster deployment, the load balancer is mandatory. For this solution, Hewlett Packard Enterprise has leveraged the required traffic for HAProxy load balancing. This configuration can be done using the sudo access. For commercial load balancer such as F5 Big-IP or any other RHOCP 4 supported load balancer, visit the manufacture website.
- Configure BindDNS
In the User-Provisioned Infrastructure (UPI), DNS records are required for each machine. These records resolve the hostnames for all other machines in a RHOCP cluster. This component can also be configured using the sudo access for Linux-based DNS solution. It provides details on configuring the sudo to allow non-root users to execute root level commands.
- Configure firewall ports
In the User-Provisioned Infrastructure (UPI), the network connectivity between machines allows cluster components to communicate within the RHOCP cluster. Hence, the required ports must be open between RHOCP cluster nodes. This component can also be configured using the sudo access for Linux-based firewall. For third-party firewall solutions, visit the manufacture website. It provides details on configuring the sudo to allow non-root users to execute root level commands.
For more information, see the Installing a user-provisioned bare metal cluster with network customizations and Networking requirements for user-provisioned infrastructure sections in the OpenShift Container Platform 4.16 documentation.
- Start RHOCP 4 User-Provisioned Infrastructure setup
The User-Provisioned Infrastructure (UPI) begins with installing a bastion host. This setup uses RHEL 9.4 virtual machine as a bastion host. This bastion host is used for deployment and management of the RHOCP 4 clusters. The setup and configuration of this step can be completed using the sudo user access.
For more information, see the Generating a key pair for cluster node SSH access section in the OpenShift Container Platform 4.16 documentation.
- Download RHOCP 4 software version and images
To download the RHOCP 4 image, see the RHCOS image mirror page. Check the access token for your cluster and install it on the bastion host. The bastion host is used for deploying and managing the RHOCP 4 clusters. The setup and configuration of this step can be completed using the sudo user access.
For more information, see the Obtaining the installation program section in the OpenShift Container Platform 4.16 documentation.
- Create ignition config files
This step begins with the creation of the install-config.yaml in a new folder. Use the Red Hat OpenShift installer tool to convert the YAML file to the ignition config file, which is required to install the RHOCP 4. During this process, system modification is not done on the bastion host or the provisioning server. This setup can be completed using the sudo access.
For more information, see the Manually creating the installation configuration file section in the OpenShift Container Platform 4.16 documentation.
- Upload ignition config files to the web
In this step, the ignition config files are uploaded to an internal website that allows anonymous access to the iPXE boot process. Update the iPXE default file to point to the website location of the ignition file. The action required in this step can be done using the sudo user.
For more information, see the Installing RHCOS by using PXE or iPXE booting section in the OpenShift Container Platform 4.16 documentation.
NOTE
KVM is an open-source virtualization technology that converts your Linux machine into a type-1 bare-metal hypervisor and allows you to run multiple Virtual Machines (VMs) or guest VMs on Red Hat Linux.
For more information, see the Getting started with virtualization section in the Red Hat Enterprise Linux 8 documentation.
- Deploy bootstrap node
The bootstrap node is a temporary node that is used to bring up the RHOCP cluster. After the cluster is up, this machine can be decommissioned, and the hardware can be reused. The iPXE boot process must use bootstrapping information as a part of the iPXE boot parameter to install the RHCOS on this node.
- Deploy master node
The master node uses the iPXE image for RHCOS after the bootstrap node. The iPXE boot process must use the master.ign information as a part of the iPXE boot parameter to install the RHCOS on this node. The root user is not active by default in RHCOS. Since the root login is not available, log in as the core user.
- Create the cluster
The four nodes, one bootstrap and three master nodes boot up and are available at the login prompt for RHCOS. To complete the bootstrap process, log in as a sudo user on the bastion host or provision server and use the Red Hat OpenShift installer tool.
For more information, see the Waiting for the bootstrap process to complete section in the OpenShift Container Platform 4.16 documentation.
- Log in to the cluster
After the bootstrap process has completed successfully, login to the cluster. The kubeconfig file is present in the auth directory where the ignition files are created on the bastion host. Export the cluster kubeconfig file and log in to your cluster as a default system user. The kubeconfig file contains information about the cluster that is used by the CLI to connect a client to the correct cluster and API server. This file is specific to a cluster and is created during the RHOCP installation. After logging in, approve the pending Certificate Signing Requests (CSRs) for the nodes.
For more information, see the Approving the certificate signing requests for your machines section in the OpenShift Container Platform 4.16 documentation.
- Configure operators
After the control plane initializes, you must immediately configure operators that are not available. It ensures their availability (for example, image-registry).
For more information, see the Image registry storage configuration section in the OpenShift Container Platform 4.16 documentation. To complete this step, you can also log in as a sudo user on the bastion host or provision server.
- Add Worker nodes
In the RHOCP, you can add RHEL worker nodes to a User-Provisioned Infrastructure cluster or an installation-provisioned infrastructure cluster on the x86_64 architecture. For more information, see the Adding RHEL compute machines to an OpenShift Container Platform cluster section in the OpenShift Container Platform 4.16 documentation.
Preparing the execution environment for RHOCP worker node
Prerequisites:
- RedHat Enterprise Linux 9.4 must be installed and registered on your host machine
- Configure BOND
Setting up RHEL 9.4 installer machine
This section assumes the following considerations for our deployment environment:
- A server running Red Hat Enterprise Linux (RHEL) 9.4 exists within the deployment environment and is accessible to the installation user to be used as an installer machine. This server must have internet connectivity.
- A virtual machine is used to act as an installer machine and the same host is utilized as an Ansible Engine host. We are using one of the worker machines as an installer machine to execute Ansible Playbook.
Prerequisites to execute ansible playbook:
RHEL 9.4 installer machine must have the following configurations:
- The installer machine must have at least 500 GB disk space (especially in the "/" partition), 4 CPU cores and 16 GB RAM.
- RHEL 9.4 installer machine must be subscribed with valid Red Hat credentials. To register the installer machine for the Red Hat subscription, run the following command:
$ sudo subscription-manager register --username=<username> --password=<password> --auto-attach
- Sync time with NTP server.
- SSH key pair must be available on the installer machine. If the SSH key is not available, generate a new SSH key pair with the following command:
$ ssh-keygen
To set up the installer machine:
- Create and activate a Python3 virtual environment for deploying this solution with the following commands:
$ python3 -m venv <virtual_environment_name>

$ source <virtual_environment_name>/bin/activate
- Download the OpenShift repositories using the following commands in the Ansible Engine:
$ mkdir /opt

$ cd /opt

$ yum install -y git

$ git clone <https://github.com/HewlettPackard/hpe-solutions-openshift.git>
- Setup the installer machine to configure the nginx, development tools, and other python packages required for LTI installation. Navigate to the $BASE_DIR directory and run the following command:
$ cd $BASE_DIR
$ sh setup.sh
Note
$BASE_DIR refers to /opt/hpe-solutions-openshift/DL-LTI-Openshift/
As part of setup.sh script it will create nginx service, so user must download and copy Rhel 9.4 DVD ISO to /usr/share/nginx/html/
Minimum Storage requirement for management servers
| Management Servers | Host OS disk | Storage Pool disk |
|---|---|---|
| Server 1 | 2 x 1.6 TB | 2 x 1.6 TB |
| Server 2 | 2 x 1.6 TB | 2 x 1.6 TB |
| Server 3 | 2 x 1.6 TB | 2 x 1.6 TB |
Host OS disk – raid1 for redundancy
- Creating and deleting logical drives
Create and delete logical drives on the head nodes following below steps.
Input File Update:-
User has to update the input.yaml file in $BASE_DIR/create_delete_logicaldrives directory to execute the logical drive script.
User needs to update all the details in the input.yaml file which include:-
		ILOServers:

			- ILOIP: 172.28.*.*

				ILOuser: admin

				ILOPassword: Password

				controller: 12

				RAID: Raid1

				PhysicalDrives: 1I:1:1,1I:1:2

			- ILOIP: 172.28.*.*

				ILOuser: admin

				ILOPassword: Password

				controller: 1

				RAID: Raid1

				PhysicalDrives: 1I:3:1,1I:3:2

			- ILOIP: 172.28.*.*

				ILOuser: admin

				ILOPassword: Password

				controller: 11

				RAID: Raid1

				PhysicalDrives: 1I:3:1,1I:3:2
Note:-
1. To find controller id login to the respective ILO -> System Information -> Storage tab where inside Location find the **slot number** as the controller id.

			 # Example - Slot = 12

2. To find the PhysicalDrives login to the respective ILO -> System Information -> Storage tab inside Unconfigured Drives where under Location you can deduce PhysicalDrives based on these information:

		 # Slot: 12:Port=1I:Box=1:Bay=1

		# Example - 1I:1:1 ('Port:Box:Bay')

		# Slot: 12:Port=1I:Box=1:Bay=2

		# Example - 1I:1:2 ('Port:Box:Bay')
Playbook Execution:-
To delete all the existing logical drives in the server in case if any and to create new logical drives named 'RHEL Boot Volume' in respective ILO servers run the site.yml playbook inside create_delete_logicaldrives directory with the below mentioned command
$ ansible-playbook site.yml --ask-vault-pass
We can provide the input variables in any one of the below methods
Method 1. Input.py : Automation way of taking input
Through the input.py, go to the directory /opt/hpe-solutions-openshift/DL-LTI-Openshift/ and run the below command.
python input.py
Here it will prompt for values which are not obtained from SCID json files.
A sample input collection through input.py is as follows.
	Enter server serial number for the first head node server ( Example: 2M2210020X )
	2M205107TH
	Enter ILO address for the first head node server ( Example: 192.28.201.5 )
	172.28.201.13
	Enter ILO username for the first head node server ( Example: admin )
	admin
	Enter ILO password for the first head node server ( Example: Password )
	Password
	Enter Host FQDN for the first head node server ( Example: kvm1.xyz.local )
	headnode1.isv.local
	etc ...............................'
After execution of input.py, it will generate input.yaml and hosts file in the same location.
Method 2. Input.yaml: Manually editing input file
Go to the directory $BASE_DIR(/opt/hpe-solutions-openshift/DL-LTI-Openshift/), here we will have input.yaml and hosts files.
- A preconfigured Ansible vault file (input.yaml) is provided as a part of this solution, which consists of sensitive information to support the host and virtual machine deployment.
cd $BASE_DIR
Run the following commands on the installer VM to edit the vault to match the installation environment.
ansible-vault edit input.yaml
NOTE
The default password for the Ansible vault file is changeme
Sample input_sample.yml can be found in the $BASE_DIR along with description of each input variable.
A sample input.yaml file is as follows with a few filled parameters.
 - Server_serial_number: 2M20510XXX
   ILO_Address: 172.28.*.*
   ILO_Username: admin
   ILO_Password: *****
   Hostname: headnode3.XX.XX                #ex. headnode3.isv.local
   Host_Username: root
   Host_Password: ******
   HWADDR1: XX:XX:XX:XX:XX:XX             #mac address for server physical interface1
   HWADDR2: XX:XX:XX:XX:XX:XX             #mac address for server physical interface2
   Host_OS_disk: sda
   Host_VlanID: 230
   Host_IP: 172.28.*.*
   Host_Netmask: 255.*.*.*
   Host_Prefix: XX                          #ex. 8,24,32
   Host_Gateway: 172.28.*.*
   Host_DNS: 172.28.*.*
   Host_Domain: XX.XX                       #ex. isv.local
   corporate_proxy: 172.28.*.*              #provide corporate proxy, ex. proxy.houston.hpecorp.net
   corporate_proxy_port: XX               #corporate proxy port no, ex. 8080

config:
   HTTP_server_base_url: http://172.28.*.*/  #Installer IP address
   HTTP_file_path: /usr/share/nginx/html/
   OS_type: rhel9
   OS_image_name: rhel-9.4-x86_64-dvd.iso    # ISO image should be present in /usr/share/nginx/html/
   base_kickstart_filepath: /opt/hpe-solutions-openshift/DL-LTI-Openshift/playbooks/roles/rhel9_os_deployment/tasks/ks_rhel9.cfg
A sample hosts files is as follows
		   '[kvm_nodes]
			172.28.*.*
			172.28.*.*
			172.28.*.*

			[ansible_host]
			172.28.*.*

			[rhel9_installerVM]
			172.28.*.*

			[binddns_masters]
			172.28.*.*

			[binddns_slaves]
			172.28.*.*
			172.28.*.*

			[masters_info]
			master1 ip=172.28.*.* hostname=headnode1

			[slaves_info]
			slave1 ip=172.28.*.* hostname=headnode2
			slave2 ip=172.28.*.* hostname=headnode3'
Deploying RHOCP cluster using Ansible playbooks
The Lite Touch Installation (LTI) package includes Ansible playbooks with scripts to deploy RHOCP cluster. You can use one of the following two methods to deploy RHOCP cluster:
- Run a consolidated playbook: This method includes a single playbook for deploying the entire solution. This site.yml playbook contains a script that performs all the tasks starting from the OS deployment until the RHOCP cluster is successfully installed and running. To run LTI using a consolidated playbook:
$ ansible-playbook -i hosts site.yml --ask-vault-pass
NOTE
The default password for the Ansible vault file is changeme
- Run individual playbooks: This method includes multiple playbooks with scripts that enable you to deploy specific parts of the solution depending on your requirements. The playbooks in this method must be executed in a specific sequence to deploy the solution. The following table includes the purpose of each playbook required for the deployment:
TABLE 8. RHOCP cluster deployment using Ansible playbooks
| Playbook | Description |
|---|---|
| rhel9_os_deployment.yml | This playbook contains the script to deploy RHEL 9.4 OS on BareMetal servers. |
| copy_ssh_headnode.yml | This playbook contains the script to copy the SSH public key from the installer machine to the head nodes. |
| prepare_rhel_hosts.yml | This playbook contains the script to prepare nodes for the RHOCP head nodes. |
| ntp.yml | This playbook contains the script to create NTP setup to enable time synchronization on head nodes. |
| binddns.yml | This playbook contains the script to deploy Bind DNS on three head nodes and acts as active-passive cluster configuration. |
| haproxy.yml | This playbook contains the script to deploy HAProxy on the head nodes and acts as active-active cluster configuration. |
| squid_proxy.yml | This playbook contains the script to deploy the Squid proxy on the head nodes to get web access. |
| storage_pool.yml | This playbook contains the script to create the storage pools on the head nodes. |
| rhel9_installerVM.yml | This playbook contains the script to create a RHEL 9 installer machine, which will also be used as an installer at a later stage. |
| copy_ssh_installerVM.yml | This playbook contains the script to copy the SSH public key to the RHEL 9 installer machine. |
| prepare_rhel9_installer.yml | This playbook contains the script to prepare the RHEL 9 installer. |
| copy_scripts.yml | This playbooks contains the script to copy ansible code to rhel9 installer and headnodes. |
| download_ocp_packages.yml | This playbook contains the script to download the required RHOCP packages. |
| generate_manifest.yml | This playbook contains the script to generate the manifest files. |
| copy_ocp_tool.yml | This playbook contains the script to copy the RHOCP tools from the current installer to the head nodes and RHEL 9 installer. |
| deploy_ipxe_ocp.yml | This playbook contains the script to deploy the iPXE server on the head nodes. |
| ocp_vm.yml | This playbook contains the script to create bootstrap and master nodes. |
To run individual playbooks:
- Do one of the following:
- Edit site.yml file and add a comment for all the playbooks you do not want to execute.
For example, add the following comments in the site.yml file to deploy RHEL 9.4 OS:
- import_playbook: playbooks/rhel9_os_deployment.yml
- import_playbook: playbooks/copy_ssh_headnode.yml
- import_playbook: playbooks/prepare_rhel_hosts.yml
- import_playbook: playbooks/ntp.yml
- import_playbook: playbooks/binddns.yml
- import_playbook: playbooks/haproxy.yml
- import_playbook: playbooks/squid_proxy.yml
- import_playbook: playbooks/storage_pool.yml
- import_playbook: playbooks/rhel9_installerVM.yml
- import_playbook: playbooks/copy_ssh_installerVM.yml
- import_playbook: playbooks/prepare_rhel9_installer.yml
- import_playbook: playbooks/download_ocp_packages.yml
- import_playbook: playbooks/generate_manifest.yml
- import_playbook: playbooks/copy_ocp_tool.yml
- import_playbook: playbooks/deploy_ipxe_ocp.yml
- import_playbook: playbooks/ocp_vm.yml
- Run the individual YAML files using the following command:
$ ansible-playbook -i hosts playbooks/<yaml_filename>.yml --ask-vault-pass
For example, run the following YAML file to deploy RHEL 9.4 OS:
$ ansible-playbook -i hosts playbooks/rhel9_os_deployment.yml --ask-vault-pass
For more information on executing individual playbooks, see the consecutive sections.
Deploying RHEL 9 OS on baremetal servers
This section describes how to run the playbook that contains the script for deploying RHEL 9.4 OS on BareMetal servers. To deploy RHEL 9.4 OS on the head nodes:
- Navigate to the $BASE_DIR(/opt/hpe-solutions-openshift/DL-LTI-Openshift/) directory on the installer.
- Run the following playbook:
$ ansible-playbook -i hosts playbooks/rhel9_os_deployment.yml --ask-vault-pass
Copying SSH key to head nodes
Once the OS is installed on the head nodes, copy the ssh key from the installer machine to the head nodes. It uses playbook that contains the script to copy the SSH public key from the installer machine to the head nodes.
To copy the SSH key to the head node run the following playbook:
$ ansible-playbook -i hosts playbooks/copy_ssh_headnode.yml --ask-vault-pass
Setting up head nodes
This section describes how to run the playbook that contains the script to prepare nodes for the RHOCP head nodes.
To register the head nodes to Red Hat subscription and download and install KVM Virtualization packages run the following playbook:
$ ansible-playbook -i hosts playbooks/prepare_rhel_hosts.yml --ask-vault-pass
Setting up NTP server on head nodes
This section describes how to run the playbook that contains the script to set up NTP server and enable time synchronization on all head nodes.
To set up NTP server on head nodes run the following playbook:
$ ansible-playbook -i hosts playbooks/ntp.yml --ask-vault-pass
Deploying Bind DNS on head nodes
This section describes how to deploy Bind DNS service on all three head nodes for active-passive cluster configuration.
To deploy Bind DNS service on head nodes run the following playbook:
$ ansible-playbook -i hosts playbooks/binddns.yml --ask-vault-pass
Deploying HAProxy on head nodes
The RHOCP 4.16 uses an external load balancer to communicate from outside the cluster with services running inside the cluster. This section describes how to deploy HAProxy on all three head nodes for active-active cluster configuration.
To deploy HAProxy server configuration on head nodes run the following playbook:
$ ansible-playbook -i hosts playbooks/haproxy.yml --ask-vault-pass
Deploying Squid proxy on head nodes
Squid is a proxy server that caches content to reduce bandwidth and load web pages more quickly. This section describes how to set up Squid as a proxy for HTTP, HTTPS, and FTP protocol, as well as authentication and restricting access. It uses a playbook that contains the script to deploy the Squid proxy on the head nodes to get web access.
To deploy Squid proxy server on head nodes run the following playbook:
$ ansible-playbook -i hosts playbooks/squid_proxy.yml --ask-vault-pass
Creating storage pools on head nodes
This section describes how to use the storage_pool.yml playbook that contains the script to create the storage pools on the head nodes.
To create the storage pools run the following playbook:
$ ansible-playbook -i hosts playbooks/storage_pool.yml --ask-vault-pass
Creating RHEL 9 installer machine
This section describes how to create a RHEL 9 installer machine using the rhel9_installerVM.yml playbook. This installer machine is also used as an installer for deploying the RHOCP cluster and adding RHEL 9.4 worker nodes.
To create a RHEL 9 installer machine run the following playbook:
$ ansible-playbook -i hosts playbooks/rhel9_installerVM.yml --ask-vault-pass
Copying SSH key to RHEL 9 installer machine
This section describes how to copy the SSH public key to the RHEL 9 installer machine using the copy_ssh_installerVM.yml playbook.
To copy the SSH public key to the RHEL 9 installer machine run the following playbook:
$ ansible-playbook -i hosts playbooks/copy_ssh_installerVM.yml --ask-vault-pass
Setting up RHEL 9 installer
This section describes how to set up the RHEL 9 installer using the prepare_rhel9_installer.yml playbook.
To set up the RHEL 9 installer run the following playbook:
$ ansible-playbook -i hosts playbooks/prepare_rhel9_installer.yml --ask-vault-pass
Downloading RHOCP packages
This section provides details about downloading the required RHOCP 4.16 packages using a playbook.
To download RHOCP 4.16 packages:
Download the required packages on the installer VM with the following playbook:
$ ansible-playbook -i hosts playbooks/download_ocp_packages.yml --ask-vault-pass
Generating Kubernetes manifest files
The manifests and ignition files define the master node and worker node configuration and are key components of the RHOCP 4.16 installation. This section describes how to use the generate_manifest.yml playbook that contains the script to generate the manifest files.
To generate Kubernetes manifest files run the following playbook:
$ ansible-playbook -i hosts playbooks/generate_manifest.yml --ask-vault-pass
Copying RHOCP tools
This section describes how to copy the RHOCP tools from the present installer to head nodes and RHEL 9 installer using the copy_ocp_tool.yml playbook.
To copy the RHOCP tools to the head nodes and RHEL 9 installer run the following playbook:
$ ansible-playbook -i hosts playbooks/copy_ocp_tool.yml --ask-vault-pass
Deploying iPXE server on head nodes
This section describes how to deploy the iPXE server on the head nodes using the deploy_ipxe_ocp.yml playbook.
To deploy the iPXE server run the following playbook:
$ ansible-playbook -i hosts playbooks/deploy_ipxe_ocp.yml --ask-vault-pass
Creating bootstrap and master nodes
This section describes how to create bootstrap and master nodes using the scripts in the ocp_vm.yml playbook.
To create bootstrap and master VMs on Kernel-based Virtual Machine (KVM):
Run the following playbook:
$ ansible-playbook -i hosts playbooks/ocp_vm.yml --ask-vault-pass
Deploying RHOCP cluster
Once the playbooks are executed successfully and the Bootstrap and master nodes are deployed with the RHCOS, deploy the RHOCP cluster.
To deploy the RHOCP cluster:
- Login to the installer VM.
This installer VM was created as a KVM VM on one of the head nodes using the rhel9_installerVM.yml playbook. For more information, see the Creating RHEL 9 installer machine section.
- Add the kubeconfig path in the environment variables using the following command:
$ export KUBECONFIG=/opt/hpe-solutions-openshift/DL-LTI-Openshift/playbooks/roles/generate_ignition_files/ignitions/auth/kubeconfig
- Run the following command:
$ openshift-install wait-for bootstrap-complete --dir=/opt/hpe-solutions-openshift/DL-LTI-Openshift/playbooks/roles/generate_ignition_files/ignitions --log-level debug
- Complete the RHOCP 4.16 cluster installation with the following command:
$openshift-install wait-for install-complete --dir=/opt/hpe-solutions-openshift/DL-LTI-Openshift/playbooks/roles/generate_ignition_files/ignitions --log-level=debug
The following output is displayed:
DEBUG OpenShift Installer v4.16

DEBUG Built from commit 6ed04f65b0f6a1e11f10afe658465ba8195ac459

INFO Waiting up to 30m0s for the cluster at https://api.rrocp.pxelocal.local:6443 to initialize...

DEBUG Still waiting for the cluster to initialize: Working towards 4.16: 99% complete

DEBUG Still waiting for the cluster to initialize: Working towards 4.16: 99% complete, waiting on authentication, console,image-registry

DEBUG Still waiting for the cluster to initialize: Working towards 4.16: 99% complete

DEBUG Still waiting for the cluster to initialize: Working towards 4.16: 100% complete, waiting on image-registry

DEBUG Still waiting for the cluster to initialize: Cluster operator image-registry is still updating

DEBUG Still waiting for the cluster to initialize: Cluster operator image-registry is still updating

DEBUG Cluster is initialized

INFO Waiting up to 10m0s for the openshift-console route to be created...

DEBUG Route found in openshift-console namespace: console

DEBUG Route found in openshift-console namespace: downloads

DEBUG OpenShift console route is created

INFO Install complete!

INFO Access the OpenShift web-console here: https://console-openshift-console.apps.ocp.ngs.local

INFO Login to the console with user: kubeadmin, password: a6hKv-okLUA-Q9p3q-UXLc3
The RHOCP cluster is successfully installed.
- After the installation is complete, check the status of the created cluster:
$ oc get nodes
Running Red Hat OpenShift Container Platform Console
Prerequisites:
The RHOCP cluster installation must be complete.
NOTE
The installer machine provides the Red Hat OpenShift Container Platform Console link and login details when the RHOCP cluster installation is complete.
To access the Red Hat OpenShift Container Platform Console:
- Open a web browser and enter the following link:
https://console-openshift-console.apps.<customer.defined.domain>

Sample one for reference:  https://console-openshift-console.apps.ocp.ngs.local
Log in to the Red Hat OpenShift Container Platform Console with the following credentials:
- Username: kubeadmin
- Password: <password>
NOTE
If the password is lost or forgotten, search for the kubeadmin-password file located in the /opt/hpe-solutions-openshift/DL-LTI-Openshift/playbooks/roles/generate_ignition_files/ignitions/auth/kubeadmin-password directory on the installer machine.
The following figure shows the Red Hat OpenShift Container Platform Console after successful deployment:

FIGURE 8. Red Hat OpenShift Container Platform Console login screen
Adding RHEL 9.4 worker nodes to RHOCP cluster using Ansible playbooks
NOTE
RHEL Worker Nodes are supported as best effort and require it own update and lifecycle management hence as not actively recommended.
The Lite Touch Installation (LTI) package includes Ansible playbooks with scripts to add the RHEL 9.4 worker nodes to the RHOCP cluster. You can use one of the following two methods to add the RHEL 9.4 worker nodes:
- Run a consolidated playbook: This method includes a single playbook, site.yml, that contains a script to perform all the tasks for adding the RHEL 9.4 worker nodes to the existing RHOCP cluster. To run LTI using a consolidated playbook:
$ ansible-playbook -i inventory/hosts site.yml --ask-vault-pass
NOTE
The default password for the Ansible vault file is changeme
- Run individual playbooks: This method includes multiple playbooks with scripts that enable you to deploy specific tasks for adding the RHEL 9.4 worker nodes to the existing RHOCP cluster. The playbooks in this method must be executed in a specific sequence to add the worker nodes.
The following table includes the purpose of each playbook required for the deployment:
TABLE 9. Add RHEL 9.4 nodes using Ansible playbooks
| Playbook | Description |
|---|---|
| rhel9_os_deployment.yml | This playbook contains the scripts to deploy RHEL 9.4 OS on worker nodes. |
| copy_ssh.yml | This playbook contains the script to copy the SSH public key to the RHEL 9.4 worker nodes. |
| prepare_worker_nodes.yml | This playbook contains the script to prepare nodes for the RHEL 9.4 worker nodes. |
| ntp.yml | This playbook contains the script to create NTP setup to enable time synchronization on the worker nodes. |
| openshift-ansible/playbooks/scaleup.yml | This playbook contains the script to add worker nodes to the RHOCP cluster. This playbook queries the master, generates and distributes new certificates for the new hosts, and then runs the configuration playbooks on the new hosts. |
To run individual playbooks do one of the following:
- Edit site.yaml file and add a comment for all the playbooks except the ones that you want to execute.
For example, add the following comments in the site.yaml file to deploy RHEL 9.4 OS on the worker nodes:
import_playbook: playbooks/rhel9_os_deployment.yml

# import_playbook: playbooks/copy_ssh.yml

# import_playbook: playbooks/prepare_worker_nodes.yml

# import_playbook: playbooks/ntp.yml

# import_playbook: openshift-ansible/playbooks/scaleup.yml
OR
Run the individual YAML files using the following command:
$ ansible-playbook -i inventory/hosts playbooks/<yaml_filename>.yml --ask-vault-pass
For example, run the following YAML file to deploy RHEL 9.4 OS on the worker nodes:
$ ansible-playbook -i inventory/hosts playbooks/rhel9_os_deployment.yml --ask-vault-pass
For more information on executing individual playbooks, see the consecutive sections.
Adding RHEL 9.4 worker nodes
This section describes how to add RHEL 9.4 worker nodes to an existing RHOCP cluster.
To add RHEL 9.4 worker nodes to the RHOCP cluster:
- Login to the Installer VM.
This installer VM was created as a KVM VM on one of the head nodes using the rhel9_installerVM.yml playbook. For more information, see the Creating RHEL 9 installer machine section.
- Navigate to the directory $BASE_DIR/worker_nodes/
cd $BASE_DIR/worker_nodes/
NOTE
$BASE_DIR refers to /opt/hpe-solutions-openshift/DL-LTI-Openshift/
Run the following commands on the rhel9 installer VM to edit the vault input file.
ansible-vault edit input.yaml
The installation user should review hosts file (located on the installer VM at $BASE_DIR/inventory/hosts)
vi inventory/hosts
- Copy Rhel9.4 DVD ISO to /usr/share/nginx/html/
- Navigate to the $BASE_DIR/worker_nodes/ directory and run the following command:
$ sh setup.sh
- Add the worker nodes to the cluster using one of the following methods:
- Run the following sequence of playbooks:
ansible-playbook -i inventory/hosts playbooks/rhel9_os_deployment.yml --ask-vault-pass

ansible-playbook -i inventory/hosts playbooks/copy_ssh.yml --ask-vault-pass

ansible-playbook -i inventory/hosts playbooks/prepare_worker_nodes.yml --ask-vault-pass

ansible-playbook -i inventory/hosts playbooks/ntp.yml --ask-vault-pass

ansible-playbook -i inventory/hosts openshift-ansible/playbooks/scaleup.yml --ask-vault-pass
OR
- If you want to deploy the entire solution to add the worker nodes to the cluster, execute the following playbook:
$ ansible-playbook -i inventory/hosts site.yml --ask-vault-pass
- Once all the playbooks are executed successfully, check the status of the node using the following command:
$ oc get nodes
The following output is displayed:
NAME			STATUS	ROLES		AGE	VERSION

master0.ocp.ngs.local	Ready	master,worker	3d	v1.29.4+8ca71f7

master1.ocp.ngs.local	Ready	master,worker	3d	v1.29.4+8ca71f7

master2.ocp.ngs.local	Ready	master,worker	3d	v1.29.4+8ca71f7

worker1.ocp.ngs.local	Ready	worker		1d	v1.29.4+8ca71f7

worker2.ocp.ngs.local	Ready	worker		1d	v1.29.4+8ca71f7

worker3.ocp.ngs.local	Ready	worker		1d	v1.29.4+8ca71f7
- Once the worker nodes are added to the cluster, set the “mastersSchedulable” parameter as false to ensure that the master nodes are not used to schedule pods.
- Edit the schedulers.config.openshift.io resource.
$ oc edit schedulers.config.openshift.io cluster
Configure the mastersSchedulable field.
apiVersion: config.openshift.io/v1

kind: Scheduler

metadata:

`	`creationTimestamp: “2024-01-04T09:20:06Z"

`	`generation: 2

`	`name: cluster

`	`resourceVersion: “5939203"

`	`uid: a636d30a-d377-11e9-88d4-0a60097bee62

spec:

`	`mastersSchedulable: false

`	`policy:

`		`name: “"

status: { }
NOTE
Set the mastersSchedulable to true to allow Control Plane nodes to be schedulable or false to disallow Control Plane nodes to be schedulable.
- Save the file to apply the changes.
$ oc get nodes
The following output is displayed:
NAME			STATUS	ROLES	AGE	VERSION

master0.ocp.ngs.local	Ready	master	3d	v1.29.4+8ca71f7

master1.ocp.ngs.local	Ready	master	3d	v1.29.4+8ca71f7

master2.ocp.ngs.local	Ready	master	3d	v1.29.4+8ca71f7

worker1.ocp.ngs.local	Ready	worker	1d	v1.29.4+8ca71f7

worker2.ocp.ngs.local	Ready	worker	1d	v1.29.4+8ca71f7

worker3.ocp.ngs.local	Ready	worker	1d	v1.29.4+8ca71f7
NOTE
To add more worker nodes, update worker details in HAProxy and binddns on head nodes and then add RHEL 9.4 worker nodes to the RHOCP cluster.
Adding RHCOS worker nodes to RHOCP cluster using Ansible playbooks
The Lite Touch Installation (LTI) package includes Ansible playbooks with scripts to add the RHCOS worker nodes to the RHOCP cluster. You can use one of the following two methods to add the RHCOS worker nodes:
- Run a consolidated playbook: This method includes a single playbook, site.yml, that contains a script to perform all the tasks for adding the RHCOS worker nodes to the existing RHOCP cluster. To run LTI using a consolidated playbook:
$ ansible-playbook -i hosts site.yml --ask-vault-pass
NOTE
The default password for the Ansible vault file is changeme
- Run individual playbooks: This method includes multiple playbooks with scripts that enable you to deploy specific tasks for adding the RHCOS worker nodes to the existing RHOCP cluster. The playbooks in this method must be executed in a specific sequence to add the worker nodes.
The following table includes the purpose of each playbook required for the deployment:
TABLE 9. Playbook Description
| Playbook | Description |
|---|---|
| rhel9_os_deployment.yml | This playbook contains the scripts to deploy RHEL 9.4 OS on baremetal servers. |
| copy_ssh_workernode.yml | This playbook contains the script to copy the ssh public key from installer machine to the KVM worker nodes. |
| prepare_rhel_hosts.yml | This playbook contains the script to prepare KVM worker nodes with required packages and subscription. |
| ntp.yml | This playbook contains the script to create NTP setup on KVM worker nodes to make sure time synchronization. |
| binddns.yml | This playbook contains the script to deploy bind dns on three head nodes and it will work as both Active & Passive. |
| haproxy.yml | This playbook contains the script to deploy haproxy on the head nodes and it will act as Active. |
| storage_pool.yml | This playbook contains the script to create the storage pools on the KVM Worker nodes. |
| deploy_ipxe_ocp.yml | This playbook contains the script to deploy the ipxe code on the RHEL 9 installer machine. |
| ocp_rhcosworkervm.yml | This playbook contains the script to add kvm based coreos nodes to exsting Openshift cluster. |
To run individual playbooks do one of the following:
- Edit site.yaml file and add a comment for all the playbooks except the ones that you want to execute.
For example, add the following comments in the site.yaml file to deploy RHCOS on the worker nodes:
import_playbook: playbooks/rhel9_os_deployment.yml
# import_playbook: playbooks/copy_ssh_workernode.yml
# import_playbook: playbooks/prepare_rhel_hosts.yml
# import_playbook: playbooks/ntp.yml
# import_playbook: playbooks/binddns.yml
# import_playbook: playbooks/haproxy.yml
# import_playbook: playbooks/storage_pool.yml
# import_playbook: playbooks/deploy_ipxe_ocp.yml
# import_playbook: playbooks/ocp_rhcosworkervm.yml
OR
Run the individual YAML files using the following command:
$ ansible-playbook -i hosts playbooks/<yaml_filename>.yml --ask-vault-pass
For example, run the following YAML file to deploy RHEL 9.4 OS on the worker nodes:
$ ansible-playbook -i hosts playbooks/rhel9_os_deployment.yml --ask-vault-pass
For more information on executing individual playbooks, see the consecutive sections.
Adding RHCOS worker nodes
This section covers the steps to Enable KVM hypervisor on Worker Nodes and add RHCOS worker VM nodes to an existing Red Hat OpenShift Container Platform cluster.
- Login to the Installer VM.
This installer VM was created as a KVM VM on one of the head nodes using the rhel9_installerVM.yml playbook. For more information, see the Creating RHEL 9 installer machine section.
- Navigate to the $BASE_DIR(/opt/hpe-solutions-openshift/DL-LTI-Openshift/) directory, then copy input file and hosts file to $BASE_DIR/coreos_kvmworker_nodes/ and later update ocp worker details in input file and kvm_workernodes group as per sample host file.
ansible-vault edit input.yaml
vi hosts
    '[kvm_workernodes]
    KVMworker1 IP
    KVMworker2 IP
    KVMworker3 IP'
NOTE
ansible vault password is changeme
- Copy RHEL 9.4 DVD ISO to the /usr/share/nginx/html/ directory.
- Navigate to the /opt/hpe-solutions-openshift/DL-LTI-Openshift/coreos_kvmworker_nodes/ directory add the worker nodes to the cluster using one of the following methods:
- Run the following sequence of playbooks:
    ansible-playbook -i hosts playbooks/rhel9_os_deployment.yml --ask-vault-pass
    ansible-playbook -i hosts playbooks/copy_ssh_workernode.yml --ask-vault-pass
    ansible-playbook -i hosts playbooks/prepare_rhel_hosts.yml --ask-vault-pass
    ansible-playbook -i hosts playbooks/ntp.yml --ask-vault-pass
    ansible-playbook -i hosts playbooks/binddns.yml --ask-vault-pass
    ansible-playbook -i hosts playbooks/haproxy.yml --ask-vault-pass
    ansible-playbook -i hosts playbooks/storage_pool.yml --ask-vault-pass
    ansible-playbook -i hosts playbooks/deploy_ipxe_ocp.yml --ask-vault-pass
    ansible-playbook -i hosts playbooks/ocp_rhcosworkervm.yml --ask-vault-pass
OR
- If you want to deploy the entire solution to add the RHCOS worker nodes to the cluster, execute the following playbook:
$ ansible-playbook -i hosts site.yml --ask-vault-pass
- After successful execution of all playbooks, check the node status as below.
Approving server certificates (CSR) for newly added nodes
The administrator needs to approve the CSR requests generated by each kubelet.
You can approve all Pending CSR requests using below command
$ oc get csr -o json | jq -r '.items[] | select(.status == {} ) | .metadata.name' | xargs oc adm certificate approve
- Later, Verify Node status using below command:
$ oc get nodes
- Execute the following command to set the parameter mastersSchedulable parameter as false, so that master nodes will not be used to schedule pods.
$ oc edit scheduler
Adding BareMetal CoreOS worker nodes to RHOCP cluster using Ansible playbooks
The Lite Touch Installation (LTI) package includes Ansible playbooks with scripts to add the bare metal CoreOS worker nodes to the RHOCP cluster. You can use one of the following two methods to add the CoreOS worker nodes:
- Run a consolidated playbook: This method includes a single playbook, site.yml, that contains a script to perform all the tasks for adding the CoreOS worker nodes to the existing RHOCP cluster. To run LTI using a consolidated playbook:
$ ansible-playbook -i hosts site.yml --ask-vault-pass
NOTE
The default password for the Ansible vault file is changeme
- Run individual playbooks: This method includes multiple playbooks with scripts that enable you to deploy specific tasks for adding the CoreOS worker nodes to the existing RHOCP cluster. The playbooks in this method must be executed in a specific sequence to add the worker nodes.
The following table includes the purpose of each playbook required for the deployment:
TABLE 9. Playbook Description
| Playbook | Description |
|---|---|
| binddns.yml | This playbook contains the script to deploy bind dns on three worker nodes and it will work as both Active & Passive. |
| haproxy.yml | This playbook contains the script to deploy haproxy on the worker nodes and it will act as Active. |
| deploy_ipxe_ocp.yml | This playbook contains the script to deploy the ipxe code on the worker machine. |
To run individual playbooks do one of the following:
- Edit site.yml file and add a comment for all the playbooks except the ones that you want to execute.
For example, add the following comments in the site.yml file to bind dns on the worker nodes:
import_playbook: playbooks/binddns.yml
# import_playbook: playbooks/haproxy.yml
# import_playbook: playbooks/deploy_ipxe_ocp.yml
OR
Run the individual YAML files using the following command:
$ ansible-playbook -i hosts playbooks/<yaml_filename>.yml --ask-vault-pass
For example, run the following YAML file to bind dns to the worker nodes:
$ ansible-playbook -i hosts playbooks/binddns.yml --ask-vault-pass
For more information on executing individual playbooks, see the consecutive sections.
Adding CoreOS worker nodes
This section covers the steps to add RHCOS worker nodes to an existing Red Hat OpenShift Container Platform cluster.
- Login to the Installer VM.
This installer VM was created as a KVM VM on one of the head nodes using the rhel8_installerVM.yml playbook. For more information, see the Creating RHEL 9 installer machine section.
- Navigate to the $BASE_DIR(/opt/hpe-solutions-openshift/DL-LTI-Openshift/) directory, then copy input file and hosts file to $BASE_DIR/coreos_BareMetalworker_nodes/ and later update ocp worker details in input file.
ansible-vault edit input.yaml
------------------------------------------------------------------------------------------------------------
ocp_workers:
 - name: worker1
   ip: 172.28.xx.xxx
   fqdn: xxx.ocp.isv.local                   #ex. mworker1.ocp.isv.local
   mac_address: XX:XX:XX:XX:XX:XX			 #For BareMetal core os worker update mac address of server NIC
 - name: worker2
   ip: 172.28.xx.xxx
   fqdn: xxx.ocp.isv.local                 #ex. mworker2.ocp.isv.local
   mac_address: XX:XX:XX:XX:XX:XX 		   #For BareMetal core os worker update mac address of server NIC
 - name: worker3
   ip: 172.28.xx.xxx
   fqdn: xxx.ocp.isv.local                   #ex. mworker3.ocp.isv.local
   mac_address: XX:XX:XX:XX:XX:XX 		     #For BareMetal core os worker update mac address of server NIC
------------------------------------------------------------------------------------------------------------
NOTE
import the hosts file from the $BASE_DIR
ansible vault password is changeme
- Navigate to the /opt/hpe-solutions-openshift/DL-LTI-Openshift/coreos_BareMetalworker_nodes/ directory add the worker nodes to the cluster using one of the following methods:
- Run the following sequence of playbooks:
$ ansible-playbook -i hosts playbooks/binddns.yml --ask-vault-pass
$ ansible-playbook -i hosts playbooks/haproxy.yml --ask-vault-pass
$ ansible-playbook -i hosts playbooks/deploy_ipxe_ocp.yml --ask-vault-pass
OR
- If you want to deploy the entire solution to add the RH CoreOS worker nodes to the cluster, execute the following playbook:
$ ansible-playbook -i hosts site.yml --ask-vault-pass
- After successful execution of all playbooks, check the node status as below.
Approving server certificates (CSR) for newly added nodes
The administrator needs to approve the CSR requests generated by each kubelet.
You can approve all Pending CSR requests using below command
$ oc get csr -o json | jq -r '.items[] | select(.status == {} ) | .metadata.name' | xargs oc adm certificate approve
- Later, Verify Node status using below command:
$ oc get nodes
- Execute the following command to set the parameter mastersSchedulable parameter as false, so that master nodes will not be used to schedule pods.
$ oc edit scheduler
Adding COREOS GPU worker nodes to RHOCP cluster
NOTE
For addition of worker node into the RHOCP cluster, you can follow the process documented at section "Adding BareMetal CoreOS worker nodes to RHOCP cluster using Ansible playbooks".
NVIDIA GPU Operator on openshift cluster
NVIDIA supports the use of graphics processing unit (GPU) resources on OpenShift Container Platform.
The NVIDIA GPU Operator leverages the Operator framework within OpenShift Container Platform to manage the full lifecycle of NVIDIA software components required to run GPU-accelerated workloads.
The prerequisites needed for running containers and VMs with GPU(s) differs, with the primary difference being the drivers required. For example, the datacenter driver is needed for containers, the vfio-pci driver is needed for GPU passthrough, and the NVIDIA vGPU Manager is needed for creating vGPU devices.
Prerequisites:
A working OpenShift 4.16 cluster with GPU enabled worker node.
Access to the OpenShift cluster as a cluster-admin to perform the required steps.
OpenShift CLI (oc) is installed.
OpenShift Virtualization operator is installed
NFD Operator need to install
Installing the Node Feature Discovery (NFD) Operator
The Node Feature Discovery (NFD) Operator is a prerequisite for the NVIDIA GPU Operator. Install the NFD Operator using the Red Hat OperatorHub catalog in the OpenShift Container Platform web console
Procedure
- In the OpenShift Container Platform web console, click Operators → OperatorHub.
- Choose Node Feature Discovery from the list of available Operators, and then click Install.
- On the Install Operator page, select A specific namespace on the cluster, and then click Install. You do not need to create a namespace because it is created for you.
Verification
To verify that the NFD Operator installed successfully:
- Navigate to the Operators → Installed Operators page.
- Ensure that Node Feature Discovery is listed in the openshift-nfd project with a Status of InstallSucceeded.
NOTE
During installation an Operator might display a Failed status. If the installation later succeeds with an InstallSucceeded message, you can ignore the Failed message.

Create NodeFeatureDiscovery CR instance
When the Node Feature Discovery is installed, create an instance of Node Feature Discovery using the NodeFeatureDiscovery tab.
- Click Operators > Installed Operators from the side menu.
- Find the Node Feature Discovery entry.
- Click NodeFeatureDiscovery under the Provided APIs field.
- Click Create NodeFeatureDiscovery.
- In the subsequent screen click Create. This starts the Node Feature Discovery Operator that proceeds to label the nodes in the cluster that have GPUs.
NOTE
The values pre-populated by the OperatorHub are valid for the GPU Operator.
Verify that the Node Feature Discovery Operator is functioning correctly
The Node Feature Discovery Operator uses vendor PCI IDs to identify hardware in a node. NVIDIA uses the PCI ID 10de. Use the OpenShift Container Platform web console or the CLI to verify that the Node Feature Discovery Operator is functioning correctly.
- In the OpenShift Container Platform web console, click Compute > Nodes from the side menu.
- Select a worker node that you know contains a GPU.
- Click the Details tab.
- Under Node labels verify that the following label is present: feature.node.kubernetes.io/pci-10de.present=true
NOTE
0x10de is the PCI vendor ID that is assigned to NVIDIA.
- Verify the GPU device (pci-10de) is discovered on the GPU node:
$ oc describe node | egrep 'Roles|pci' | grep -v master
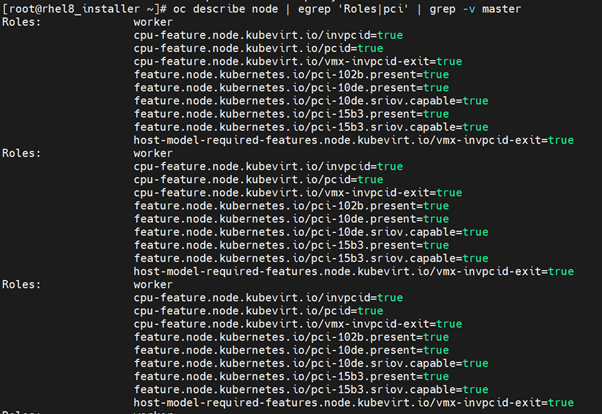
$ oc get nodes -l feature.node.kubernetes.io/pci-10de.present

Enabling the IOMMU driver on hosts
To enable the IOMMU (Input-Output Memory Management Unit) driver in the kernel, create the MachineConfig object and add the kernel arguments.
NOTE
Enabling IOMMU is needed for GPU with Openshift Virtualization
- Prerequisites:
- Administrative privilege to a working OpenShift Container Platform cluster.
- Intel or AMD CPU hardware.
- Intel Virtualization Technology for Directed I/O extensions or AMD IOMMU in the BIOS (Basic Input/Output System) is enabled.
- Procedure:
- Create a MachineConfig object that identifies the kernel argument. The following example shows a kernel argument for an Intel CPU:
apiVersion: machineconfiguration.openshift.io/v1
kind: MachineConfig
metadata:
  labels:
    machineconfiguration.openshift.io/role: worker
  name: 100-worker-iommu
spec:
  config:
    ignition:
      version: 3.2.0
  kernelArguments:
      - intel_iommu=on
- Create the new MachineConfig object:
$ oc create -f 100-worker-kernel-arg-iommu.yaml
- Verify that the new MachineConfig object was added:
$ oc get machineconfig
Labeling worker nodes
The GPU Operator uses the value of the label to determine which operands to deploy. Assign the following values to the label: container, vm-passthrough, and vm-vgpu. Use the following command to add a label to a worker node:
$ oc label node <node1-name> --overwrite nvidia.com/gpu.workload.config=vm-vgpu
$ oc label node <node2-name> --overwrite nvidia.com/gpu.workload.config=container
$ oc label node <node3-name> --overwrite nvidia.com/gpu.workload.config= vm-passthrough

Verify the GPU device details before installation.
ssh to the node, you can list the NVIDIA GPU devices with a command like the following example:
$ lspci -nnk -d 10de:

Installing the NVIDIA GPU Operator by using the web console
- In the OpenShift Container Platform web console from the side menu, navigate to Operators > OperatorHub and select All Projects.
- In Operators > OperatorHub, search for the NVIDIA GPU Operator. For additional information see the Red Hat OpenShift Container Platform documentation.
Note
The suggested namespace to use is the nvidia-gpu-operator. You can choose any existing namespace or create a new namespace name. If you install in any other namespace other than nvidia-gpu-operator, the GPU Operator will not automatically enable namespace monitoring, and metrics and alerts will not be collected by Prometheus.
If only trusted operators are installed in this namespace, you can manually enable namespace monitoring with this command:
$ oc label ns/$NAMESPACE_NAME openshift.io/cluster-monitoring=true
- Select the NVIDIA GPU Operator, click Install. In the subsequent screen click Install
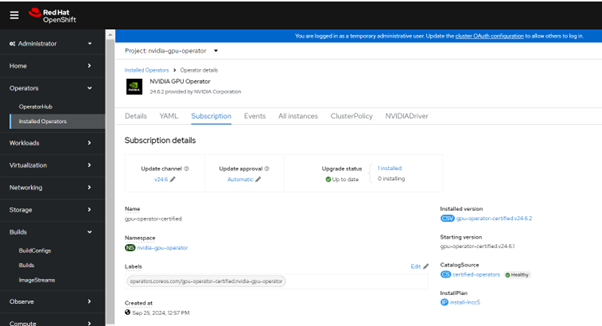
FIGURE 9. NVIDIA GPU Operator deployment
Setup Openshift internal image registry to upload vGPU Manager image
To start the image registry, change the Image Registry Operator configuration’s managementState from Removed to Managed
$ oc patch configs.imageregistry.operator.openshift.io cluster –type merge –patch ‘{“spec”:{“managementState”:”Managed”}}’
Image registry storage configuration:
Configuring the Image Registry Operator to use CephFS storage with Red Hat OpenShift Data Foundation
Create a PVC to use the cephfs storage class. For example:
cat <<EOF | oc apply -f -
apiVersion: v1
kind: PersistentVolumeClaim
metadata:
 name: registry-storage-pvc
 namespace: openshift-image-registry
spec:
 accessModes:
 - ReadWriteMany
 resources:
   requests:
     storage: 100Gi
 storageClassName: ocs-storagecluster-cephfs
EOF
Configure the image registry to use the CephFS file system storage by entering the following command:
$ oc patch config.image/cluster -p '{"spec":{"managementState":"Managed","replicas":2,"storage":{"managementState":"Unmanaged","pvc":{"claim":"registry-storage-pvc"}}}}' --type=merge
Set Default Route to True:
$ oc patch configs.imageregistry.operator.openshift.io/cluster --patch '{"spec":{"defaultRoute":true}}' --type=merge
Login to image registry:
$ HOST=$(oc get route default-route -n openshift-image-registry --template='{{ .spec.host }}')
$ podman login -u kubeadmin -p $(oc whoami -t) --tls-verify=false $HOST
Create the secret to access the vGPU manager image
create a secret object for storing your registry API key (the mechanism used to authenticate your access to the private container registry).
Navigate to Home > Projects and ensure the nvidia-gpu-operator is selected.
In the OpenShift Container Platform web console, click Secrets from the Workloads drop down.
Click the Create Drop down.
Select Image Pull Secret.
Enter the following into each field:
a. Secret name: private-registry-secret
b. Authentication type: Image registry credentials
c. Registry server address: < image-registry.openshift-image-registry.svc:5000 >
d. Username: kubeadmin
e. Password: < kubeadm-password >
f. Email: < YOUR-EMAIL >
Click Create.
A pull secret is created.
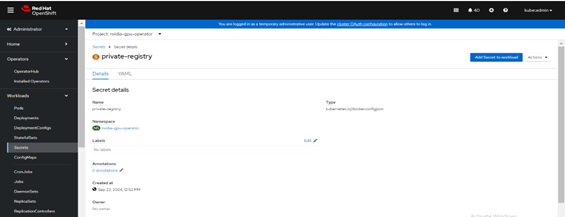
FIGURE 10. Pull secret creation
Building the vGPU Manager image
Note
Building a vGPU Manager image is only required for NVIDIA vGPU. If you plan to use GPU Passthrough only, skip this section.
Use the following steps to build the vGPU Manager container and push it to a private registry.
Download the vGPU Software from the NVIDIA Licensing Portal.
• Login to the NVIDIA Licensing Portal and navigate to the Software Downloads section.
• The NVIDIA vGPU Software is located on the Driver downloads tab of the Software Downloads page.
• Click the Download link for the Linux KVM complete vGPU package. Confirm that the Product Version column shows the vGPU version to install. Unzip the bundle to obtain the NVIDIA vGPU Manager for Linux (NVIDIA-Linux-x86_64-{version}-vgpu-kvm.run file)
Use the following steps to clone the driver container repository and build the driver image.
- Open a terminal and clone the driver container image repository:
$ git clone https://gitlab.com/nvidia/container-images/driver
$ cd driver
- Change to the vgpu-manager directory for your OS:
$ cd vgpu-manager/rhel9
- Copy the NVIDIA vGPU Manager from your extracted zip file:
$ cp NVIDIA-Linux-x86_64-550.90.05-vgpu-kvm.run .
Set the following environment variables:
• PRIVATE_REGISTRY - Name of the private registry used to store the driver image.
• VERSION - The NVIDIA vGPU Manager version downloaded from the NVIDIA Software Portal.
• OS_TAG - This must match the Guest OS version. For RedHat OpenShift, specify rhcos4.x where x is the supported minor OCP version.
• CUDA_VERSION - CUDA base image version to build the driver image with.
• $ export PRIVATE_REGISTRY=image-registry.openshift-image-registry.svc:5000/openshift VERSION=550.90.05 OS_TAG=rhcos4.16 CUDA_VERSION=12.4
Note
The recommended registry to use is the Integrated OpenShift Container Platform registry.
- Build the NVIDIA vGPU Manager image:
$ docker build \
    --build-arg DRIVER_VERSION=${VERSION} \
    --build-arg CUDA_VERSION=${CUDA_VERSION} \
    -t ${PRIVATE_REGISTRY}/vgpu-manager:${VERSION}-${OS_TAG} .
- Push the NVIDIA vGPU Manager image to your private registry:
$ docker push ${PRIVATE_REGISTRY}/vgpu-manager:${VERSION}-${OS_TAG}

$ docker push image-registry.openshift-image-registry.svc:5000/openshift/vgpu-manager: 550.90.05- rhcos4.16
Create the cluster policy for the NVIDIA GPU Operator:
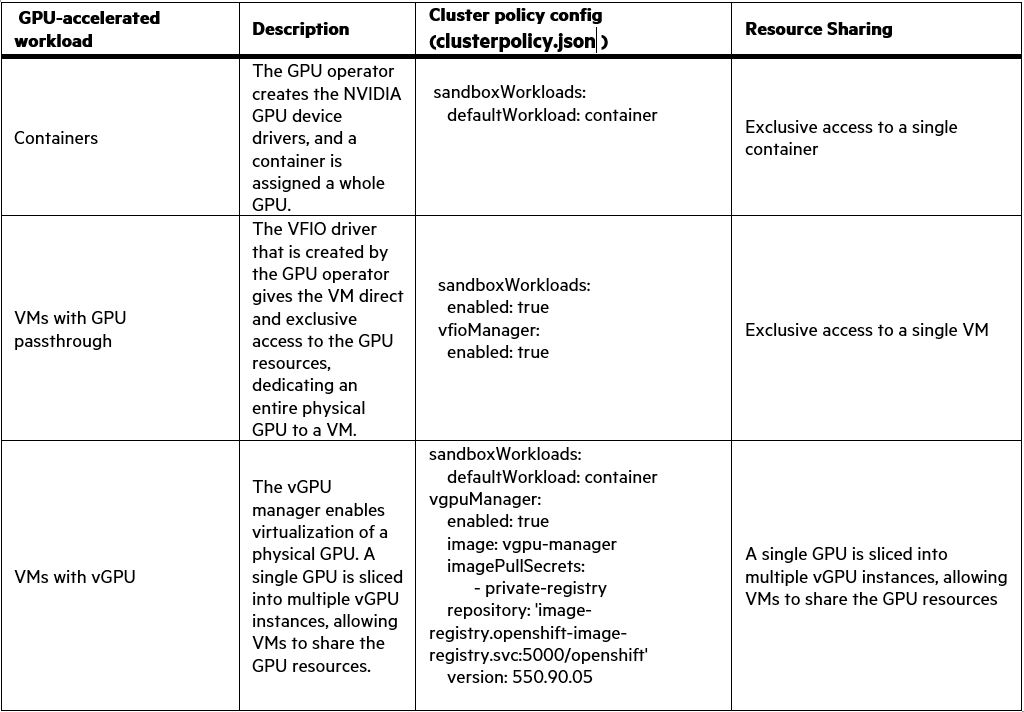
The ClusterPolicy configures the GPU stack, configuring the image names and repository, pod restrictions/credentials and so on.
Table 12: clusterpolicy configuration for GPU-accelerated containers, GPU accelerated VMs with GPU passthrough and GPU accelerated-VMs with vGPU
Create the ClusterPolicy:
- In the OpenShift Container Platform web console, from the side menu, select Operators -> Installed Operators, and click NVIDIA GPU Operator.
- Select the ClusterPolicy tab, then click Create ClusterPolicy. The platform assigns the default name gpu-cluster-policy.
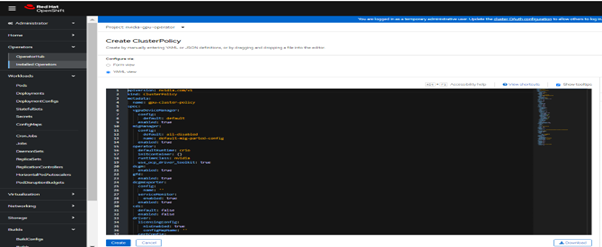
FIGURE 11. ClusterPolicy creations
- Modify the clusterpolicy.json file as described in the Table 12:
Note
The vgpuManager options are only required if you want to use the NVIDIA vGPU.
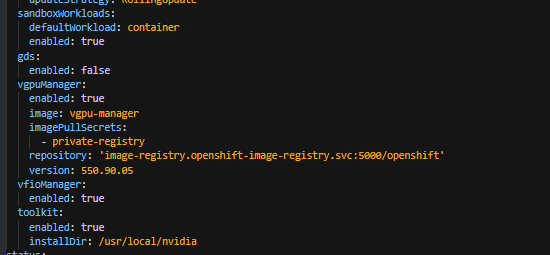
save the changes:
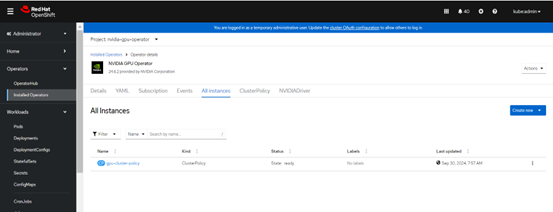
FIGURE 12. created Clusterpolicy for NVIDIA GPU's
The vGPU Device Manager, deployed by the GPU Operator, automatically creates vGPU devices which can be assigned to KubeVirt VMs. Without additional configuration, the GPU Operator creates a default set of devices on all GPUs.
Verify the successful installation of the NVIDIA GPU Operator:
Run the following command to view these new pods and daemonsets:
$ oc get pods,daemonset -n nvidia-gpu-operator
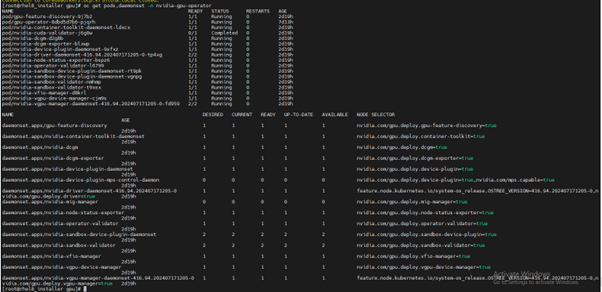
Running a sample GPU Application Run a simple CUDA VectorAdd sample, which adds two vectors together to ensure the GPUs have bootstrapped correctly. Run the following:
$ cat << EOF | oc create -f -
apiVersion: v1
kind: Pod
metadata:
  name: cuda-vectoradd
spec:
 restartPolicy: OnFailure
 containers:
 - name: cuda-vectoradd
   image: "nvidia/samples:vectoradd-cuda11.2.1"
   resources:
     limits:
       nvidia.com/gpu: 1
EOF
Check the logs of the container:
$ oc logs cuda-vectoradd

Getting information about the GPU
The nvidia-smi shows memory usage, GPU utilization, and the temperature of the GPU. Test the GPU access by running the popular nvidia-smi command within the pod. To view GPU utilization, run nvidia-smi from a pod in the GPU Operator daemonset.
- Change to the nvidia-gpu-operator project:
- Run the following command to view these new pods:
$ oc get pod -owide -lopenshift.driver-toolkit=true

$ oc exec -it nvidia-driver-daemonset-<4xx.xxxxxxxxxxxx> -- nvidia-smi
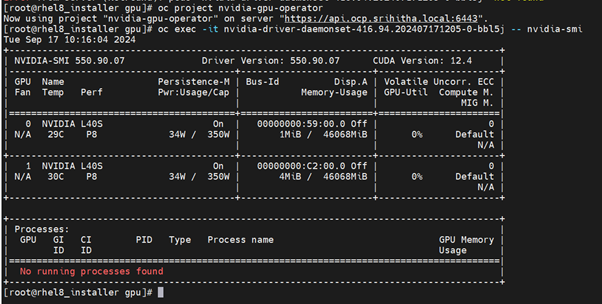
2 tables are generated. The first table reflects the information about all available GPUs (the example shows 2 GPU). The second table provides details on the processes using the GPUs.
Verify the GPU devices on worker node after installation:
ssh to the worker node which is configured for vm-vgpu workload, and you can list the NVIDIA vGPU device created with a command like the following example:
$ lspci -nnk -d 10de:
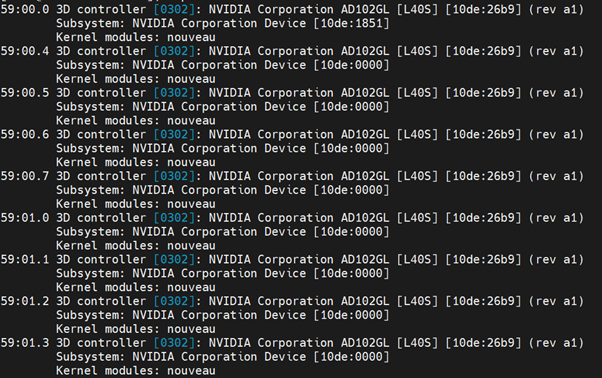
ssh to the worker node which is configured for vm-passthrough workload, and you can list the NVIDIA GPU devices with a command like the following example:
$ lspci -nnk -d 10de:

ssh to the worker node which is configured for Container workload, and you can list the NVIDIA GPU devices with a command like the following example:
$ lspci -nnk -d 10de:

Add GPU Resources to the HyperConverged Custom Resource:
Update the HyperConverged custom resource so that all GPU and vGPU devices in your cluster are permitted and can be assigned to virtual machines.
Determine the resource names for the GPU devices:
$ oc get node <gpu-node > -o json | jq '.status.allocatable | with_entries(select(.key | startswith("nvidia.com/"))) | with_entries(select(.value != "0"))'

Determine the PCI device IDs for the GPUs.
ssh to the node, you can list the NVIDIA GPU devices with a command like the following example:
$ lspci -nnk -d 10de:

Modify the HyperConvered custom resource like the following example:
$ oc edit hyperconverged kubevirt-hyperconverged -n openshift-cnv

  permittedHostDevices:
    mediatedDevices:
    - externalResourceProvider: true
      mdevNameSelector: NVIDIA_L40S-24Q
      resourceName: nvidia.com/NVIDIA_L40S-24Q
    pciHostDevices:
    - externalResourceProvider: true
      pciDeviceSelector: 10DE:26b9
      resourceName: nvidia.com/AD102GL_L40S

Creating a virtual machine with GPU
Assign GPU devices, either passthrough or vGPU, to virtual machines.
- Prerequisites
The GPU devices are configured in the HyperConverged custom resource (CR).
- Procedure
Assign the GPU devices to a virtual machine (VM) by editing the spec.domain.devices.gpus field of the VirtualMachine manifest:
apiVersion: kubevirt.io/v1
kind: VirtualMachine
....
spec:
  domain:
    devices:
      gpus:
      - deviceName: nvidia.com/NVIDIA_L40S-24Q
        name: gpu1
….
deviceName: the resource name associated with the GPU. name: name to identify the device on the VM.
VM with vm-vGPU device attached:
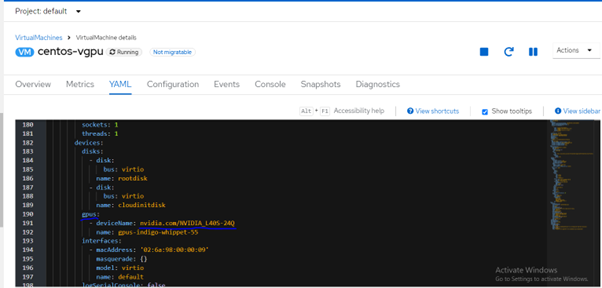
FIGURE 13. Virtual Machine with vGPU
VM with vm-passthrough device attached:
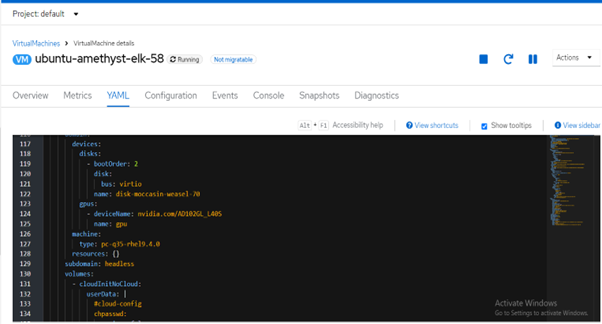
FIGURE 14. Virtual Machine with vm-passthrough
Deploying sample application on RHOCP 4.16 using Ephemeral storage
NGINX is an open-source software for web serving, reverse proxying,caching, load balancing, media streaming, and so on. This section describes how to deploy a sample NGINX application on RHOCP 4.16 using Ephemeral storage.
Prerequisites:
- RHOCP must be up and running.
To deploy a sample application on RHOCP 4.16 using Ephemeral storage:
- Create a new project with namespace as "my-nginx-example".
$ oc new-project my-nginx-example
- Deploy a new application.
$ oc new-app httpd-example --name=my-nginx-example --param=NAME=my-nginx-example
- Validate the created service and route for the application.
$ oc status
- Retrieve the service details of the application.
$ oc get svc my-nginx-example
- Retrieve the route created for the application.
$ oc get route my-nginx-example
- Use the route in your browser to access the application.
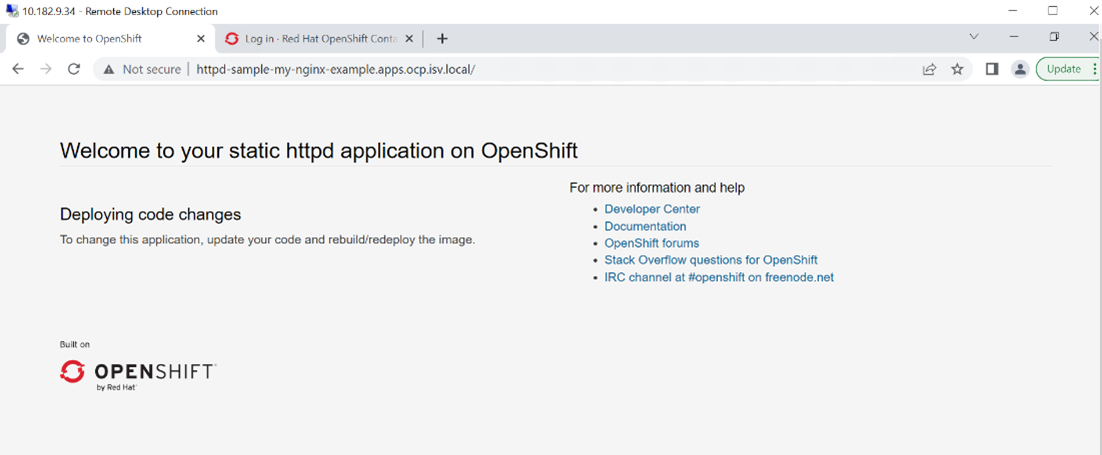
FIGURE 15. NGINX application Web Console login screen