# CSI Driver
Prior to Container Storage Integration (CSI), Kubernetes provided in-tree plugins to support volume. This posed a problem as storage vendors had to align to the Kubernetes release process to fix a bug or to release new features. This also means every storage vendor had their own process to present volume to Kubernetes.
CSI was developed as a standard for exposing block and file storage systems to containerized workloads on Container Orchestrator Systems (COS) like Kubernetes. Container Storage Interface (CSI) is an initiative to unify the storage interface of COS combined with storage vendors. This means, implementing a single CSI for a storage vendor is guaranteed to work with all COS. With the introduction of CSI, there is a clear benefit for the COS and storage vendors. Due to its well-defined interfaces, it also helps developers and future COS to easily implement and test CSI. Volume plugins served the storage needs for container workloads in case of Kubernetes, before CSI existed. The HPE CSI Driver is a multi-vendor and multi-backend driver where each implementation has a Container Storage Provider (CSP). The HPE CSI Driver for Kubernetes uses CSP to perform data management operations on storage resources such as searching for a logical unit number (lun) and so on. Using the CSP specification, the HPE CSI Driver allows any vendor or project to develop its own CSP, which makes it very easy for third- parties to integrate their storage solution into Kubernetes as all the intricacies are taken care of by the HPE CSI Driver.
This document contains details on how to configure a HPE CSI Driver storage for 3PAR on an existing Red Hat OpenShift Container Platform 4.
# CSI Driver Architecture
A diagrammatic representation of the CSI driver architecture is illustrated. **Figure 424 shows the CSI architecture.
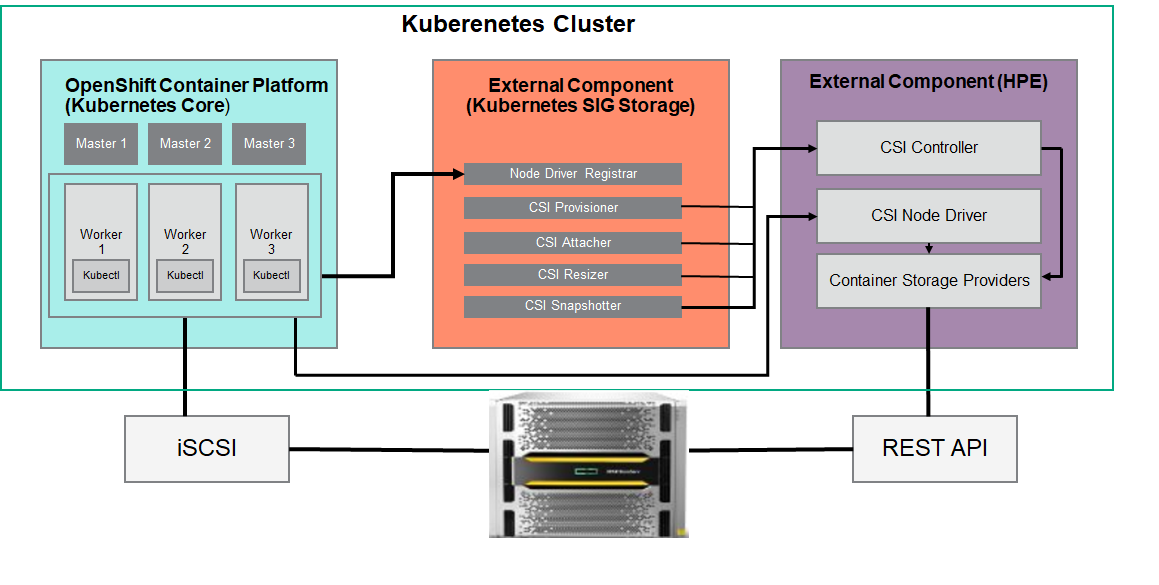
Figure 24. CSI architecture
The OpenShift Container Platform 4 cluster comprises the master and worker nodes (physical and virtual) with CoreOS deployed as the operating system. The iSCSI interface configured on the host nodes establishes the connection with the HPE 3PAR array to the cluster. Upon successful deployment of CSI Driver, the CSI controller, CSI Driver, and 3PAR CSP gets deployed which communicates with the HPE 3PAR or Nimble array via REST APIs. The associated features on Storage Class such as CSI Provisioner, CSI Attacher, and others are configured on the Storage Class.
# Configuring CSI Driver
Prior to configuring the HPE CSI driver, the following prerequisites needs to be met.
# Prerequisites
- OpenShift Container Platform 4.x must be successfully deployed and console should be accessible.
- iSCSI interface should be configured for HPE 3PAR Storage and Nimble storage on Host server.
- Additional iSCSI network interfaces must be configured on worker nodes (physical and virtual).
- Deploy scc.yaml file to enable Security Context Constraints (SCC).
Note
To get access to the host ports, host network, and to mount the host path volume, the HPE CSI Driver needs to be run in privileged mode. Prior to deployment of the CSI operator on OpenShift, createSCC to allow CSI driver to run with these privileges. Download SCC yaml file from GitHub https://raw.githubusercontent.com/hpe-storage/co-deployments/master/operators/hpe-csi-operator/deploy/scc.yaml (opens new window) and update relevant fields such as project or namespace before running the yaml to deploy SCC.
# Configuring iSCSI interface on worker nodes
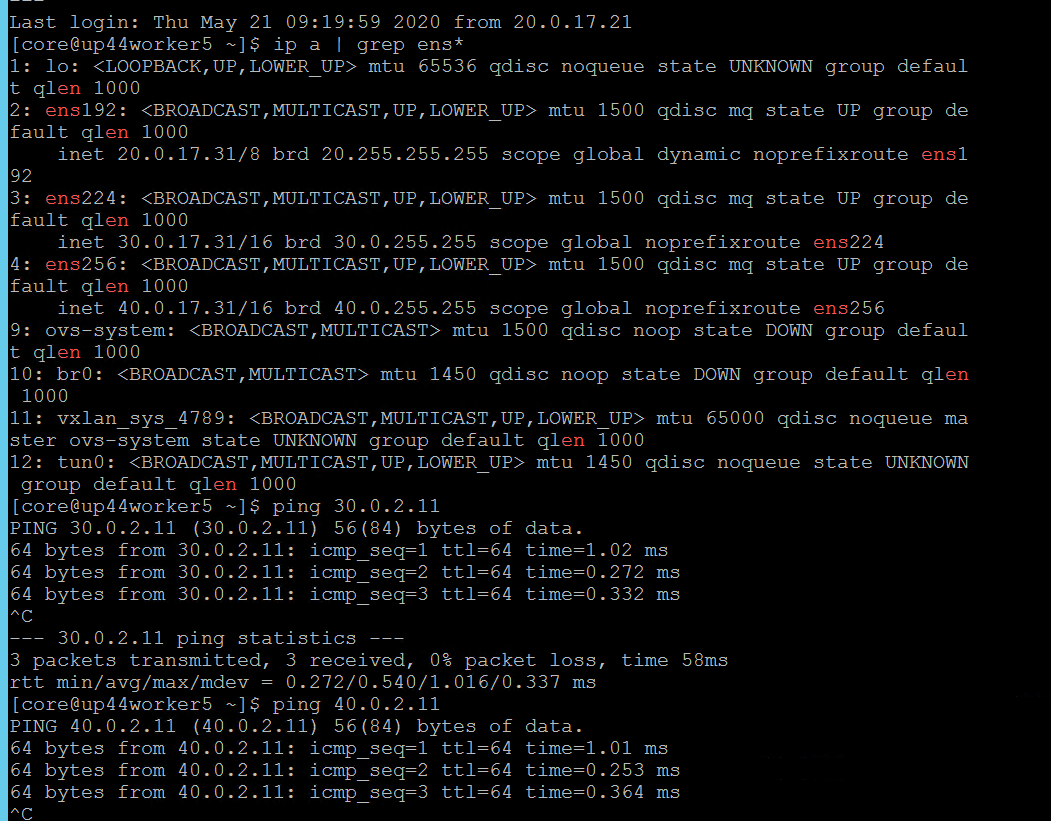
Additional iSCSI interface needs to be configured on all the worker nodes (physical and virtual) for establishing the connection between the OCP cluster and HPE 3PAR array, HPE Nimble array. iSCSI_A and iSCSI_B interfaces needs to be configured on the worker nodes for redundancy. Follow the steps as listed to configure the additional interface.
- Create interface configuration files (ifcfg files) on each of the worker nodes by specifying the following parameters.
HWADDR=52:4D:1F:20:01:94 (MAC address of the iSCSI connector)
TYPE=Ethernet
BOOTPROTO=none
IPADDR=40.0.17.221
PREFIX=16
DNS1= 20.1.1.254
ONBOOT=yes
- Reboot the worker nodes after configuring the ifcfg files. The 3PAR or Nimble Discovery IP should be pingable.
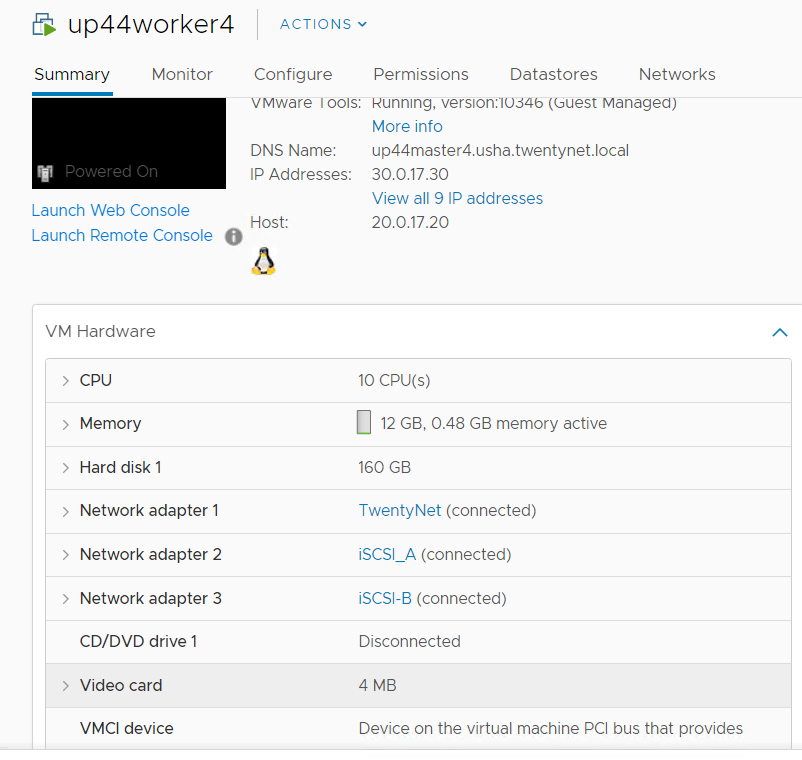
For virtual worker nodes, additional network adapters are added and the corresponding network port groups are selected.
# iSCSI Interface for physical worker nodes
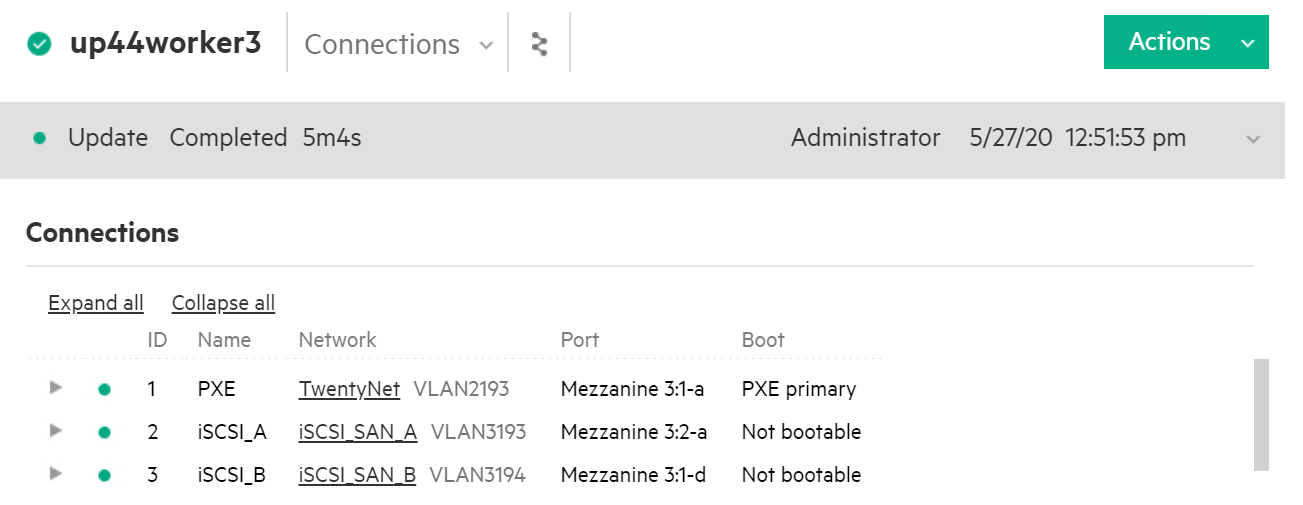
For physical worker nodes, the server profile is configured with iSCSI_A connection for storage interface and additional iSCSI_B connection is added to the server profile for redundancy.
# Steps to deploy SCC
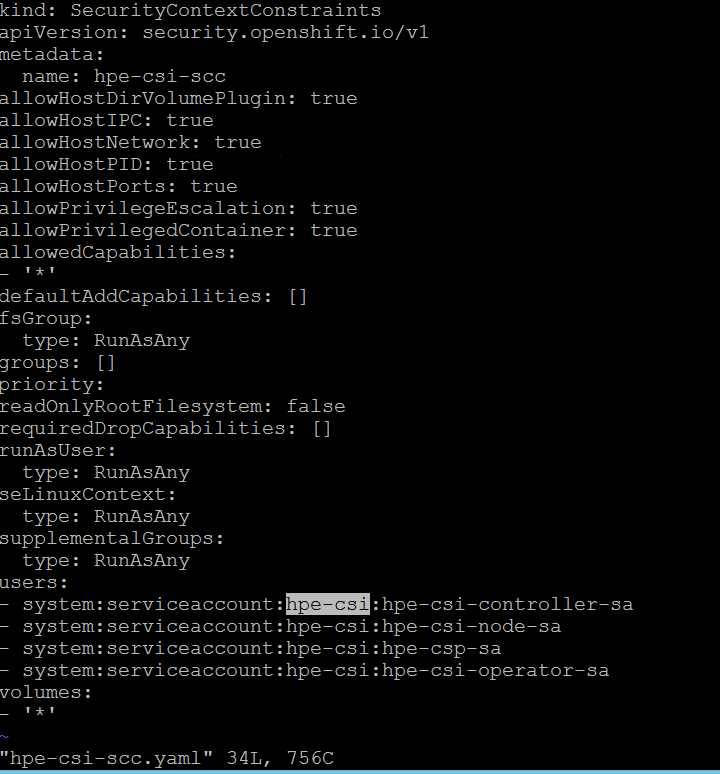
The following figure shows the parameters that needs to be edited (project name) where the CSI Operator is being deployed.
- From the Installer vm, download the scc.yaml file from GitHub from the following path. curl -sL <https://raw.githubusercontent.com/hpe-storage/co-deployments/master/operators/hpe-csi-operator/deploy/scc.yaml > hpe-csi-scc.yaml
- Edit relevant parameters such as Project name and save the file.
- Deploy SCC and check the output
oc create -f hpe-csi-scc.yaml
Output:
securitycontextconstraints.security.openshift.io/hpe-csi-scc created
# CSI driver installation on 3PAR
# Creating Namespace
Before installing the CSI Driver from the OpenShift console, create a namespace called HPE-CSI Driver. Perform the following steps to create a Namespace.
- Click Administration → Namespaces in the left pane of the Console.
- Click Create Namespaces.
- In the Create Namespace dialog box -> enter HPE- CSI.
- Click Create.
# Installing Red Hat HPE CSI Driver Operator using the Operator Hub
# Installing HPE CSI Driver Operator
- Login to the Red Hat OpenShift Container Platform Web Console.
- Click Operators → Operator Hub.
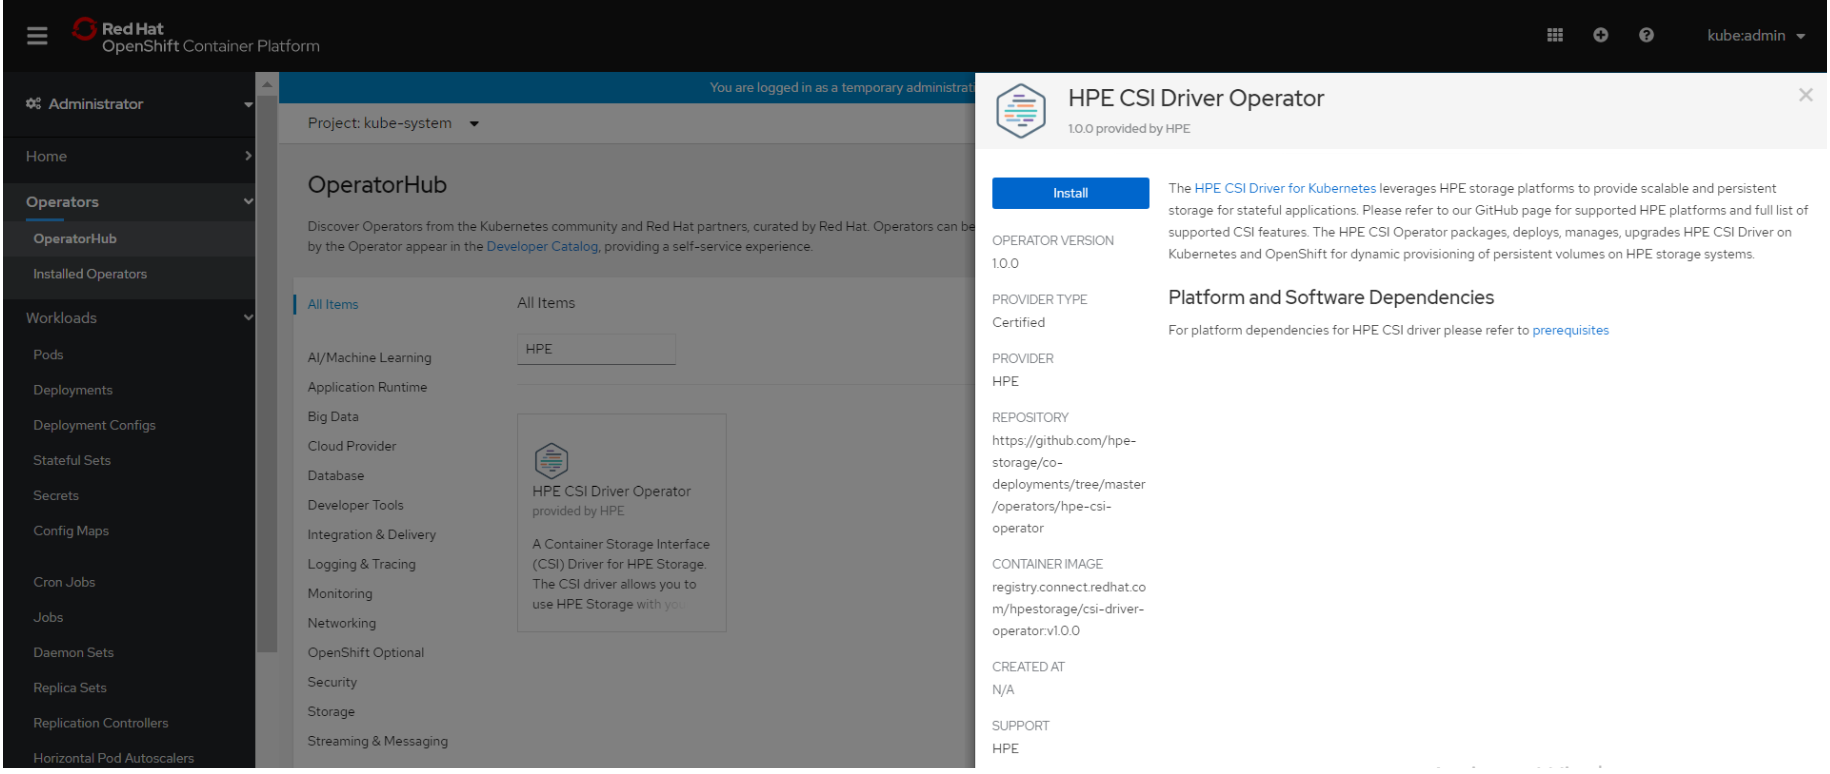
- Search for HPE CSI Driver Operator from the list of operators and click HPE CSI Driver operator.
- On the HPE-CSI Operator page, click Install.
- On the Create Operator Subscription page, the Installation Mode, Update Channel and Approval Strategy options are available.
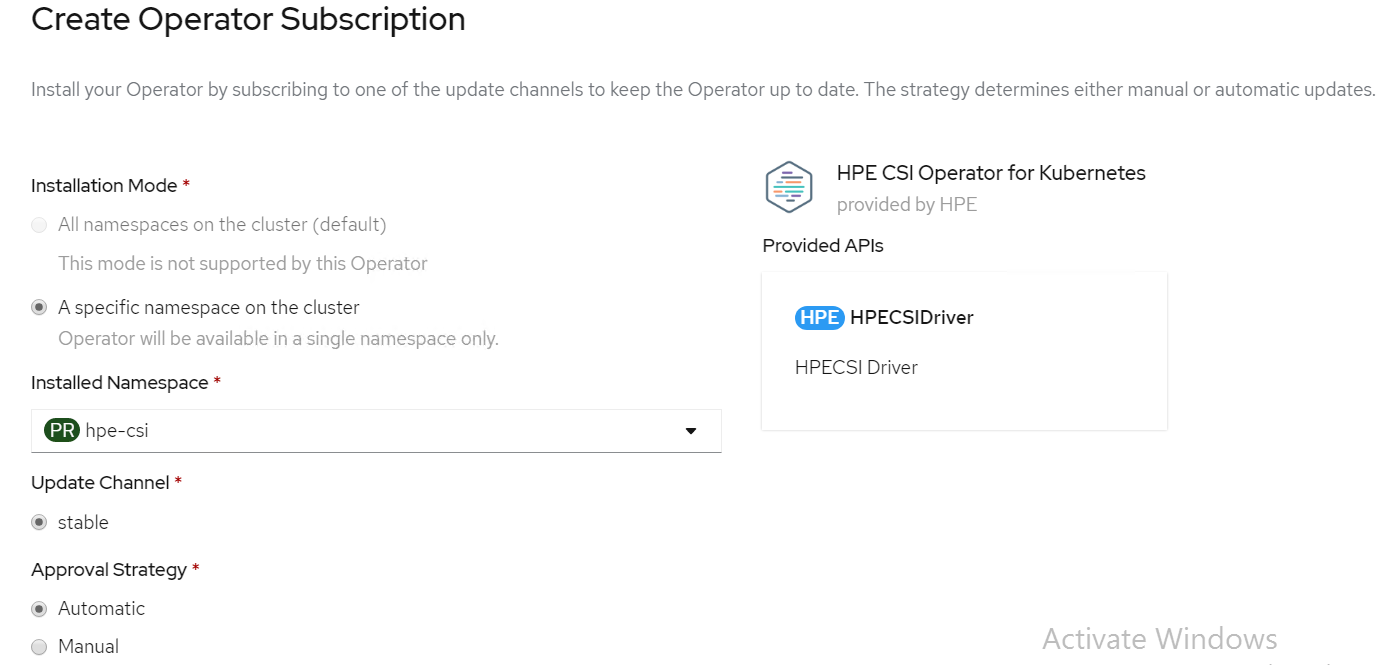
- Select an Approval Strategy. The available options are:
- Automatic: Specifies that the OpenShift Container Platform is required to upgrade HPE CSI Storage automatically. Select the Automatic option.
- Manual: Specifies that you need to upgrade to OpenShift Container Platform manually.
- Click Subscribe.
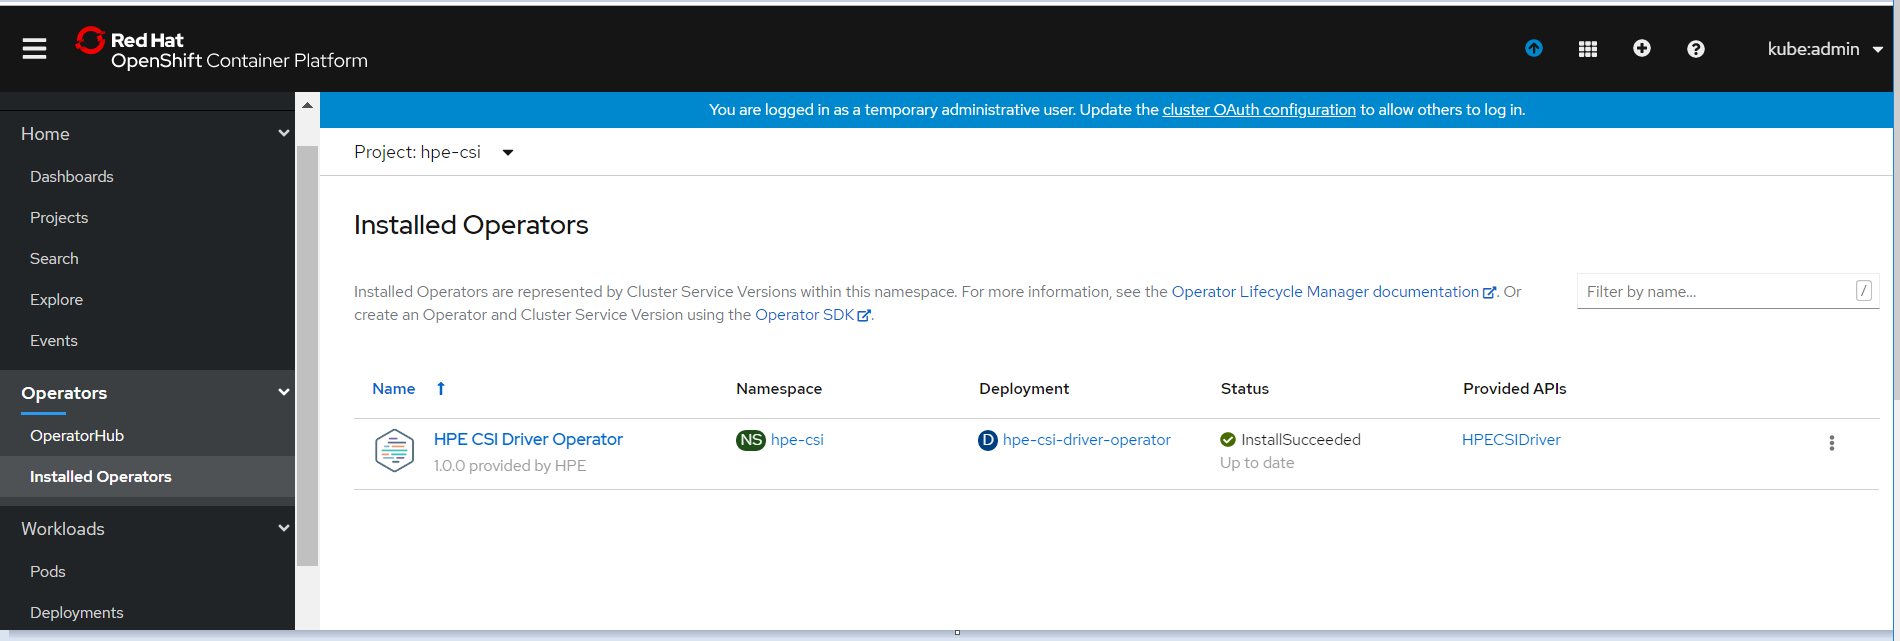
- The Installed Operators page is displayed with the status of the operator as shown.
# Creating HPE CSI driver
The HPE CSI Driver allows any vendor or project to develop its own Container Storage Provider by using the CSP specification (opens new window). This makes it very easy for third- parties to integrate their storage solution into Kubernetes as all the intricacies are taken care of by the HPE CSI Driver.
To create HPE CSI driver, perform the following steps.
- Click Operators → Installed Operators from the left pane of the OpenShift Web Console to view the installed operators.
- On the Installed Operator page, select HPE CSI Driver from the Project drop down list to switch to the HPE-CSI project
- Click HPE CSI Driver.
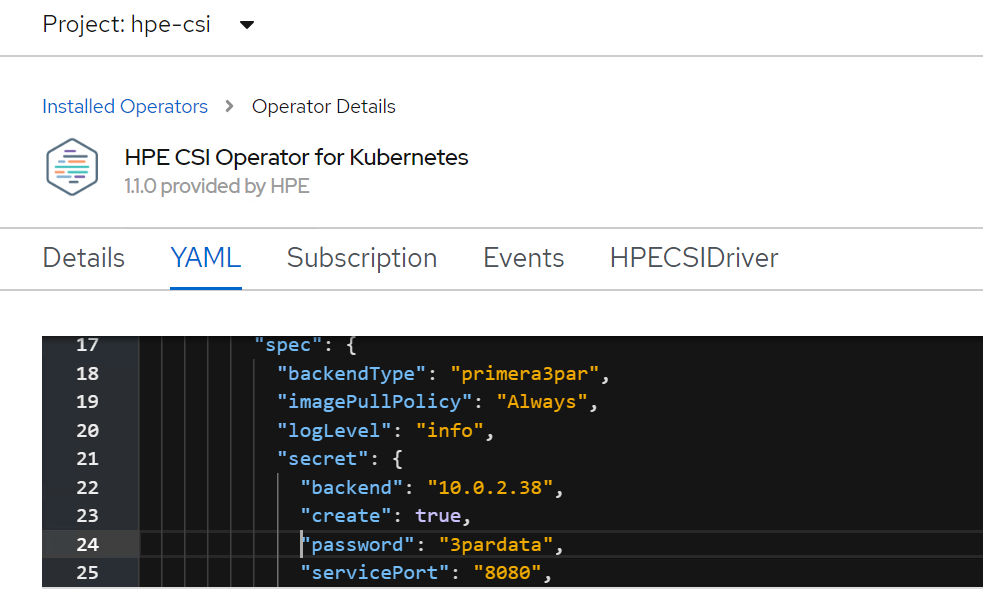
- On the HPE CSI Driver Operator page, scroll right and click the HPE CSI Driver yaml file.
- Edit the HPE CSI Driver yaml file with required values like backend (3PAR array IP), password and username as shown.
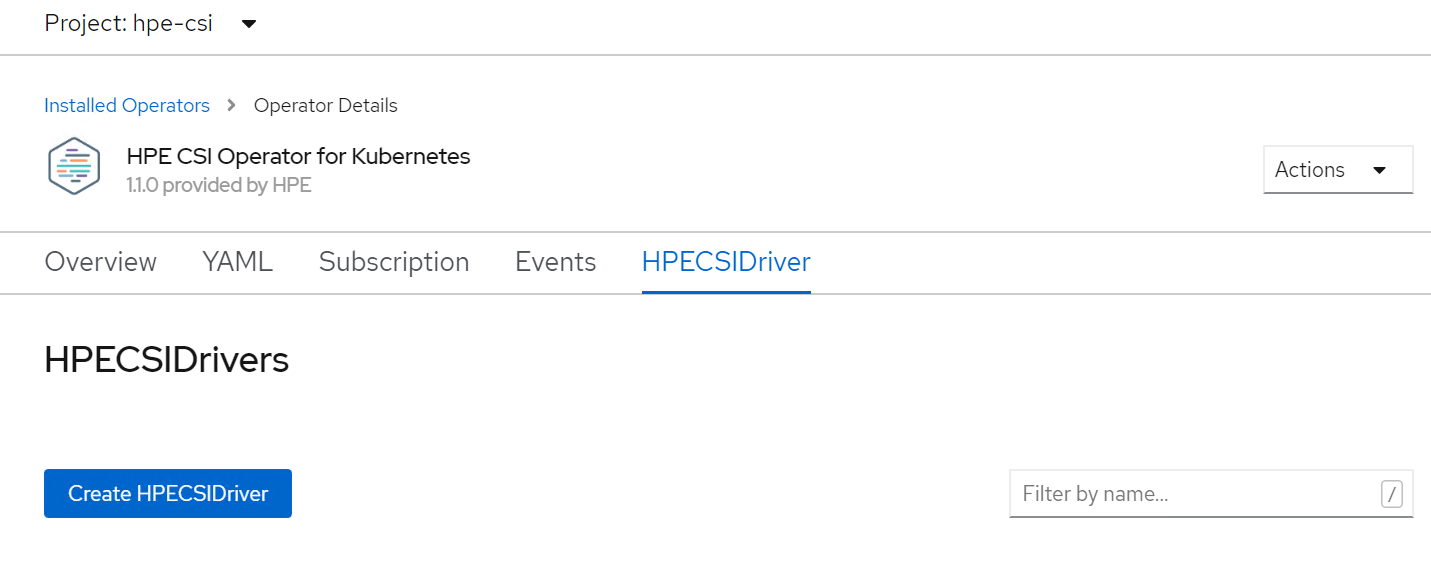
- On the HPE CSI Driver Operator page, scroll right and click the HPECSI Driver tab as shown.
# Verifying creation of HPE CSI Driver
After the HPECSI Driver is deployed, one can see the associated deployment pods being created such as hpe-csi-controller, hpe-csi-driver, and primera3par-csp.
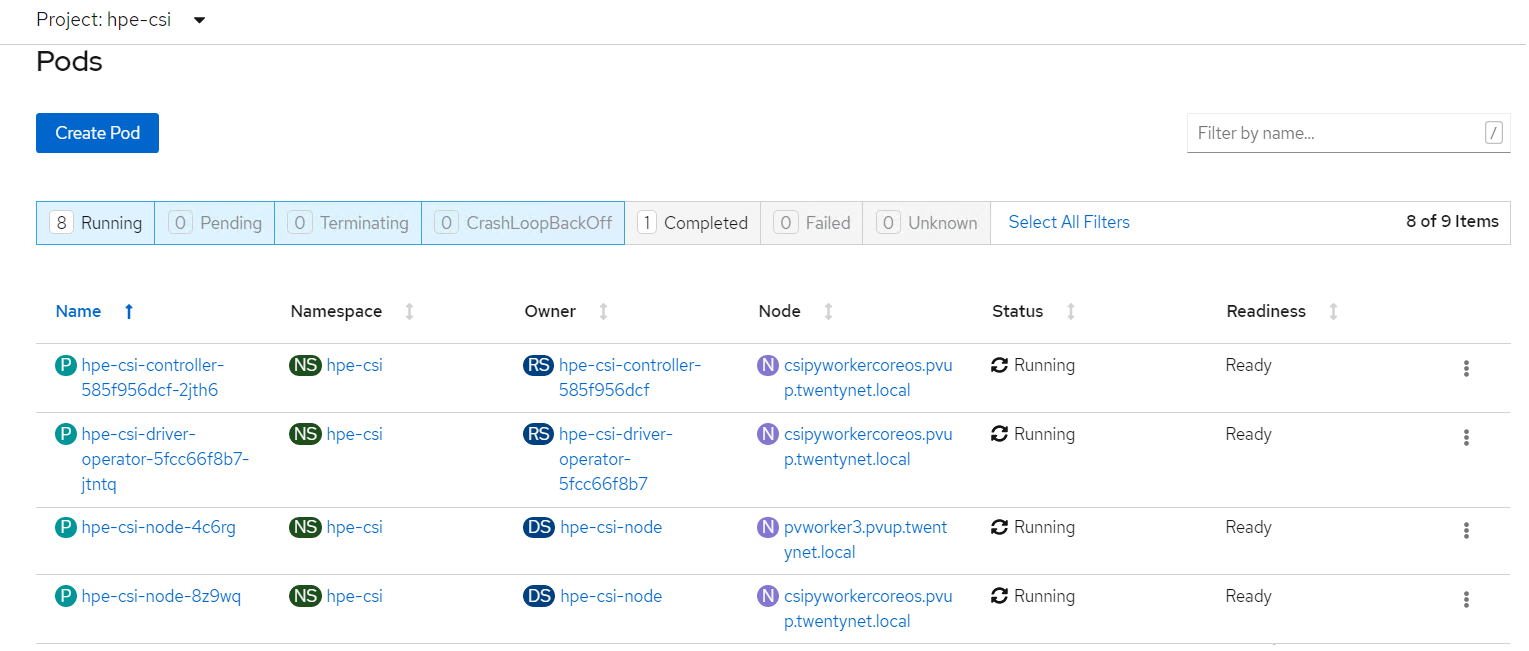
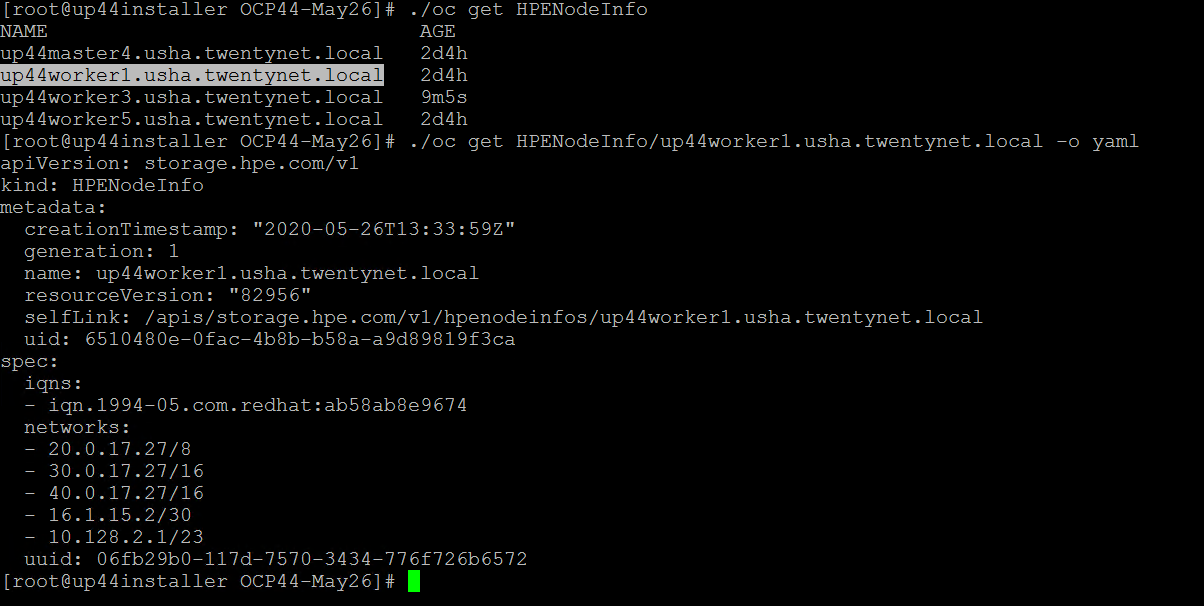
To verify the HPE CSI Node Info, perform the following steps.
- Run the following command from the Installer VM to check HPENodeinfo and network status of worker nodes.
# oc get HPENodeInfo
# oc get HPENodeInfo/<workernode fqdn> -o yaml
# HPE CSI Driver Storage installation
After installing HPE CSI Driver, Storage Class is created manually.
- From the OpenShift console navigate to Storage -> Storage Class
- Click Create Storage Class -> Click Edit yaml -> insert the parameters for SC creation -> Click Create.
- ‘hpe-standard’ storage class is created as shown.
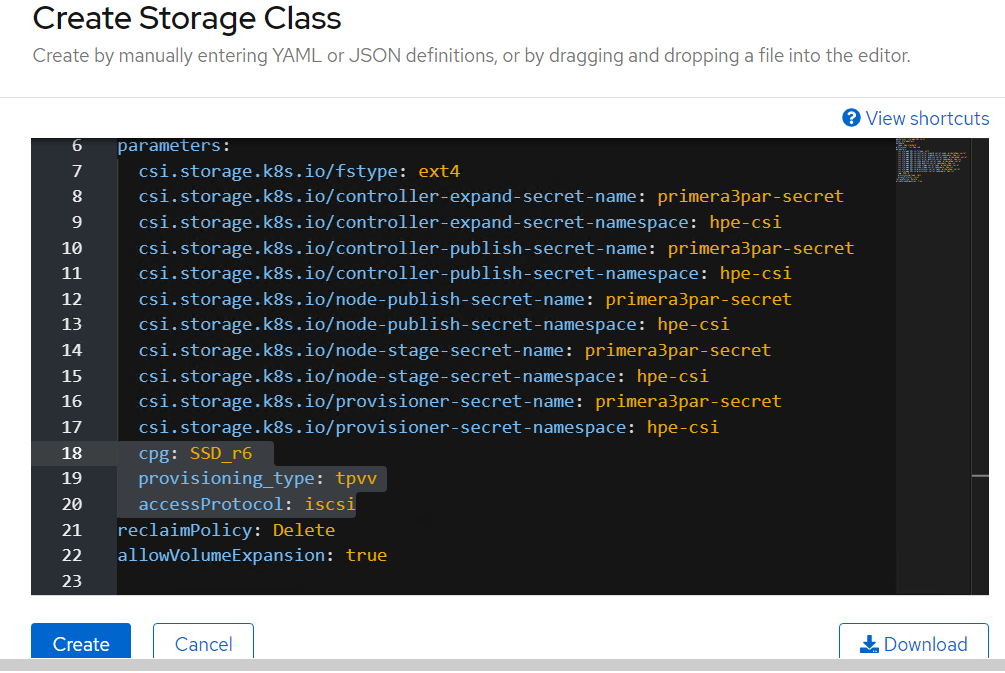
Run the following command on the CLI to tag the storage class default- storage class by :
# oc annotate storageclass hpe-standard storageclass.kubernetes.io/is-default-class=true
The create Storage Class yaml file parameters are as follows:
apiVersion: storage.k8s.io/v1
kind: StorageClass
metadata:
  name: hpe-standard
provisioner: csi.hpe.com
parameters:
  csi.storage.k8s.io/fstype: ext4
  csi.storage.k8s.io/controller-expand-secret-name: primera3par-secret
  csi.storage.k8s.io/controller-expand-secret-namespace: hpe-csi
  csi.storage.k8s.io/controller-publish-secret-name: primera3par-secret
  csi.storage.k8s.io/controller-publish-secret-namespace: hpe-csi
  csi.storage.k8s.io/node-publish-secret-name: primera3par-secret
  csi.storage.k8s.io/node-publish-secret-namespace: hpe-csi
  csi.storage.k8s.io/node-stage-secret-name: primera3par-secret
  csi.storage.k8s.io/node-stage-secret-namespace: hpe-csi
  csi.storage.k8s.io/provisioner-secret-name: primera3par-secret
  csi.storage.k8s.io/provisioner-secret-namespace: hpe-csi
  cpg: SSD_r6
  provisioning_type: tpvv
  accessProtocol: iscsi
reclaimPolicy: Delete
allowVolumeExpansion: true
Note
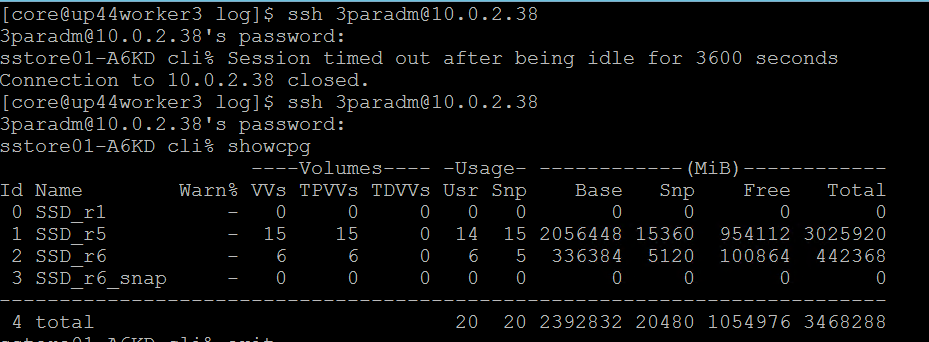
From the worker node, ssh to the 3PAR array to check on the cpg values for Storage Class creation as shown.
# Sample application deployment
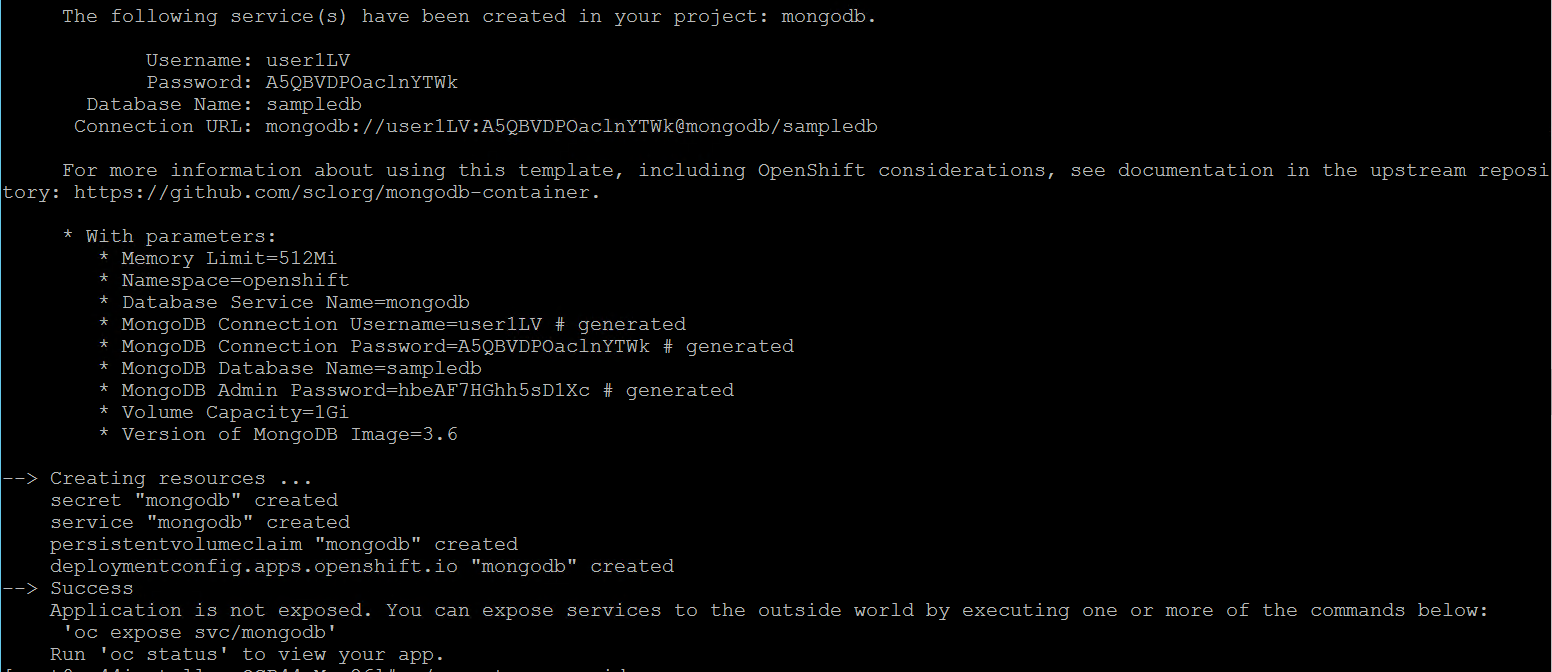
A sample application deployed on the existing Red Hat OpenShift Container Platform utilizes the volume from 3PAR array through HPE CSI Driver. A sample application such as mongodb or mariadb is deployed and scheduled on the worker nodes. Follow the steps to deploy a sample application.
- Run the following command to deploy a sample application.
# oc new-app mongodb-persistent
Output:
- Check the status of PVC and Pod.
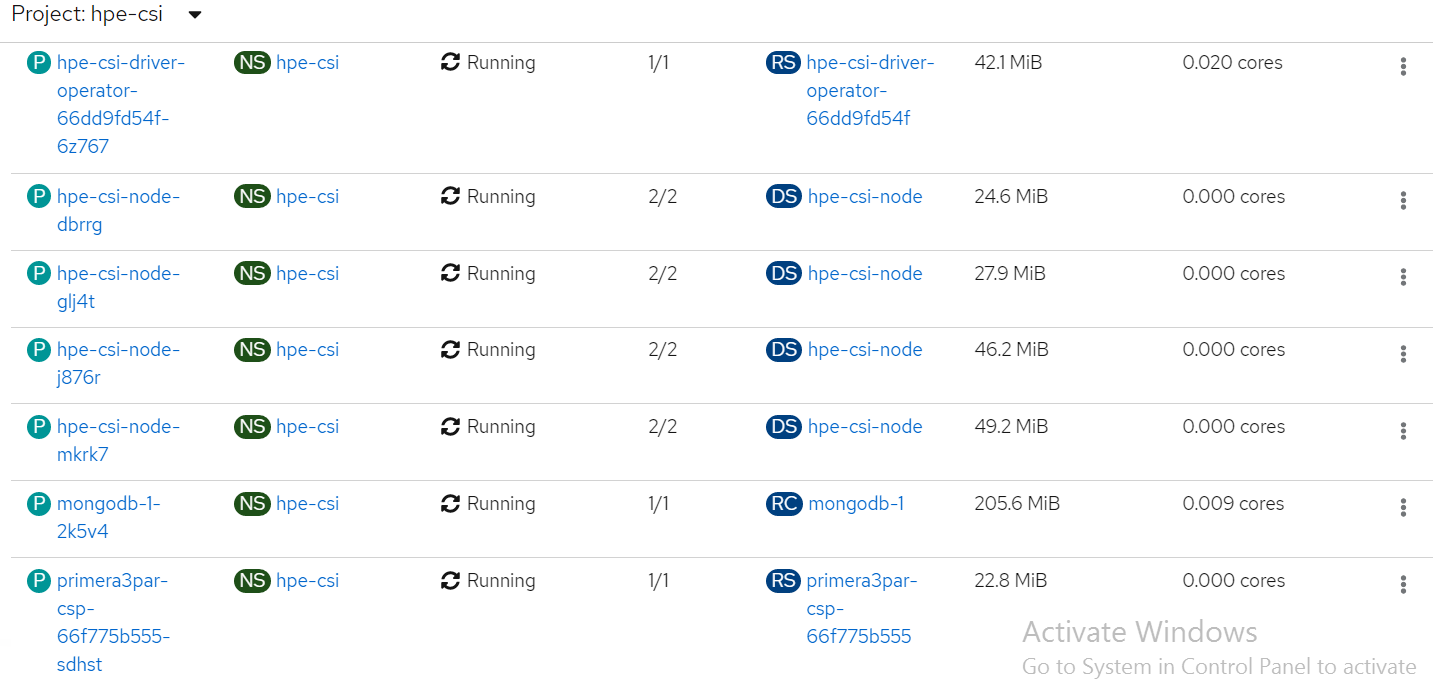
List of pods created on the cluster along with the one for sample application deployed is shown.

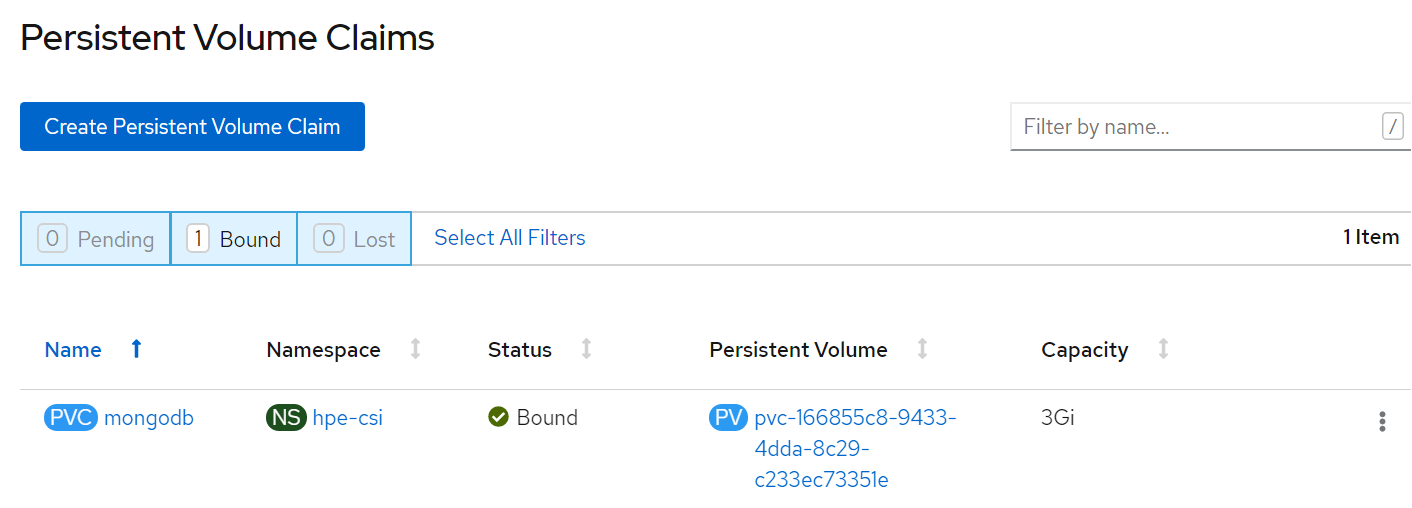
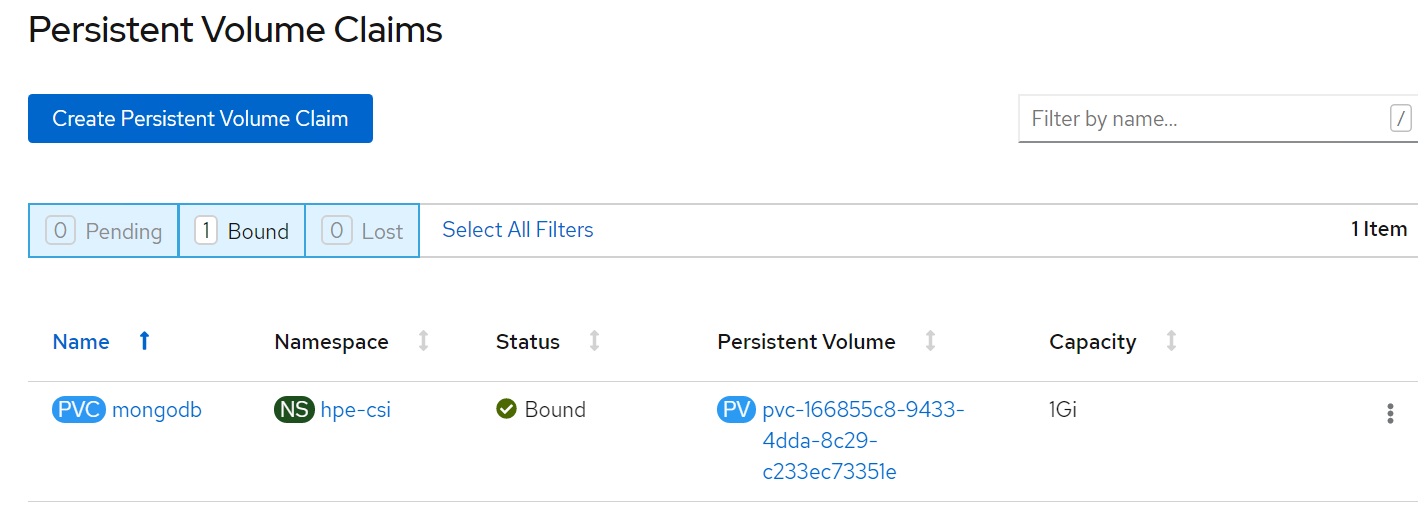
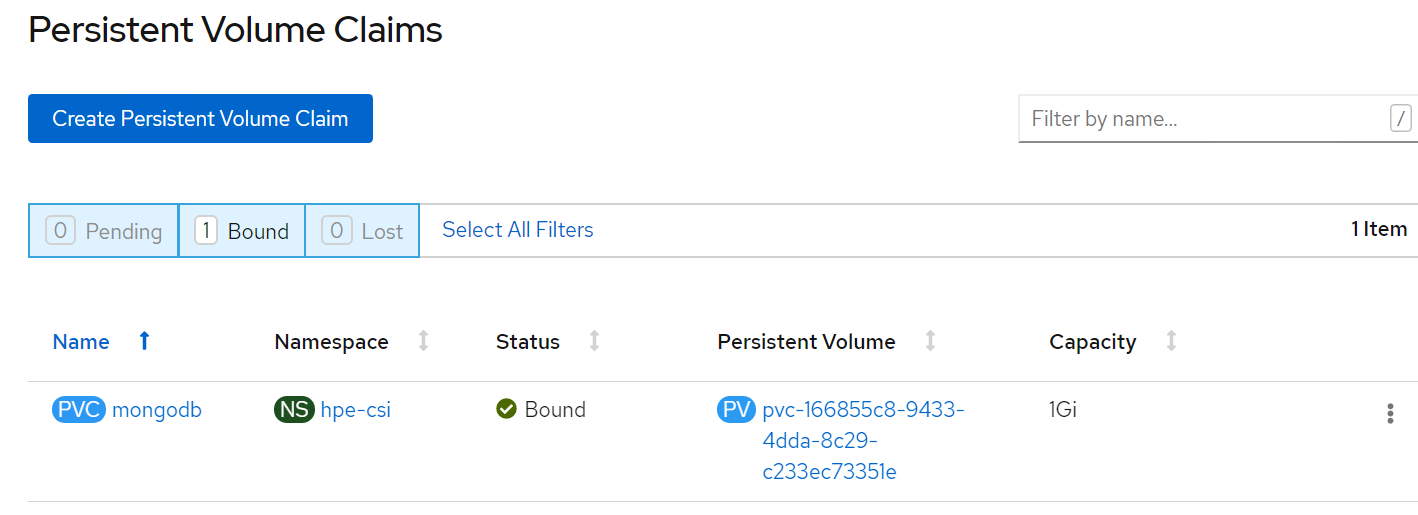
PVC for the sample application deployed is created and bound. This can be verified in the OpenShift Console by navigating to Storage -> Persistent Volume Claim section.
# Verification of Persistent Volume Claim on 3PAR array
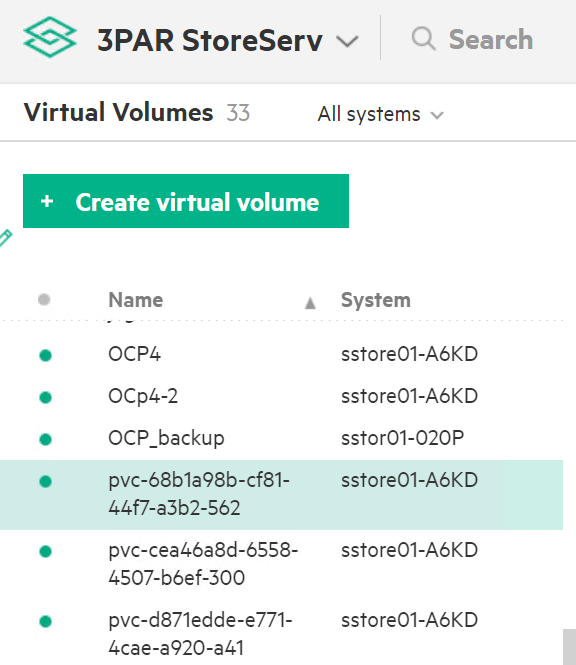
The PVC created for the sample application deployed (mongodb) can be verified on the 3PAR array by searching for the PVC id seen on the console or on the CLI.
Note
The PVC ID is not completely seen on 3PAR console as it gets truncated beyond 30 characters.
Steps to verify the PVC on 3PAR array:
- Login to the 3PAR SSMC URL at https://10.0.20.19:8443/#/login with appropriate credentials.
- Navigate from the drop- down menu option on 3PAR StoreServ -> Virtual volumes
- The volume for the PVC created can be seen under the list of virtual volume as shown.
# OpenShift Persistent Volume Expansion
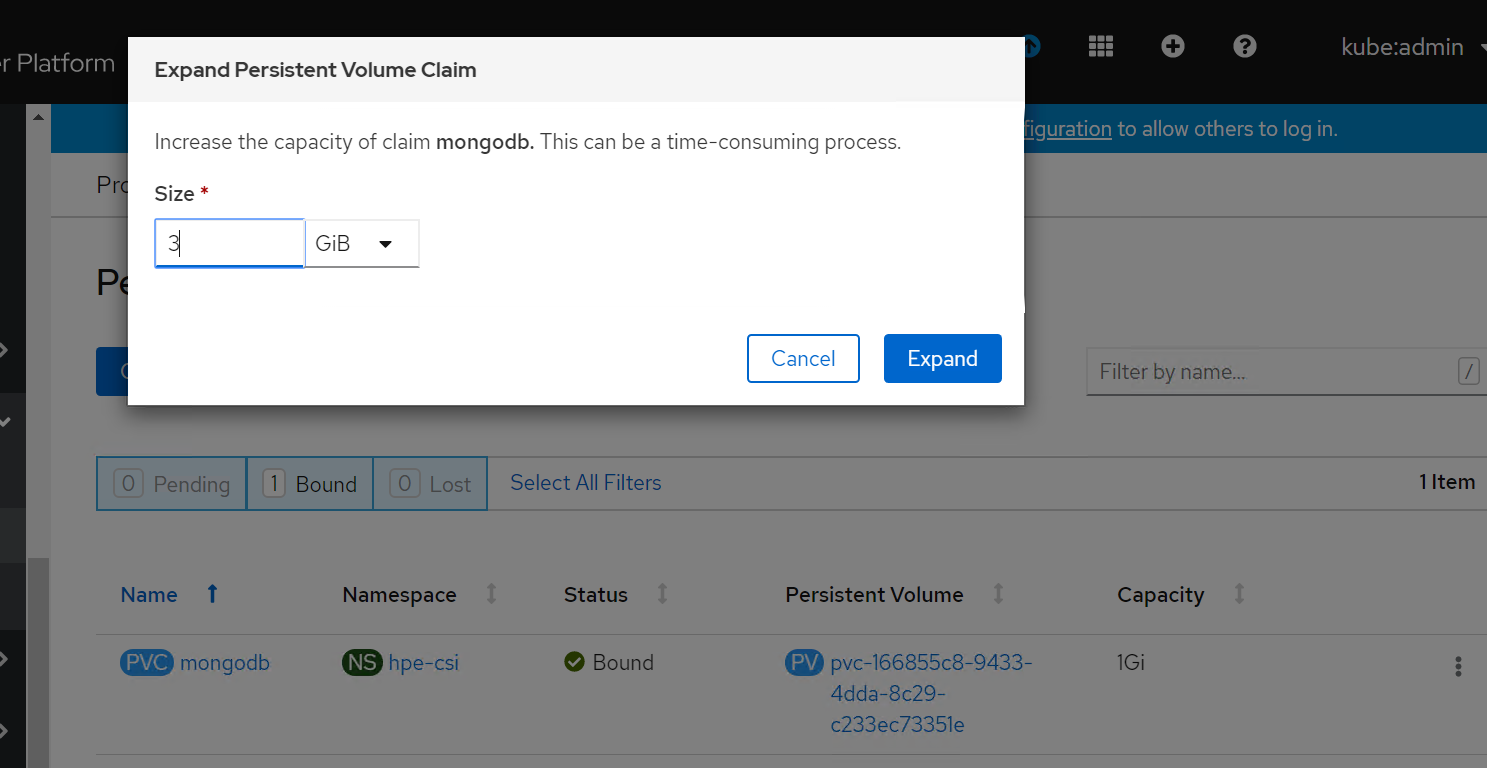
The volume of the sample application deployed can be expanded by specifying the volume size on the OpenShift console. The steps for PVC expansion is as follows.
- On the OpenShift web console navigate to Storage -> Persistent Volume Claims -> select a specific pod -> click on the dots seen towards the right side -> select ‘Expand PVC’
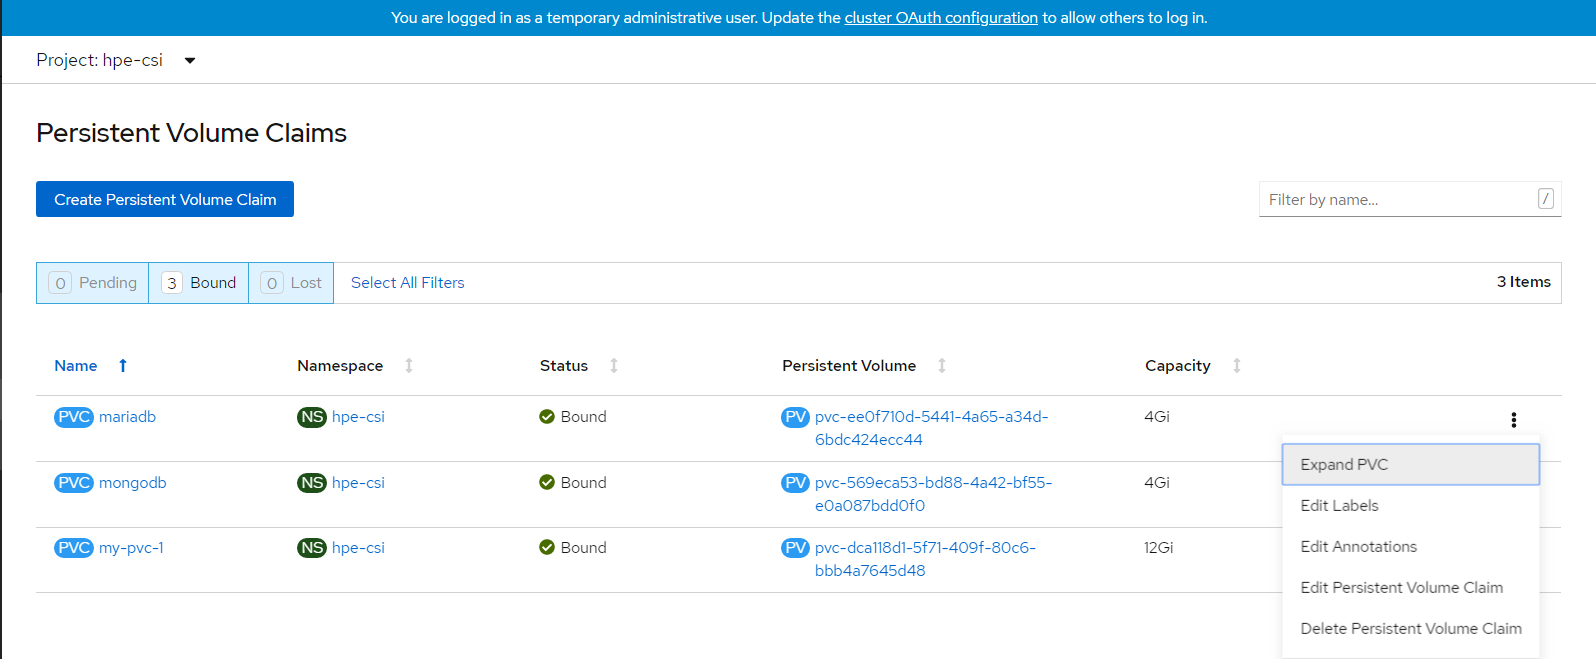
- Change the volume size from 1Gi to 3Gi and click Expand button as shown.
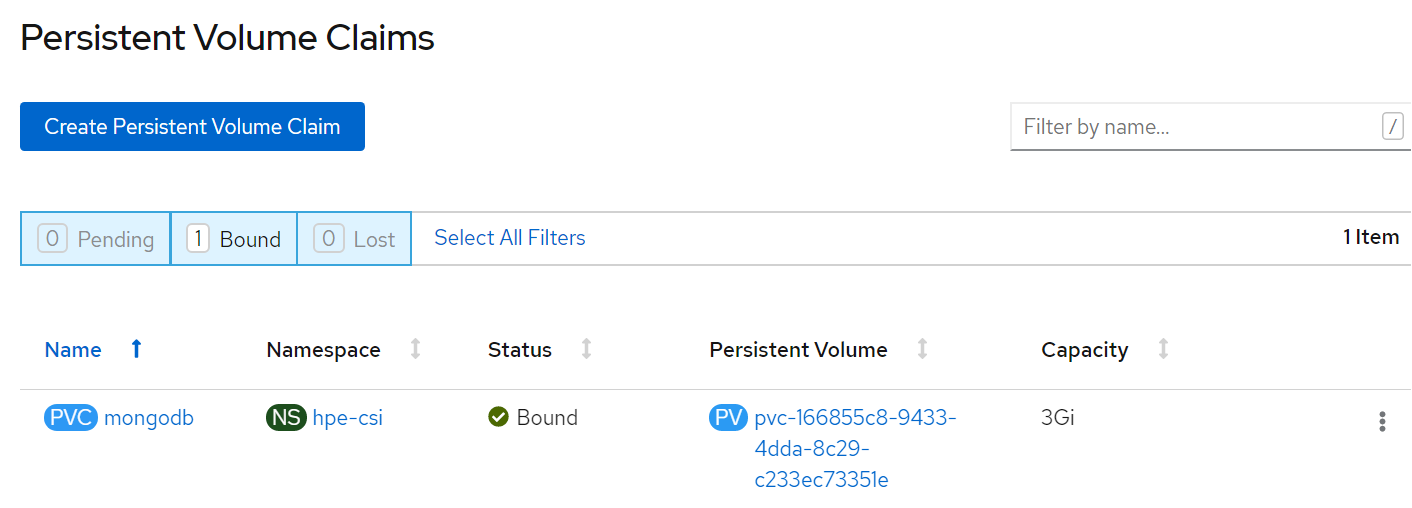
- Now, you can see PVC and PV has been resized to 3 GB.
# Deploying HPE 3PAR FC Storage on OCP 4
From the CSI driver section till verifying creation of CSI driver, there is no change in the procedure. Follow the steps as listed in the previous section.
# HPE CSI Driver storage installation
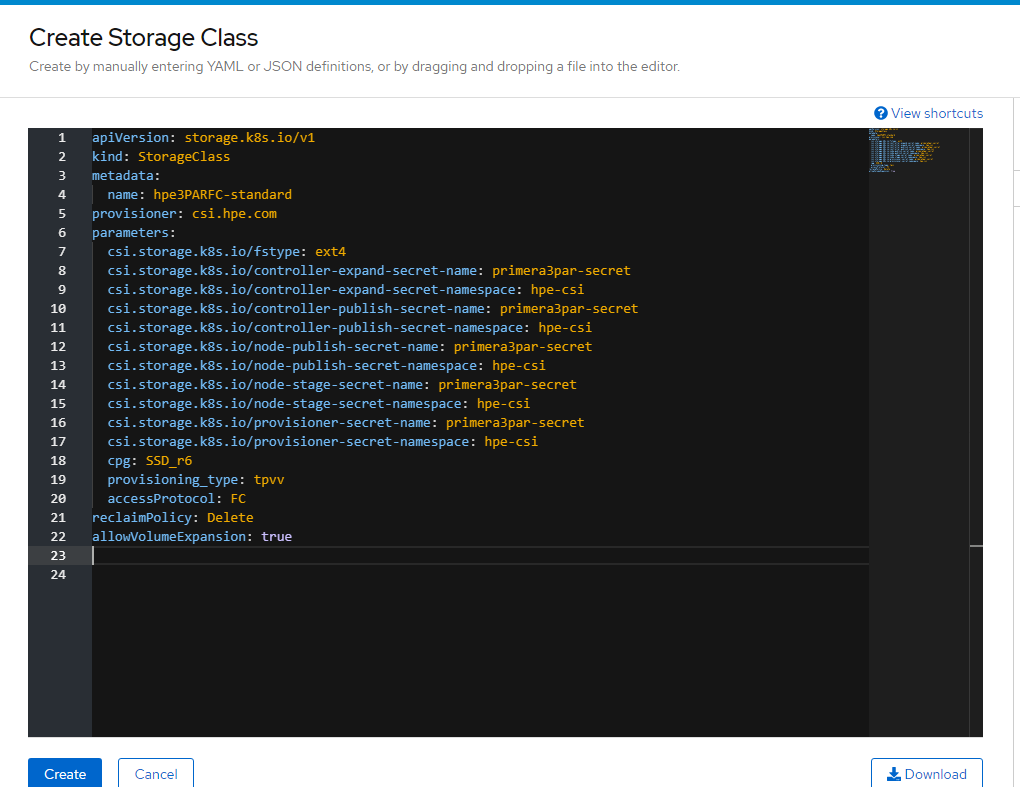
After installing HPE CSI Driver, Storage Class is created manually.
- From the OpenShift console navigate to Storage -> Storage Class
- Click Create Storage Class -> Click Edit yaml -> insert the parameters for SC creation -> Click Create.
- ‘hpe-standard’ storage class is created as shown.
Run the following command on the CLI to tag the storage class default- storage class.
# oc annotate storageclass hpe-standard storageclass.kubernetes.io/is-default-class=true
The create Storage Class yaml file parameters are as follows:
apiVersion: storage.k8s.io/v1
kind: StorageClass
metadata:
  name: hpe-standard
provisioner: csi.hpe.com
parameters:
  csi.storage.k8s.io/fstype: ext4
  csi.storage.k8s.io/controller-expand-secret-name: primera3par-secret
  csi.storage.k8s.io/controller-expand-secret-namespace: hpe-csi
  csi.storage.k8s.io/controller-publish-secret-name: primera3par-secret
  csi.storage.k8s.io/controller-publish-secret-namespace: hpe-csi
  csi.storage.k8s.io/node-publish-secret-name: primera3par-secret
  csi.storage.k8s.io/node-publish-secret-namespace: hpe-csi
  csi.storage.k8s.io/node-stage-secret-name: primera3par-secret
  csi.storage.k8s.io/node-stage-secret-namespace: hpe-csi
  csi.storage.k8s.io/provisioner-secret-name: primera3par-secret
  csi.storage.k8s.io/provisioner-secret-namespace: hpe-csi
  cpg: SSD_r6
  provisioning_type: tpvv
  accessProtocol: FC
reclaimPolicy: Delete
allowVolumeExpansion: true
# Sample application deployment
A sample application deployed on the existing Red Hat OpenShift Container Platform utilizes the volume from 3PAR array through HPE CSI Driver. A sample application such as mongodb or mariadb is deployed and scheduled on the worker nodes. Follow the steps to deploy a sample application. Steps:
- Run the following command to deploy a sample application.
# oc new-app mongodb-persistent
Output:

- Check the status of PV and PVC.


List of pods created on the cluster along with the one for sample application deployed is shown.

# OpenShift Persistent Volume Expansion
The volume of the sample application deployed can be expanded by specifying the volume size on the OpenShift console. The steps for PVC expansion is as follows.
- On the OpenShift web console navigate to Storage -> Persistent Volume Claims -> select a specific pod -> click on the dots seen towards the right side -> select ‘Expand PVC’
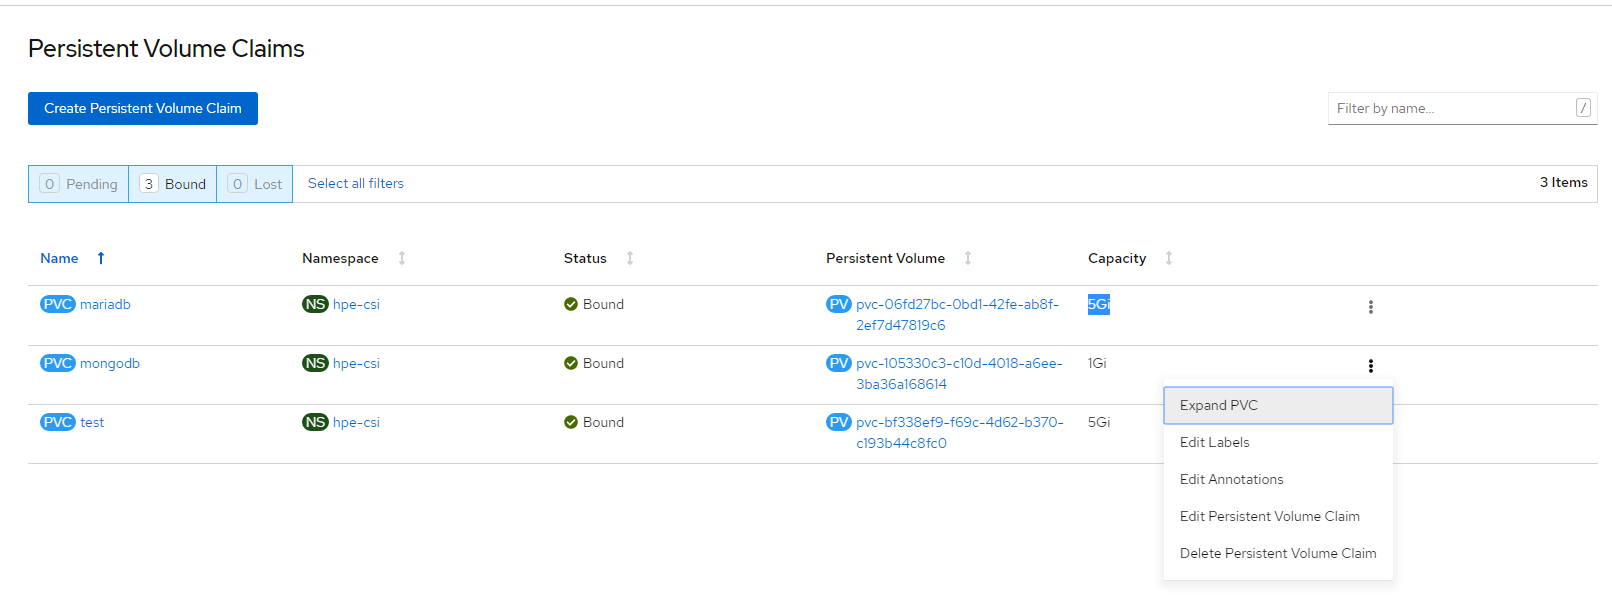
- Change the volume size from 1Gi to 5Gi and click Expand button as shown.
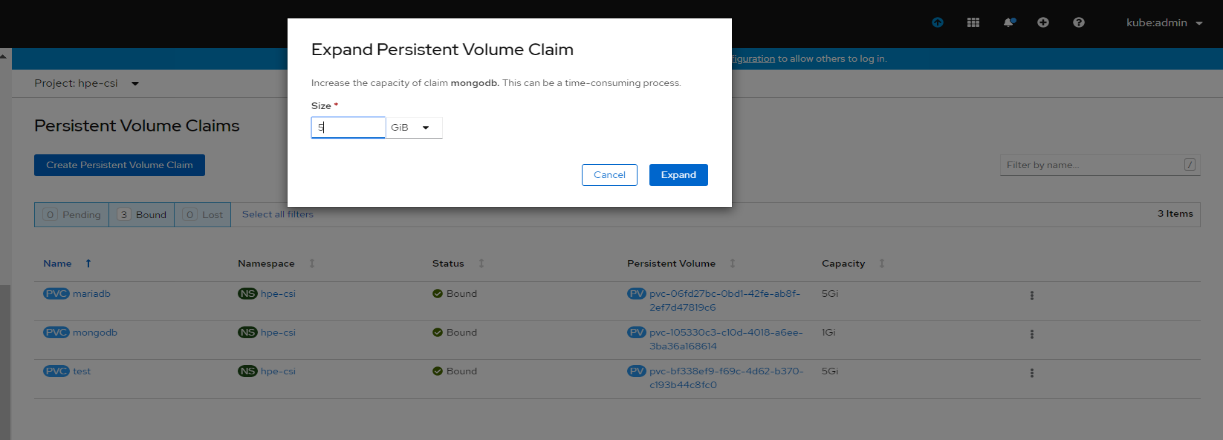
- Now, you can see PVC and PV has been resized to 5 GB.

# Deploying HPE CSI Driver Nimble Storage on OCP 4
The sections CSI driver architecture, SCC and HPE CSI driver storage installation are the same as listed.
# Configuring iSCSI interface on worker nodes
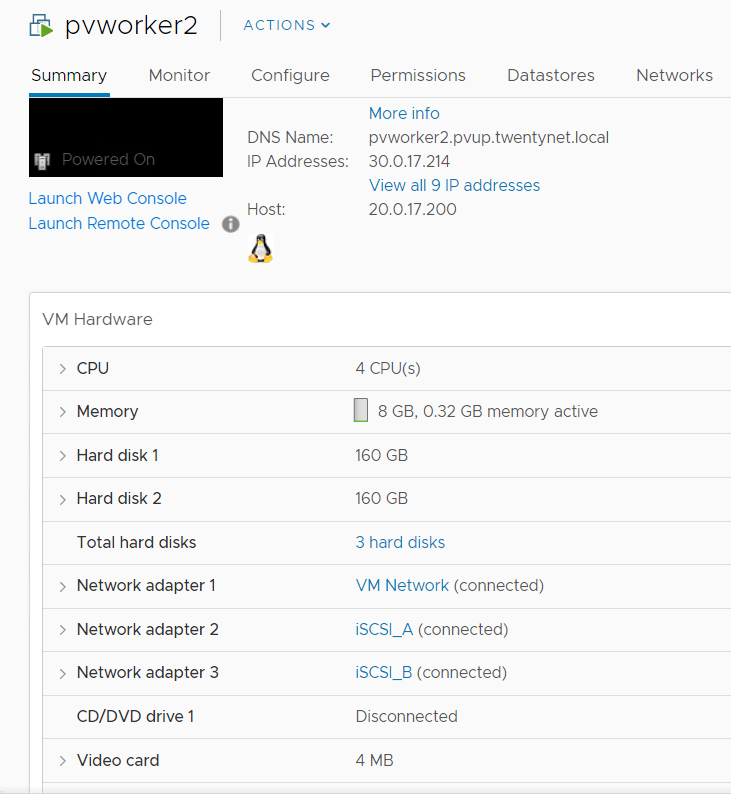
Additional iSCSI interface needs to be configured on all the worker nodes (physical and virtual) for establishing the connection between the OCP cluster and HPE Nimble array. iSCSI_A and iSCSI_B interfaces needs to be configured on the worker nodes for redundancy. Follow the steps as- listed to configure the additional interface.
- Create interface configuration files (ifcfg files) on each of the worker nodes by specifying the following parameters.
HWADDR=52:4D:1F:20:01:94 (MAC address of the iSCSI connector)
TYPE=Ethernet
BOOTPROTO=none
IPADDR=40.0.17.221
PREFIX=16
DNS1= 20.1.1.254
ONBOOT=yes
- Reboot the worker nodes after configuring the ifcfg files. The Nimble Discovery IP should be pingable.
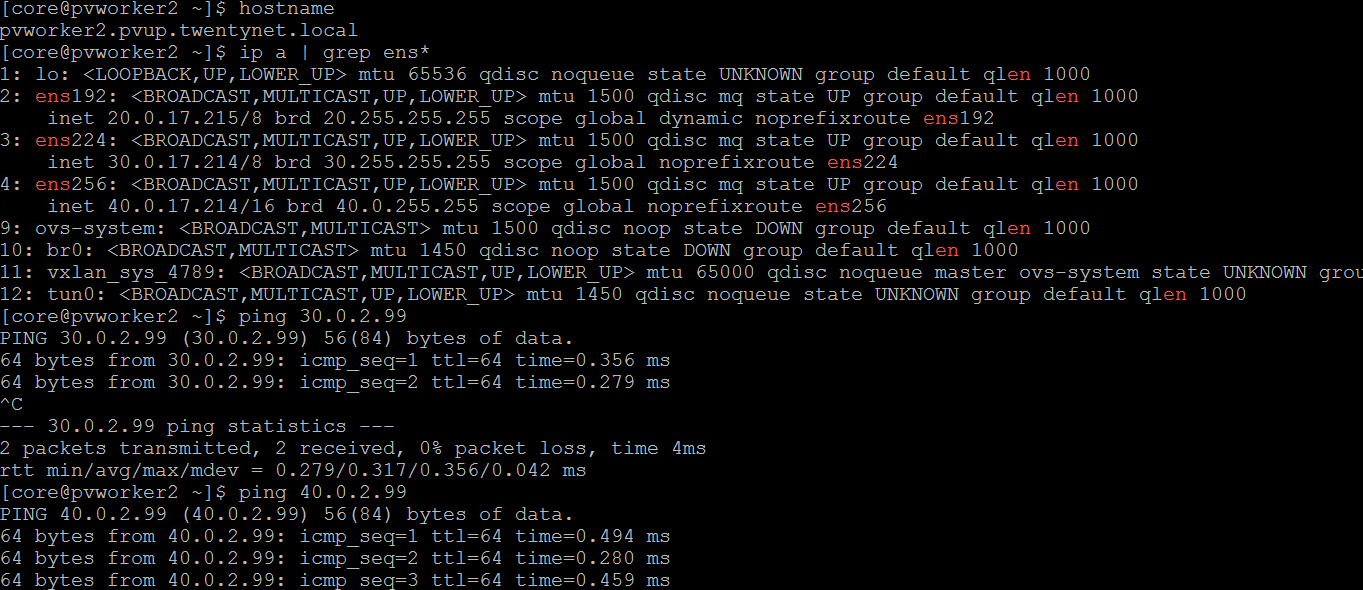
For virtual worker nodes, additional Network adapters are added and the corresponding network port groups are selected.
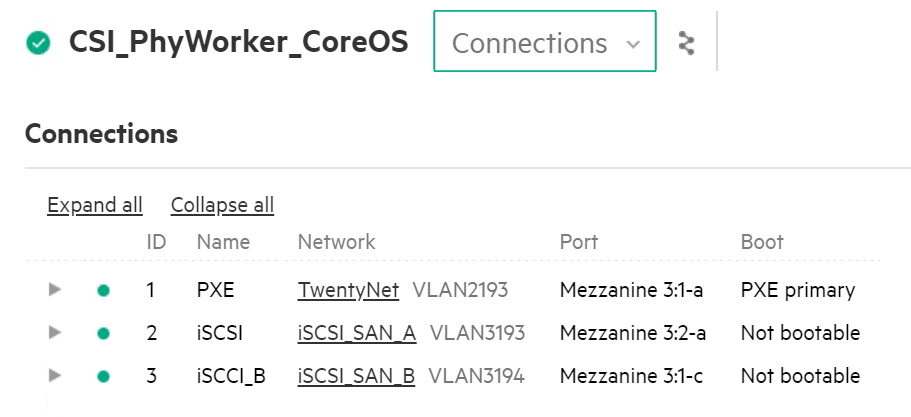
# iSCSI Interface for Physical worker nodes
For Physical worker nodes, the server profile is configured with iSCSI_A connection for storage interface and additional iSCSI_B connection is added to the server profile for redundancy.
# Sample application deployment
A sample application deployed on the existing RedHat OpenShift Container Platform utilizes the volume from Nimble array through HPE CSI Driver. A sample application such as mongodb or mariadb is deployed and scheduled on the worker nodes.
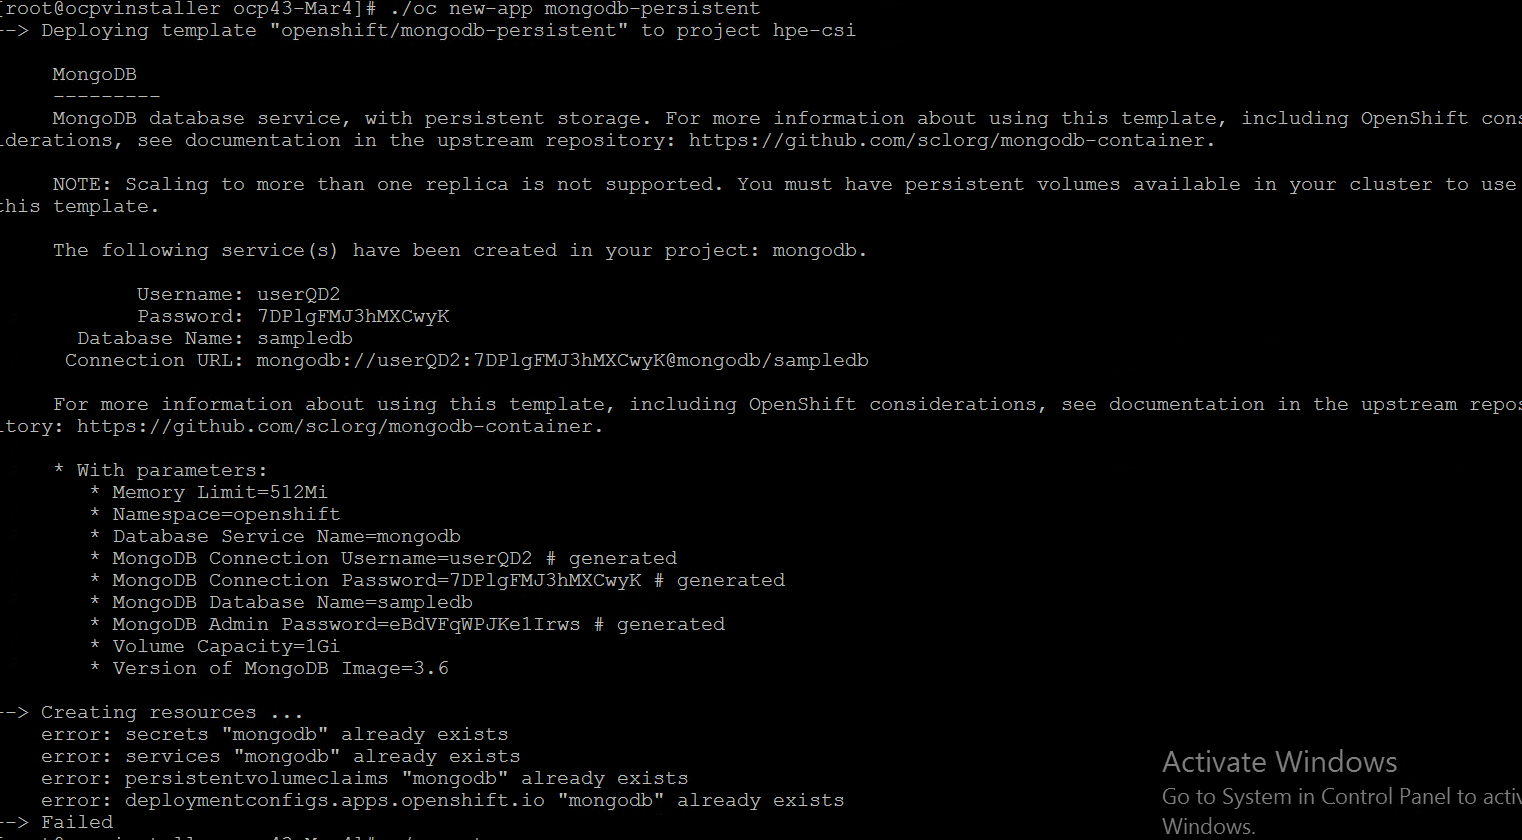
- Use the following command to deploy a sample application.
# oc new-app mongodb-persistent
The output is as follows.
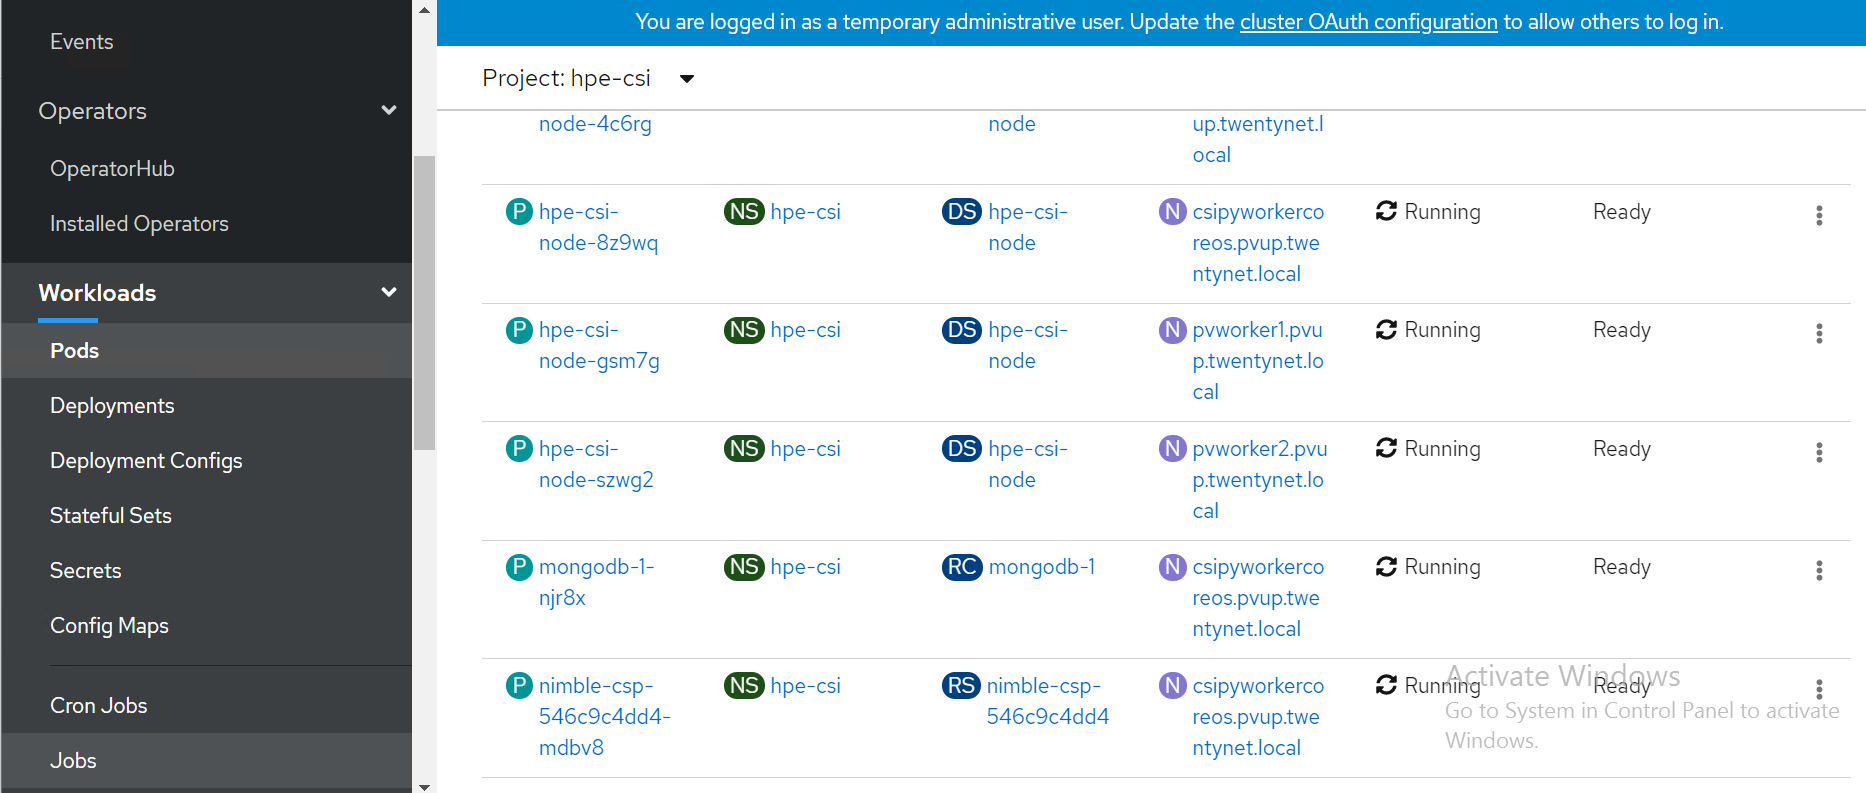
- Check the status of PVC and pod.
# OpenShift Persistent Volume Expansion
The volume of the sample application deployed can be expanded by specifying the volume size on the OpenShift console. The steps for PVC expansion is listed as follows.
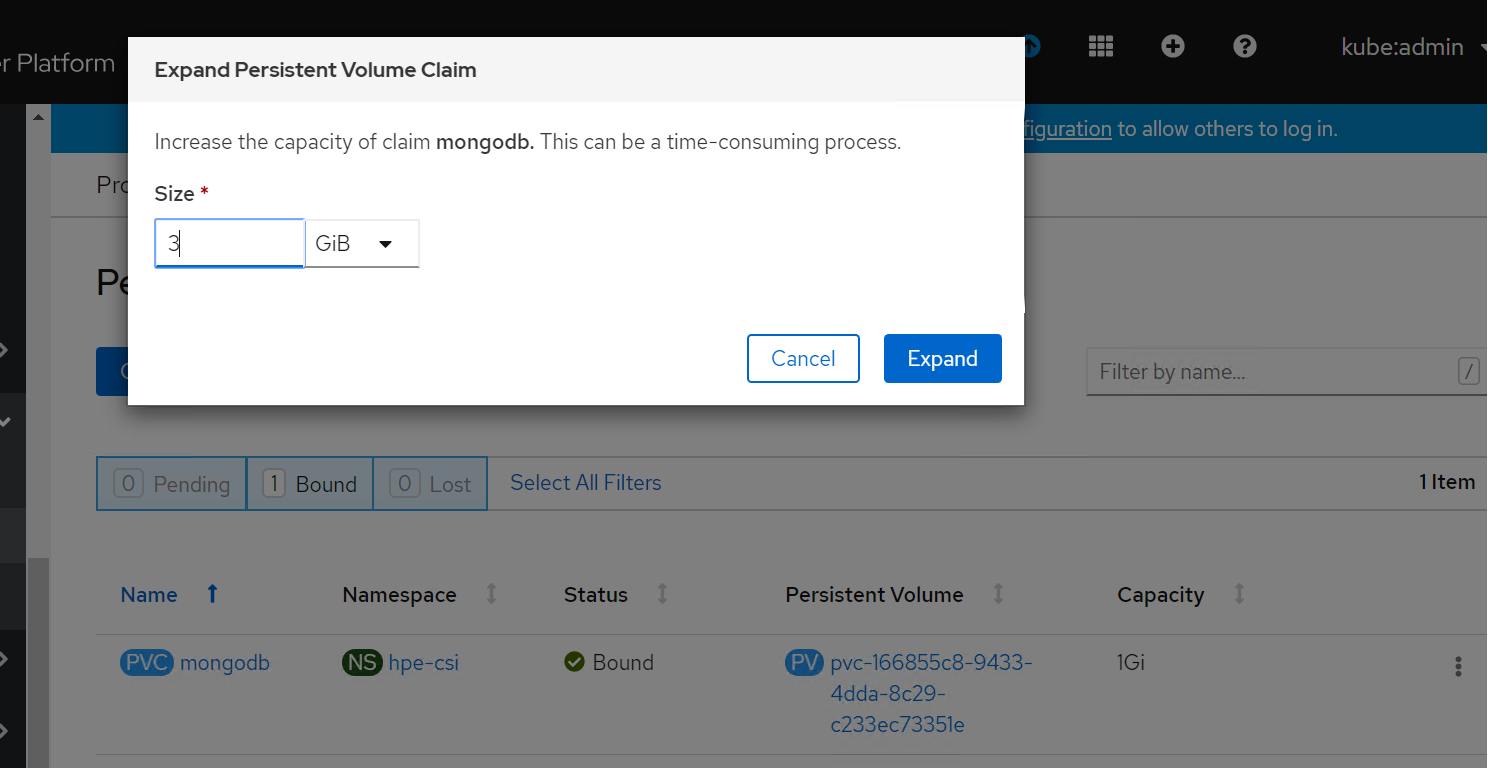
- On the OpenShift web console navigate to Storage -> Persistent Volume Claims -> select a specific pod -> click on the dots seen towards the right side -> select ‘Expand PVC’
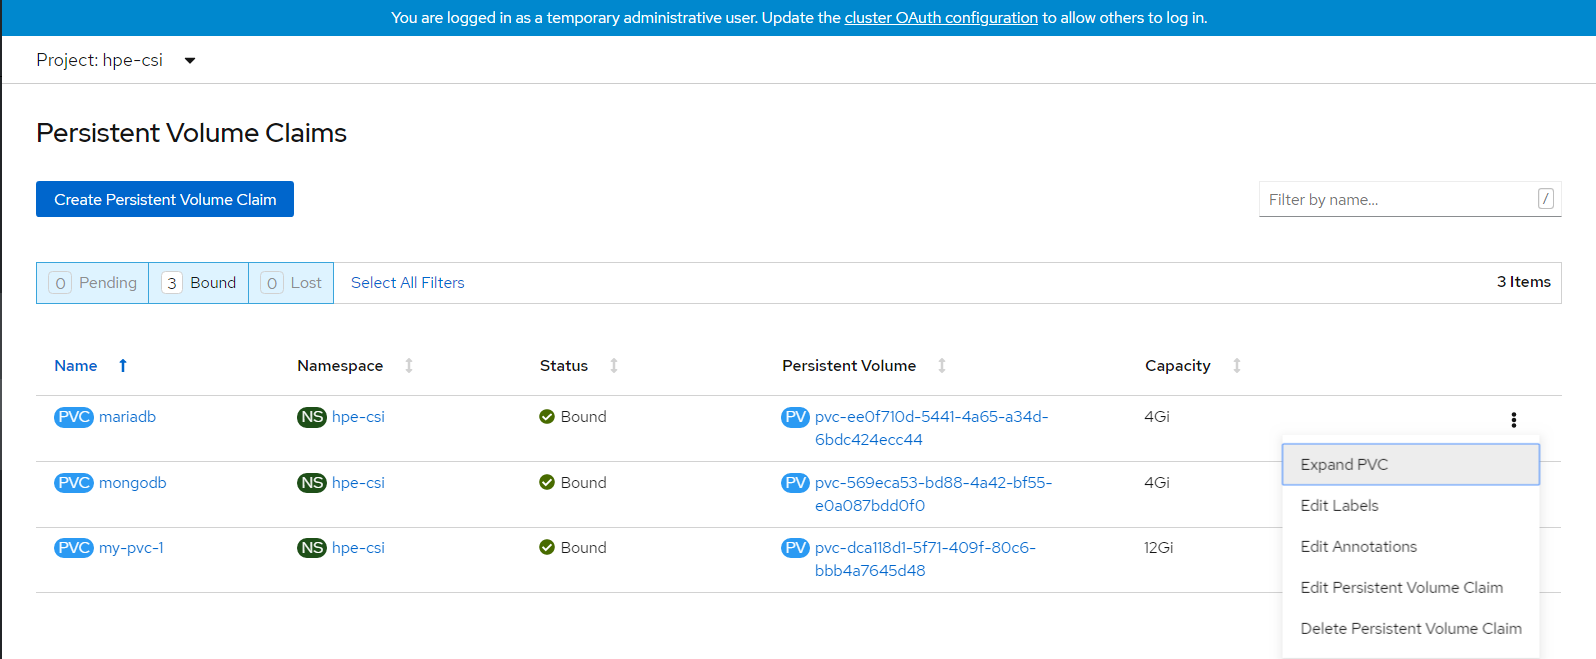
- Change the volume size from 1Gi to 3Gi and click Expand button.
- Now you can see PVC and PV has been resized to 3 GB.
