# Deploying a 3-Tier Application using KubeDirector
NOTE
Setting up the HPE Ezmeral Data Fabric is required for deploying the 3-Tier Application using KubeDirector.
# Introduction
Legacy application modernization enables organizations to create new business value from existing and aging applications. This is achieved by updating them with modern features and capabilities. Different strategies such as refactoring, re-architecting, rebuilding, and so on are adopted to modernize an application. Hewlett Packard Enterprise recommends starting with a “lift and shift” approach where the application is first containerized with as minimal changes as possible. After the application is containerized, it is easier and faster to upgrade to better infrastructure, refactor to microservices, and dynamically scale deployment. This approach enables regression testing of application before further modifications are done.
In a "lift and shift" scenario, the same versions of OS, libraries or components and applications are retained. Containers provide the application with an environment very similar to the existing environment. This paves the way to commence modernizing the application deployment while making minimal or no changes to the application itself. In this section, Hewlett Packard Enterprise describes the best practices for modernizing applications by containerizing the legacy application and deploying it on the HPE Ezmeral Container Platform using KubeDirector. In a "lift and shift" scenario, the same versions of OS, libraries or components and applications are retained. Containers provide the application with an environment very similar to the existing environment. This paves the way to commence modernizing the application deployment while making minimal or no changes to the application itself. In this section, Hewlett Packard Enterprise describes the best practices for modernizing applications by containerizing the legacy application and deploying it on the HPE Ezmeral Container Platform using KubeDirector.
The application used in this deployment is a 3-tier web-application called Methodize-Productivity. It is a MERN stack application (MongoDB, ExpressJS, ReactJS, NodeJS). This is a simple application for organising your thoughts and creating simple tasks. It has an elegant UI along with basic authentication features and as an addon it has a simple weather api for displaying the weather.
# Basic Application Architecture
The legacy application is broken down into 3 tiers: frontend, backend and the database as shown in Figure 69.
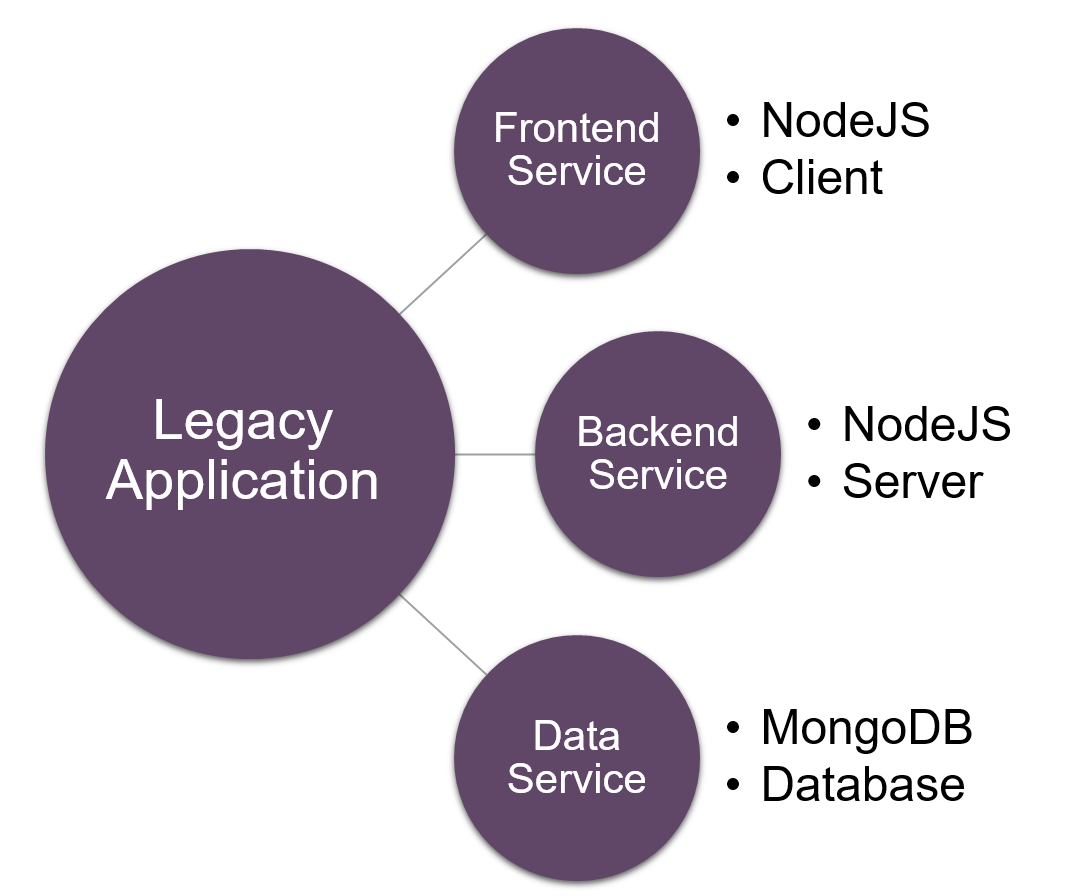
Figure 68: Basic Architecture
# High Level Process Flow
The steps to deploy the Methodize-Productivity application can be broken down into 5 main phases as shown in Figure 69.
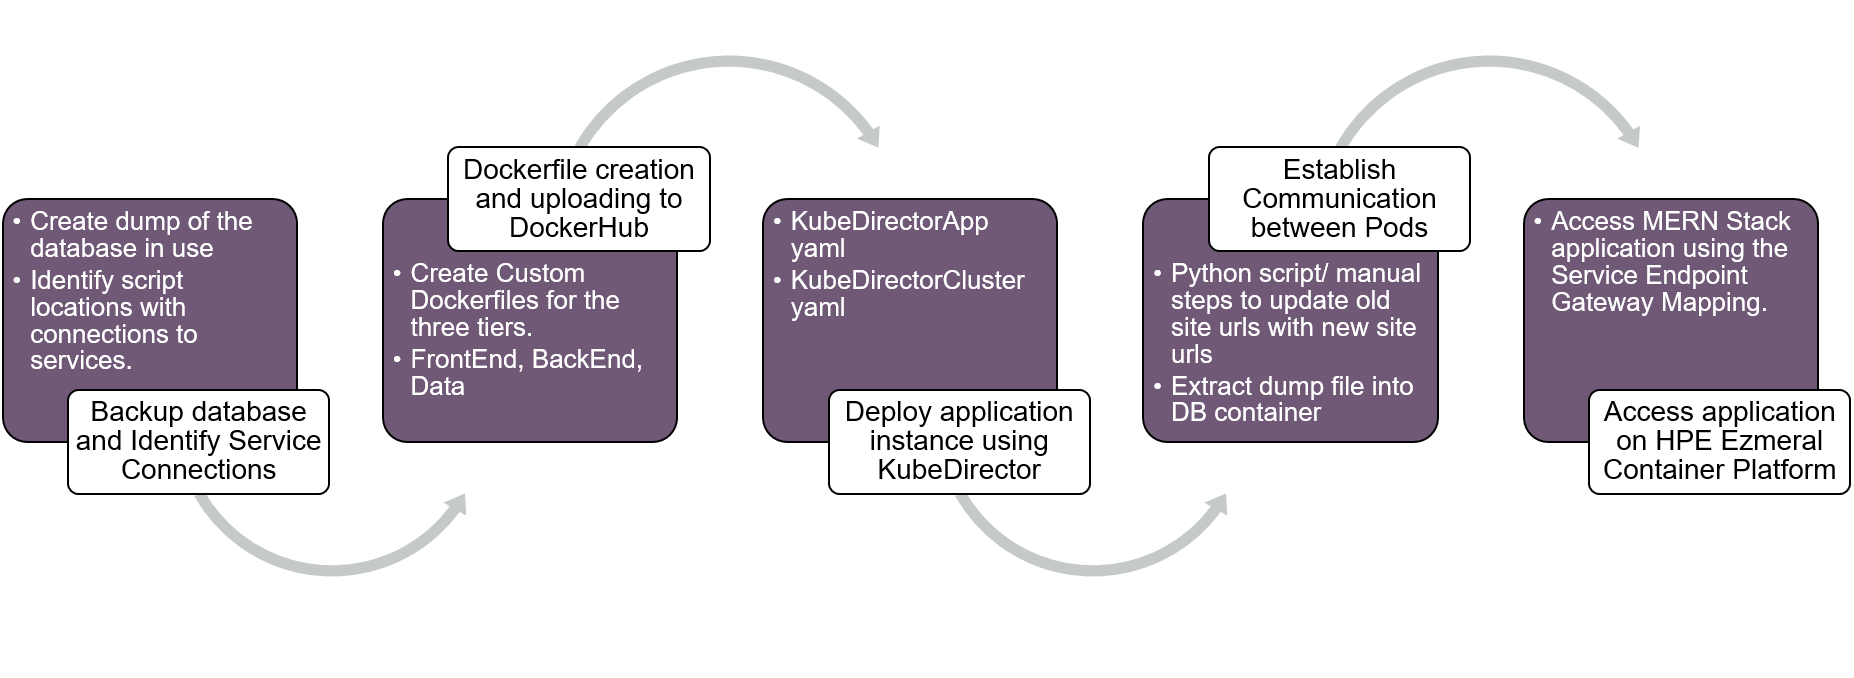
Figure 69: High Level Process Flow to Deploy application
NOTE
In this example we observe the following existing service connections and details:
The frontend is running at http://localhost:3000
The backend is running at http://localhost:8081
The database is running at http://localhost:27017
The frontend establishes connection with the backend via the "proxy" key in the "package.json" file.
The backend establishes connection with the database via the "MONGO_URL" key in the config/dev.js file.
NOTE
In the following steps the communication establishment between pods is done manually without the use of any script.
The end goal is to "lift and shift" the Methodize-Productivity application that is running on the Virtual Machine environment on to the containerized environment as shown below in Figure 70.
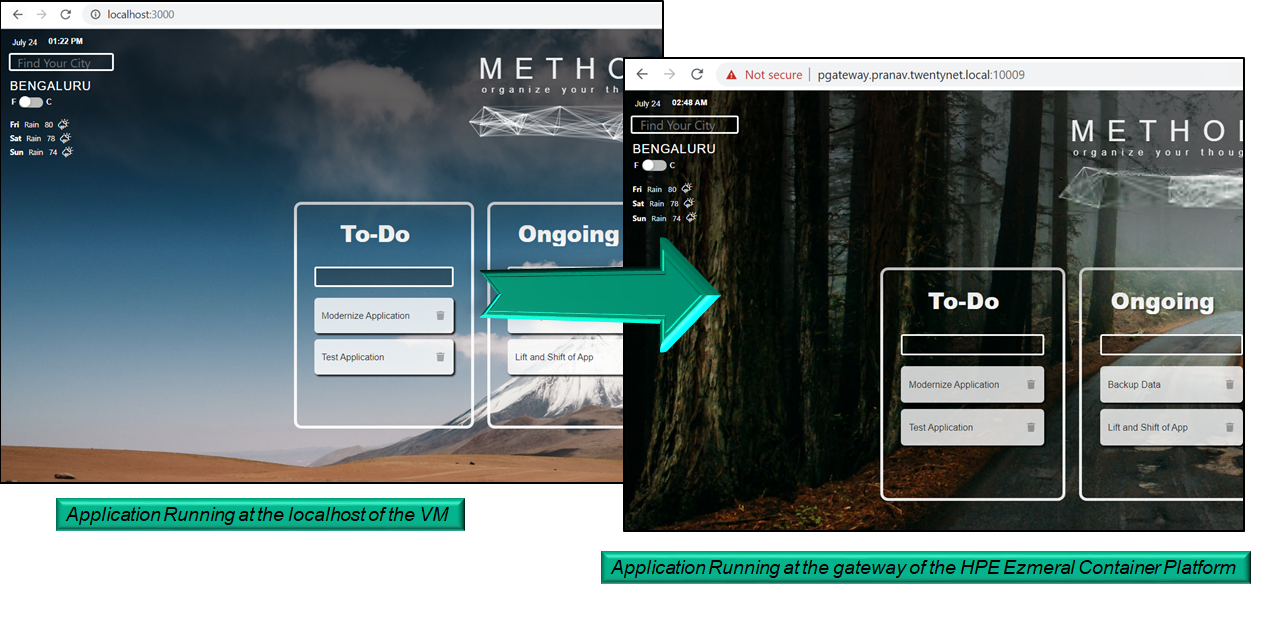
Figure 70: Lift and Shift of Methodize-Productivity Application
# Steps to Deploy the Methodize-Productivity Application
NOTE
- The following instructions are executed inside the web-terminal of the tenant.
- If the commands need to be run on the master/controller node, append "-n <tenant_name>" to all the commands so that it references the required tenant.
- Eg. kubectl create -f methodize-productivity.yaml -n kubedirector (where kubedirector is the name of the tenant)
NOTE
- Steps 1-6 explains the process to create the Dockerfiles for the application and the uploading of the images to DockerHub. These steps explain how the user can create images for their application.
- Since the images are available in DockerHub, the user can skip to Step 7 to start deploying the Methodize-Productivity Application using KubeDirector.
Create a Project Folder "Methodize-Productivity" and create 3 sub-directories Frontend , Backend and Data inside it.
Backup the existing data by creating a dump file.
- Execute the command "mongodump --db methodize" (where methodize is the name of the database in use).
- This creates a dump folder at the directory the command was executed. It has a database folder "methodize" inside it.
- Copy the methodize folder into the Data folder of the "Methodize-Productivity" project.
Copy the server related files (models, handlers, middleware, package.json etc) into the Backend folder of the "Methodize-Productivity" project.
Copy the user interface client files (components, actions, package.json etc) into the Frontend folder of the "Methodize-Productivity" project.
NOTE
The above steps set up the project file structure for easy creation of Dockerfiles.
Create Dockerfiles for the 3 tiers (Frontend, Backend and Database)
Create the Frontend Dockerfile inside the Frontend folder: Start from node:10 base image. Copy the package.json file and install all the required modules and dependencies and then copy the remaining project files into the working directory and expose port 3000. Use the command “npm start” to start the frontend User Interface:
FROM node:10
WORKDIR /usr/src/app

RUN apt-get update && apt-get install vim -y && apt-get install curl -y

COPY package.json ./

RUN npm install

COPY . .

EXPOSE 3000

CMD ["npm", "start"]
Create the Backend Dockerfile inside the Backend folder: Copy the package.json file and install all the required modules and dependencies and then copy the remaining project files into the working directory and expose port 8081. Use the command “nodemon index” to start the backend server:
FROM node:10
WORKDIR /usr/src/app

RUN apt-get update && apt-get install vim -y && apt-get install curl -y

COPY package.json ./

RUN npm install

RUN npm install -g nodemon

COPY . .

EXPOSE 8081

CMD ["nodemon", "index"]
Create the Database Dockerfile inside the Data folder. Copy the data dump file into the image.
FROM mongo:4.0

COPY . .
RUN apt-get update && apt-get install curl –y
Build the dockerfiles using the "docker build" command and tag them appropriately and push them into DockerHub for future access from the HPE Ezmeral Container Platform. For this example 3 images have been created and pushed as shown in Figure 71.
- pranavvutkur/frontend-methodize
- pranavvutkur/backend-methodize
- pranavvutkur/data-methodize
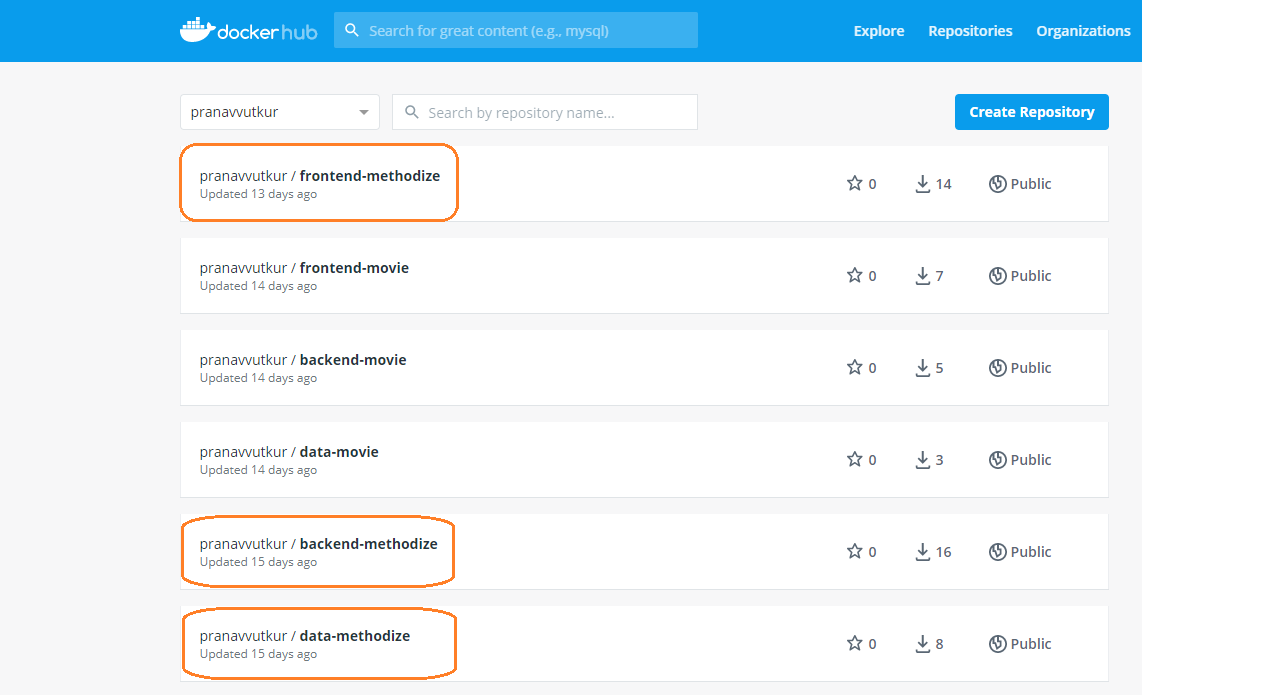
Figure 71: Application images in DockerHub
Login to the HPE Ezmeral Container Platform and the required tenant. Create the KubeDirectorApp yaml file as shown.
vi methodize-productivity.yamlFill in the following details:
apiVersion: kubedirector.hpe.com/v1beta1
kind: KubeDirectorApp
metadata:
  name: methodize-productivity
spec:
  label:
    name: Methodize-Productivity
    description: A productivity task manager application using the MERN Stack
  distroID: hpecp/methodize
  version: '1.1'
  configSchemaVersion: 7
  defaultConfigPackage: null
  services:
  - id: frontend
    label:
      name: Frontend Service
    endpoint:
      port: 3000
      urlScheme: http
      isDashboard: true
  - id: backend
    label:
      name: Backend Service
    endpoint:
      port: 8081
      isDashboard: false
  - id: mongodb
    label:
      name: MongoDB Service
    endpoint:
      port: 27017
      isDashboard: false
  roles:
  - id: frontend
    cardinality: '1'
    imageRepoTag: docker.io/pranavvutkur/frontend-methodize:latest
    persistDirs:
    - "/usr/src/app"
  - id: backend
    cardinality: '1'
    imageRepoTag: docker.io/pranavvutkur/backend-methodize:latest
    persistDirs:
    - "/usr/src/app"
  - id: mongodb
    cardinality: '1'
    imageRepoTag: docker.io/pranavvutkur/data-methodize:latest
    persistDirs:
    - "/data/db"
  config:
    selectedRoles:
    - frontend
    - backend
    - mongodb
    roleServices:
    - roleID: frontend
      serviceIDs:
      - frontend
    - roleID: backend
      serviceIDs:
      - backend
    - roleID: mongodb
      serviceIDs:
      - mongodb
  systemdRequired: true
NOTE
This file specifies the name of the application as Methodize-Productivity (spec.label.name). Three services are created. First service is for the frontend exposing port 3000 and second service is for the backend exposing port 8081 and finally the last service is for the mongodb database exposing port 27017.
The three roles created are:
- frontend role which specifies the image used (docker.io/pranavvutkur/frontend-methodize:latest) and the persistDirs directory (/usr/src/app).
- backend role specifies the image used (docker.io/pranavvutkur/backend-methodize:latest) and the persistDirs directory (/usr/src/app)
- mongodb role specifies the image used (docker.io/pranavvutkur/data-methodize:latest) and the persistDirs directory (/data/db)
Execute the following command to create the KubeDirectorApp. This creates an application tile in the Applications window of the tenant in the HPE Ezmeral Container Platform GUI as shown in Figure 72.
kubectl create -f methodize-productivity.yaml
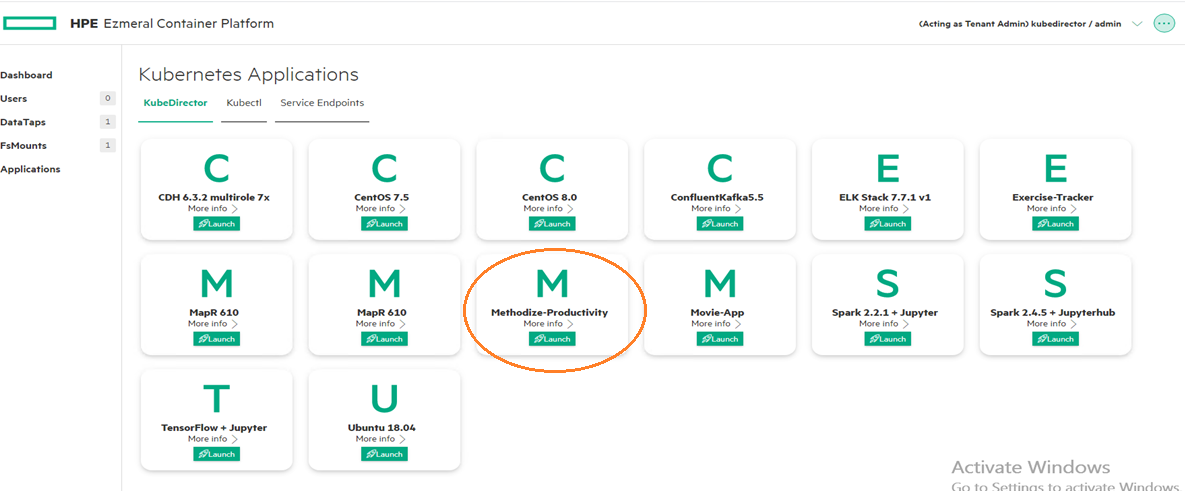
Figure 72: Methodize-Productivity in the Applications Window of the Tenant
- Click on Launch for the created application. This opens up a KubeDirectorCluster file as shown in Figure 73. Assign custom values for the storage, CPU, memory, and the number of replicas as required and include the environment variables if any for each of the roles and click Submit.
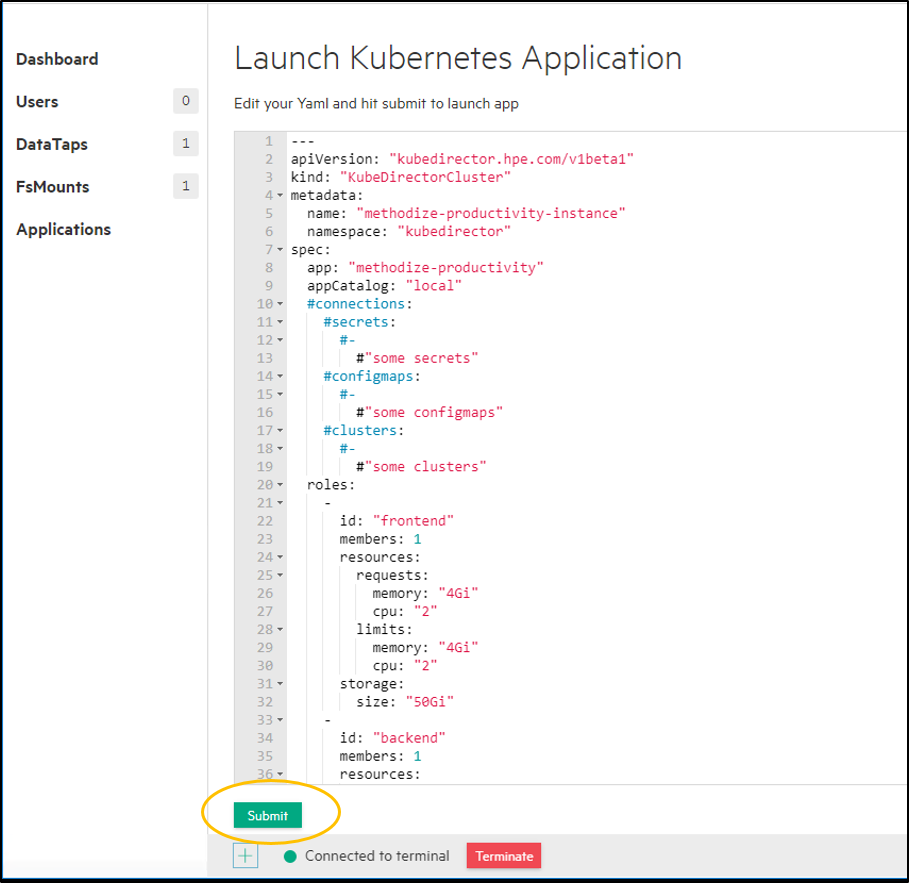
Figure 73: KubeDirectorCluster file of the application
- A KubeDirector application instance gets created for the Methodize-Productivity application along with the service endpoints as shown in Figure 74 and Figure 75 respectively.

Figure 74: Methodize-Productivity Instance
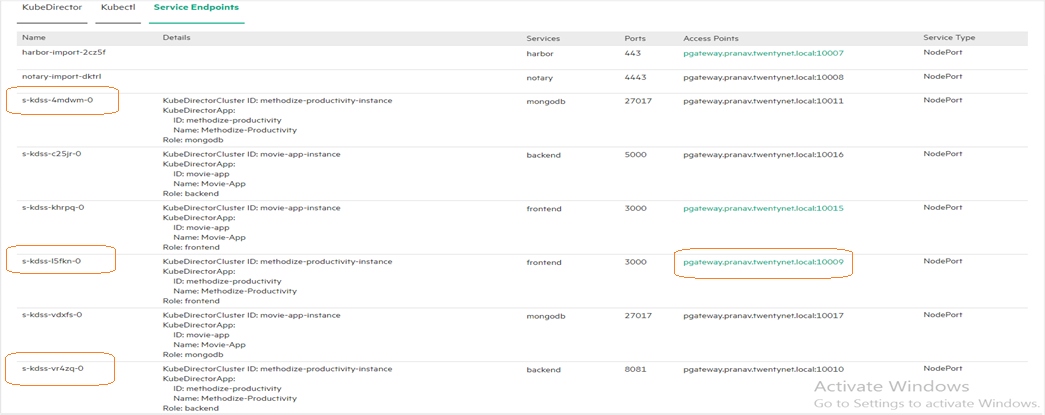
Figure 75: Service Endpoints for the application
NOTE
The services related to the application in use are highlighted in Figure 76. The frontend access point is also highlighted which is required to access the frontend.
- Identify the pods for the three tiers and modify the service connections within them and restore the database:
Exec into the database pod (kdss-4mdwm-0)
kubectl exec -it kdss-4mdwm-0 -- /bin/bashand restore the dump file using the following command.
mongorestore --db methodize --drop methodize # methodize is the name of the data dump fileExec into the backend pod (kdss-vr4zq-0)
kubectl exec -it kdss-vr4zq-0 -- /bin/bashand navigate into the “config” folder and open the “dev.js” file
vi dev.js # file which has the URL to connect to the databaseInside the file replace the “MONGO_URL” with the new service endpoint gateway mapping of the mongoDB pod.
Exec into the frontend pod (kdss-l5fkn-0)
kubectl exec -it kdss-l5fkn-0 -- /bin/bashand open the “package.json” file
vi package.json # file which has the server(backend) URLInside the file replace the “proxy” key with the service end point gateway mapping of the backend pod.
NOTE
The pods can be identified from the Service-Endpoint tab which shows all the services:
- The service names start with the prefix "s-kdss"
- The pods are the same name without the "s-" prefix
- Eg. the service "s-kdss-4mdwm-0" belongs to the mongodb service, and the corresponding pod name would then be "kdss-4mdwm-0"
NOTE
The mongo restore command restores the data dump file that we copied into the mongo image during the dockerfile creation.
The "MONGO_URL" value "mongodb://127.0.0.1:27017/methodize" is replaced with "mongodb://pgateway.pranav.twentynet.local:10011/methodize" in this example.
The "proxy" value "http://localhost:8081" is replaced with "http://pgateway.pranav.twentynet.local:10010" in this example.
Delete the Frontend pod so the new pod will spin up with the modified proxy changes.
kubectl delete pod kdss-l5fkn-0Now the application has been setup. The service endpoint gateway mapping of the frontend is used to access the Methodize-Productivity user interface. Click the frontend access point as shown in Figure 76 to open the Methodize-Productivity home screen as shown in Figure 77.
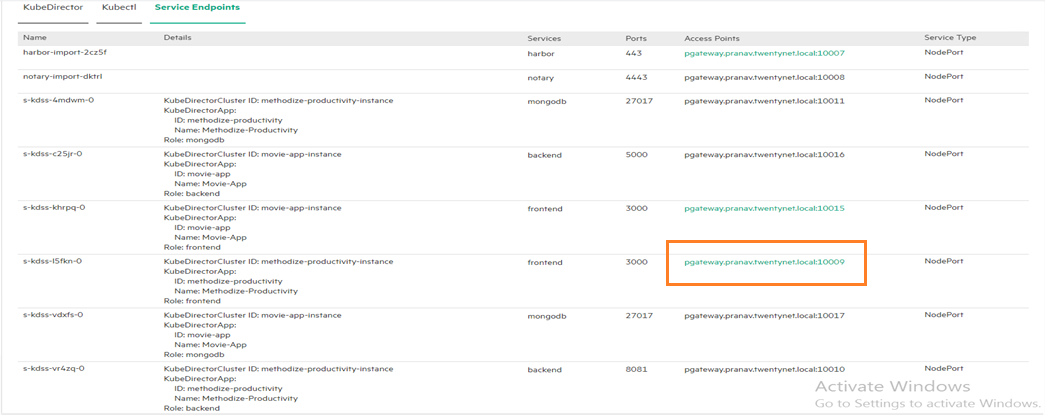
Figure 76: Access Point for the frontend UI
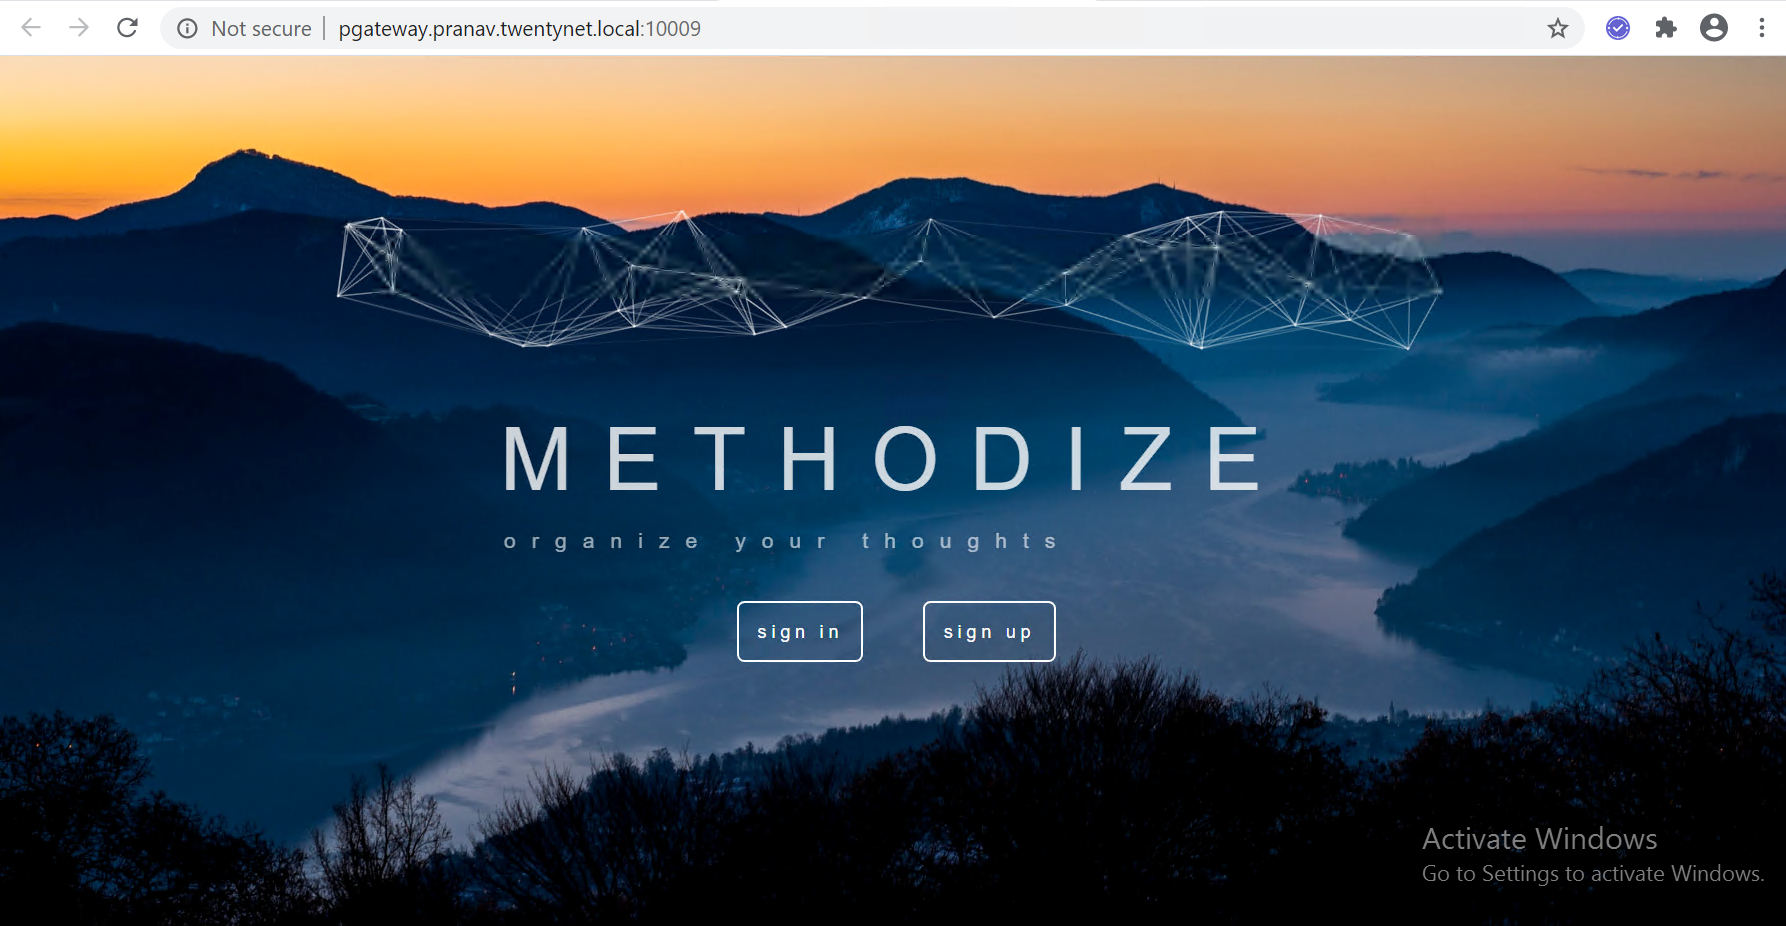
Figure 77: Methodize-Productivity home screen
- Click on “sign-in” and use the same credentials that were in use when the application was running on the virtual machine environment ( email: test@gmail.com, password: test123 ). Figure 78 shows the sign up page filled in with the existing user credentials.
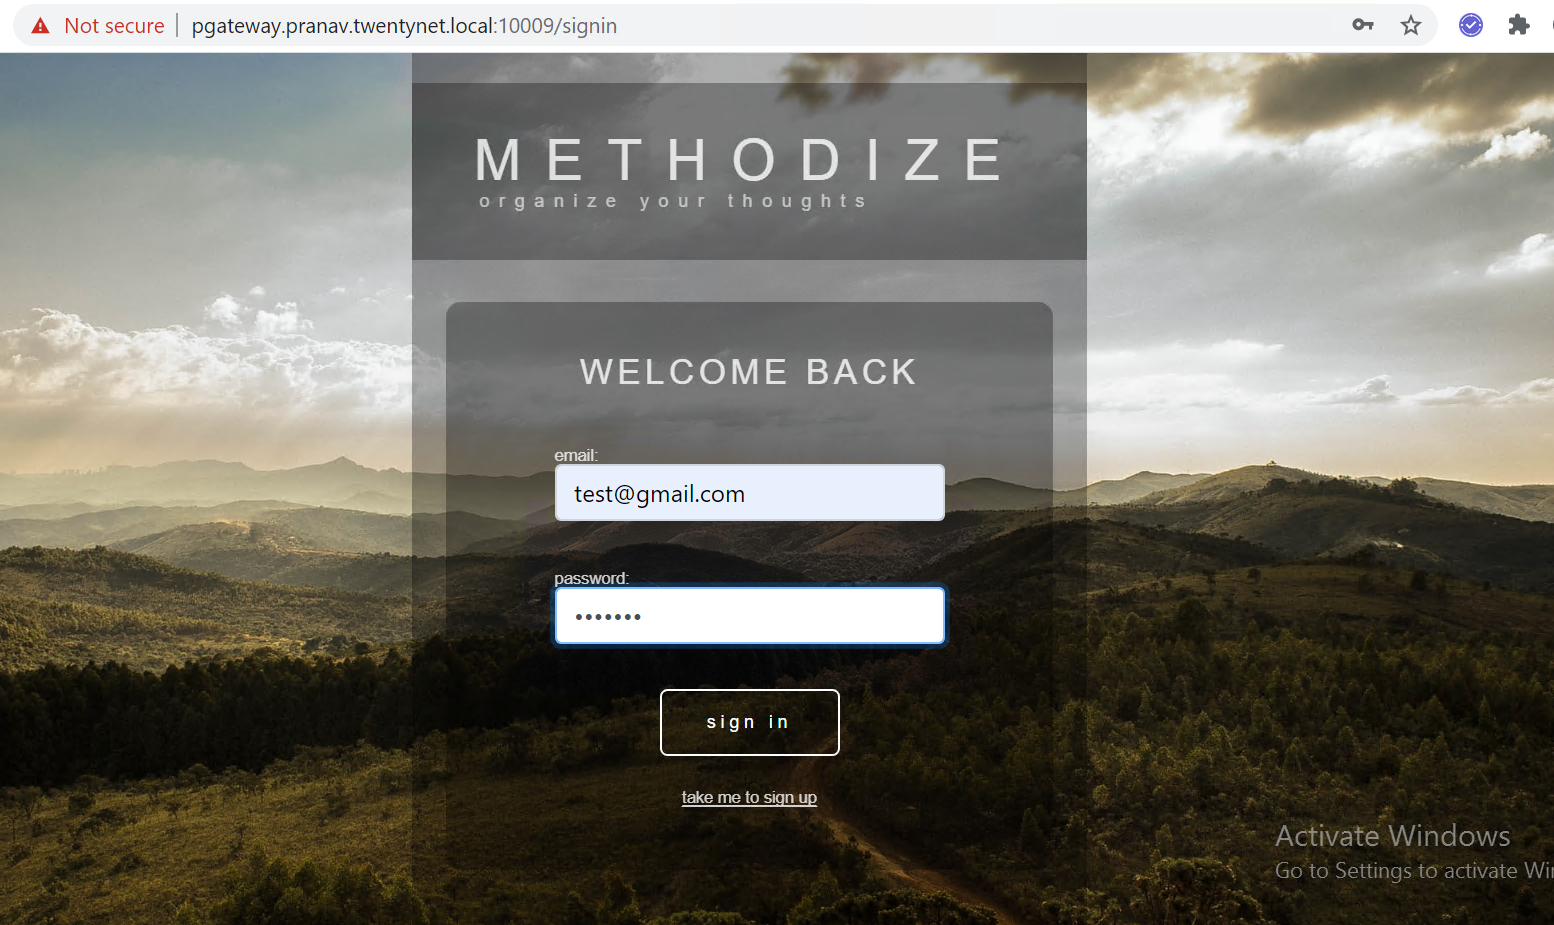
Figure 78: Methodize-Productivity sign-in page with existing user credentials
- Once the user has signed in they can view the To-Do task manager with all the existing created tasks as shown in Figure 79. The user can go ahead and create new tasks and users if required and continue using the application as before. (The application has now been containerised)
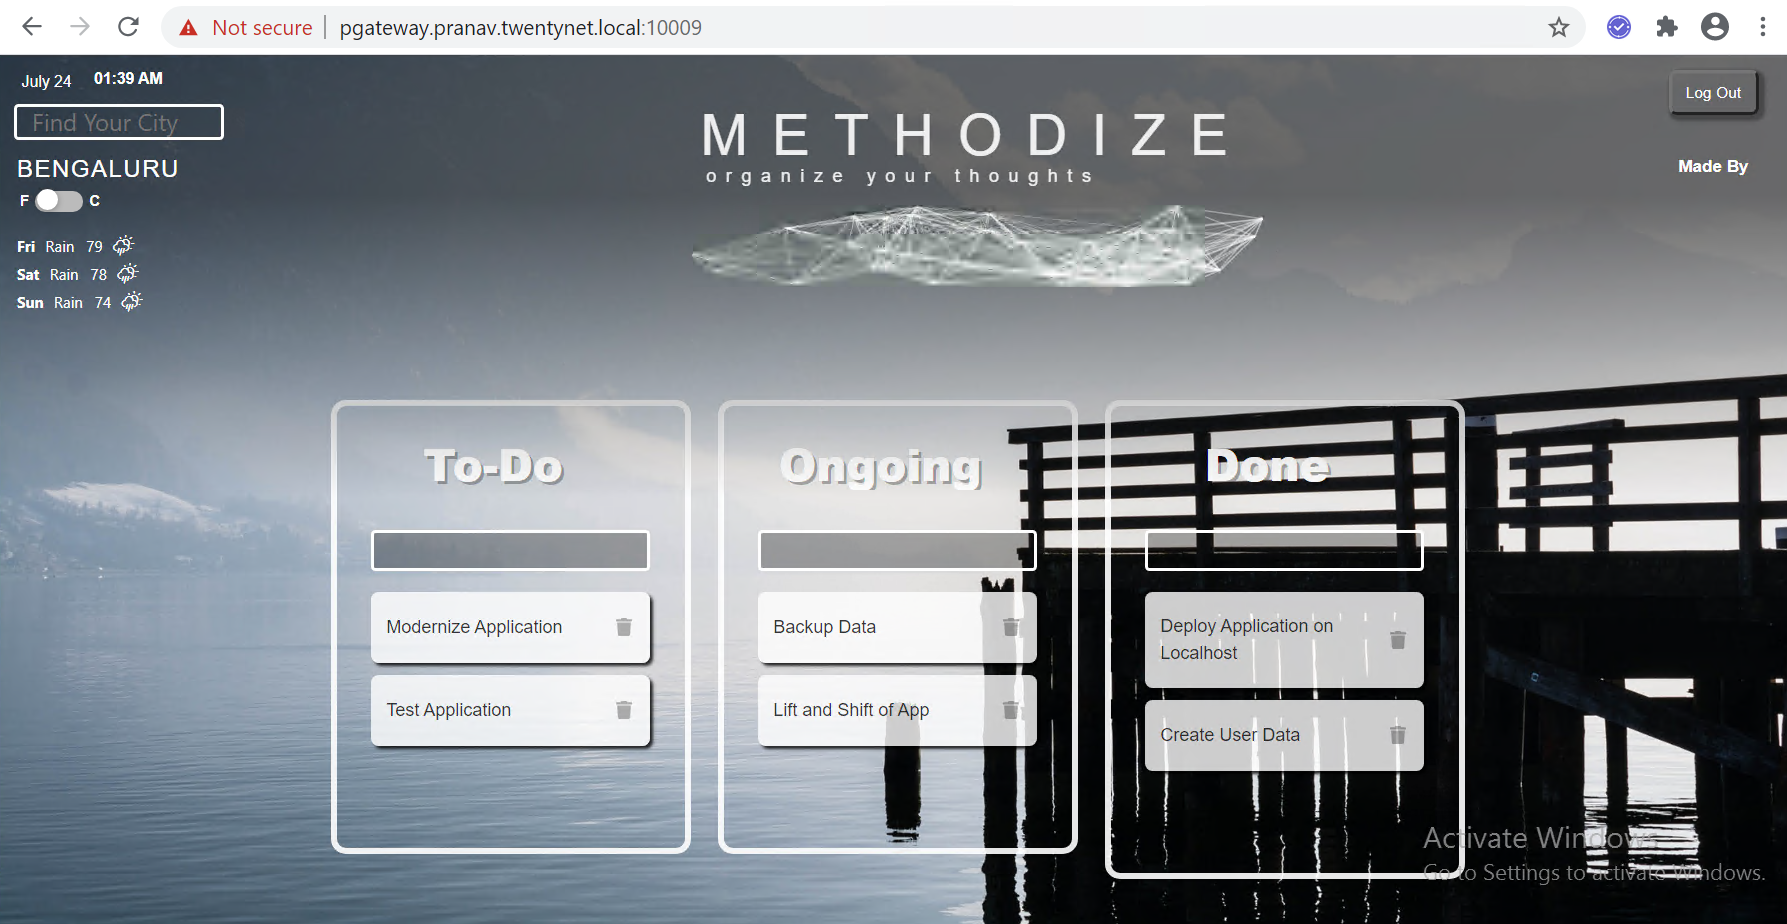
Figure 79: Methodize-Productivity To-Do task manager page with existing tasks
- Execute the following commands to see the pods, its Persistent Volume (PV) and Persistent Volume Claim (PVC) that are created. Figure 80 represents the pods, Figure 81 represents the PV, and Figure 82 represents the PVC of the Methodize-Productivity application.
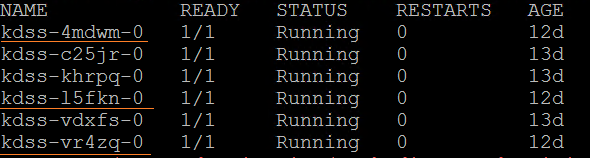
Figure 80: Pods for the Methodize-Productivity
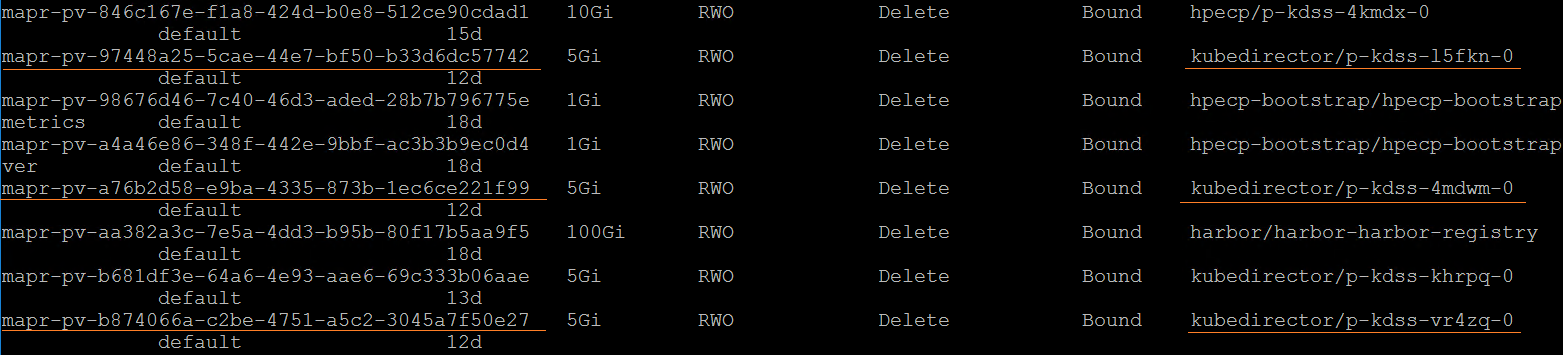
Figure 81: Persistent volume for Methodize-Productivty

Figure 82: Persistent Volume Claim for Methodize-Productivity
Note
- The above steps work in general for MERN stack applications.
- Based on the application in use ,style of development and file structure , the steps can vary slightly, but the general idea and high level steps behind containerising the application remain the same.