# Red Hat OpenShift Container Platform installation in the restricted network environment
# Solution components overview
Download server
Centos Yum repository server
OpenShift Mirror registry
Installer machine
iPXE server
Load balancer
OpenShift cluster nodes
Bootstrap node
Master nodes
Worker nodes
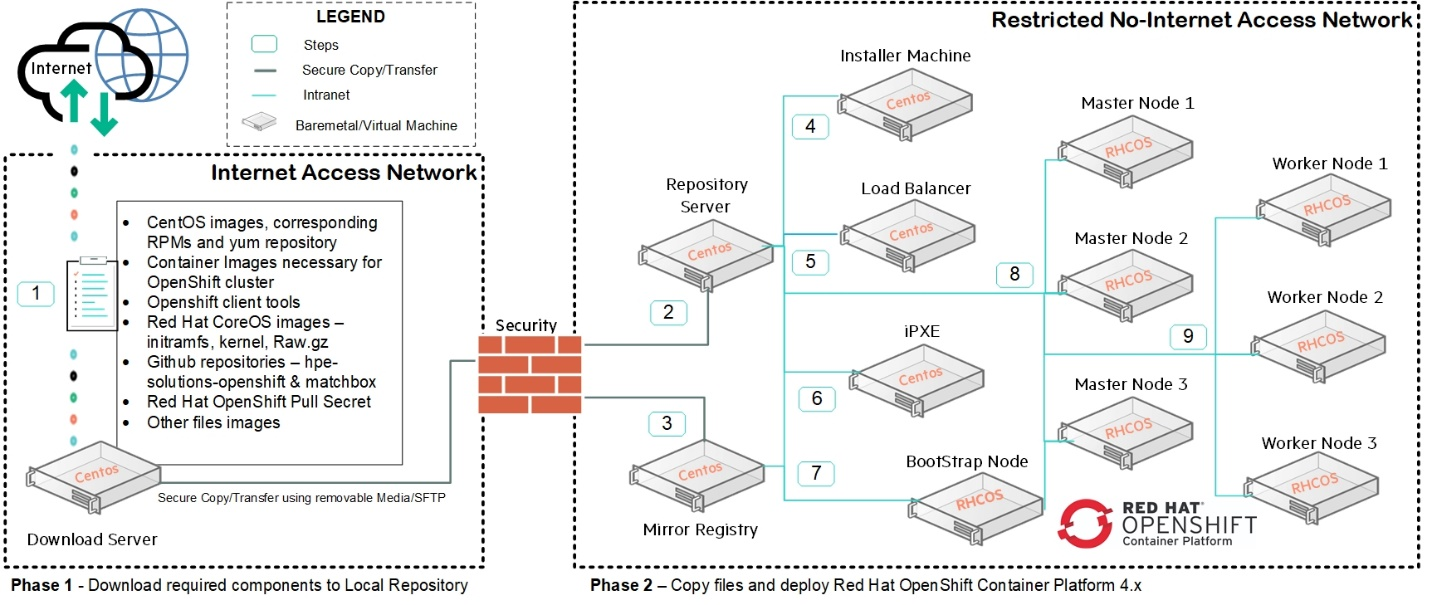
Figure 81. Air-gap installation architecture
# Flow of Execution
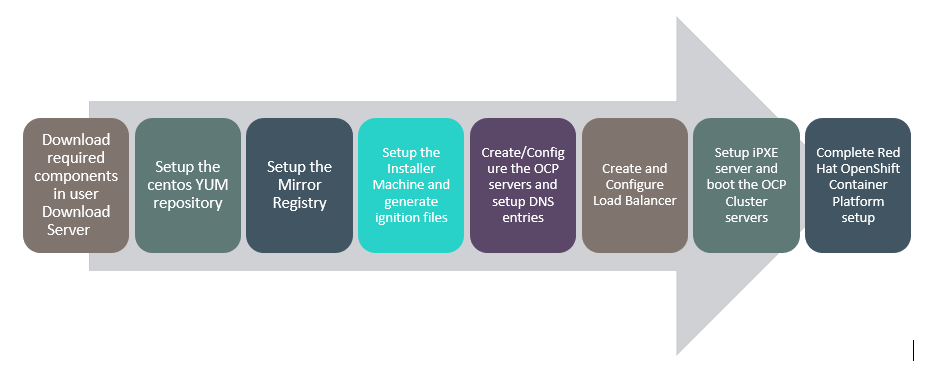 Figure 82. Air-gap insallation Solution Flow Diagram
# Download server
Download server is the server which has conditional internet access and is used to built on virtual machine with the following configurations
OS - CentOS 7 with preinstalled packages such as "Development Tools", "Compatibility Libraries", "System Administration Tools"
CPU - 4 vCPU
Memory - 8 GB
Disk - 300 GB free space in the / partition
Network adapter - 1 network adapter with connectivity to the production network
# For the Yum repository server
- Download the necessary RPM packages for yum-utils, epel-release, createrepo and nginx and zip them to a tar file
> mkdir -p /opt/hpe/solutions/hpe-solutions-openshift/rpms

> yum -y install wget

> cd /opt/hpe/solutions/hpe-solutions-openshift/rpms

> wget http://mirror.centos.org/centos/7/os/x86_64/Packages/createrepo-0.9.9-28.el7.noarch.rpm

> wget http://nginx.org/packages/mainline/centos/7/x86_64/RPMS/nginx-1.9.9-1.el7.ngx.x86_64.rpm
Delta RPM (optional -> if minimal installation is done)
> wget http://mirror.centos.org/centos/7/os/x86_64/Packages/deltarpm-3.6-3.el7.x86_64.rpm
Python Delta RPM (optional -> if minimal installation is done)
> wget http://mirror.centos.org/centos/7/os/x86_64/Packages/python-deltarpm-3.6-3.el7.x86_64.rpm

> tar -zcf centos-rpms.tar.gz *
- Download the base, extras, centosplus and updates repo to the destination download directory
> mkdir -p /opt/hpe/solutions/hpe-solutions-openshift/yum_repos

> cd /opt/hpe/solutions/hpe-solutions-openshift/yum_repos

> yum -y install epel-release createrepo yum-utils reposync

> reposync --gpgcheck -l --repoid=base
--download_path=/opt/hpe/solutions/hpe-solutions-openshift/yum_repos
--downloadcomps --download-metadata

> reposync --gpgcheck -l --repoid=extras
--download_path=/opt/hpe/solutions/hpe-solutions-openshift/yum_repos
--downloadcomps --download-metadata

> reposync --gpgcheck -l --repoid=updates
--download_path=/opt/hpe/solutions/hpe-solutions-openshift/yum_repos
--downloadcomps --download-metadata

> reposync --gpgcheck -l --repoid=centosplus
--download_path=/opt/hpe/solutions/hpe-solutions-openshift/yum_repos
--downloadcomps --download-metadata

> tar -zvcf centos-yum-repository.tar.gz *
- Securely transfer the zipped files to the server to be used as a yum repository server
# For the mirror registry
- Create the directories needed for the mirror repository
> mkdir -p /opt/hpe/solutions/hpe-solutions-openshift/registry

> export REGISTRY_BASE="/opt/hpe/solutions/hpe-solutions-openshift/registry"

> mkdir -p ${REGISTRY_BASE}/{auth,certs,data,downloads}

> mkdir -p ${REGISTRY_BASE}/downloads/{images,tools,secrets}
- Set the hostname of the server and update the hostname of the external server in the "hosts" file:
> hostnamectl set-hostname <registry_hostname>

> vi /etc/hosts

 127.0.0.1 <registry_hostname>
NOTE
Registry_hostname refers to common hostname/FQDN of the download servers and the internal mirror registry.
It is not necessary to create the DNS entry of the download server.
- Download the necessary packages
>  yum install -y jq openssl podman p7zip httpd-tools curl wget screen
nmap telnet ftp tftp openldap-clients tcpdump wireshark xorg-x11-xauth
tmux net-tools nfs-utils sg3_utils bind-utils rlwrap uucp
- Generating the self-signed certificate '
> cd ${REGISTRY_BASE}/certs/

> cat >csr_answer.txt << EOF

 [req]

 default_bits = 4096

 prompt = no

 default_md = sha256

 distinguished_name = dn

 [ dn ]

 C=US

 ST=New York

 L=New York

 O=MyOrg

 OU=MyOU

 emailAddress=**<email_address>**

 CN = **<replace with registry server hostname/FQDN. This is same as
 the internal mirror registry hostname/FQDN>**

 EOF
> openssl req -newkey rsa:4096 -nodes -sha256 -keyout domain.key -x509
-days 365 -out domain.crt -config <( cat csr_answer.txt )
- List and verify the generated self-signed certificate - there would be domain.crt and domain.key files within the ${REGISTRY_BASE}/certs/ directory.
> ll ${REGISTRY_BASE}/certs/
- Generate the credentials to access the registry
> htpasswd -bBc ${REGISTRY_BASE}/auth/htpasswd myuser mypassword
- Open firewall port 5000 to enable accessing the registry
> export FIREWALLD_DEFAULT_ZONE=`firewall-cmd --get-default-zone`

> echo $FIREWALLD_DEFAULT_ZONE

> firewall-cmd --add-port=5000/tcp --zone=$FIREWALLD_DEFAULT_ZONE
--permanent

> firewall-cmd --reload
- Create/Run the registry container
> podman run --name my-registry --rm -d -p 5000:5000 \

 -v ${REGISTRY_BASE}/data:/var/lib/registry:z \

 -v ${REGISTRY_BASE}/auth:/auth:z -e "REGISTRY_AUTH=htpasswd" \

 -e "REGISTRY_AUTH_HTPASSWD_REALM=Registry" \

 -e "REGISTRY_HTTP_SECRET=ALongRandomSecretForRegistry" \

 -e REGISTRY_AUTH_HTPASSWD_PATH=/auth/htpasswd \

 -v ${REGISTRY_BASE}/certs:/certs:z \

 -e REGISTRY_HTTP_TLS_CERTIFICATE=/certs/domain.crt \

 -e REGISTRY_HTTP_TLS_KEY=/certs/domain.key \

 docker.io/library/registry:2
- Verify connectivity to your registry with curl. Provide it the username and password you created.
> curl -u myuser:mypassword -k https://<registry_hostname_fqdn>:5000/v2/_catalog
This should return an "empty" repository for now
{"repositories":[]}
- Syncing the repositories
Export the OCP Release version
> export OCP_RELEASE=$(curl -s https://mirror.openshift.com/pub/openshift-v4/clients/ocp/latest/release.txt) | grep 'Name:' | awk '{print $NF}')

> echo "export OCP_RELEASE=${OCP_RELEASE}" >> ${REGISTRY_BASE}/downloads/tools/env_ocp
Download openshift client tool
> wget https://mirror.openshift.com/pub/openshift-v4/clients/ocp/latest/openshift-client-linux-${OCP_RELEASE}.tar.gz -P ${REGISTRY_BASE}/downloads/tools/
Untar the openshift client tool and create a soft link
> tar -xzf ${REGISTRY_BASE}/downloads/tools/openshift-client-linux-${OCP_RELEASE}.tar.gz -C ${REGISTRY_BASE}/downloads/tools/

> ln -s ${REGISTRY_BASE}/downloads/tools/oc /usr/local/bin/oc
Retrieve and create the necessary pull secrets/credentials files
- Navigate to the ${REGISTRY_BASE}/downloads/secrets/
> cd ${REGISTRY_BASE}/downloads/secrets/
Login to the Red Hat account and Navigate to the https://cloud.redhat.com/openshift/install/pull-secret (opens new window)
Create a file for the copied pull-secret and validate the same
> cat > pull-secret.json << EOF

 <Copied-pull-secret>

 EOF

> cat pull-secret.json | jq
- Generate a base64 output from the user+password string
> echo -n 'myuser:mypassword' | base64 -w0

> REG_SECRET=`echo -n 'myuser:mypassword' | base64 -w0`
- Create a bundle json file with all the registries and validate the same
> cat pull-secret.json | jq '.auths +=
{"<registry_server_fqdn>:5000": {"auth":
"REG_SECRET","email": "**<email_address>**"}}' | sed
"s/REG_SECRET/$REG_SECRET/" > pull-secret-bundle.json

> cat pull-secret-bundle.json | jq
NOTE
Update the <registry_server_fqdn> field in the above command and all the subsequent occurances of similar flag with the fully qualified domain name of the registry server as per the DNS entry. Update the <email_address> field with the email address used during the certificate creation.
- Create a json file specifically for the mirror registry and validate the same
> echo '{ "auths": {}}' | jq '.auths +=
 {"<registry_server_fqdn>:5000": {"auth":
 "REG_SECRET","email": "**<email_address>**"}}' | sed
 "s/REG_SECRET/$REG_SECRET/" | jq -c .> pull-secret-registry.json

> cat pull-secret-registry.json | jq
- Trust the self-signed certificate generated earlier
> cp ${REGISTRY_BASE}/certs/domain.crt
 /etc/pki/ca-trust/source/anchors/

> update-ca-trust extract
Export a few more variable for the mirroring process and write them into the environment variables file which can be later used to source
> export LOCAL_REGISTRY='<registry_server_fqdn>:5000'

> export OCP_RELEASE="${OCP_RELEASE}-x86_64"

> export LOCAL_REPOSITORY='ocp/openshift4'

> export PRODUCT_REPO='openshift-release-dev'

> export LOCAL_SECRET_JSON="${REGISTRY_BASE}/downloads/secrets/pull-secret-bundle.json"

> export RELEASE_NAME="ocp-release"

> export GODEBUG="x509ignoreCN=0"

> echo "export
 LOCAL_REGISTRY='<registry_server_fqdn>:5000'" >>
 ${REGISTRY_BASE}/downloads/tools/env_ocp

> echo '[[ ! ${OCP_RELEASE} =~ 'x86_64' ]] && export
 OCP_RELEASE="${OCP_RELEASE}-x86_64"' >>
 ${REGISTRY_BASE}/downloads/tools/env_ocp

> echo "export LOCAL_REPOSITORY='ocp/openshift4'" >>
 ${REGISTRY_BASE}/downloads/tools/env_ocp

> echo "export PRODUCT_REPO='openshift-release-dev'" >>
 ${REGISTRY_BASE}/downloads/tools/env_ocp

> echo 'export
 LOCAL_SECRET_JSON="${REGISTRY_BASE}/downloads/secrets/pull-secret-bundle.json"'
 >> ${REGISTRY_BASE}/downloads/tools/env_ocp

> echo 'export RELEASE_NAME="ocp-release"' >>
 ${REGISTRY_BASE}/downloads/tools/env_ocp
Start the oc release mirroring process
> oc adm -a ${LOCAL_SECRET_JSON} release mirror \

 --from=quay.io/${PRODUCT_REPO}/${RELEASE_NAME}:${OCP_RELEASE} \

 --to=${LOCAL_REGISTRY}/${LOCAL_REPOSITORY} \

 --to-release-image=${LOCAL_REGISTRY}/${LOCAL_REPOSITORY}:${OCP_RELEASE}
 \

 2>&1 | tee ${REGISTRY_BASE}/downloads/secrets/mirror-output.txt
- Generating the openshift binary and validating the same
> cd ${REGISTRY_BASE}/downloads/tools/

> oc adm -a ${LOCAL_SECRET_JSON} release extract
 --command=openshift-install
 "${LOCAL_REGISTRY}/${LOCAL_REPOSITORY}:${OCP_RELEASE}"

> echo $? -> this should return a 0
- Save the Registry container
> podman stop my-registry
(optional)
> podman rm --force my-registry

> podman save docker.io/library/registry:2 -o
 ${REGISTRY_BASE}/downloads/images/registry.tar
- Remove the unwanted certificates and generate the tar file of the contents within registry directory. We will be creating a new certificate for the internal mirror registry server
> rm -f ${REGISTRY_BASE}/certs/domain.*

> cd ${REGISTRY_BASE}

> tar -zvcf ocp45-registry.tar.gz *
- This can be securely transferred to the server which is meant to be used as a mirror-registry for installing OCP in the restricted environment.
# For the installer machine
- Create a new directory for storing the files related to installer machine
> mkdir -p /opt/hpe/solutions/hpe-solutions-openshift/installer
- Navigate to the /opt/hpe/solutions/hpe-solutions-openshift/registry/downloads/tools/ and copy the tools oc, kubectl and openshift-install into the folder /opt/hpe/solutions/hpe-solutions-openshift/installer.
> cd /opt/hpe/solutions/hpe-solutions-openshift/registry/downloads/tools/

> cp kubectl oc openshift-install
/opt/hpe/solutions/hpe-solutions-openshift/installer
- Create a install-config.yaml template file within /opt/hpe/solutions/hpe-solutions-openshift/installer directory
> cat > /opt/hpe/solutions/hpe-solutions-openshift/installer/install-config.yaml << EOF
 apiVersion: v1

 baseDomain: ''

 controlPlane:

 name: master

 hyperthreading: Enabled

 replicas: 3

 compute:

 - name: worker

 hyperthreading: Enabled

 replicas: 3

 metadata:

 name: ''

 networking:

 clusterNetworks:

 - cidr: 10.128.0.0/14

 hostPrefix: 23

 machineNetwork:

 - cidr: 172.18.0.0/16

 networkType: OpenShiftSDN

 serviceNetwork:

 - 172.30.0.0/16

 platform:

 none: {}

 fips: false

 pullSecret: ''

 sshKey: ''

 additionalTrustBundle: |

 -----BEGIN CERTIFICATE-----

 <...base-64-encoded, DER - CA certificate>

 -----END CERTIFICATE-----

 EOF
- Tar the files corresponding to installer machine and securely transfer them to the server which is meant to be used as an installer for installing OCP in the restricted environment
> cd /opt/hpe/solutions/hpe-solutions-openshift/installer

> tar -zvcf installer.tar.gz *
# For the iPXE server
- Create a directory as a destination and download the necessary RPMs as follows
> mkdir -p /opt/hpe/solutions/hpe-solutions-openshift/coreos-images

> cd /opt/hpe/solutions/hpe-solutions-openshift/coreos-images

> wget https://www.rpmfind.net/linux/centos/7.8.2003/extras/x86_64/Packages/python-httplib2-0.9.2-1.el7.noarch.rpm

> wget https://www.rpmfind.net/linux/centos/7.8.2003/os/x86_64/Packages/python-jinja2-2.7.2-4.el7.noarch.rpm

> wget https://www.rpmfind.net/linux/epel/7/ppc64le/Packages/p/python-keyczar-0.71c-2.el7.noarch.rpm

> wget https://www.rpmfind.net/linux/centos/7.8.2003/extras/x86_64/Packages/sshpass-1.06-2.el7.x86_64.rpm

> wget https://www.rpmfind.net/linux/centos/7.8.2003/extras/x86_64/Packages/python-crypto-2.6.1-1.el7.centos.x86_64.rpm

> wget https://releases.ansible.com/ansible/rpm/release/epel-7-x86_64/ansible-2.9.9-1.el7.ans.noarch.rpm
- Retrieve the OCP ISO version
> OCP_ISO_VERSION=$(curl -s https://mirror.openshift.com/pub/openshift-v4/dependencies/rhcos/latest/latest/sha256sum.txt) | grep live | awk -F\- '{print $2}' | head -1)

> echo ${OCP_ISO_VERSION}
- Download the CoreOS images
> wget https://mirror.openshift.com/pub/openshift-v4/dependencies/rhcos/latest/latest/rhcos-${OCP_ISO_VERSION}-x86_64-live-initramfs.x86_64.img

> wget https://mirror.openshift.com/pub/openshift-v4/dependencies/rhcos/latest/latest/rhcos-${OCP_ISO_VERSION}-x86_64-live-kernel-x86_64

> wget https://mirror.openshift.com/pub/openshift-v4/dependencies/rhcos/latest/latest/rhcos-${OCP_ISO_VERSION}-x86_64-live-rootfs.x86_64.img
- Download git and git repositories - hpe-solutions-openshift and matchbox with the following commands
> sudo yum install git -y
> git clone https://github.com/HewlettPackard/hpe-solutions-openshift.git
> wget https://github.com/poseidon/matchbox/releases/download/v0.8.0/matchbox-v0.8.0-linux-amd64.tar.gz
- Generate the Tar file of the images
> tar -zcf ipxe.tar.gz *
- This can be securely transferred to the server which is meant to be used as the iPXE server for installing OCP in the restricted environment.
Ansible and python setup - https://medium.com/@theking99984/how-to-install-ansible-offline-on-centos-and-rhel-f3c872b2d91e (opens new window)
# CentOS 7 internal Yum Server
- CentOS 7 Yum server is offline/disconnected server which has conditional internet access and is used as a remote yum server for the restricted network centos servers. It built on virtual machine with the following configurations
a. OS - CentOS 7 with preinstalled packages as follows
- "Development Tools"

- "Compatibility Libraries"

- "System Administration Tools"
b. CPU - 4 vCPU
c. Memory - 8 GB
d. Disk - 300 GB free space in the / partition
e. Network adapter - 1 network adapter with connectivity to the production network
Refer to the setup the non-root section of the deployment guide to create a non-root user and switch to the thus created non-root user
Navigate to the folder that contains the centos-rpms.tar.gz and centos-yum -repository.tar.gz shared from the download server
> cd path/to/copied/tar/file/centos-rpms.tar.gz
- Extract the tar file centos-rpms.tar.gz consisting of the RPMs needed to bring up the offline/disconnected CentOS Yum server.
> sudo tar -xvf centos-rpms.tar.gz
- Install the RPMs
> sudo rpm -ivh nginx-1.9.9-1.el7.ngx.x86_64.rpm

> (optional) sudo rpm -ivh deltarpm-3.6-3.el7.x86_64.rpm

> (optional) sudo rpm -ivh python-deltarpm-3.6-3.el7.x86_64.rpm

> sudo rpm -ivh createrepo-0.9.9-28.el7.noarch.rpm
NOTE
Try with --nodeps option if its failing
- Enable, start and verify the status of Nginx web service.
> sudo systemctl start nginx

> sudo systemctl status nginx
- Move and untar the centos-yum-repository.tar.gz to the root directory of the Nginx server i.e, /usr/share/nginx/html/
> sudo tar -xvf path/to/copied/tar/file/centos-yum-repository.tar.gz -C
/usr/share/nginx/html/
- Create the Yum repos for base, extras, updates and centosplus repos.
> sudo createrepo /usr/share/nginx/html/base/

> sudo createrepo /usr/share/nginx/html/centosplus/

> sudo createrepo /usr/share/nginx/html/extras/

> sudo createrepo /usr/share/nginx/html/updates/
- Update the Nginx configuration file with the following details to host the Yum repository.
> sudo vi /etc/nginx/conf.d/repos.conf
 server {

 listen 80;

 server_name **<IP_address_or_FQDN_of_the_centos_yum_server>;**

 root /usr/share/nginx/html/;

 location / {

 index index.php index.html index.htm;

 autoindex on; #enable listing of directory index

 }

 }
Remove/rename files with extention .html in /usr/share/nginx/html/
Restart the nginx web service
> sudo systemctl restart nginx
- Update the firewall ports to allow http communication.
> export FIREWALLD_DEFAULT_ZONE=`firewall-cmd --get-default-zone`

> sudo firewall-cmd --add-port=80/tcp --zone=$FIREWALLD_DEFAULT_ZONE
--permanent

> sudo firewall-cmd --reload
- Validate the creation of yum server with the following command. You should be able to the see the following content
> curl http://<IP_address_or_FQDN_of_the_centos_yum_server>/
 <html>

 <head><title>Index of /</title></head>

 <body bgcolor="white">

 <h1>Index of /</h1>

 <hr><pre>

 <a href="../">../</a>

 <a href="base/">base/</a>

 <a href="centosplus/">centosplus/</a>

 <a href="extras/">extras/</a>

 <a href="updates/">updates/</a>

 <a href="50x.html.bck">50x.html.bck</a>

 <a href="index.html.bck">index.html.bck</a>

 </pre><hr></body>

 </html>
Reference
https://www.tecmint.com/setup-local-http-yum-repository-on-centos-7/ (opens new window)
# Mirror registry (Internal registry)
Mirror registry is the server which serves as the container registry for the Red Hat OpenShift Container Platform cluster, this server does not have internet access and is built on virtual machine with the following configurations
a. OS - CentOS 7 with preinstalled packages as follows
- "Development Tools"

- "Compatibility Libraries"

- "System Administration Tools"
b. CPU - 4 vCPU
c. Memory - 8 GB
d. Disk - 300 GB free space in the / partition
e. Network adapter - 1 network adapter with connectivity to the production network
Refer to the setup the non-rootsection of the deployment guide to create a non-root user and switch to the thus created non-root user
Refer to the Setup centos servers to use internal yum server section of the deployment guide to enable offline package/module installation for the mirror registry
Set the hostname of the internal registry server and update the same in /etc/hosts file as follows:
> hostnamectl set-hostname registry

> sudo vi /etc/hosts

 127.0.0.1 <registry_hostname>
NOTE
Registry_hostname refers to common hostname/FQDN of the download servers and the internal mirror registry.
It is not necessary to create the DNS entry of the download server.
- Create a directory for the mirror-registry files
> sudo mkdir -p /opt/hpe/solutions/hpe-solutions-openshift/registry
- Move and extract the ocp45-registry.tar.gz file from the download/external server to the location /opt/hpe/solutions/hpe-solutions-openshift/registry
> export REGISTRY_BASE=/opt/hpe/solutions/hpe-solutions-openshift/registry

> sudo tar -xvf /path/to/ocp45-registry.tar.gz -C $REGISTRY_BASE
- Source the environment variables as saved in env_ocp file from the download/external server
> source $REGISTRY_BASE/downloads/tools/env_ocp
- Create the certificate for the internal registry server
> cd $REGISTRY_BASE/certs/

> sudo openssl req -newkey rsa:4096 -nodes -sha256 -keyout domain.key
 -x509 -days 365 -out domain.crt
Provide the following details when prompted
 Country Name (2 letter code) [AU] : US

 State or Province Name (full name) : New York

 Locality Name (eg, city) [] : New York

 Organization Name (eg, company) : MyOrg

 Organizational Unit Name (eg, section) [] : MyOU

 Common Name (e.g. server FQDN or YOUR name) [] :
 <registry_server_fqdn -> same as external download server fqdn>

 Email Address [] : <email_address>
NOTE
Provide the same email ID for the flag <email_address> as provided in the external download server while downloading the openshift images.
- Trust the self-signed certificate generated earlier
> sudo cp $REGISTRY_BASE/certs/domain.crt
/etc/pki/ca-trust/source/anchors/

> sudo update-ca-trust extract
- Install podman
> sudo yum install podman -y
- Load the registry container image and verify the same using the following command
> sudo podman load -i $REGISTRY_BASE/downloads/images/registry.tar

> sudo podman image list
- Update the Firewall rules to open the ports 5000 using the following commands
> export FIREWALLD_DEFAULT_ZONE=`firewall-cmd --get-default-zone`

> echo $FIREWALLD_DEFAULT_ZONE

> sudo firewall-cmd --add-port=5000/tcp --zone=$
 FIREWALLD_DEFAULT_ZONE --permanent

> sudo firewall-cmd --reload
- Run the podman registry container and verify the same using the following commands
> sudo podman run --name my-registry --rm -d -p 5000:5000 \

 -v $REGISTRY_BASE/data:/var/lib/registry:z \

 -v $REGISTRY_BASE/auth:/auth:z \

 -e "REGISTRY_AUTH=htpasswd" \

 -e "REGISTRY_AUTH_HTPASSWD_REALM=Registry" \

 -e "REGISTRY_HTTP_SECRET=ALongRandomSecretForRegistry" \

 -e REGISTRY_AUTH_HTPASSWD_PATH=/auth/htpasswd \

 -v $REGISTRY_BASE/certs:/certs:z \

 -e REGISTRY_HTTP_TLS_CERTIFICATE=/certs/domain.crt \

 -e REGISTRY_HTTP_TLS_KEY=/certs/domain.key
 docker.io/library/registry:2

> sudo podman ps

> curl -u myuser:mypassword -k https://<registry_hostname_fqdn>:5000/v2/_catalog
Replace the <registry_hostname_fqdn> to the fully qualified domain name of the internal mirror registry server. Output of the above command should be as follows:
{"repositories":[ocp/openshift4]}
# DNS entries
Consult the User Provisioned DNS requirements section for details on creating the DNS entries required for the Red Hat OpenShift Container Platform installation.
# Load balance server with HAProxy
This server is used as a load balancer for the Red Hat OpenShift Container Platform cluster, this server does not have internet access and is built on virtual machine with the following configurations
a. OS - CentOS 7 with preinstalled packages as follows
- "Development Tools"

- "Compatibility Libraries"

- "System Administration Tools"
b. CPU - 4 vCPU
c. Memory - 8 GB
d. Disk - 150 GB
e. Network adapter - 1 network adapter with connectivity to the production network
Refer to the setup the non-root section of the deployment guide to create a non-root user and switch to the thus created non-root user
Refer to the Setup centos servers to use internal yum server section of the deployment guide to enable offline package/module installation for the mirror registry
Disable SELinux
> sudo sed -i 's/enforcing/disabled/g' /etc/selinux/config
- Set the hostname of the loadbalancer server as follows:
> hostnamectl set-hostname <loadbalancer_fqdn>
NOTE
A reboot may be required at this point to reflect the changes done so far.
To check selinux status, use the following command.
> getenforce
- Install HAProxy using the following command
> sudo yum -y install haproxy
- Update the HAProxy configuration file present at /etc/haproxy/haproxy.cfg as follows
> sudo vi /etc/haproxy/haproxy.cfg
 #---------------------------------------------------------------------

 # Example configuration for a possible web application. See the

 # full configuration options online.

 #

 # <http://haproxy.1wt.eu/download/1.4/doc/configuration.txt>

 #

 #---------------------------------------------------------------------

 #---------------------------------------------------------------------

 # Global settings

 #---------------------------------------------------------------------

 global

 # to have these messages end up in /var/log/haproxy.log you will

 # need to:

 #

 # 1) configure syslog to accept network log events. This is done

 # by adding the '-r' option to the SYSLOGD_OPTIONS in

 # /etc/sysconfig/syslog

 #

 # 2) configure local2 events to go to the /var/log/haproxy.log

 # file. A line like the following can be added to

 # /etc/sysconfig/syslog

 #

 # local2.* /var/log/haproxy.log

 #

 log 127.0.0.1 local2

 chroot /var/lib/haproxy

 pidfile /var/run/haproxy.pid

 maxconn 4000

 user haproxy

 group haproxy

 daemon

 # turn on stats unix socket

 stats socket /var/lib/haproxy/stats

 #---------------------------------------------------------------------

 # common defaults that all the 'listen' and 'backend' sections
 will

 # use if not designated in their block

 #---------------------------------------------------------------------

 defaults

 mode http

 log global

 option httplog

 option dontlognull

 option http-server-close

 option forwardfor except 127.0.0.0/8

 option redispatch

 retries 3

 timeout http-request 10s

 timeout queue 1m

 timeout connect 10s

 timeout client 1m

 timeout server 1m

 timeout http-keep-alive 10s

 timeout check 10s

 maxconn 3000

 #---------------------------------------------------------------------

 # main frontend which proxys to the backends

 #---------------------------------------------------------------------

 frontend main *:5000

 acl url_static path_beg -i /static /images /javascript /stylesheets

 acl url_static path_end -i .jpg .gif .png .css .js

 use_backend static if url_static

 default_backend app

 #---------------------------------------------------------------------

 # static backend for serving up images, stylesheets and such

 #---------------------------------------------------------------------

 backend static

 balance roundrobin

 server static 127.0.0.1:4331 check

 #---------------------------------------------------------------------

 # round robin balancing between the various backends

 #---------------------------------------------------------------------

 backend app

 balance roundrobin

 server app1 127.0.0.1:5001 check

 server app2 127.0.0.1:5002 check

 server app3 127.0.0.1:5003 check

 server app4 127.0.0.1:5004 check

 frontend openshift-api-server

 bind *:6443

 default_backend openshift-api-server

 mode tcp

 option tcplog

 backend openshift-api-server

 balance source

 mode tcp

 server ocpboot ocpboot.ocp.twentynet.local:6443 check

 server ocpmaster1 ocpmaster1.ocp.twentynet.local:6443 check

 server ocpmaster2 ocpmaster2.ocp.twentynet.local:6443 check

 server ocpmaster3 ocpmaster3.ocp.twentynet.local:6443 check

 frontend machine-config-server68

 bind *:22623

 default_backend machine-config-server

 mode tcp

 option tcplog

 backend machine-config-server

 balance source

 mode tcp

 server ocpboot ocpboot.ocp.twentynet.local:22623 check

 server ocpmaster1 ocpmaster1.ocp.twentynet.local:22623 check

 server ocpmaster2 ocpmaster2.ocp.twentynet.local:22623 check

 server ocpmaster3 ocpmaster3.ocp.twentynet.local:22623 check

 frontend ingress-http

 bind *:80

 default_backend ingress-http

 mode tcp

 option tcplog

 backend ingress-http

 balance source

 mode tcp

 server ocpworker1 ocpworker1.ocp.twentynet.local:80 check

 server ocpworker2 ocpworker2.ocp.twentynet.local:80 check

 server ocpworker3 ocpworker3.ocp.twentynet.local:80 check

 frontend ingress-https

 bind *:443

 default_backend ingress-https

 mode tcp

 option tcplog

 backend ingress-https

 balance source

 mode tcp

 server ocpworker1 ocpworker1.ocp.twentynet.local:443 check

 server ocpworker2 ocpworker2.ocp.twentynet.local:443 check

 server ocpworker3 ocpworker3.ocp.twentynet.local:443 check
- Start the haproxy service
> sudo systemctl start haproxy
- Update the Firewall rules to open the ports 80, 443, 6443, 22623 using the following commands
> export FIREWALLD_DEFAULT_ZONE=`firewall-cmd --get-default-zone`

> echo $FIREWALLD_DEFAULT_ZONE

> sudo firewall-cmd --add-port=80/tcp
--zone=$FIREWALLD_DEFAULT_ZONE --permanent

> sudo firewall-cmd --add-port=443/tcp
--zone=$FIREWALLD_DEFAULT_ZONE --permanent

> sudo firewall-cmd --add-port=6443/tcp
--zone=$FIREWALLD_DEFAULT_ZONE --permanent

> sudo firewall-cmd --add-port=22623/tcp
--zone=$FIREWALLD_DEFAULT_ZONE --permanent

> sudo firewall-cmd --reload
The load balance node is now ready to be used.
# Installer machine
This machine acts as the installer machine for deploying CoreOS for the Red Hat OpenShift Container Platform cluster nodes, this server does not have internet access and is built on virtual machine with the following configurations
OS - CentOS 7 with preinstalled packages as follows
  - "Development Tools"

  - "Compatibility Libraries"

  - "System Administration Tools"
CPU - 4 vCPU
Memory - 8 GB
Disk - 150 GB free space in the / partition
Network adapter - 1 network adapter with connectivity to the production network
Refer to the setup the non-root section of the deployment guide to create a non-root user and switch to the thus created non-root user.
Refer to the Setup centos servers to use internal yum server section of the deployment guide to enable offline package/module installation for the mirror registry.
Navigate to the path to the installer.tar.gz file from the download server and untar it.
> cd /path/to/installer.tar.gz

> sudo tar -xvf installer.tar.gz
- Create a softlink for the openshift-install and oc tools
> sudo ln -s /absolute/path/to/oc /usr/local/bin/oc

> sudo ln -s /absolute/path/to/openshift-install
/usr/local/bin/openshift-install

> sudo ln -s /abslute/path/to/kubectl /usr/local/bin/kubectl
- Update the install-config.yaml file with the following details.
baseDomain: Base domain of the DNS which hosts Red Hat OpenShift Container Platform.
name: Name of the OpenShift cluster. This is same as the new domain created in DNS.
replicas: Update this field to reflect the corresponding number of master or worker instances required for the OpenShift cluster as per the installation environment requirements. It is recommended to have a minimum of 3 master nodes and 2 worker nodes per OpenShift cluster.
pullSecret: This should now be the contents of the pull_secret_registry.json present in the "mirror registry server"(internal) at /opt/hpe/solutions/hpe-solutions-openshift/registry/downloads/secrets/ pull_secret_registry.json. It consists of the credentials to access the internal/mirror registry only created for the restricted network installation of the Red Hat OpenShift Container Platform cluster.
sshKey: Update this field with the ssh-key generated for the non-root user of the installer machine. Sshkey can be generated with the following command.
> ssh-keygenThe resultant value can be retrieved from the /home/non-root-user/.ssh/id_rsa.pub
Replace 'non-root-user' in the above path with the username given for the non-root-useradditionalTrustBundle: Update this field with the CA certificated (domain.crt) generated in the internal/mirror registry. It can be found at /opt/hpe/solutions/hpe-solutions-openshift/registry/certs/domain.crt within the internal mirror registry server. Make sure the value to this field is right indented (5 spaces from the left).
imageContentSources: This content is taken from the mirror-output.txt generated in the "Download server > For the mirror registry" section of this document. It consists of the end points to connect to, to download the required files while created the Red Hat OpenShift Container Platform cluster in a restricted network environment.
The final version should look as follows:
 apiVersion: v1

 baseDomain: <your base domain. Similar to example.com>

 controlPlane:

 name: master

 hyperthreading: Enabled

 replicas: 3

 compute:

 - name: worker

 hyperthreading: Enabled

 replicas: 3

 metadata:

 name: '<your subdomain or cluster name. similar to test-cluster>

 networking:

 clusterNetworks:

 - cidr: 10.128.0.0/14

 hostPrefix: 23

 machineNetwork:

 - cidr: 172.18.0.0/16

 networkType: OpenShiftSDN

 serviceNetwork:

 - 172.30.0.0/16

 platform:

 none: {}

 fips: false

 pullSecret**: '<contents of the pull_secret_registry.json file
 similar to -> {"auths":{"<registry_hostname_fqdn>:5000":{"auth":"bXl1c2VyOm15cGFzc3dvcmQ=","email":"<email_address>"}}}>'

 sshKey**: '< Your installer machine Public SSH Key>'

 additionalTrustBundle: |

      -----BEGIN CERTIFICATE-----
      <Your CA certificate generated by the non-root user in the internal mirror registry>

      -----END CERTIFICATE-----

 imageContentSources:

 - mirrors:

   - < registry_hostname_fqdn >:5000/ocp/openshift4

   source: quay.io/openshift-release-dev/ocp-release

 - mirrors:

   - < registry_hostname_fqdn >:5000/ocp/openshift4

   source: quay.io/openshift-release-dev/ocp-v4.0-art-dev
NOTE
It is recommended to take a backup of the install-config.yaml file before creating the manifests/ignition file since the file will be consumed while they are created.
- Navigate to the path where install-config.yaml is present, create a new directory for the ignition files and copy the install-config.yaml into it. Navigate into the newly created folder
> mkdir </path/to/directory/with/openshift-install/tools>/ignitions

> cp install-config.yaml ignitions/

> cd /path/to/ignitions/directory
- Create the manifests using the following command
> openshift-install create manifests --dir=./
- Create the ignition files
> openshift-install create ignition-configs --dir=./
The ignition files thus generated could be used while the CoreOS operating system is booted on the bootstrap, master and worker nodes via the iPXE server.
- Export the kubeconfig file with the following command
> export KUBECONFIG=/path/to/kubeconfig/file
# Openshift cluster nodes
Red Hat OpenShift Container Platform sizing varies depending on the requirements of the organization and type of deployment. This section highlights the host sizing details recommended by Red Hat.
| Resource | Bootstrap node | Master node | Worker node |
|---|---|---|---|
| CPU | 4 | 4 | 4 |
| Memory | 16GB | 16GB | 16GB |
| Disk storage | 120GB | 120GB | 120GB |
Disk partitions on each of the nodes are as follows.
/var -- 40GB
/usr/local/bin -- 1GB
Temporary directory -- 1GB
NOTE
Sizing for worker nodes is ultimately dependent on the container workloads and their CPU, memory, and disk requirements.
For more information about Red Hat OpenShift Container Platform sizing, refer to the Red Hat OpenShift Container Platform 4 product documentation at https://access.redhat.com/documentation/en-us/openshift_container_platform/4.6/html/scalability_and_performance/index (opens new window).
# iPXE server
This server is used as OS deployment server for deploying CoreOS for the Red Hat OpenShift Container Platform cluster nodes, this server does not have internet access and is built on virtual machine with the following configurations
OS - CentOS 7 with preinstalled packages as follows
"Development Tools"
"Compatibility Libraries"
"System Administration Tools"
CPU - 4 vCPU
Memory - 8 GB
Disk - 300 GB free space in the / partition
Network adapter - 1 network adapter with connectivity to the production network
Refer to the setup the non-root section of the deployment guide to create a non-root user and switch to the thus created non-root user
Refer to the Setup centos servers to use internal yum server section of the deployment guide to enable offline package/module installation for the mirror registry
Navigate to the path to the ipxe.tar.gz file from the download server and untar it.
> cd path/to/ipxe.tar.gz

> sudo tar -xvf ipxe.tar.gz
- Install all the necessary RPMs and ansible as follows.
> sudo yum localinstall -y *.rpm
- Navigate to the directory "deploy-coreos" path of the github repository hpe-solutions-openshift.
> cd /path/to/hpe-solutions-openshift/

> cd synergy/scalable/os-deployment/deploy-rhcos
It is recommended to store the github repository at /opt/hpe/solutions/.
- Update the input files such hosts with the following command:
> sudo vi hosts
NOTE
add the parameters (ansible_ssh_pass, ansible_ssh_user) in the host file for the non-root user
Eg. 10.4.1.141 ansible_ssh_pass=xxx ansible_ssh_user=user
- Update the encrypted input file secret.yml with the following command
> sudo ansible-vault edit secret.yml
The default password for the encrypted file is "changeme"
- Generate the SSH key for the openshift_admin user and copy the SSH key to the known hosts file using the following command.
$ ssh-keygen
NOTE
Ensure there are no previous self-entries in the known host file.
- Copy the thus generated SSH key to the known hosts file using the following command
> ssh-copy-id openshift_admin@<ipxe_fqdn>
- Move the downloaded matchbox tar file matchbox-v0.8.0-linux-amd64.tar.gz (opens new window) to /tmp/ directory and provide the read permission using the following command
> sudo mv /path/to/matchbox-v0.8.0-linux-amd64.tar.gz) /tmp/

> sudo chmod 400 /tmp[matchbox-v0.8.0-linux-amd64.tar.gz
- Execute the following to setup iPXE
> sudo ansible-playbook -i hosts master.yml --ask-vault-pass
- Copy the ignitions files from the installer machine to /var/lib/matchbox/igniton/ folders and provide all permissions to the ignition files
Only this command to be executed on the installer machine
> scp /path/to/ignitions/files
openshift_admin@<installer_server_fqdn_or_ip_address>:/home/openshift_admin
On the iPXE server
> sudo cp /home/openshift_admin/*.ign /var/lib/matchbox/ignition
> sudo chmod 777 /var/lib/matchbox/ignition/*.ign
NOTE
Ensure the services xinetd, matchbox, tftp, dnsmasq are in active/running state in the iPXE server before initiating the installation of the CoreOS.
- Boot the cluster nodes to complete the installation of Red Hat CoreOS.
For further details on setting up the iPXE server, refer to the OS deployment
REGISTRY TESTING
This is a very important point, make sure you are able to access your registry from the bootstrap server.
$ curl -u myuser:mypassword -k https://<registry_fqdn_or_ip_address>:5000/v2/_catalog
# Red Hat OpenShift Container Platform Cluster Installation
- Login to the installer machine and start the bootstrap installation with the following command
> cd /path/to/ignition/files

> openshift-install --dir=./ wait-for bootstrap-complete --log-level
debug
Output is similar to as follows:
 INFO Waiting up to 30m0s for the Kubernetes API at
 <https://api.ocp4.example.com:6443>...

 INFO API v1.13.4+b626c2fe1 up

 INFO Waiting up to 30m0s for the bootstrap-complete event...
You can monitor the progress of the installation in the bootstrap server. This also helps in tracking the errors, they are self explainatory and helps understand what is happening.
> ssh core@bootstrap "journalctl -xe"
NOTE
After bootstrap process is complete, you can safely remove the bootstrap machine from the load balancer.
- Logging into the cluster
> export KUBECONFIG=/path/to/kubeconfig/file

> oc whoami

system:admin
- Confirm that the cluster recognizes the machines:
> oc get nodes

- Approve the pending CSRs for your machines
When you add machines to a cluster, two pending certificate signing request (CSRs) are generated for each machine that added. Verify them if the following command
> oc get csr
Output looks similar to as follows

If they are not approved, approve them manually using the following command.
> oc adm certificate approve <csr_name>
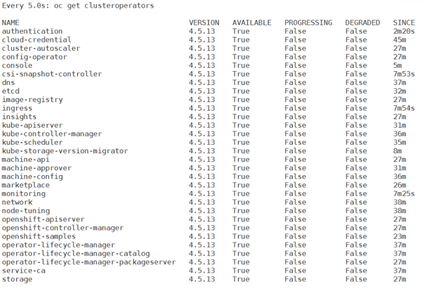
- Initial Operator configuration
In this phase you have to wait up to 15 min to all operators to go to Available True state. Verify the same using the following command.
> watch -n5 oc get clusteroperators
- Completing installation on user-provisioned infrastructure
Once Operator configuration is complete, finish installing the cluster on infrastructure using the following command and confirm that all cluster components are online
> openshift-install --dir=./ wait-for install-complete | tee
install-complete
This will give you an output of you console login with the admin user and credentials to login similar to as follows
INFO Waiting up to 30m0s for the cluster at
<https://api.eoffline.twentynet.local:6443> to initialize...

INFO Waiting up to 10m0s for the openshift-console route to be
created...

INFO Install complete!

INFO To access the cluster as the system:admin user when using 'oc',
run 'export
KUBECONFIG=/home/openshift_admin/ignitions/auth/kubeconfig'

INFO Access the OpenShift web-console here:
<https://console-openshift-console.apps.eoffline.twentynet.local>

INFO Login to the console with user: "kubeadmin", and password:
"xxxxxxxxxxxxxxxx"

INFO Time elapsed: 0s
- Ensure the cluster nodes are in the ready state using the following command.
> oc get nodes
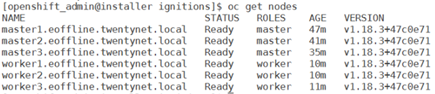
- At this point, Red Hat OpenShift Container Platform cluster is successfully installed in the restricted network environment and is available for usage.
# Snapshots
Once the cluster is installed, operators are not yet available since there is no connectivity to the internet and the operator related images are not yet downloaded to the registry server
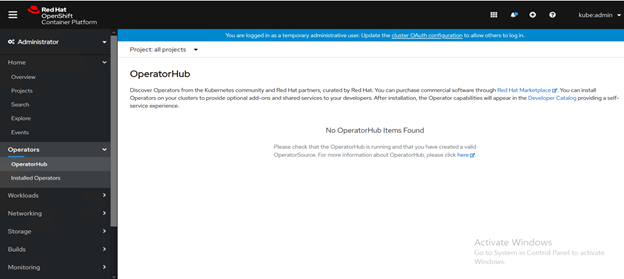
Figure 87. Red Hat OpenShift Container Platform
# Setup centos servers to use internal yum server
Login to the host as a user with "remove" permission and remove all the repo files present within the directory /etc/yum.repos.d/.
Login to the server as a non-root user.
Create a new file named local-repo.repo with the following contents. Update the yum_server_ip_address_or_fqdn field with the IP address/FQDN of the yum server in your environment
> sudo vi /etc/yum.repos.d/local-repo.repo
 [local-base]

 name=CentOS Base

 baseurl=http://**<yum_server_ip_address_or_fqdn>**/base/

 gpgcheck=0

 enabled=1

 [local-centosplus]

 name=CentOS CentOSPlus

 baseurl=http://**<yum_server_ip_address_or_fqdn>**/centosplus/

 gpgcheck=0

 enabled=1

 [local-extras]

 name=CentOS Extras

 baseurl=http://**<yum_server_ip_address_or_fqdn>**/extras/

 gpgcheck=0

 enabled=1

 [local-updates]

 name=CentOS Updates

 baseurl=http://**<yum_server_ip_address_or_fqdn>**/updates/

 gpgcheck=0

 enabled=1
- Now the server is ready to use the internal yum server for any offline package/module installations.
# Using Operator Lifecycle Manager on Restricted Networks
For OpenShift Container Platform clusters that are installed on restricted networks, also known as disconnected clusters, Operator Lifecycle Manager (OLM) by default cannot access the Red Hat-provided OperatorHub sources hosted remotely on Quay.io because those remote sources require full Internet connectivity.
However, as a cluster administrator you can still enable your cluster to use OLM in a restricted network if you have a workstation/download server that has full Internet access. This workstation is used to prepare local mirrors of the remote OperatorHub sources by pulling the required remote content. (Similar to the download server as mentioned in the above steps)
An Operator catalog is a repository of metadata that Operator Lifecycle Manager (OLM) can query to discover and install Operators and their dependencies on a cluster. OLM always installs Operators from the latest version of a catalog. As of OpenShift Container Platform 4.6, Red Hat-provided catalogs are distributed using index images. An index image, based on the Operator Bundle Format, is a containerized snapshot of a catalog.
There are four Red Hat-provided Operator catalogs:
| Catalog | Index image | Description |
|---|---|---|
| redhat-operators | registry.redhat.io/redhat/redhat-operator-index:v4.6 | Red Hat products packaged and shipped by Red Hat. Supported by Red Hat. |
| certified-operators | registry.redhat.io/redhat/certified-operator-index:v4.6 | Products from leading independent software vendors (ISVs). Red Hat partners with ISVs to package and ship. Supported by the ISV. |
| redhat-marketplace | registry.redhat.io/redhat/redhat-marketplace-index:v4.6 | Certified software that can be purchased from Red Hat Marketplace. |
| community-operators | registry.redhat.io/redhat/community-operator-index:latest | Software maintained by relevant representatives in the operator-framework/community-operators GitHub repository. No official support. |
The high-level flow of the procedure is shown below:
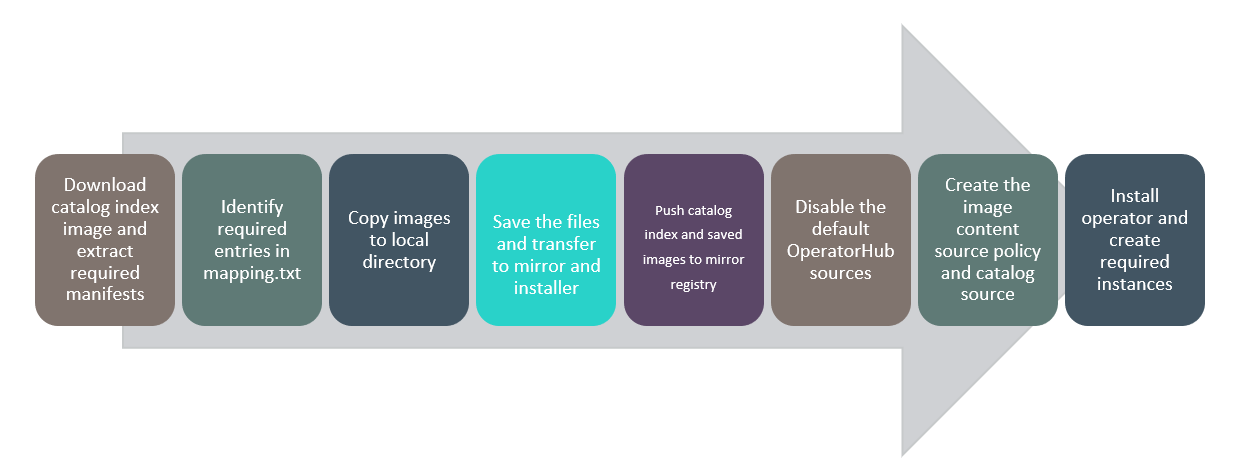 Figure 88. Solution Flow of Operator Lifecycle Manager on a
Restricted Network
Figure 88. Solution Flow of Operator Lifecycle Manager on a
Restricted Network
The following is the process that is required to enable OLM in restricted networks:
On the Download Server (workstation with Internet Access)
- Login to registry.redhat.io to pull the required catalog image
> podman login registry.redhat.io
- Create directory required for the operators
> mkdir -p ${REGISTRY_BASE}/operators
- Copy the pull secret from the RedHat site into a file in the newly created directory and validate the same
> cd ${REGISTRY_BASE}/operators

> cat > pull-secret.json << EOF

 <Copied-pull-secret>

 EOF

> cat pull-secret.json | jq
- Pull the required catalog image
> podman pull registry.redhat.io/redhat/<catalog-image>-index:v4.6
- Save the catalog image into a tar file for use in the mirror registry
> podman save <image-ID> -o ${REGISTRY_BASE}/operators/<catalog-image>-catalog.tar
- The oc adm catalog mirror command extracts the contents of an index image to generate the manifests required for mirroring. The following command creates a folder in your current directory.
> oc adm catalog registry.redhat.io/redhat/<catalog-image>-index:v4.6
<mirror_registry>:<port> --manifests-only
--registry-config=${REGISTRY_BASE}/operators/pull-secret.json
NOTE
The --manifests-only flag is to only generate the manifests required for mirroring, but not actually mirror the image content to the registry yet. This can be useful for reviewing what will be mirrored, and it allows you to make any changes to the mapping list if you only require a subset of packages.
- Navigate to the newly created folder to view the mapping.txt file and the imageContentSourcePolicy.yaml files
> cd <catalog-image>-index-manifests

> ls -lrth
- Identify the required entries for your operator from the mapping.txt file. Remove the unwanted entries.
> vi mapping.txt
NOTE
The entries in the mapping.txt file are in the following format.
source_registry/image_url@sha256:digest=mirror_registry/image_url:tag
- Install the skopeo tool to perform the copy of the images
> yum install skopeo -y
- For each entry in the mapping.txt file copy the images to the local directory into a custom folder name .
> cd ${REGISTRY_BASE}/operators

> skopeo copy --authfile
 ${REGISTRY_BASE}/operators/pull-secret.json --all
 docker://<source_registry>/<image_url>@<sha256:digest>
 dir:./<custom_folder_name_1>

> skopeo copy --authfile
 ${REGISTRY_BASE}/operators/pull-secret.json --all
 docker://<source_registry>/<image_url>@<sha256:digest>
 dir:./<custom_folder_name_2>
Do this for all the entries in the mapping.txt file
- Tar the contents of the operator folder ( catalog-image-catalog.tar, custom_folder_name_1, custom_folder_name_2...) to move to the mirror registry
> tar -zvcf mirror-operator.tar.gz <catalog-image>-catalog.tar <custom_folder_name_1> <custom_folder_name_2>...
- Tar the contents of the catalog-image-index-manifests folder to move to the installer machine.
> cd <catalog-image>-index-manifests

> tar -zvcf installer-operator.tar.gz *
On the Mirror Server (Restricted Network)
- Untar the mirror-operator.tar.gz file
> sudo mkdir ${REGISTRY_BASE}/operators

> sudo tar -xvf /path/to/mirror-operator.tar.gz -C
> ${REGISTRY_BASE}/operators/
- Login to your mirror registry to push new images
> sudo podman login <mirror_registry>:<port>
- Load the required catalog image and validate the same
> cd ${REGISTRY_BASE}/operators

> sudo podman load -i <catalog-image>-catalog.tar

> sudo podman images
- Push the catalog image to the mirror registry
> sudo podman push <catalog_image_tag>
<mirror_registry>:<port>/<namespace>/<catalog_image>-index:v4.6
- Install the skopeo tool to perform a copy of the images
> sudo yum install skopeo -y
- Transfer the images from your director into the mirror registry
> skopeo copy --authfile
 ${REGISTRY_BASE}/downloads/secrets/pull-secret-registry.json --all
 dir:./ <custom_folder_name_1> docker://<mirror registry>/<image
 url>:<tag>

> skopeo copy --authfile
 ${REGISTRY_BASE}/downloads/secrets/pull-secret-registry.json --all
 dir:./ <custom_folder_name_2> docker://<mirror registry>/<image
 url>:<tag>
Do this for all the directory folders you have by referring the mapping.txt for the corresponding tags.
For the Installer Server (Restricted Network)
- Disable the sources for the default catalogs by adding disableAllDefaultSources: true to the OperatorHub spec:
> oc patch OperatorHub cluster --type json \
-p '[{"op": "add", "path": "/spec/disableAllDefaultSources",
"value": true}]'
- Untar the installer-operator.tar.gz file
> sudo mkdir ${REGISTRY_BASE}/operators

> sudo tar -xvf /path/to/mirror-operator.tar.gz -C
 ${REGISTRY_BASE}/operators/
- Create the CatalogSource.yaml file
> cd ${REGISTRY_BASE}/operators

> sudo vi CatalogSource.yaml
Paste the following content: (Refer to instruction 16 for the catalog image)
apiVersion: operators.coreos.com/v1alpha1

kind: CatalogSource

metadata:

  name: my-operator-catalog

  namespace: openshift-marketplace

spec:

  sourceType: grpc

  image: <registry_mirror>:<port>/<namespace>/<catalog_image>-index:v4.6

  displayName: My Operator Catalog

  publisher: <custom_publisher_name>
- Verify the following resources are created successfully
Check the pods:
> oc get pods -n openshift-marketplace
Example Output:
 NAME READY STATUS RESTARTS AGE

 my-operator-catalog-6njx6 1/1 Running 0 28s

 marketplace-operator-d9f549946-96sgr 1/1 Running 0 26h
Check the CatalogSource:
> oc get catalogsource -n openshift-marketplace
Example Output:
 NAME DISPLAY TYPE PUBLISHER AGE

 my-operator-catalog My Operator Catalog grpc 5s
Check the PackageManifest:
> oc get packagemanifest -n openshift-marketplace
 Example Output:

 NAME CATALOG AGE

 jaeger-product My Operator Catalog 93s
- Apply the imageContentSourcePolicy.yaml file ( any further new entries for new operators can be appended to the existing yaml file)
> oc create -f imageContentSourcePolicy.yaml
- Wait for the Image Content Source Policy to apply to all the nodes in the cluster
> watch oc get nodes
NOTE
The nodes will go from Ready to NotReady and Scheduling Disabled states.
Wait for all the nodes to get back to Ready state
> watch oc get mcp
NOTE
Wait for the UPDATED states of both the master and worker to turn to True
Login to OpenShift Console
Install the newly pushed Operator in required namespace
Deploy instance as required
Repeat above steps for other required operators.