# Storage Option
# CSI Driver Architecture
A diagrammatic representation of the CSI driver architecture is illustrated in the figure 39.
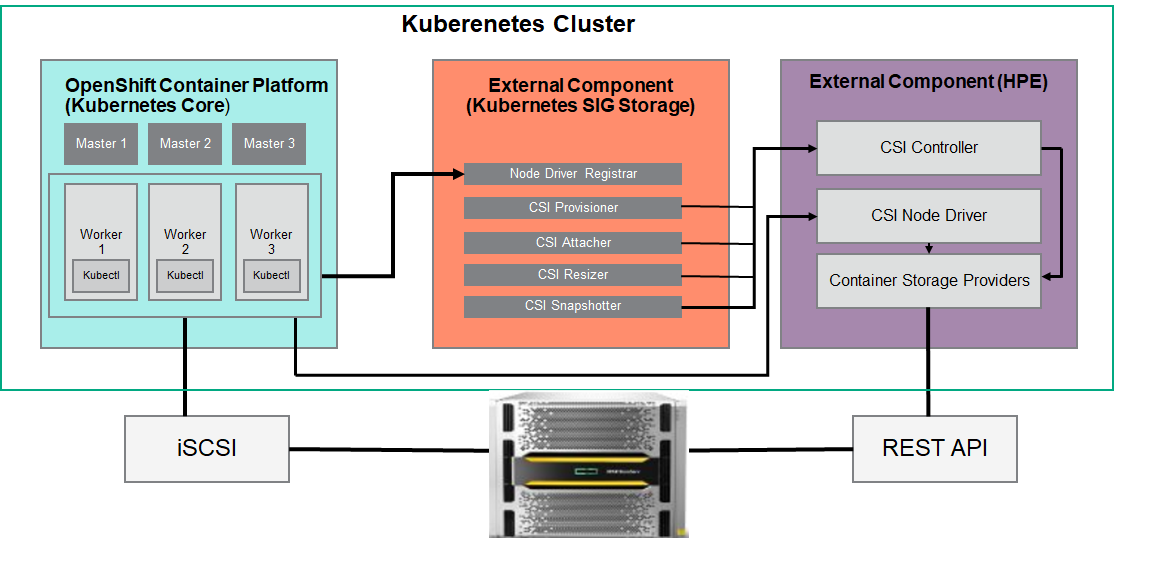
Figure 39. CSI Driver Architecture
The OpenShift Container Platform 4.6 cluster comprises the master and worker nodes (physical and virtual) with CoreOS deployed as the operating system. The iSCSI interface configured on the host nodes establishes the connection with the HPE 3PAR array to the cluster. Upon successful deployment of CSI Driver, the CSI controller, CSI Driver, and 3PAR CSP gets deployed which communicates with the HPE 3PAR array via REST APIs. The associated features on Storage Class such as CSI Provisioner, CSI Attacher, and others are configured on the Storage Class.
# Configuring CSI Driver
Prior to configuring the HPE CSI driver, the following prerequisites needs to be met.
PREREQUISITES
- OpenShift Container Platform 4.6 must be successfully deployed and console should be accessible.
- iSCSI interface should be configured for HPE 3PAR Storage on Host server.
- Additional iSCSI network interfaces must be configured on worker nodes (physical and virtual).
- Deploy scc.yaml file to enable Security Context Constraints (SCC).
NOTE
To get access to the host ports, host network, and to mount the host path volume, the HPE CSI Driver needs to be run in privileged mode. Prior to deployment of the CSI operator on OpenShift, createSCC to allow CSI driver to run with these privileges. Download SCC yaml file from GitHub https://raw.githubusercontent.com/hpe-storage/co-deployments/master/operators/hpe-csi-operator/deploy/scc.yaml (opens new window) and update relevant fields such as project or namespace before running the yaml to deploy SCC.
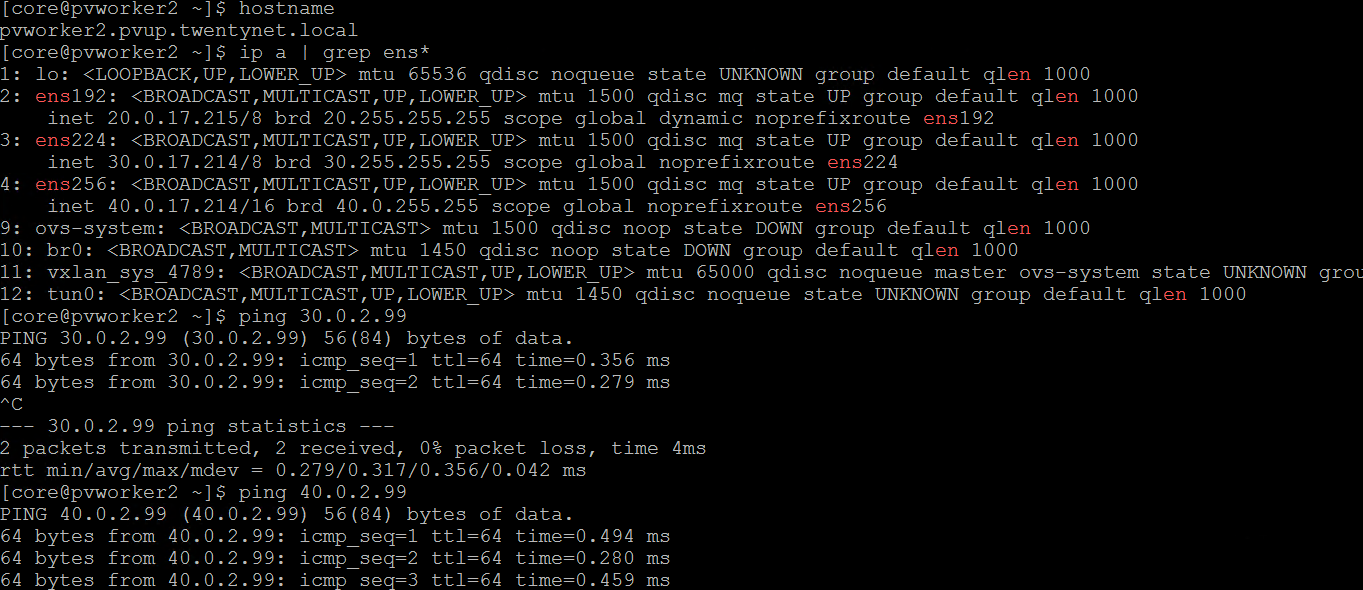
# Configuring iSCSI interface on worker nodes
Additional iSCSI interface needs to be configured on all the worker nodes (physical and virtual) for establishing the connection between the OCP cluster and HPE 3PAR array. iSCSI_A and iSCSI_B interfaces needs to be configured on the worker nodes for redundancy. Follow the steps as listed to configure the additional interface.
Create interface configuration files (ifcfg files) on each of the worker nodes by specifying the following parameters.
HWADDR=52:4D:1F:20:01:94 (MAC address of the iSCSI connector) TYPE=Ethernet BOOTPROTO=none IPADDR=40.0.17.221 PREFIX=16 DNS1= 20.1.1.254 ONBOOT=yes
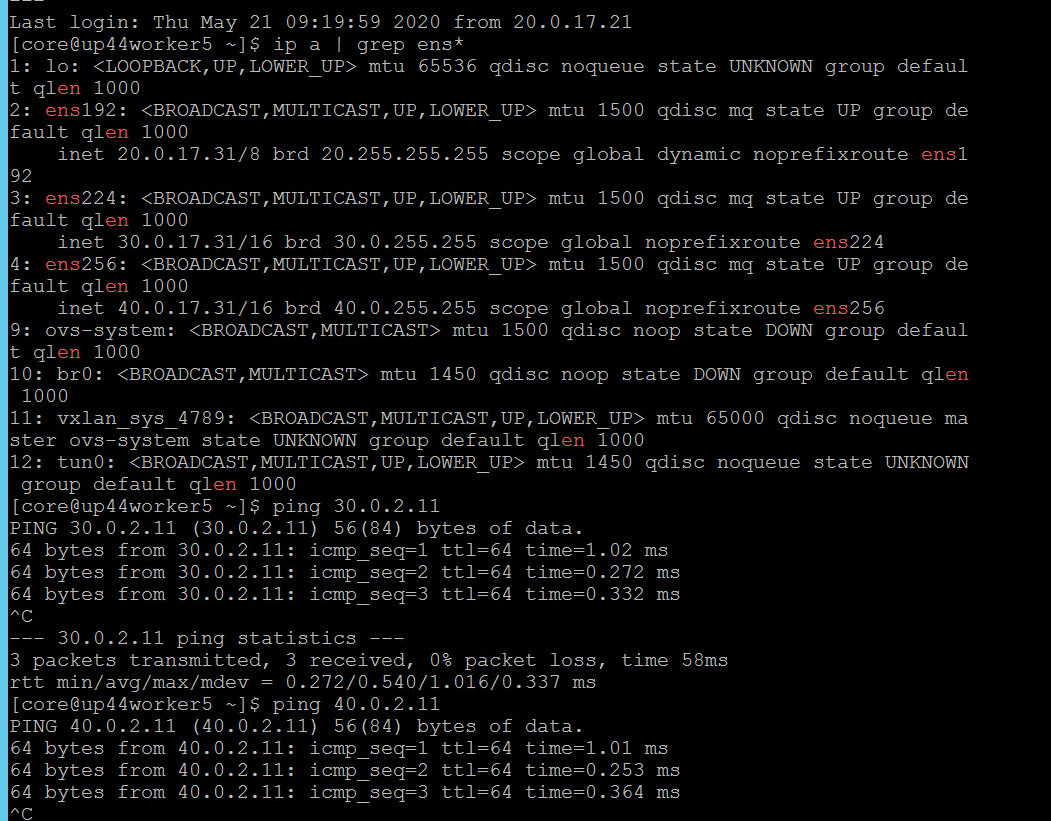
Reboot the worker nodes after configuring the ifcfg files. The 3PAR Discovery IP should be pingable.
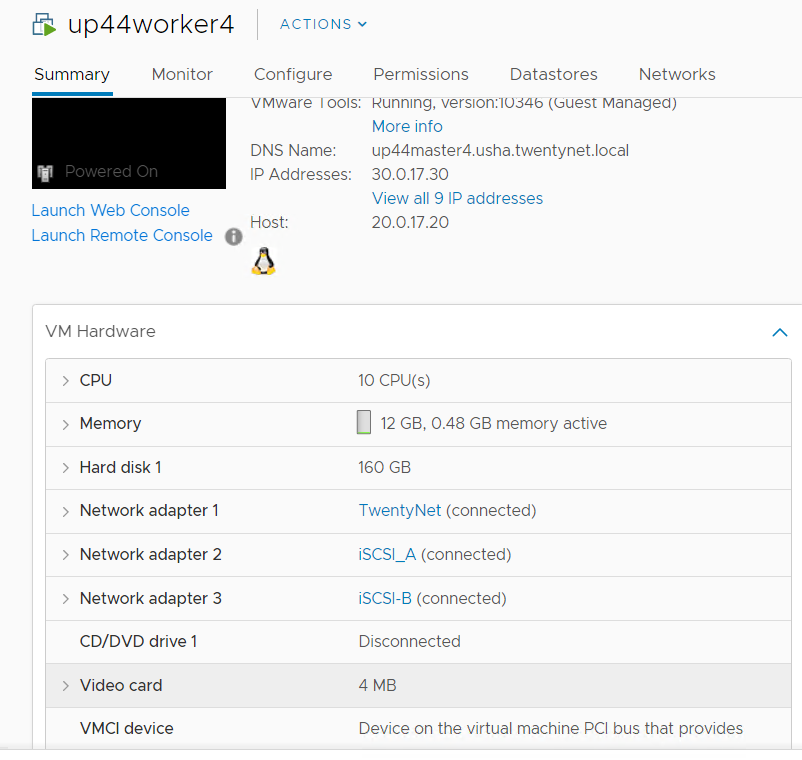
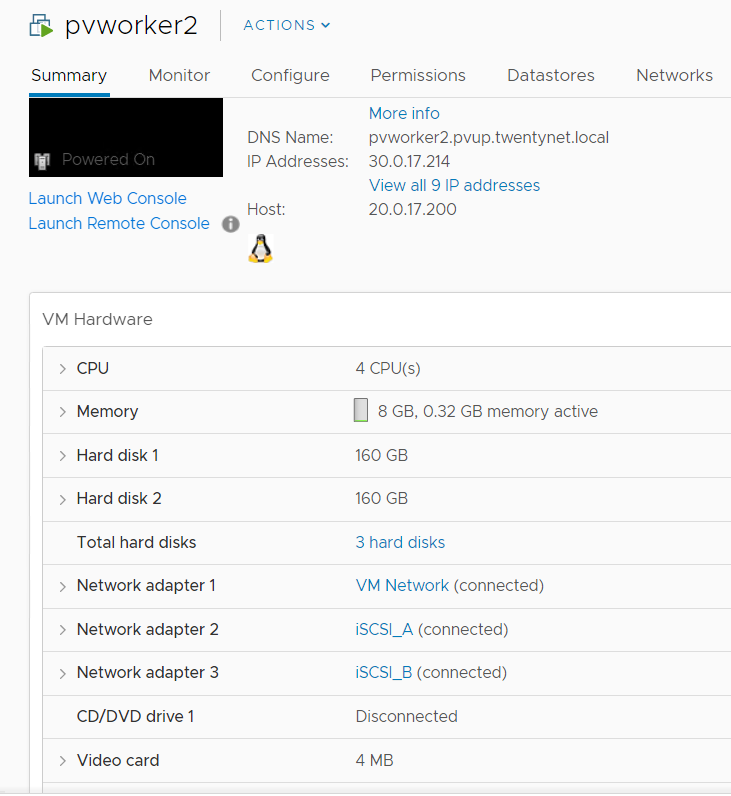
For virtual worker nodes, additional network adapters are added and the corresponding network port groups are selected.
# iSCSI Interface for physical worker nodes
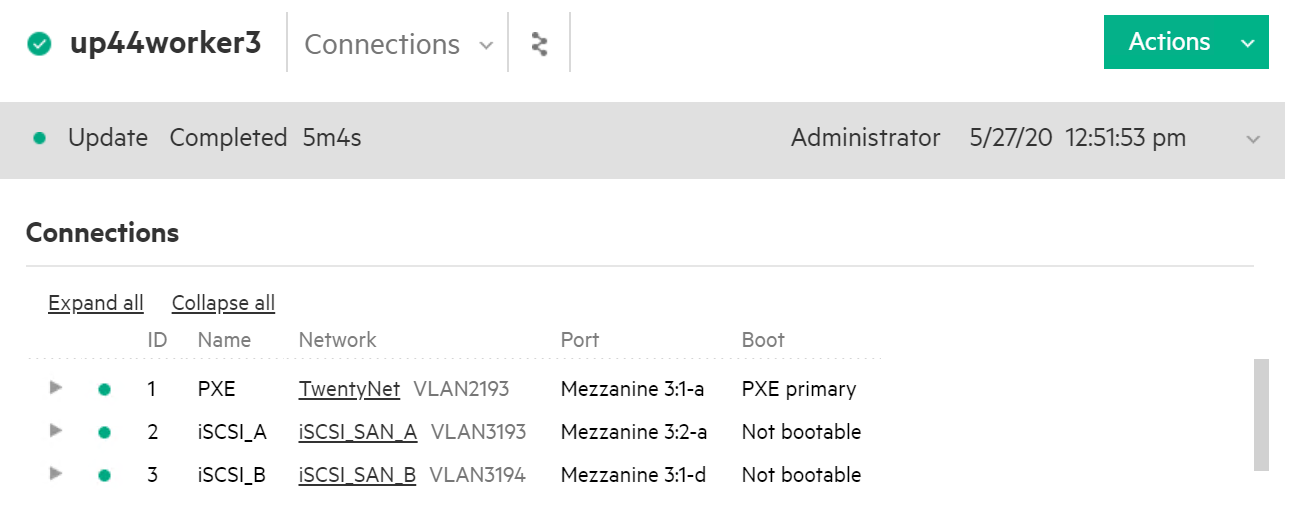
For physical worker nodes, the server profile is configured with iSCSI_A connection for storage interface and additional iSCSI_B connection is added to the server profile for redundancy.
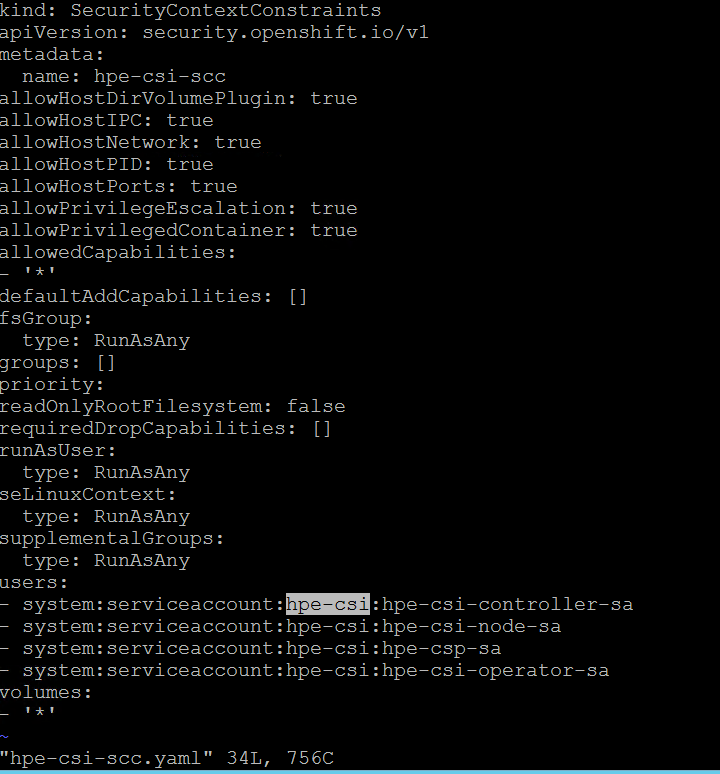
# Steps to deploy SCC
The following figure shows the parameters that needs to be edited (project name) where the CSI Operator is being deployed.
- From the Installer vm, download the scc.yaml file from GitHub from
the following path.
> curl -sL https://raw.githubusercontent.com/hpe-storage/co-deployments/master/operators/hpe-csi-operator/deploy/scc.yaml > hpe-csi-scc.yaml - Edit relevant parameters such as Project name and save the file.
- Deploy SCC and check the outputOutput:
> oc create -f hpe-csi-scc.yamlsecuritycontextconstraints.security.openshift.io/hpe-csi-scc created
# Installing HPE CSI Driver on an existing Red Hat OpenShift Container Platform
# Creating Namespace
Before installing the CSI Driver from the OpenShift console, create a namespace called HPE-CSI Driver. Perform the following steps to create a Namespace.
- Click Administration → Namespaces in the left pane of the Console.
- Click Create Namespaces.
- In the Create Namespace dialog box -> enter HPE- CSI.
- Click Create.
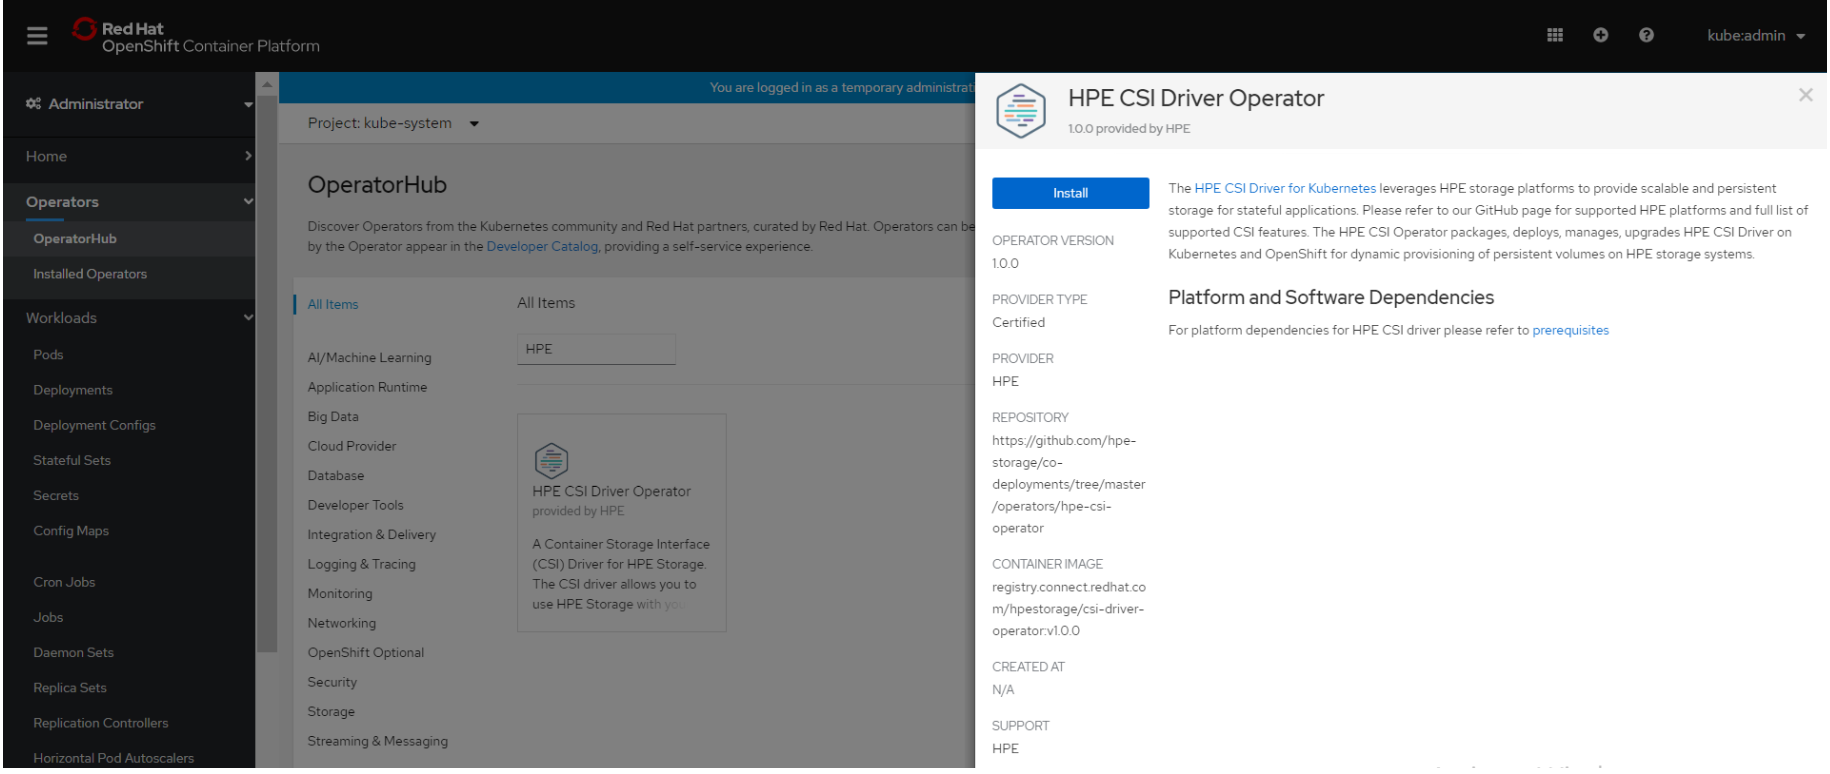
# Installing Red Hat HPE CSI Driver Operator using the Operator Hub
# Installing HPE CSI Driver Operator
- Login to the Red Hat OpenShift Container Platform Web Console.
- Click Operators → Operator Hub.
- Search for HPE CSI Driver Operator from the list of operators and click HPE CSI Driver operator.
- On the HPE-CSI Operator page, click Install.
- On the Create Operator Subscription page, the Installation Mode, Update Channel and Approval Strategy options are available.
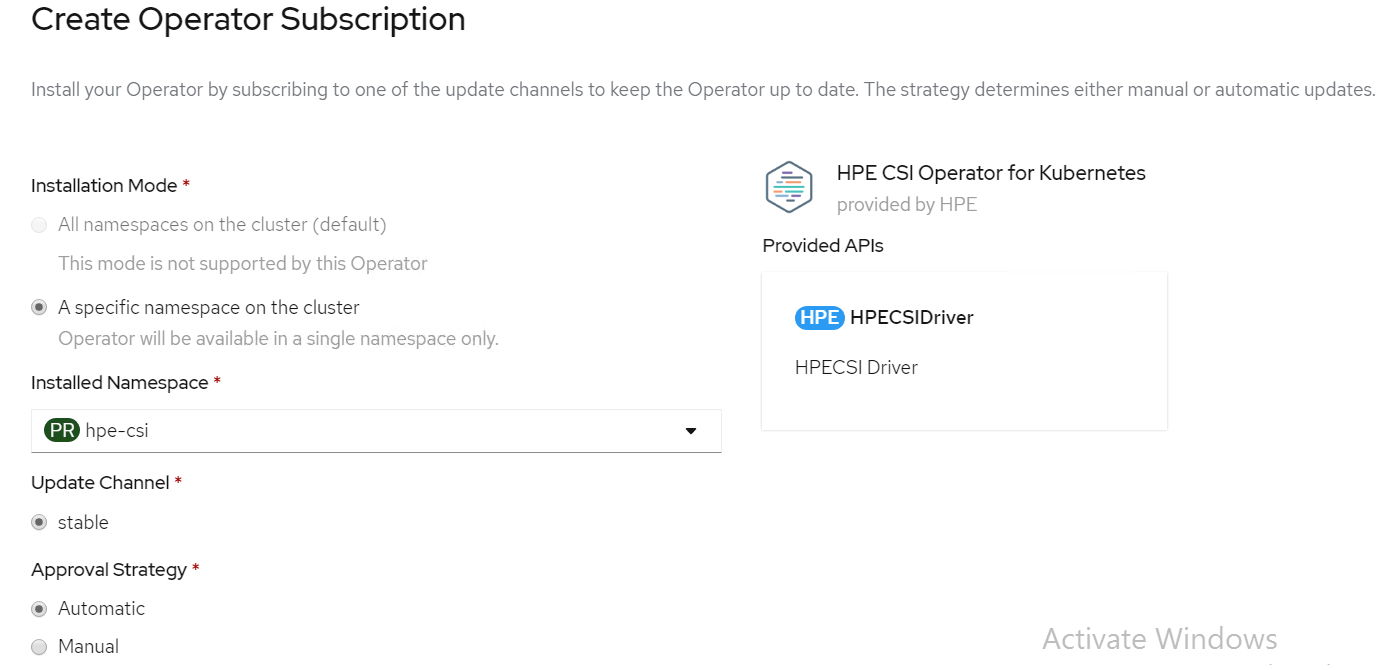
- Select an Approval Strategy. The available options are:
- Automatic: Specifies that the OpenShift Container Platform is required to upgrade HPE CSI Storage automatically. Select the Automatic option.
- Manual: Specifies that you need to upgrade to OpenShift Container Platform manually.
- Click Subscribe.
- The Installed Operators page is displayed with the status of the operator as shown.

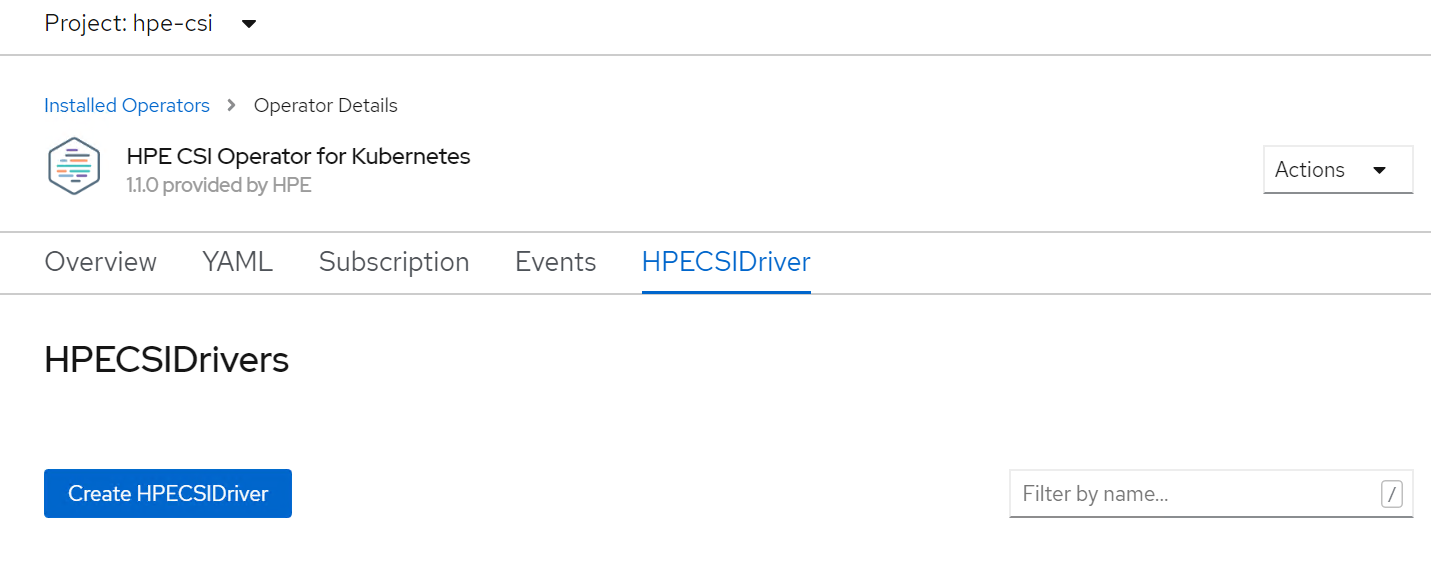
# Creating HPE CSI driver
The HPE CSI Driver allows any vendor or project to develop its own Container Storage Provider by using the CSP specification (opens new window). This makes it very easy for third- parties to integrate their storage solution into Kubernetes as all the intricacies are taken care of by the HPE CSI Driver.
To create HPE CSI driver, perform the following steps.
Click Operators → Installed Operators from the left pane of the OpenShift Web Console to view the installed operators.
On the Installed Operator page, select HPE CSI Driver from the Project drop down list to switch to the HPE-CSI project
Click HPE CSI Driver.
On the HPE CSI Driver Operator page, scroll right and click the HPE CSI Driver yaml file.
Edit the HPE CSI Driver yaml file with required values like backend (3PAR array IP), password and username as shown.

- On the HPE CSI Driver Operator page, scroll right and click the
HPECSI Driver tab as shown.
# Verifying creation of HPE CSI Driver
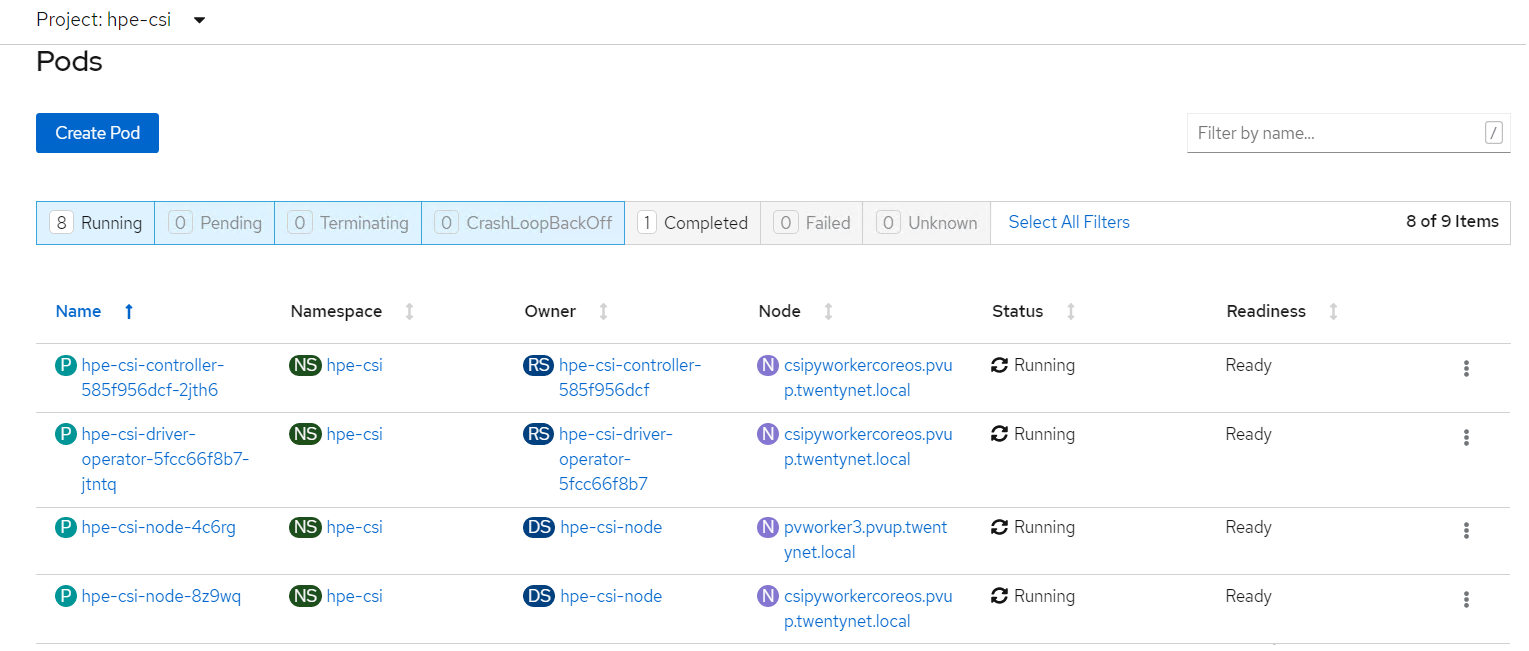
After the HPECSI Driver is deployed, one can see the associated deployment pods being created such as hpe-csi-controller, hpe-csi-driver, and primera3par-csp.
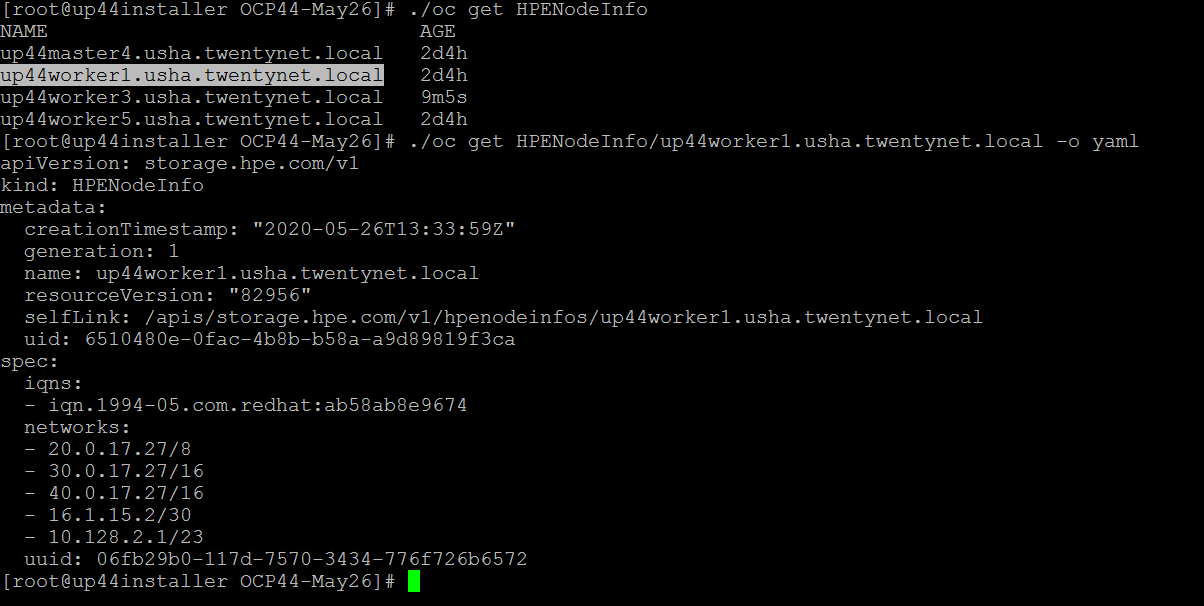
To verify the HPE CSI Node Info, perform the following steps.
Run the following command from the Installer VM to check HPENodeinfo and network status of worker nodes.
> oc get HPENodeInfo
> oc get HPENodeInfo/<workernode fqdn > -o yaml
# HPE CSI Driver Storage installation
After installing HPE CSI Driver, Storage Class is created manually.
- From the OpenShift console navigate to Storage -> Storage Class
- Click Create Storage Class -> Click Edit yaml -> insert the parameters for SC creation -> Click Create.
- 'hpe-standard' storage class is created as shown.
Run the following command on the CLI to tag the storage class default- storage class by :
> oc annotate storageclass hpe-standard storageclass.kubernetes.io/is-default-class=true
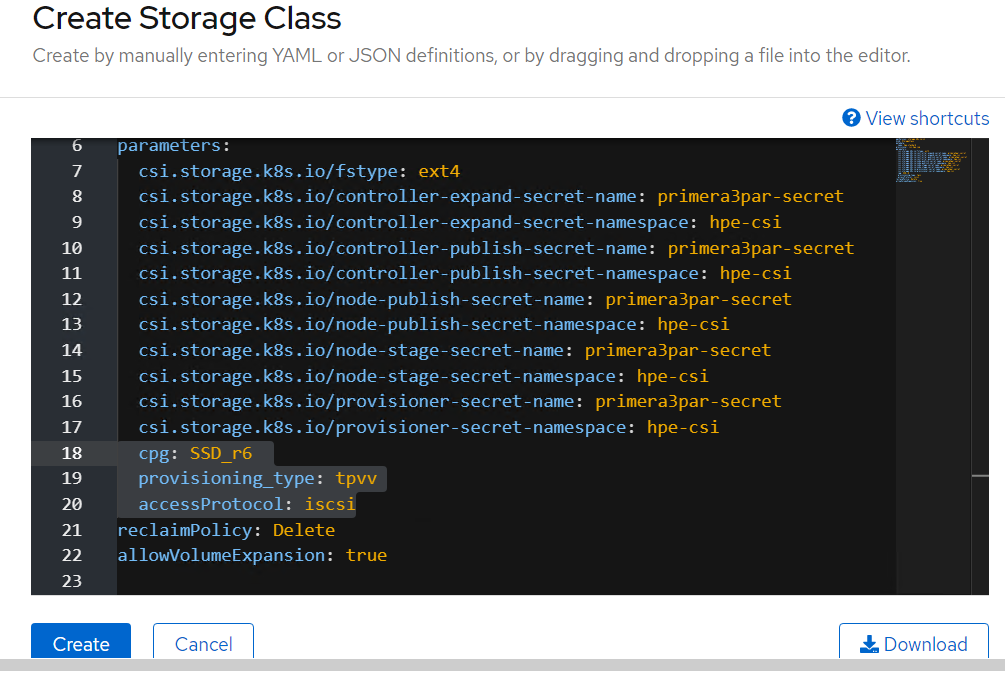
The create Storage Class yaml file parameters are as follows:
apiVersion: storage.k8s.io/v1
kind: StorageClass
metadata:
  name: hpe-standard
provisioner: csi.hpe.com
parameters:
  csi.storage.k8s.io/fstype: ext4
  csi.storage.k8s.io/controller-expand-secret-name: primera3par-secret
  csi.storage.k8s.io/controller-expand-secret-namespace: hpe-csi
  csi.storage.k8s.io/controller-publish-secret-name: primera3par-secret
  csi.storage.k8s.io/controller-publish-secret-namespace: hpe-csi
  csi.storage.k8s.io/node-publish-secret-name: primera3par-secret
  csi.storage.k8s.io/node-publish-secret-namespace: hpe-csi
  csi.storage.k8s.io/node-stage-secret-name: primera3par-secret
  csi.storage.k8s.io/node-stage-secret-namespace: hpe-csi
  csi.storage.k8s.io/provisioner-secret-name: primera3par-secret
  csi.storage.k8s.io/provisioner-secret-namespace: hpe-csi
  cpg: SSD_r6
  provisioning_type: tpvv
  accessProtocol: iscsi
reclaimPolicy: Delete
allowVolumeExpansion: true
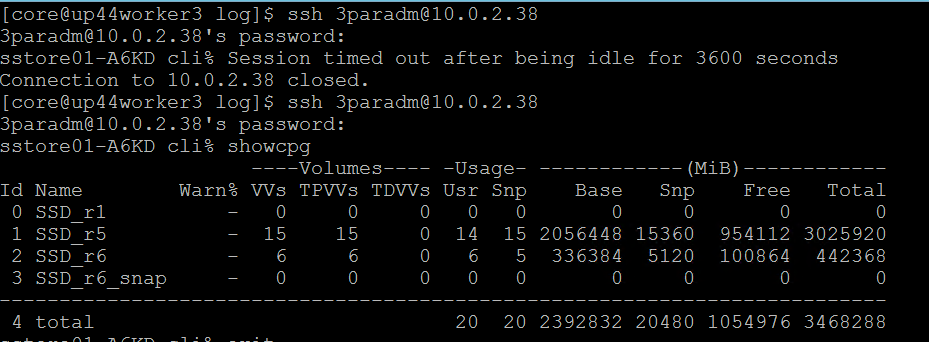
NOTE
From the worker node, ssh to the 3PAR array to check on the cpg values for Storage Class creation as shown.
# Sample application deployment
A sample application deployed on the existing Red Hat OpenShift Container Platform utilizes the volume from 3PAR array through HPE CSI Driver. A sample application such as mongodb or mariadb is deployed and scheduled on the worker nodes. Follow the steps to deploy a sample application.
- Run the following command to deploy a sample application.
> oc new-app mongodb-persistent
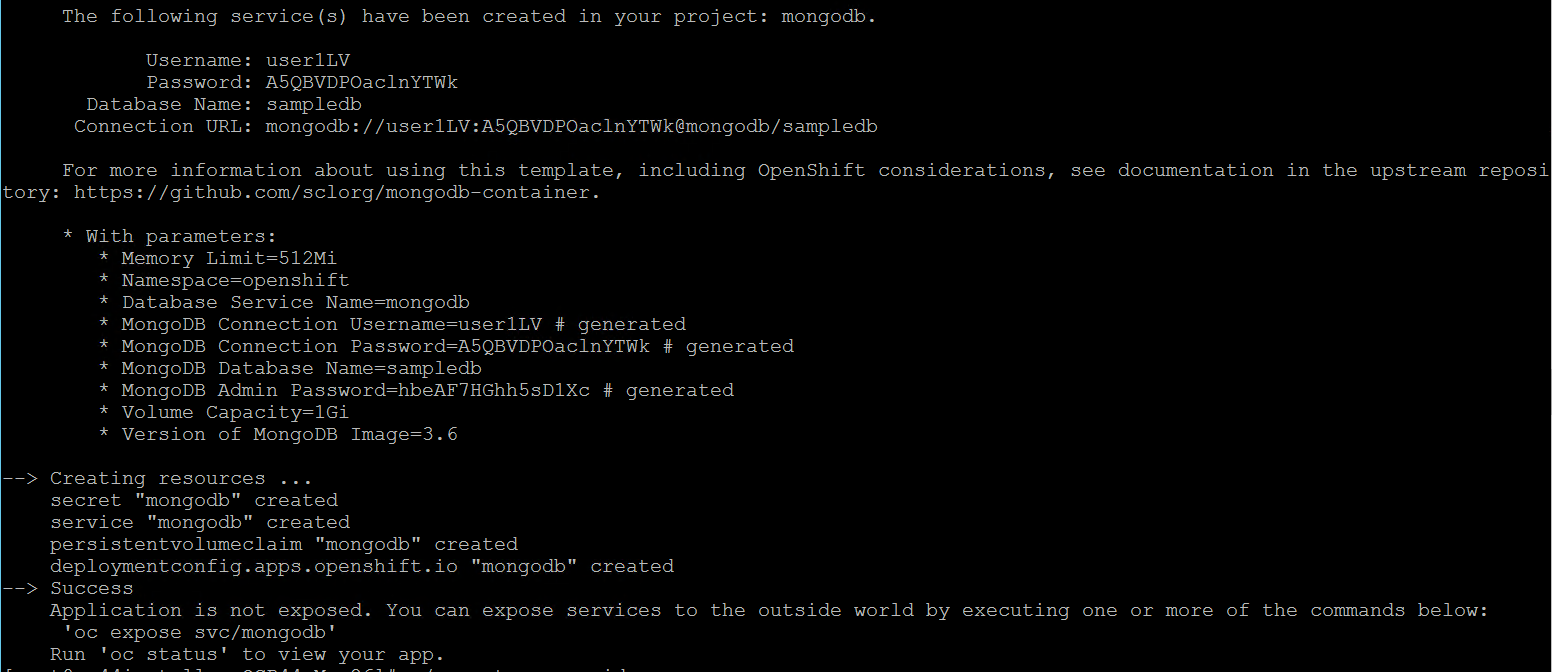
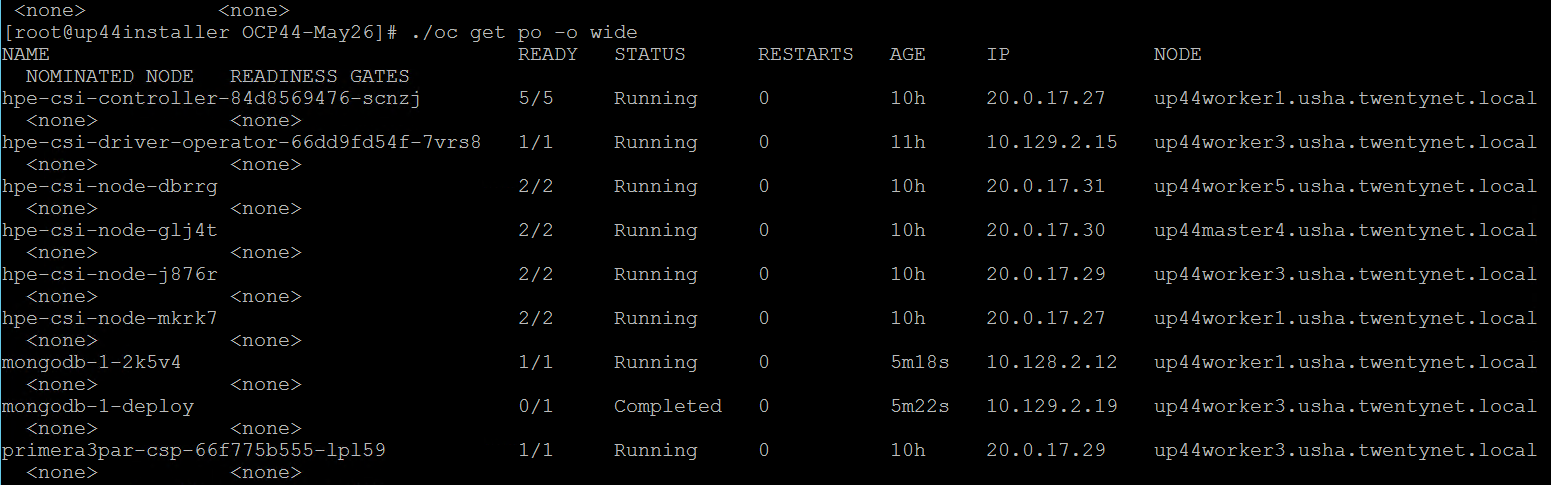
- Check the status of PVC and Pod.
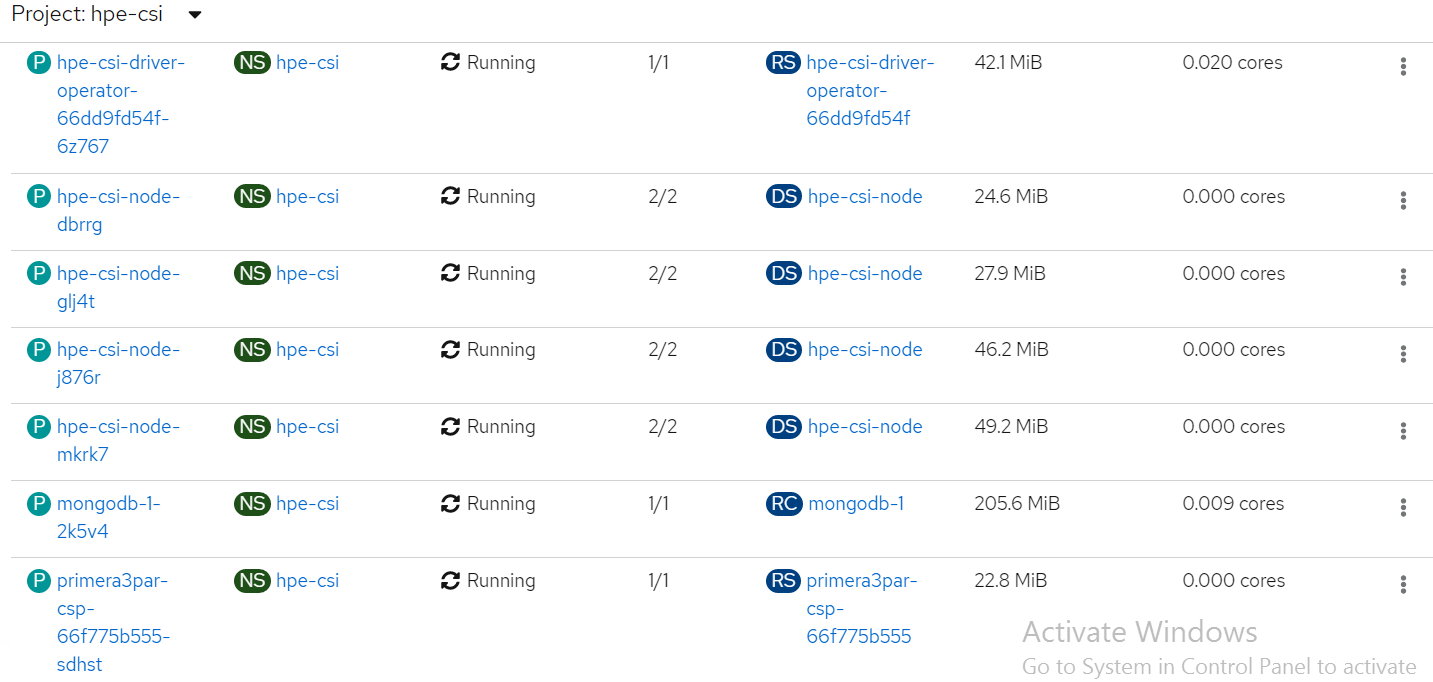
List of pods created on the cluster along with the one for sample application deployed is shown.
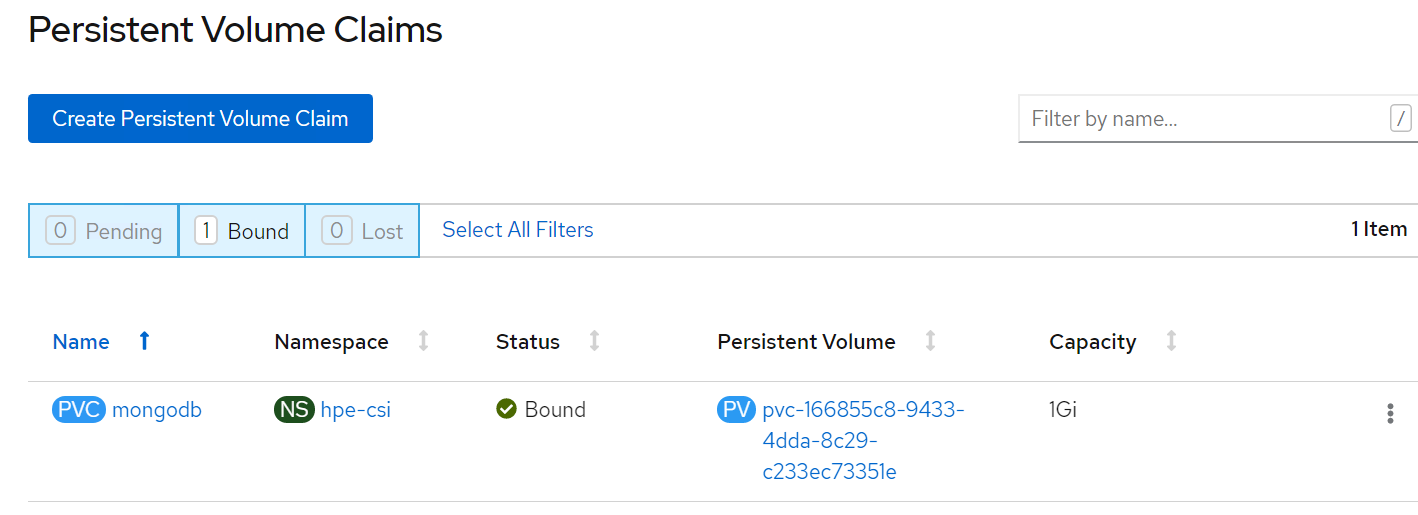
PVC for the sample application deployed is created and bound. This can be verified in the OpenShift Console by navigating to Storage -> Persistent Volume Claim section.
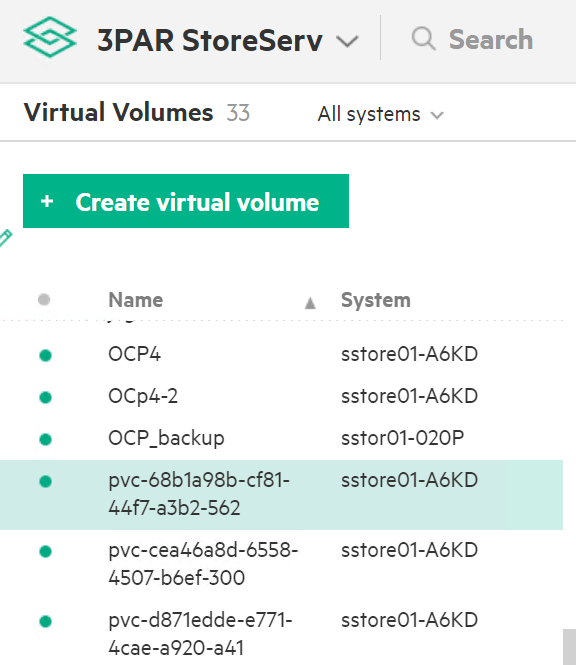
# Verification of Persistent Volume Claim on 3PAR array
The PVC created for the sample application deployed (mongodb) can be verified on the 3PAR array by searching for the PVC id seen on the console or on the CLI.
NOTE
The PVC ID is not completely seen on 3PAR console as it gets truncated beyond 30 characters.
Steps to verify the PVC on 3PAR array:
- Login to the 3PAR SSMC URL at https://10.0.20.19:8443/#/login with appropriate credentials.
- Navigate from the drop- down menu option on 3PAR StoreServ -> Virtual volumes
- The volume for the PVC created can be seen under the list of virtual volume as shown.
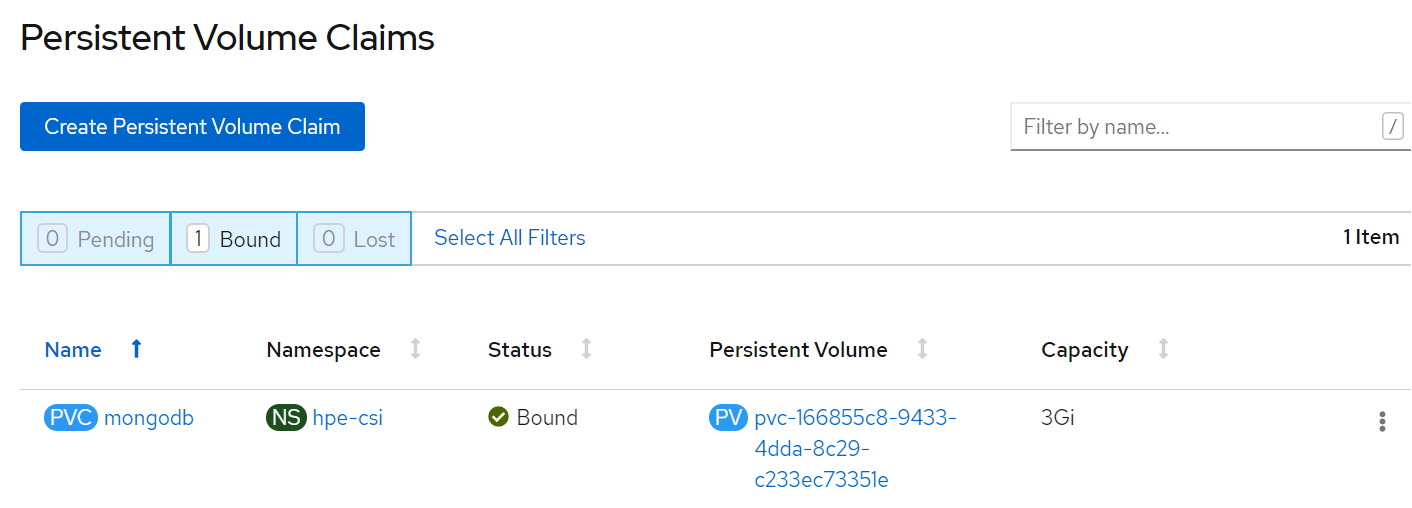
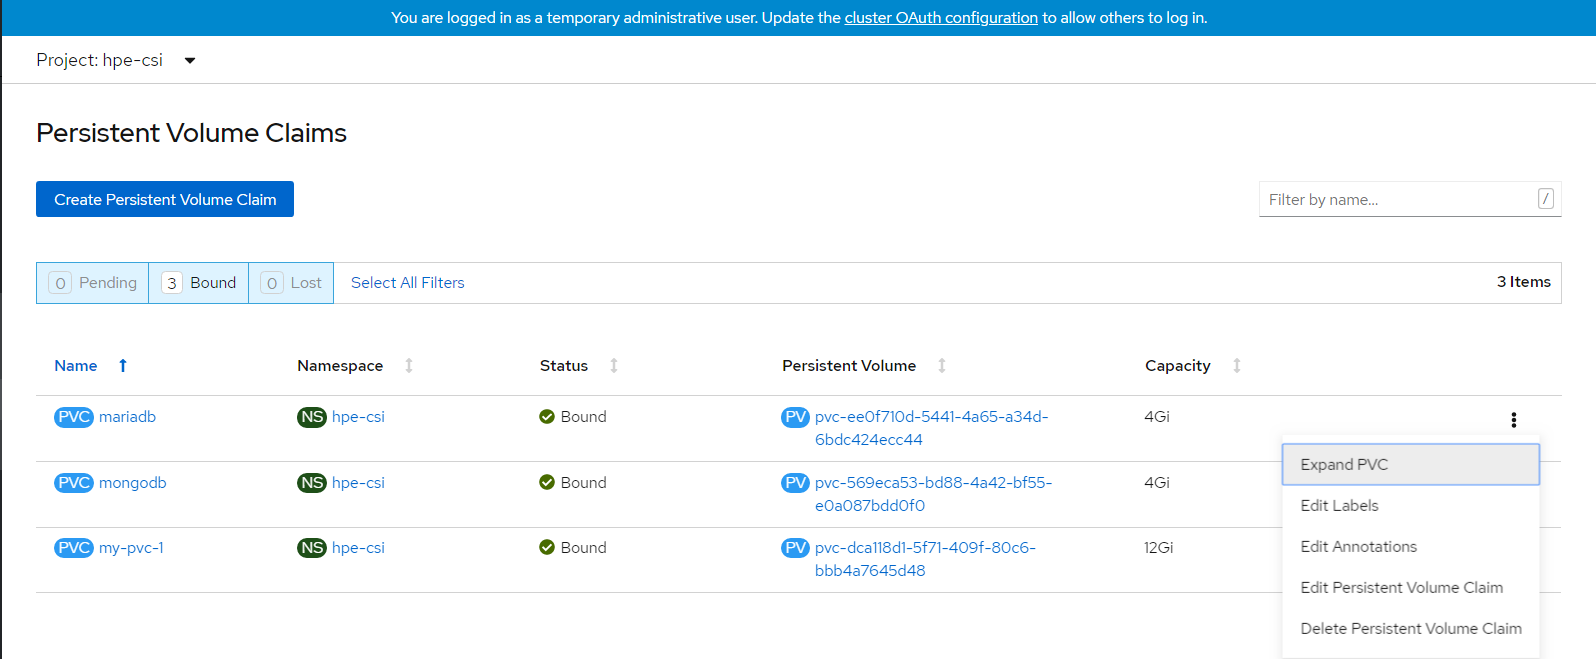
# OpenShift Persistent Volume Expansion
The volume of the sample application deployed can be expanded by specifying the volume size on the OpenShift console. The steps for PVC expansion are as follows.
- On the OpenShift web console navigate to Storage -> Persistent Volume Claims -> select a specific pod -> click on the dots seen towards the right side -> select 'Expand PVC'

- Change the volume size from 1Gi to 3Gi and click Expand button as shown.
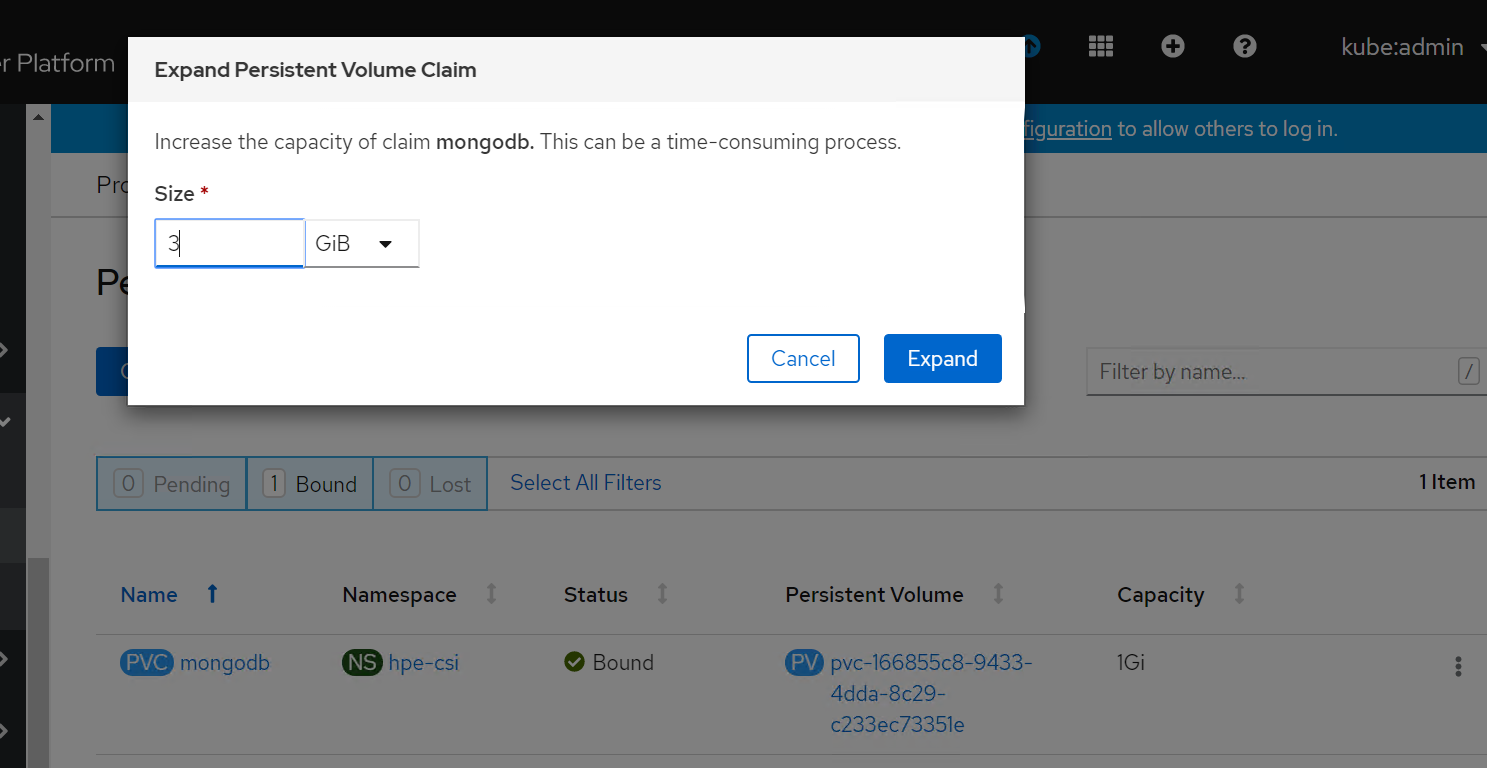
- Now, you can see PVC and PV has been resized to 3 GB.
# CSI Driver
CSI was developed as a standard for exposing block and file storage systems to containerized workloads on Container Orchestrator Systems (COS) like Kubernetes. Container Storage Interface (CSI) is an initiative to unify the storage interface of COS combined with storage vendors. This means, implementing a single CSI for a storage vendor is guaranteed to work with all COS. With the introduction of CSI, there is a clear benefit for the COS and storage vendors. Due to its well-defined interfaces, it also helps developers and future COS to easily implement and test CSI. Volume plugins served the storage needs for container workloads in case of Kubernetes, before CSI existed. The HPE CSI Driver is a multi-vendor and multi-backend driver where each implementation has a Container Storage Provider (CSP). The HPE CSI Driver for Kubernetes uses CSP to perform data management operations on storage resources such as searching for a logical unit number (lun) and so on. Using the CSP specification, the HPE CSI Driver allows any vendor or project to develop its own CSP, which makes it very easy for third- parties to integrate their storage solution into Kubernetes as all the intricacies are taken care of by the HPE CSI Driver.
This document contains details on how to configure a HPE CSI Driver storage for 3PAR on an existing Red Hat OpenShift Container Platform 4.6.
# Deploying HPE CSI Driver Nimble Storage on OCP 4.6
# Configuring iSCSI interface on worker nodes
Additional iSCSI interface needs to be configured on all the worker nodes (physical and virtual) for establishing the connection between the OCP cluster and HPE Nimble array. iSCSI_A and iSCSI_B interfaces needs to be configured on the worker nodes for redundancy. Follow the steps as- listed to configure the additional interface. 1. Create interface configuration files (ifcfg files) on each of the worker nodes by specifying the following parameters.
HWADDR=52:4D:1F:20:01:94 (MAC address of the iSCSI connector)
TYPE=Ethernet
BOOTPROTO=none
IPADDR=40.0.17.221
PREFIX=16
DNS1= 20.1.1.254
ONBOOT=yes
- Reboot the worker nodes after configuring the ifcfg files. The Nimble Discovery IP should be pingable.
For virtual worker nodes, additional Network adapters are added and the corresponding network port groups are selected.
# iSCSI Interface for Physical worker nodes
For Physical worker nodes, the server profile is configured with iSCSI_A connection for storage interface and additional iSCSI_B connection is added to the server profile for redundancy.

# OpenShift Persistent Volume Expansion
The volume of the sample application deployed can be expanded by specifying the volume size on the OpenShift console. The steps for PVC expansion is listed as follows.
- On the OpenShift web console navigate to Storage -> Persistent Volume Claims -> select a specific pod -> click on the dots seen towards the right side -> select 'Expand PVC'
- Change the volume size from 1Gi to 3Gi and click Expand button.

- Now you can see PVC and PV has been resized to 3 GB.

# Deploying Openshift Container Storage
This section covers deploying OpenShift Container Storage 4.5 on existing Red Hat OpenShift Container Platform 4.6 worker nodes.
The OpenShift Container Storage operator installation will be using Local Storage operator which will use file system storage of 10GB for monitoring purpose and block storage of 500GB/2TB for OSD (Object Storage Daemon) volumes. These OSD are useful for configuring any application on top of OCP cluster using OCS configuration.
The below operators are required to create OCS cluster and deployed through automation fashion.
Local Storage Operator
OpenShift Container Storage Operator
# Flow Diagram
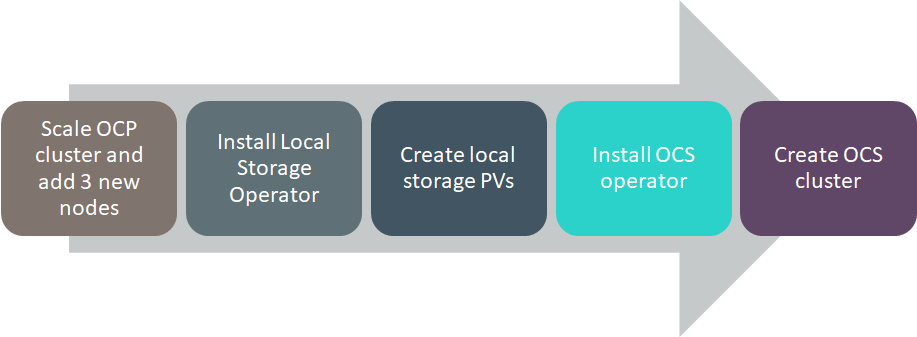
Figure 67. Openshift Container Storage Solution Flow Diagram
# Configuration requirements
The below table shows about all required worker node configuration.
| Server Role | CPU | RAM | HardDisk1 | HardDiak2 | HardDisk3 |
|---|---|---|---|---|---|
| Worker | 16 | 64 | 120 GB | 10 GB | 500 GB/2 TB |
PREREQUISITES
Red Hat OpenShift Container Platform 4.6 cluster console is required with the login credentials.
Availability of any local storage from any storage (Local Storage) in OpenShift Container Platform.
OCS installation on OCP 4.6 cluster requires a minimum of 3 worker nodes but OCS should have exact 3 worker nodes which use two more hard disks with 10GB for mon POD (3 in total using always a PVC) + 500GB (or more than 500GB) volume (a PVC using the default "thin" storage class) for the OSD volumes. It also requires 16 CPUs and 64GB RAM for each node and worker node hard disk configuration as shown in above figure.
# Scripts for deploying OCS cluster
NOTE
BASE_DIR - is a base directory path for all automated scripts directories are in place and path is /opt/hpe/solutions/ocp/hpe-solutions-openshift/synergy/scalable
This section provides details on the scripts developed to automate the installation of OCS operator on the OCP cluster. The scripts used to deploy OCS can be found in the installer VM at $BASE_DIR/ocs_installation.
install_ocs_operator.py - main python script which installs Local Storage operator, OpenShift Container Storage operators, creates file system & block storage and also creates SCs, PVs, PVCs.
config.py - This python script is used to convert user input values into program variables for usage by the install_ocs_operator.py script.
userinput.json - The userinput.json file needs to be modified as per user configuration and requirements for installing and scaling OCS cluster.
config_secrets.json -- This encrypted file has OCP cluster login credentials and user needs to provide credentials to this file using 'ansible-vault' command.
create_local_storage_operator.yaml -- Creates Local Storage operator's Namespace, installs Local Storage operator.
local_storage_fs.yaml -- Creates file system storage for monitoring OCS cluster.
local_storage_block.yaml -- Creates block storage for claiming OSD persistent volumes.
ocs_operator.yaml -- This playbook creates OpenShift Container Storage Namespace, block storage for bounding PVC to Storage Class.
storage_ocs.yaml -- This playbook creates storage classes, PVCs, pods to bring up the OCS cluster.
scaling_ocs_operator.py - This python script is used to scale OCS cluster by expanding OCS storage with 3 more worker nodes.
# Installing OpenShift Container Storage on OpenShift Container Platform
Login to the installer machine as non-root user and browse to python virtual environment as per DG.
Update the config_secrets.json file found at $BASE_DIR/ocs_installation using 'ansible-vault' command as shown below:
The below command is used to open encrypted file config_secrets.json
> ansible-vault edit config_secrets.json# OPENSHIFT_USERNAME: <OpenShift Container Platform cluster username> # OPENSHIFT_PASSWORD: <OpenShift Container Platform cluster password>Update the userinput.json file is found at $BASE_DIR/ocs_installation with the following setup configuration details:
# "OPENSHIFT_DOMAIN": "<OpenShift Server sub domain fqdn
(api.domain.base_domain)>",

# "OPENSHIFT_PORT": "<OpenShift Server port number (OpenShift
Container Platform runs on port 6443 by default)>",

# "LOCAL_STORAGE_NAMESPACE": "<Local Storage Operator Namespace
(local-storage)>",

# "OPENSHIFT_CONTAINER_STORAGE_NAMESPACE": "<OpenShift Container
Storage Operator Namespace (openshift-storage)>",

# "OPENSHIFT_CONTAINER_STORAGE_LOCAL_STORAGE_VERSION":
"<OCP_cluster_version>",

# "OPENSHIFT_CONTAINER_STORAGE_FILESYSTEM_STORAGE": "<Provide 10GiB
worker node's drive for file system storage (Ex: /dev/sdb)>" ,

# "OPENSHIFT_CONTAINER_STORAGE_BLOCK_STORAGE": "<Provide 500Gi worker
node's drive for block storage (Ex: /dev/sdc)>",

# "OPENSHIFT_CLIENT_PATH": "<Provide oc absolute path ending with /
OR leave empty in case oc is available under /usr/local/bin>",

# "OPENSHIFT_CONTAINER_PLATFORM_WORKER_NODES": <Provide OCP worker
nodes fqdn list ["sworker1.fqdn", "sworker2.fqdn",
"worker3.fqdn"]>,

# "OPENSHIFT_CONTAINER_STORAGE_SCALING_WORKER_NODES": <Provide OCS
worker nodes fqdn list ["sworker4.fqdn", "sworker5.fqdn",
"sworker6.fqdn"]>,

# "OPENSHIFT_CONTAINER_STORAGE_BLOCK_VOLUME": "<Provide
base/scale OCS worker node block storage, should be in Gi/Ti (example
- 500Gi or 2Ti)>"
Execute the following command to deploy OCS cluster.
> cd $BASE_DIR/ocs_installation
> python -W ignore install_ocs_operator.py
The output of the above command as shown below:
$ python -W ignore install_ocs_operator.py
Enter key for encrypted variables:
Logging into your OpenShift Cluster
Successfully logged into the OpenShift Cluster
Waiting for 1 minutes to 'Local Storage' operator to be available on
OCP web console..!!
'Local Storage' operator is created..!!
Waiting for 2 minutes to OCS operator to be available on OCP web
console..!!
'OpenShift Container Storage' operator is created..!!
INFO:
1) Run the below command to list all PODs and PVCs of OCS cluster.
'oc get pod,pvc -n openshift-storage'
2) Wait for 'pod/ocs-operator-xxxx' pod to be up and running.
3) Log into OCP web GUI and check Persistant Stoarge in dashboard.
$
# Validation of the OpenShift Container Storage cluster
The required operators will be created after the execution of the script and they will be reflected in the OpenShift console. This section outlines the steps to verify the operators created through script and are reflected in the GUI:
Login to the OpenShift Container Platform web console as the user with administrative privileges.
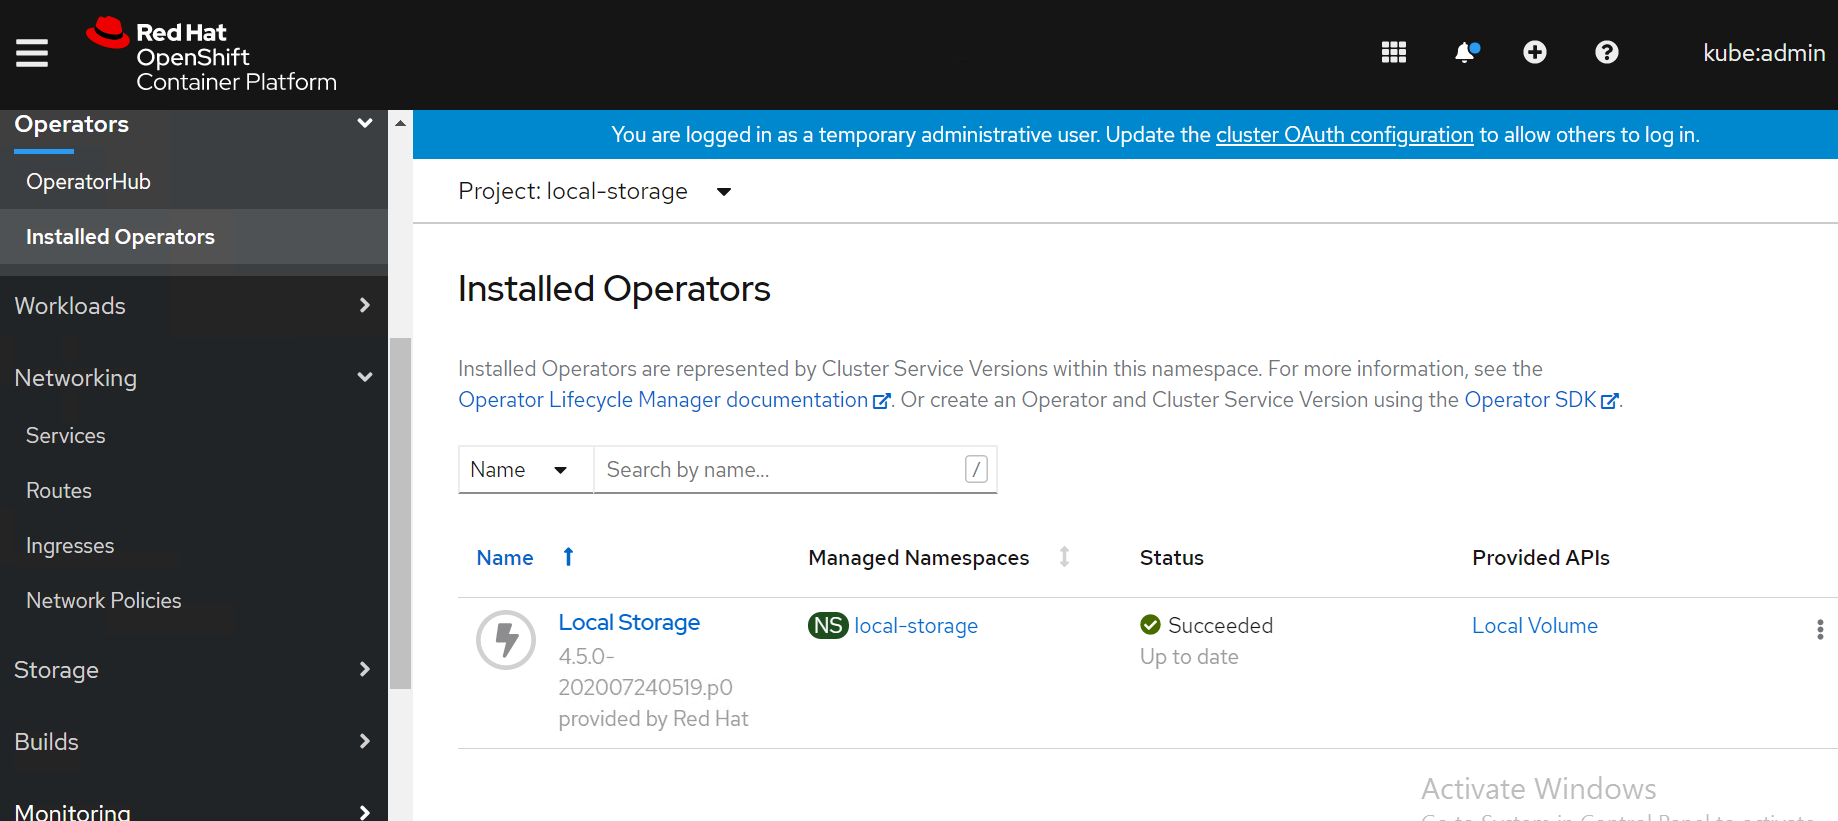
Navigate to Operators -> Project (local-storage) -> Installed Operators select your project name.
The Local Storage operator will be available in the OpenShift web console as shown in below Figure.
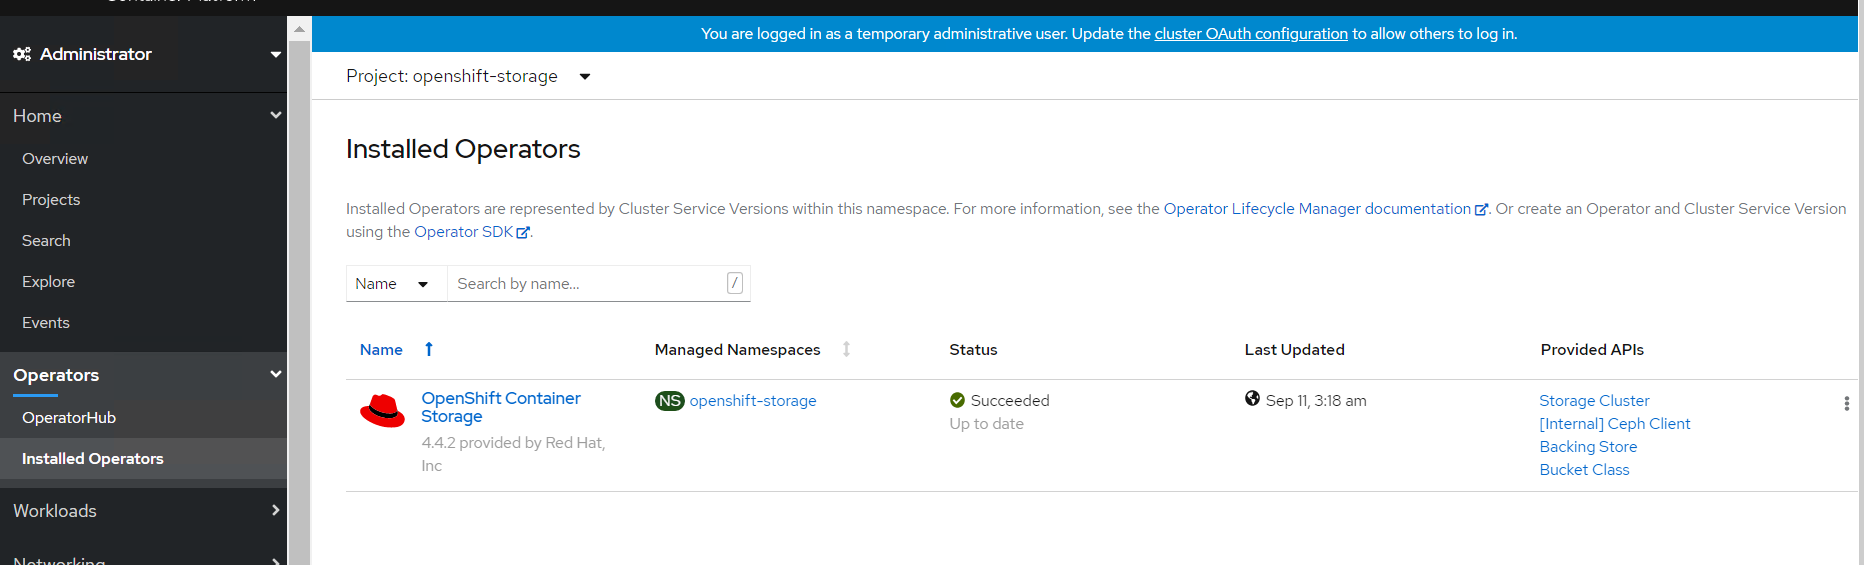
Navigate to Operators -> Installed Operators select your project name openshift-storage for OpenShift Container Storage operator.
The OpenShift Container Storage operator will be available on the OpenShift Container Platformm web console as shown in below Figure.
- SCs of OpenShift Container Storage operator on CLI as shown in below.
> oc get sc
 NAME PROVISIONER RECLAIMPOLICY VOLUMEBINDINGMODE ALLOWVOLUMEEXPANSION
 AGE

 local-sc kubernetes.io/no-provisioner Delete WaitForFirstConsumer
 false 45h

 localblock-sc kubernetes.io/no-provisioner Delete WaitForFirstConsumer
 false 45h

 ocs-storagecluster-ceph-rbd openshift-storage.rbd.csi.ceph.com Delete
 Immediate false 45h

 ocs-storagecluster-cephfs openshift-storage.cephfs.csi.ceph.com Delete
 Immediate false 45h

 openshift-storage.noobaa.io openshift-storage.noobaa.io/obc Delete
 Immediate false 45h
- PVs of OpenShift Container Storage operator on CLI as shown in below.
> oc get pv
 NAME CAPACITY ACCESS MODES RECLAIM POLICY STATUS CLAIM STORAGECLASS
 REASON AGE

 local-pv-2febb788 500Gi RWO Delete Bound
 openshift-storage/ocs-deviceset-1-0-lhtvh localblock-sc 45h

 local-pv-5f19c0e5 10Gi RWO Delete Bound
 openshift-storage/rook-ceph-mon-b local-sc 45h

 local-pv-b73b1cd5 500Gi RWO Delete Bound
 openshift-storage/ocs-deviceset-2-0-jmmck localblock-sc 45h

 local-pv-b8ba8c38 10Gi RWO Delete Bound
 openshift-storage/rook-ceph-mon-a local-sc 45h

 local-pv-c3a372f6 10Gi RWO Delete Bound
 openshift-storage/rook-ceph-mon-c local-sc 45h

 local-pv-e5e3d596 500Gi RWO Delete Bound
 openshift-storage/ocs-deviceset-0-0-5jxg7 localblock-sc 45h

 pvc-8f3e3d8b-6be7-4ba8-8968-69cbc866c89f 50Gi RWO Delete Bound
 openshift-storage/db-noobaa-db-0 ocs-storagecluster-ceph-rbd 45h
- PVCs of OpenShift Container Storage operator on CLI as shown in below.
> oc get pvc -n openshift-storage
 NAME STATUS VOLUME CAPACITY ACCESS MODES STORAGECLASS AGE

 db-noobaa-db-0 Bound pvc-8f3e3d8b-6be7-4ba8-8968-69cbc866c89f 50Gi RWO
 ocs-storagecluster-ceph-rbd 45h

 ocs-deviceset-0-0-5jxg7 Bound local-pv-e5e3d596 500Gi RWO
 localblock-sc 45h

 ocs-deviceset-1-0-lhtvh Bound local-pv-2febb788 500Gi RWO
 localblock-sc 45h

 ocs-deviceset-2-0-jmmck Bound local-pv-b73b1cd5 500Gi RWO
 localblock-sc 45h

 rook-ceph-mon-a Bound local-pv-b8ba8c38 10Gi RWO local-sc 45h

 rook-ceph-mon-b Bound local-pv-5f19c0e5 10Gi RWO local-sc 45h

 rook-ceph-mon-c Bound local-pv-c3a372f6 10Gi RWO local-sc 45h
- PODs of OpenShift Container Storage operator on CLI as shown in below.
> oc get pod -n openshift-storage
 NAME READY STATUS RESTARTS AGE

 csi-cephfsplugin-6xpsk 3/3 Running 0 45h

 csi-cephfsplugin-7khm6 3/3 Running 0 17m

 csi-cephfsplugin-bb48n 3/3 Running 0 45h

 csi-cephfsplugin-cfzx6 3/3 Running 0 15m

 csi-cephfsplugin-provisioner-79587c64f9-2dpm6 5/5 Running 0 45h

 csi-cephfsplugin-provisioner-79587c64f9-hf46x 5/5 Running 0 45h

 csi-cephfsplugin-w6p6v 3/3 Running 0 45h

 csi-rbdplugin-2z686 3/3 Running 0 45h

 csi-rbdplugin-6tv5m 3/3 Running 0 45h

 csi-rbdplugin-jgf5z 3/3 Running 0 17m

 csi-rbdplugin-provisioner-5f495c4566-76rqm 5/5 Running 0 45h

 csi-rbdplugin-provisioner-5f495c4566-pzvww 5/5 Running 0 45h

 csi-rbdplugin-v7lfx 3/3 Running 0 45h

 csi-rbdplugin-ztdjs 3/3 Running 0 15m

 noobaa-core-0 1/1 Running 0 45h

 noobaa-db-0 1/1 Running 0 45h

 noobaa-endpoint-6458fc874f-vpznd 1/1 Running 0 45h

 noobaa-operator-7f4495fc6-lmk9k 1/1 Running 0 45h

 ocs-operator-5d664769f-59v8j 1/1 Running 0 45h

 rook-ceph-crashcollector-sworker1.socp.twentynet.local-84dddddb 1/1
 Running 0 45h

 rook-ceph-crashcollector-sworker2.socp.twentynet.local-8b5qzzsz 1/1
 Running 0 45h

 rook-ceph-crashcollector-sworker3.socp.twentynet.local-699n9kzp 1/1
 Running 0 45h

 rook-ceph-drain-canary-sworker1.socp.twentynet.local-85bffzm66m 1/1
 Running 0 45h

 rook-ceph-drain-canary-sworker2.socp.twentynet.local-66bcfjjfkr 1/1
 Running 0 45h

 rook-ceph-drain-canary-sworker3.socp.twentynet.local-5f6b57c9nt 1/1
 Running 0 45h

 rook-ceph-mds-ocs-storagecluster-cephfilesystem-a-67fbb67dkb4kz 1/1
 Running 0 45h

 rook-ceph-mds-ocs-storagecluster-cephfilesystem-b-db66df7dtqkmx 1/1
 Running 0 45h

 rook-ceph-mgr-a-6f5f7b58dc-fjvjc 1/1 Running 0 45h

 rook-ceph-mon-a-76cc49c944-5pcgf 1/1 Running 0 45h

 rook-ceph-mon-b-b9449cdd7-s6mct 1/1 Running 0 45h

 rook-ceph-mon-c-59d854cd8-gn6sd 1/1 Running 0 45h

 rook-ceph-operator-775cd6cd66-sdfph 1/1 Running 0 45h

 rook-ceph-osd-0-7644557bfb-9l7ns 1/1 Running 0 45h

 rook-ceph-osd-1-7694c74948-lc9sf 1/1 Running 0 45h

 rook-ceph-osd-2-794547558-wjcpz 1/1 Running 0 45h

 rook-ceph-osd-prepare-ocs-deviceset-0-0-5jxg7-t89zh 0/1 Completed 0
 45h

 rook-ceph-osd-prepare-ocs-deviceset-1-0-lhtvh-f2znl 0/1 Completed 0
 45h

 rook-ceph-osd-prepare-ocs-deviceset-2-0-jmmck-wsrb2 0/1 Completed 0
 45h

 rook-ceph-rgw-ocs-storagecluster-cephobjectstore-a-67b7865qx276 1/1
 Running 0 45h
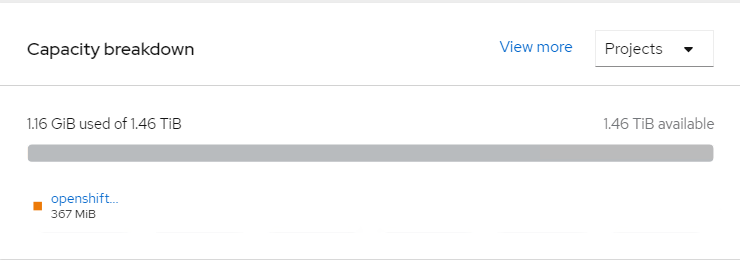
- Storage capacity of OCS cluster with 3 worker nodes (3x500Gi) on OCP web cluster as shown below figure.
# Validating OCS with deploying WordPress application
This section covers the steps to validate the OpenShift Container Storage deployment (OCS) by deploying 2-tier application along with MySQL database.
PREREQUISITES
OCP 4.6 cluster must be installed.
OCS to claim persistent volume (PV).
# Deploying WordPress application
NOTE
BASE_DIR - is a base directory path for all automated scripts directories are in place and path is /opt/hpe/solutions/ocp/hpe-solutions-openshift/synergy/scalable
Login to the installer machine as a non-root user.
From within the repository, navigate to the WordPress script folder
> cd $BASE_DIR/ocs_installation/wordpress
- Run below script to deploy Wordpress application along with MySQL
> ./deploy_wordpress.sh
The deploy_wordpress.sh scripts does the following activities.
Creates project
Sets default storage class
Deploys Wordpress and MySQL app
Create routes
- Below is the output of the scripts
> ./deploy_wordpress.sh
 Already on project "wordpress" on server
 "https://api.socp.twentynet.local:6443".

 You can add applications to this project with the 'new-app' command.
 For example, try:

 oc new-app ruby~https://github.com/sclorg/ruby-ex.git

 to build a new example application in Ruby. Or use kubectl to deploy a
 simple Kubernetes application:

 kubectl create deployment hello-node
 --image=gcr.io/hello-minikube-zero-install/hello-node

 Already on project "wordpress" on server
 "https://api.socp.twentynet.local:6443".

 clusterrole.rbac.authorization.k8s.io/system:openshift:scc:anyuid
 added: "default"error: --overwrite is false but found the following
 declared annotation(s):
 'storageclass.kubernetes.io/is-default-class' already has a value
 (true)

 service/wordpress-http created

 service/wordpress-mysql created

 persistentvolumeclaim/mysql-pv-claim created

 persistentvolumeclaim/wp-pv-claim created

 secret/mysql-pass created

 deployment.apps/wordpress-mysql created

 deployment.apps/wordpress created

 route.route.openshift.io/wordpress-http created

 URL to access application

 wordpress-http-wordpress.apps.socp.twentynet.local
# Verifying the WordPress deployment
- Execute the following command to verify the persistent volume associated with WordPress application and MySQL database.
> oc get pods,pvc,route -n wordpress
 NAME READY STATUS RESTARTS AGE

 pod/wordpress-6f69797b8f-hqpss 1/1 Running 0 5m52s

 pod/wordpress-mysql-8f4b599b5-cd2s2 1/1 Running 0 5m52s

 NAME STATUS VOLUME CAPACITY ACCESS MODES STORAGECLASS AGE

 persistentvolumeclaim/mysql-pv-claim Bound
 pvc-ccf2a578-9ba3-4577-8115-7c80ac200a9c 5Gi RWO
 ocs-storagecluster-ceph-rbd 5m50s

 persistentvolumeclaim/wp-pv-claim Bound
 pvc-3acec0a0-943d-4138-bda9-5b57f8c35c5d 5Gi RWO
 ocs-storagecluster-ceph-rbd 5m50s

 NAME HOST/PORT PATH SERVICES PORT TERMINATION WILDCARD

 route.route.openshift.io/wordpress-http
 wordpress-http-wordpress.apps.socp.twentynet.local wordpress-http
 80-tcp None
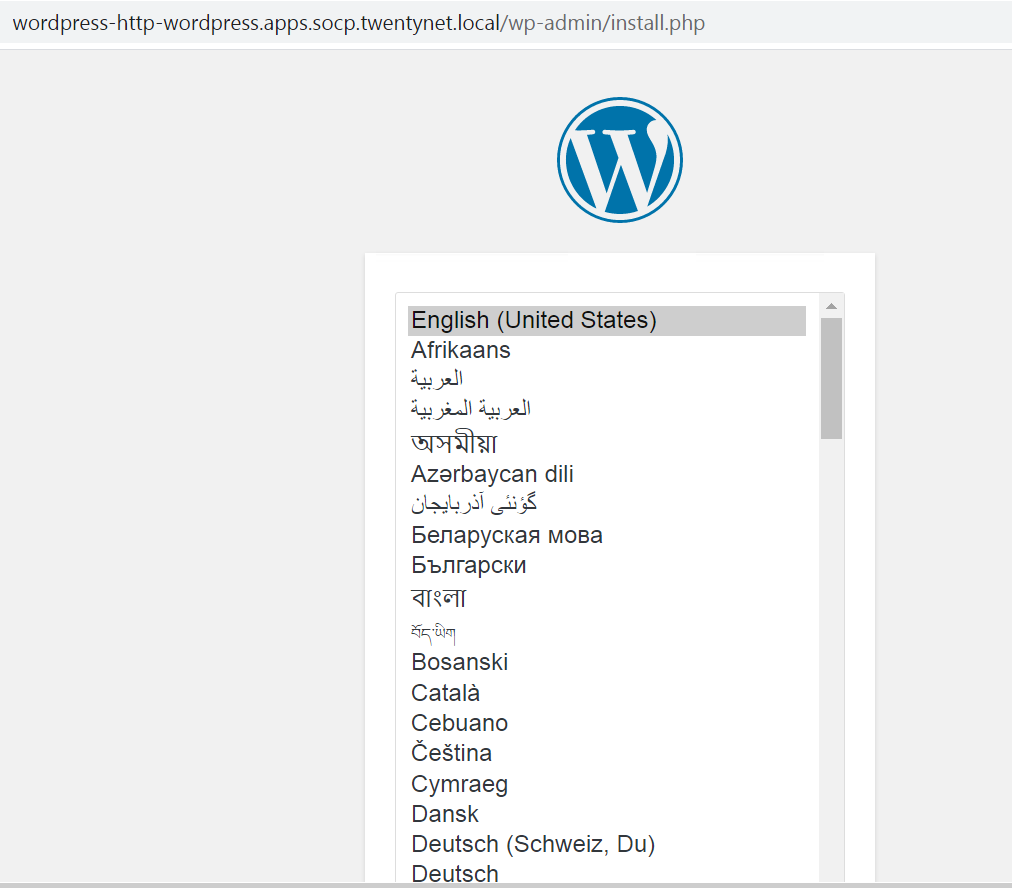
- Access the route url in browser to access the WordPress application as shown below.
# Deploying OpenShift Container Storage with VMware vSphere
OpenShift 4.6 provides software-defined storage that is optimized for container environment. OpenShift Container Storage (OCS) can either be deployed on vSphere or AWS Azure.
For more information on planning your infrastructure requirements for OCS, see https://access.redhat.com/documentation/en-us/red_hat_openshift_container_storage/4.5/pdf/planning_your_deployment/Red_Hat_OpenShift_Container_Storage-4.5-Planning_your_deployment-en-US.pdf (opens new window)
Use the Red Hat®OpenShift®Container Platform operator hub to install OCS on vSphere Platform. For more information on how to install OCS on vSphere using Red Hat OpenShift Container Platform, see https://access.redhat.com/documentation/en-us/red_hat_openshift_container_storage/4.5/html/deploying_openshift_container_storage/index (opens new window)
# CSI Driver Prior to Container Storage Integration (CSI)
Kubernetes provided in-tree plugins to support volume. This posed a problem as storage vendors had to align to the Kubernetes release process to fix a bug or to release new features. This also means every storage vendor had their own process to present volume to Kubernetes.