# Install and Configure Velero
# Introduction
Velero is an open source tool to safely backup and restore, perform disaster recovery, and migrate Kubernetes cluster resources and persistent volumes. It works both on premises and in a public cloud. Velero consists of a server process running as a deployment in your Kubernetes cluster and a command-line interface (CLI) with which DevOps teams and platform operators configure scheduled backups, trigger ad-hoc backups, perform restores, and more.
Unlike other tools which directly access the Kubernetes etcd database to perform backups and restores, Velero uses the Kubernetes API to capture the state of cluster resources and to restore them when necessary. This API-driven approach has a number of key benefits:
Backups can capture subsets of the cluster's resources, filtering by namespace, resource type, and/or label selector, providing a high degree of flexibility around what's backed up and restored.
Users of managed Kubernetes offerings often do not have access to the underlying etc
d database, so direct backups/restores of it are not possible.
Resources exposed through aggregated API servers can easily be backed up and restored even if they're stored in a separate etcd database
Velero provides a suite of tools to backup Kubernetes resources and applications for two main purposes:
Disaster Recovery -- Recover Kubernetes cluster components and applications.
Migration -- Migrate your Kubernetes applications to another Kubernetes cluster.
Data Protection - Offers key data protection features such as scheduled backups, retention schedules, and pre or post-backup hooks for custom actions.
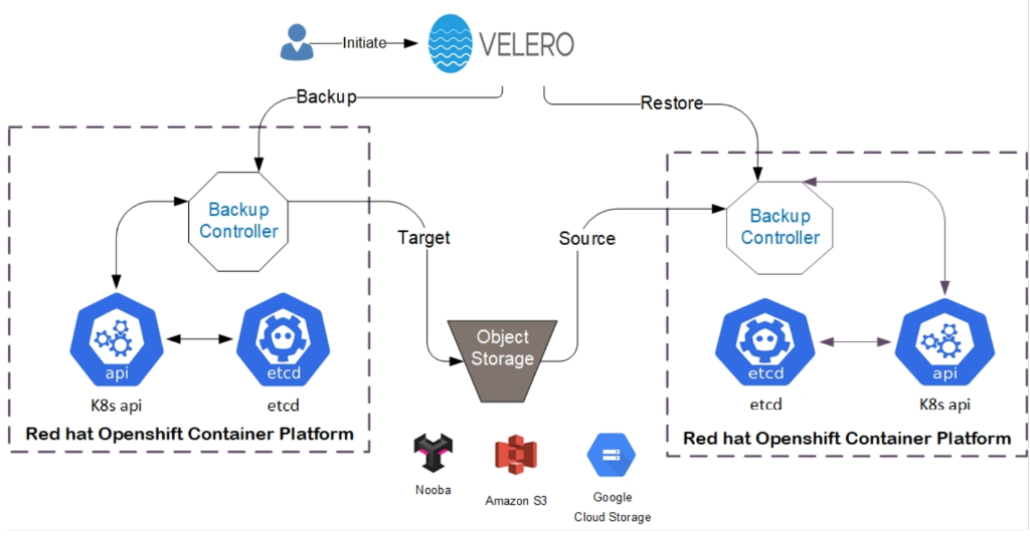
Figure 131. Installing and Configure Velero Solution Layout
Velero lets you:
Take backups of your cluster and restore in case of loss.
Migrate cluster resources to other clusters.
Replicate your production cluster to development and testing clusters.
Velero consists of:
A server that runs on your cluster
A command-line client that runs locally
This section covers how to install and configure Velero and how to use Velero to take backup/restore on an Openshift Container Platform by using noobaa object storage.
# Flow Diagram
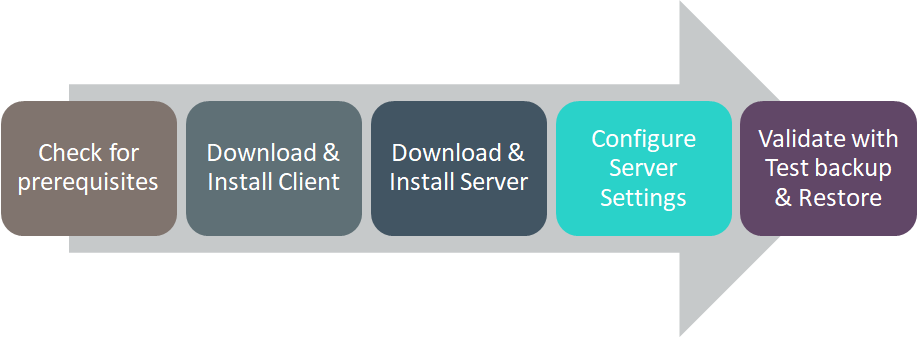
Figure 132. Installing and Configuring Velero Solution Flow Diagram
PREREQUISITES
OpenShift Container Platform cluster should be available with the administrator credentials
OCP cluster should have noobaa object storage as part of Openshift Storage cluster
# Installation Process
Follow below steps to retrieve Nooba information.
Login to the ocp cluster and describe the noobaa pod to get the external DNS
> oc describe noobaa -n openshift-storageGet the noobaa access ID & KEY by running bellow command
> kubectl get secret noobaa-admin -n openshift-storage -o json | jq
'.data|map_values(@base64d)'
Once we have noobaa information, create credential file in cluster as shown below:
Create file by running following command
vi velero.credentialsAdd content into the file as mentioned below:
[default]

aws_access_key_id = "3vTNl90sOpX654VdQYQm"

aws_secret_access_key = "L0q2juZc647ySGRTHNzalmA2qKXK+fdkHV"
Follow below steps to configure Velero with Nooba storage.
Create a separate directory for Velero configuration and switch into that directory.
> mkdir --p ~/Velero

> cd ~/Velero
Download and install Velero client by using below steps
> wget
https://github.com/vmware-tanzu/velero/releases/download/v1.5.1/velero-v1.5.1-linux-amd64.tar.gz

> tar zxf velero-v1.5.1-linux-amd64.tar.gz

> sudo mv velero-v1.5.1-linux-amd64/Velero /usr/local/bin/

> rm -rf velero*
Generate a certificate using the below command.
> openssl s_client -showcerts \
-servername s3-openshift-storage.apps.dev01.twentynet.local \
-connect s3-openshift-storage.apps.dev01.twentynet.local:443
2>/dev/null | openssl x509 -inform pem > /tmp/noobaa.crt
To configure Velero server by using noobaa storage run the following command:
> velero install \

--provider aws \

--plugins velero/velero-plugin-for-aws:v1.1.0 \

--bucket velerobucket1 \

--secret-file ./noobaa.credentials \

--use-volume-snapshots=false --use-restic --default-volumes-to-restic
\

--backup-location-config
region=noobaa,s3ForcePathStyle=true,s3Url=https://s3-openshift-storage.apps.dev0.twentynet.local
\

--cacert=/tmp/noobaa.crt
Output of the above command:
ClusterRoleBinding/velero: already exists, proceeding

ClusterRoleBinding/velero: created

ServiceAccount/velero: attempting to create resource

ServiceAccount/velero: created

Secret/cloud-credentials: attempting to create resource

Secret/cloud-credentials: created

BackupStorageLocation/default: attempting to create resource

BackupStorageLocation/default: created

Deployment/velero: attempting to create resource

Deployment/velero: created

Velero is installed! ⛵ Use 'kubectl logs deployment/velero -n velero'
to view the status.
Enable Velero Pods
Execute the below commands for creating velero pods.
> oc adm policy add-scc-to-user privileged -z velero -n velero

> oc patch ds/restic --namespace velero --type json -p
'[{"op":"add","path":"/spec/template/spec/containers/0/securityContext","value":
{ "privileged": true}}]'
Velero pods should be Running and use the below command to check velero pods status.
> watch oc get pods --n velero
Follow below steps for backup and restore.
Below figure shows wordpress app resources under project wordpress

Run the following command to take backup
> velero backup create wpbackup --include-namespaces wordpressOutput of the above command:
Backup request "my-backup" submitted successfully.
Run `velero backup describe wpbackup` or `velero backup logs
wpbackup` for more details.
After few seconds, run the below command to check the backup status.
> velero backup describe wpbackupRun below command to get available backups in Velero.
> velero backup getOutput of the above command:
NAME STATUS ERRORS WARNINGS CREATED EXPIRES STORAGE LOCATION SELECTOR
wpbackup Completed 0 0 2020-09-29 14:38:36 +0200 CEST 29d default
<none>
Run the below command to restore the backup in Velero.
> velero restore create --from-backup wpbackupOutput of the above command:
Restore request "wpbackup-20200930065552" submitted successfully.
Run `velero restore describe wpbackup-20200930065552` or `velero
restore logs wpbackup-20200930065552` for more details.
Run the below command to list the restore.
> velero restore getOutput of the above command.
NAME BACKUP STATUS STARTED COMPLETED ERRORS WARNINGS CREATED SELECTOR
wpbackup-20200930065552 wpbackup Completed 2020-09-30 06:55:51 +0200
CEST 2020-09-30 06:55:53 +0200 CEST 0 0 2020-09-30 06:55:52 +0200 CEST
<none>
# Verification
Verify wordpress resources got restored or not.
