# OpenShift Virtualization
The new paradigm shift in application development is moving to containers, and increasingly serverless as well, however existing investment in applications that run as virtual machines in many organizations poses management challenges. Many of the existing virtual machines (VMs) provide vital services to new and existing containerized applications at times are not good candidates for containerization. OpenShift Virtualization also referred to as container-native virtualization lets developers bring virtual machines (VMs) into containerized workflows by running a virtual machine within a container where they can develop, manage, and deploy virtual machines side-by-side with containers and serverless all in one platform. This is a built-in feature of OpenShift Container Platform, OpenShift Virtualization combines two technologies of virtualization and containerization into a single management platform so organizations take advantage of the simplicity and speed of containers and Kubernetes while still benefiting from the applications and services that have been architected for virtual machines.
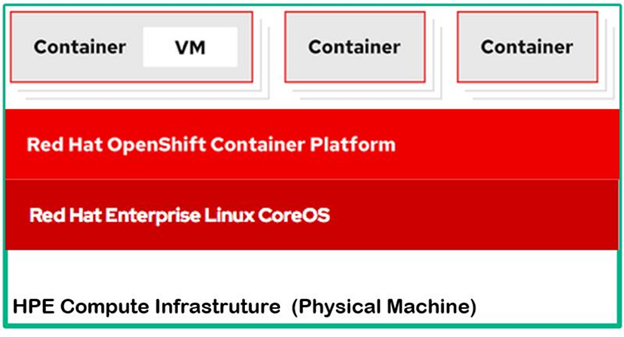
Figure 156. OpenShift virtualization overview layout
OpenShift Virtualization adds new objects into your OpenShift Container Platform cluster via Kubernetes custom resources to enable virtualization tasks. These tasks include:
Creating and managing Linux and Windows virtual machines
Connecting to virtual machines through a variety of consoles and CLI tools
Importing and cloning existing virtual machines
Managing network interface controllers and storage disks attached to virtual machines
Live migrating virtual machines between nodes
An enhanced web console provides a graphical portal to manage these virtualized resources alongside the OpenShift Container Platform cluster containers and infrastructure.
OpenShift Virtualization is tested with OpenShift Container Storage (OCS) and designed to use with OCS features for the best experience.
OpenShift Virtualization allows the usage with either the OVN-Kubernetes (opens new window) or the OpenShiftSDN (opens new window) default Container Network Interface (CNI) network provider.
# Enabling OpenShift Virtualization
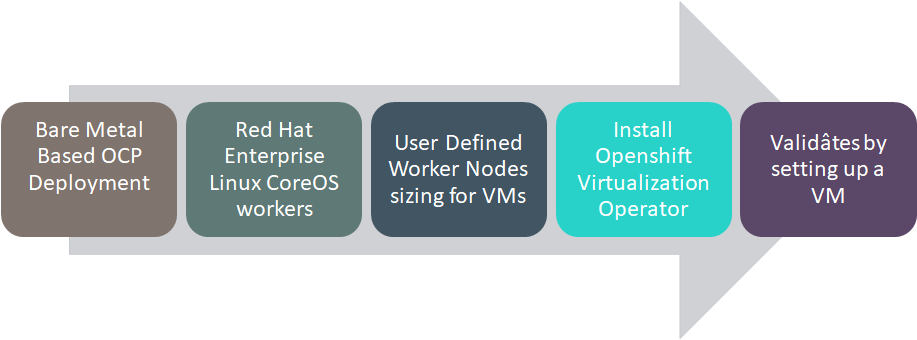
Figure 157. OpenShift Virtualization setup overview
OpenShift Virtualization adds the ability to easily create and manage traditional virtual machines inside of OpenShift alongside standard container workloads. Its deep integration into the OpenShift UI makes the first steps very easy and intuitive.
# Prerequisites
OpenShift Container Platform 4.6 must be successfully deployed, and console should be accessible.
Install OpenShift Container Storage on your cluster.
Create network interface configuration on worker nodes: To Access VM from your datacentre, you need to create bridge network on worker nodes and attach it to NetworkAttachmentDefinition.
Create any Webserver: To create VM we need source images in this format .iso,.img, .qcow2 or raw. So, we upload images in webserver.
# Installing OpenShift Virtualization using the web console
Install OpenShift Virtualization to add virtualization functionality to your OpenShift Container Platform cluster.
You can use the OpenShift Container Platform 4.6 web console (opens new window) to subscribe to and deploy the OpenShift Virtualization Operators.
OpenShift Virtualization 2.4 is supported for use on OpenShift Container Platform 4.6 clusters
# Subscribing to the OpenShift Virtualization catalog
Before you install OpenShift Virtualization, subscribe to the OpenShift Virtualization catalog from the OpenShift Container Platform web console. Subscribing gives the openshift-cnv namespace access to the OpenShift Virtualization Operators.
# Procedure
Open a browser window and log in to the OpenShift Container Platform web console.
Navigate to the Operators → OperatorHub page.
Search for OpenShift Virtualization and then select it.
Click Install.
On the Install Operator page:
- For Installed Namespace, ensure that the Operator recommended namespace option is selected. This installs the Operator in the mandatory openshift-cnv namespace.
NOTE
Attempting to install the OpenShift Virtualization Operator in a namespace other than openshift-cnv causes the installation to fail.
Select 2.4 from the list of available Update Channel options.
For Approval Strategy, select Automatic , which is the default value selected. OpenShift Virtualization automatically updates when a new z-stream release is available.
Click Install to make the Operator available to the openshift-cnv namespace.
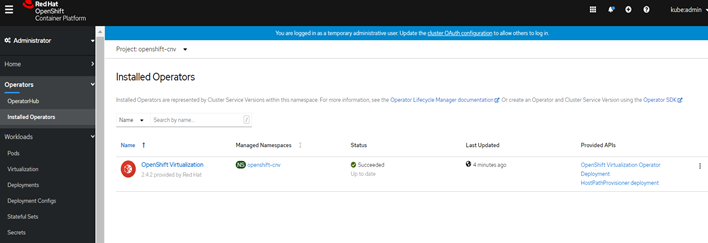
On the Installed Operators screen, the Status displays Succeeded when OpenShift Virtualization finishes installation.
# Deploying OpenShift Virtualization
After subscribing to the OpenShift Virtualization catalog, create the OpenShift Virtualization Operator Deployment custom resource to deploy OpenShift Virtualization.
# Prerequisites
- Subscribe to the OpenShift Virtualization catalog in the openshift-cnv namespace.
# Procedure
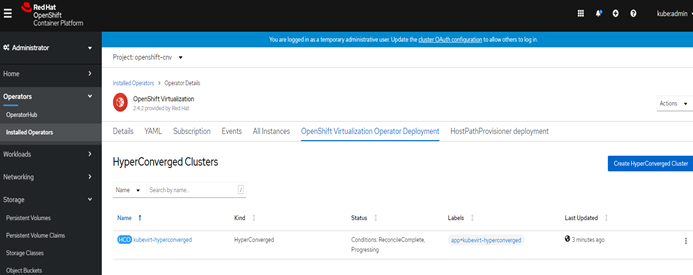
Navigate to the Operators → Installed Operators page.
Click OpenShift Virtualization.
Click the OpenShift Virtualization Operator Deployment tab and click Create HyperConverged Cluster.
Click Create to launch OpenShift Virtualization.
- Navigate to the Workloads → Pods page and monitor the OpenShift Virtualization Pods until they are all Running. After all the Pods display the Running state, you can access OpenShift Virtualization.
# Create network interface configuration on worker nodes
Apply NodeNetworkConfigurationPolicy to create the node network configuration. This includes addition or removal of interfaces from the node.
# Adding an interface on nodes
Add an interface on nodes in the cluster by applying a NodeNetworkConfigurationPolicy manifest.
# Procedure to add interface
- Create the NodeNetworkConfigurationPolicy manifest. The following example configures a Linux bridge on all worker nodes:
Create br1-ens3f0-policy-worker.yaml file is depicted as follows.
apiVersion: nmstate.io/v1alpha1

kind: NodeNetworkConfigurationPolicy

metadata:

  name: <br1-eth1-policy> #Name of the Policy.

spec:

  nodeSelector:

    node-role.kubernetes.io/worker: "" #If you do not include the nodeSelector, the Policy applies to all nodes in the cluster.

  desiredState:

    interfaces:

      - name: br1

        description: Linux bridge with ens3f0 as a port

        type: linux-bridge

        state: up

        ipv4:

          dhcp: true

          enabled: true

        bridge:

          options:

            stp:

              enabled: false

        port:

      - name: ens3f0 # worker nodes interface
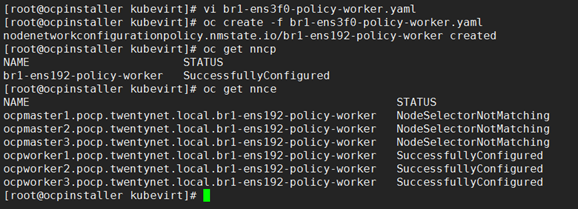
- Use the following command to Create the Policy br1-ens3f0-policy-worker.yaml:
> oc create -f br1-ens3f0-policy-worker.yaml
- After a policy is applied to the worker nodes, the status is SuccessfullyConfigured. To verify this, use the nncp and nnce commands. Execution of these commands lists all the policies and their status.
> oc get nncp

> oc get nnce
# Creating a NetworkAttachmentDefinition
Container-native virtualization provide layer-2 networking capabilities that you to connect virtual machines to multiple network. You can import virtual machines with existing workloads that depends on access to multiple interface.
# Creating a Linux bridge NetworkAttachmentDefinition in the web console
The NetworkAttachmentDefinition is a custom resource that exposes layer-2 devices to a specific namespace in your container-native virtualization cluster.
Network administrators can create NetworkAttachmentDefinitions to provide existing layer-2 networking to Pods and virtual machines.
PREREQUISITES
Container-native virtualization 2.2 or above installed on your cluster.
A Linux bridge must be configured and attached to the correct Network Interface Card (NIC) on every worker node.
# Procedure
In the web console, click Networking → Network Attachment Definitions**.**
Click Create Network Attachment Definition.
Enter a unique Name and optional Description.
Click the Network Type list and select CNV Linux bridge.
Enter the name of the bridge (Previously created NodeNetworkConfigurationPolicy object as interfaces name ex: br1) in the Bridge Name field.
Click Create.
NOTE
If the resource has VLAN IDs configured, enter the ID numbers in the VLAN Tag Number field. This step optional.
# Creating virtual machines
Use one of these procedures to create a virtual machine:
Running the virtual machine wizard
Pasting a pre-configured YAML file with the virtual machine wizard
Using the CLI
Importing a VMware virtual machine or template with the virtual machine wizard (opens new window)
NOTE
Do not create virtual machines in openshift-* namespaces. Instead, create a new namespace or use an existing namespace without the openshift prefix.
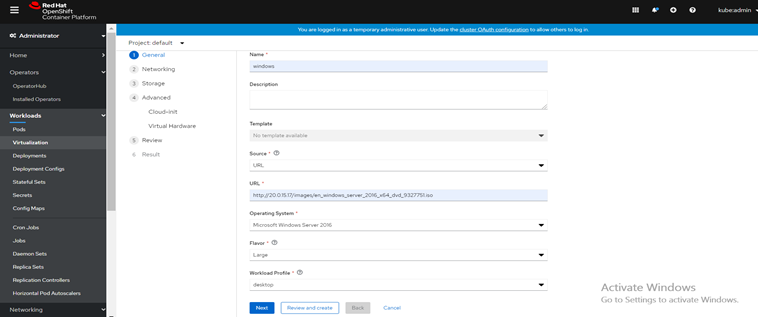
# Running the virtual machine wizard to create a virtual machine
The web console features an interactive wizard that guides you through General, Networking, Storage, Advanced, and Review steps to simplify the process of creating virtual machines. All required fields are marked by a *. When the required fields are completed, you can review and create your virtual machine.
Network Interface Cards (NICs) and storage disks can be created and attached to virtual machines after they have been created.
# Bootable Disk
If either URL or Container are selected as the Source in the General tab, a rootdisk disk is created and attached to the virtual machine as the Bootable Disk. You can modify the rootdisk but you cannot remove it.
A Bootable Disk is not required for virtual machines provisioned from a PXE source if there are no disks attached to the virtual machine. If one or more disks are attached to the virtual machine, you must select one as the Bootable Disk.
PREREQUISITES
When you create your virtual machine using the wizard, your virtual machine's storage medium must support Read-Write-Many (RWX) PVCs.
# Procedure
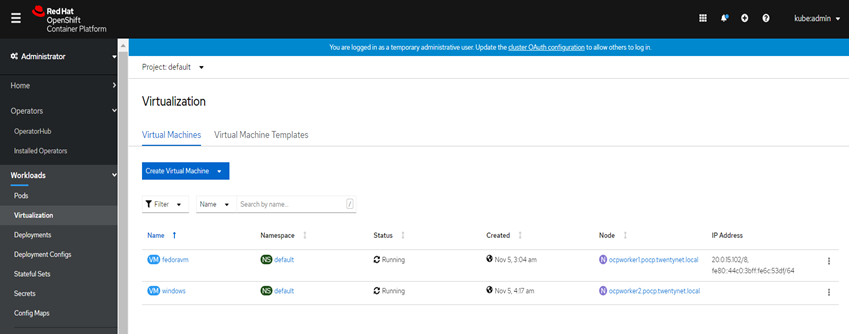
Click Workloads → Virtualization from the side menu.
Click the Virtual Machines tab.
Click Create Virtual Machine and select New with Wizard.
Fill in all required fields in the General tab.
Provide VM name.
Select Operating system.
Select Source of image and click any of these options PXE, URL, Container and Disk.
Select flavour as per requirement.
Select Workload Profile like desktop, server and high performance.
Click Next to progress to the Networking step. A nic0 NIC is attached by default using pod network.To access virtual machine from your datacentre, remove default pod network and assign previously created bridge network to virtual machine.
(Optional) Click Add Network Interface to create additional NICs.
(Optional) You can remove any or all NICs by clicking the Options menu and selecting Delete. A virtual machine does not need a NIC attached to be created. NICs can be created after the virtual machine has been created.
Click Next to progress to the Storage screen.
(Optional) Click Add Disk to create additional disks. These disks can be removed by clicking the Options menu and selecting Delete.
(Optional) Click the Options menu to edit the disk and save your changes.
Click Review and Create. The Results screen displays the JSON configuration file for the virtual machine.
The virtual machine is listed in the Virtual Machines tab.
# Pasting in a pre-configured YAML file to create a virtual machine
Create a virtual machine by writing or pasting a YAML configuration file. A valid example virtual machine configuration is provided by default whenever you open the YAML edit screen.
If your YAML configuration is invalid when you click Create, an error message indicates the parameter in which the error occurs. Only one error is shown at a time.
Navigating away from the YAML screen while editing cancels any changes to the configuration you have made.
# Procedure
Click Workloads → Virtualization from the side menu.
Click the Virtual Machines tab.
Click Create Virtual Machine and select New from YAML.
Write or paste your virtual machine configuration in the editable window.
- Alternatively, use the example virtual machine provided by default in the YAML screen.
(Optional) Click Download to download the YAML configuration file in its present state.
Click Create to create the virtual machine.
The virtual machine is listed in the Virtual Machines tab.
# Using the CLI to create a virtual machine
# Procedure
The spec object of the VirtualMachine configuration file references the virtual machine settings, such as the number of cores and the amount of memory, the disk type, and the volumes to use.
Attach the virtual machine disk to the virtual machine by referencing the relevant PVC claimName as a volume.
To create a virtual machine with the OpenShift Container Platform client, run this command:
> oc create --f <vm.yaml>Since virtual machines are created in a Stopped state, run a virtual machine instance by starting it.